background image

Maximum Values

131

11

Maximum Values

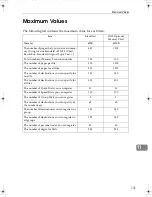
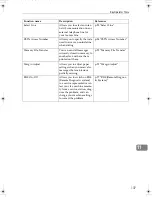
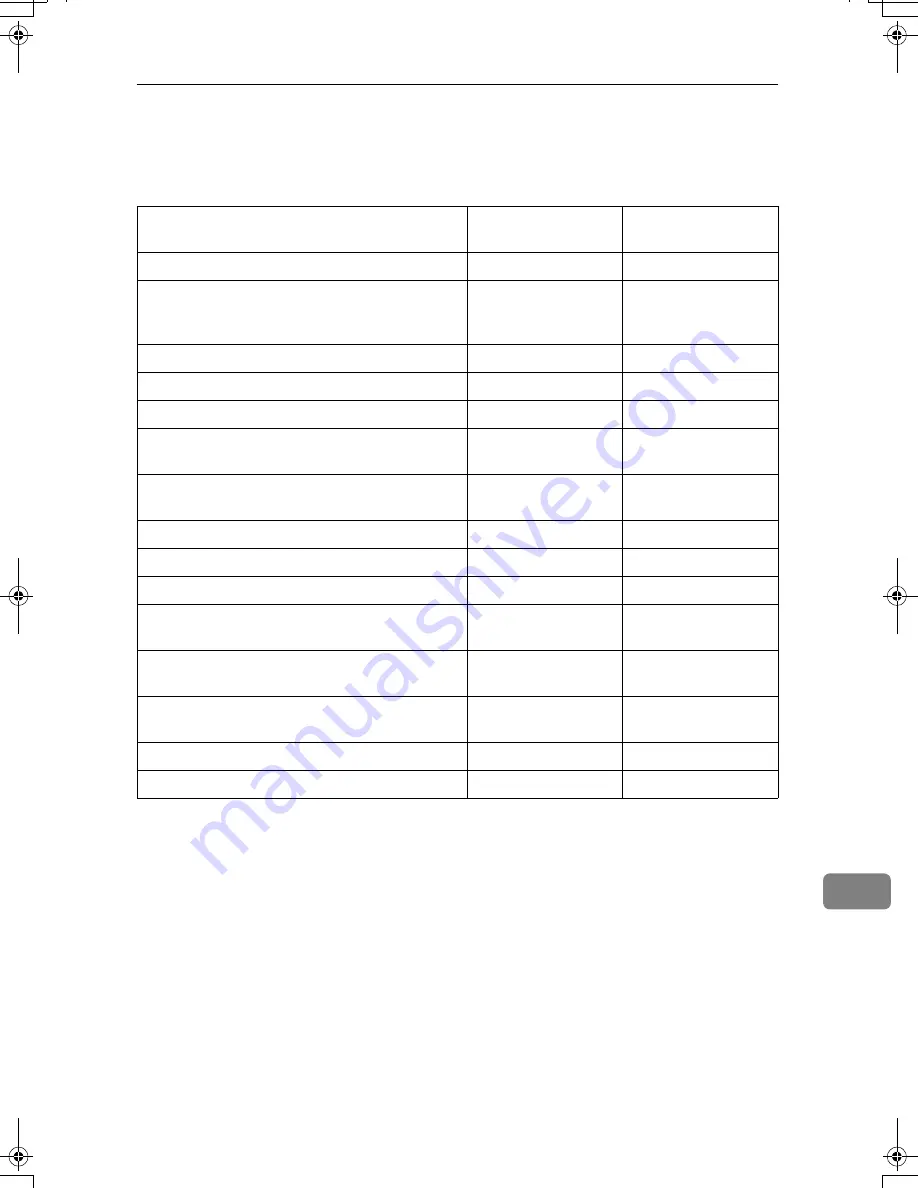
The following list contains the maximum value for each item. 

Item

Standard

With Optional 

Memory Card

Memory

6MB

40MB

The number of pages that you can store in mem-
ory (Using A4 size Standard <ITU-T #1Chart, 
Resolution: Standard, Original Type: Text > ) 

480

1500

Total number of Memory Transmission files

100

100

The number of pages per file

500

1500

The number of pages for all files

500

1500

The number of destinations you can specify for 
one file

140

140

The number of destinations you can specify for 
all files

300

300

The number of Quick Dials you can register 

30

30

The number of Speed Dials you can register 

100

100

The number of Group Dials you can register

5

5

The number of destinations you can specify by 
the number keys

69

69

The number of destinations you can register in a 
group

140

140

The number of destinations you can register in 
all groups

149

149

The number of personal codes you can register

30

30

The number of digits for Dials 

254

254

StellaF15_EN_Combine_F1_Pre_FM.book  Page 131  Friday, August 27, 2004  6:23 PM

Summary of Contents for LF311

Page 1: ...ore you use this product and keep it handy for future reference Transmission Options Job Information Other Transmission Features Reception Features Copying Facsimile User Tools Key Operator Settings Solving Operation Problems Maintaining Your Machine Installation Appendix ...

Page 2: ...ht not be available in some countries For details please contact your local dealer Warning Use of controls or adjustment or performance of procedures other than those specified in this manual might result in hazardous radiation exposure Two kinds of size notation are employed in this manual With this machine refer to the inch version Important Contents of this manual are subject to change without ...

Page 3: ...ist 12 Printing a Stored Message Print TX File 13 Printing a Confidential Fax Message 14 Printing a Memory locked Message 15 Printing the Journal 16 Report Formats 17 3 Other Transmission Features Handy Dialing Functions 19 Chain Dial 19 Telephone Directory 20 Redial 20 On Hook Dial 21 Manual Dial 22 Transmission Features 23 SEP Code 23 SUB Code 24 Closed Network Transmission 25 Blank Sheet Detect...

Page 4: ...36 Center Mark 36 Checkered Mark 36 TSI Print 36 Reception Time 37 Page Separation and Length Reduction 37 When There is No Paper of the Correct Size 38 5 Copying Copying 41 Copying on special paper 42 6 Facsimile User Tools Counters 43 Programs 44 Storing a Program 44 Using a Program 45 Changing a Program 45 Editing the Program Name 45 Deleting a Program 46 Storing an Often Used Document Auto Doc...

Page 5: ...ified Sender 78 Deleting a Forwarding Station 78 Deleting a Specified Sender 79 Printing the Specified Sender list 80 Energy Save Timer 80 User Parameters 83 Changing the User Parameters 87 Printing the User Parameter List 88 Personal Codes 89 Registering and Editing 89 Deleting 90 Printing the Personal Code List 90 Restricted Access 91 ID Code 91 Registering 92 Line Type 93 Select Line 93 PSTN Ac...

Page 6: ...121 Connecting to a Telephone Line and an External Telephone 122 Connecting to a Telephone Line 122 Connecting an External Telephone 122 11 Appendix Specifications 123 Base Machine 123 Available Options 124 Originals 125 Sizes and weights of Recommended Originals 125 Originals unsuitable for the Document Feeder ADF 125 Paper 126 Recommended Paper Sizes and Types 126 Non recommended Paper 127 Paper...

Page 7: ... machine without following the instructions under this symbol Be sure to read the instructions all of which are described in the Safety Information section The statements above are notes for your safety Important If this instruction is not followed paper might be misfed originals might be damaged or data might be lost Be sure to read this Preparation This symbol indicates information or preparatio...

Page 8: ...f the control panel and machine Chapter 2 Faxing Explains basic transmission You can also learn about other types of transmis sions Chapter 3 Registering Explains how to make initial settings such as the Own Name and Own Fax Number settings Also explains the Quick Dial Speed Dial and Group keys These keys allow you to store numbers and save time when dialing This chapter also explains how to enter...

Page 9: ...end Later is displayed E E E E Press the OK key F F F F Press 0 0 0 0 or 1 1 1 1 to select On G G G G Press the OK key H H H H Press 0 0 0 0 or 1 1 1 1 to select AM or PM I I I I Press the OK key J J J J Enter the time that you want to send the fax message with the number key Enter the hour setting 1 to 12 Then press 0 or 1 Then enter a 2 digit number for the minute setting 00 to 59 Note If you ma...

Page 10: ...Transmission Options 4 1 M M M M Press the Start key Note You can cancel a message trans mission set for Send Later See p 11 Canceling Transmission or Reception ...

Page 11: ...ne so that it prints the Fax Header on the mes sage when it is received on the oth er end with the User Parameters It is handy to set this function to the option more frequently used and then when necessary you can change the setting back with this feature See p 83 User Parame ters switch 06 bit 0 A A A A Make sure that the machine is in Facsimile mode and the standby display is shown B B B B Plac...

Page 12: ...ended receiver what code must be entered to print the message To set up a confidential transmission do the following Limitation The machine at the other end must have memory space available and it must have the Confidential Re ception feature This is a proprietary function and as such it only functions with ma chines produced by the same man ufacturer that have this function Note A Confidential ID...

Page 13: ... party s fax number H H H H Press the Start key When sending messages to fax machines produced by other manufacturers Normally you can only send and re ceive confidential faxes between ma chines of the same make which support confidential sending and re ceiving However if the other party s fax is not the same as your own you can still send and receive confidential fax messages if the other party s...

Page 14: ...ter your personal code your personal code will also ap pear on the page From is automati cally inserted before your personal code This function is available when personal code is registered and the Restricted Access is turned on 1 Name that is registered in the Quick Dial or Speed Dial key 2 Name that is assigned to the Per sonal Code Reference To program the Label Insertion function in a Quick Di...

Page 15: ... with matching ID s If no ID s match any messages that does not require an ID are received Free Polling Limitation Polling Reception requires that the other machine can perform Polling Transmission To receive a message sent by any Secured Polling Transmission or Stored ID Override Polling Trans mission it is necessary to specify the same Polling ID as the sender s To receive a message sent by Se c...

Page 16: ...nufacturer that have the Polling Reception function However if the other party s fax machine supports SEP Code Polling Reception you can receive documents from them using SEP Code See p 23 SEP Code File Reserve Report Polling RX This report is printed after Polling Re ception has been set up You can check the date and time Fax Header File No Transmission con dition and the Other party s name with ...

Page 17: ... List to con firm the transmission files stored in memory Reference For details about Memory Trans mission and Polling Reception see p 25 Memory Transmission Ba sic Features and p 9 Calling to Re quest a Message Polling Reception A A A A Make sure that the machine is in Facsimile mode and the standby display is shown B B B B Press the Job Information key Confirm that 1 Cancel TX RX is displayed C ...

Page 18: ...s Note The contents of an original stored in memory can also be printed See p 13 Printing a Stored Message Print TX File A A A A Make sure that the machine is in Facsimile mode and the standby display is shown B B B B Press the Job Information key C C C C Press 0 0 0 0 or 1 1 1 1 until 2 Print File List is displayed D D D D Press the OK key E E E E Press the Start key The File List is printed out ...

Page 19: ... B Press the Job Information key The Information menu is shown C C C C Press 0 0 0 0 or 1 1 1 1 until 3 Print TX File is displayed D D D D Press the OK key E E E E Display the file you want to print The registered name or fax number appears on the lower line Note Enter the file number with the number keys or search using 0 or 1 If you make a mistake press the Cancel key and try again F F F F Press...

Page 20: ...e perform the following steps for printing a confidential fax message Tell the other party that SUB code is 8 dig its or less This function is not available in Germany and some ar eas Important If the power switch is off for a cer tain period of time all Confidential Messages are deleted If this hap pens use the Power Failure Report to identify which messages have been lost See p 101 Power Fail ur...

Page 21: ...ception are automatically printed even if this function is switched on If the power switch is turned off for a certain period of time all messages protected by Memory Lock are deleted If this happens use the Power Failure Report to identify which messages have been lost See p 101 Power Fail ure Report A A A A Make sure that the machine is in Facsimile mode and the standby display is shown B B B B ...

Page 22: ... Journal is useful when you need to register a Specified Sender If you do not want the Journal to be printed automatically you can turn au tomatic printing off See p 83 User Parameters switch 03 bit 7 A A A A Make sure that the machine is in Facsimile mode and the standby display is shown B B B B Press the Job Information key C C C C Press 0 0 0 0 or 1 1 1 1 until 6 Print Journal is displayed D D ...

Page 23: ... of communication These codes are explained on the bottom of the report 2 The Result Column OK Successful communication E An error occurred D Power Failure 3 The Footnote on the Journal Transmission counter Total number of transmitted pages Reception counter Total number of re ceived pages MAR 10 2002 11 07AM ...

Page 24: ...Job Information 18 2 ...

Page 25: ... Paris Speed Dial 0 1 5551234 Note For Memory Transmission and Im mediate Transmission insert a pause between numbers For On Hook Dial and Manual Dial no pause is needed Maximum length of telephone or fax number 254 digits Reference For registering fax numbers to Speed Dials or Quick Dial keys See p 52 Speed Dial Basic Fea turesor p 46 Quick Dial Basic Features A A A A Set your original and select...

Page 26: ...is played and then press the OK key Note If you make a mistake press the Cancel key and try again If you wish to dial another des tination press the OK key and dial another fax number E E E E Press the Start key Redial The machine can recall the last 10 des tinations that have been dialed If you wish to send a message to a destina tion which you faxed recently the Re dial function saves you from f...

Page 27: ...m the inter nal speaker If you wish to cancel this operation press the On Hook Dial key again C C C C Dial The machine immediately dials the destination If you make a mistake press the On Hook Dial key and re turn to step B Note You can change the volume of sound with 0 or 1 D D D D When the line is connected and you hear a high pitched tone press the Start key Note If you hear a voice pick up the...

Page 28: ... lect any scan settings you require B B B B Pick up the external telephone You will hear a tone C C C C Dial If you make a mistake replace the external telephone and try again from step B D D D D When the line is connected and you hear a high pitched tone press the Start key to send your fax message Note If the other party answers the phone inform them that you are sending a fax E E E E Replace th...

Page 29: ...ps Messages you receive using this function are marked SEP on all reports When you send a fax message with SEP Code to other makers ma chines sometimes a password PWD is necessary Use PWD when it is necessary A A A A Dial the destination fax number using the number keys B B B B Press the User Function key as signed with the Dial Option func tion C C C C Press 0 0 0 0 or 1 1 1 1 until 2 SEP is disp...

Page 30: ...he specification of the fax you are sending to You can store IDs in Quick Dials Speed Dials and Groups Messages you send using this function are marked SUB on all reports When you send fax message with SUB Code to other makers ma chines sometimes a password SID is necessary Use SID when it is necessary A A A A Place your original and make any changes to the scan settings if nec essary B B B B Dial...

Page 31: ...g in originals If you try and scan in an almost com pletely blank original an alarm sounds and Some Page s are Blank appears on the display Make sure the original is not blank Note Transmission is not cancelled even if the original is blank With Memory Transmission the alarm sounds as soon as the origi nal has been scanned If you press the Clear Stop key while the Some Page s are Blank is shown on...

Page 32: ...orrects the black line made when scanning originals The black line does not appear on the received message However sometimes very small parts of the image might be miss ing on the received message You can turn this function on or off with User Parameters See p 83 User Parameters switch 20 bit 4 ...

Page 33: ...n Result Report the report will not be printed after ev ery transmission However should a transmission fail a Com munication Failure Report will be printed instead If you turn off the printing of the Transmission Result Report Im mediate Transmission the Error Report will be printed when the communication on fails You can also check the transmission result by examining the Journal See p 16 Printin...

Page 34: ...ing in memory to be sent to the same destination that message is sent along with your mes sage Several fax messages can be sent with a single call thus eliminating the need for several separate calls This helps save communication costs and reduces transmission time Fax messages for which the transmis sion time has been set in advance are sent by Batch Transmission when that time is reached Note Yo...

Page 35: ...andard Memory Transmission is used instead of Parallel Memory Transmission in the following cas es When the line is busy and could not be connected to With Send Later When you store an original for Memory Transmission while another communication is in progress When Auto resolution is select ed If you press the Clear Stop key the original jams or memory be comes full during Parallel Memory Transmis...

Page 36: ...printed if an original could not be stored Note File Reserve Report will not be printed with Parallel Memory Transmission Communication Result Report Switch 03 Bit 0 This report is printed when a Memo ry Transmission is completed so you can check the result of the transmis sion If two or more destinations are specified this report is printed after the fax message has been sent to all the destinati...

Page 37: ...and the fax message could not be successfully transmitted the error re port is printed instead Note If the page was sent successfully the Page column gives the total number of pages that were sent successfully The Not Sent col umn gives the number of pages that could not be sent successfully Confidential File Report Switch 04 Bit 0 This report is printed whenever your machine receives a Confidenti...

Page 38: ...Other Transmission Features 32 3 ...

Page 39: ...any further reception be comes impossible and the current communication is ter minated Memory Reception The machine waits until all pages of the message have been received into memory before printing the message This method is used with Substitute Reception See p 34 Printing Docu ments that have been Received into Memory Substitute Reception Important All the messages stored in memory are deleted ...

Page 40: ... to let you know when message s have been received using Substi tute Reception If free memory reaches 0 during Substitute Reception any further reception becomes impossible and the current communication is ter minated Screening Out Messages from Anonymous Senders To help you screen out unwanted messages that may fill up your mem ory the machine can be programmed to only use Substitute Reception fo...

Page 41: ...eiving Messages in Telephone Mode In this mode you have to answer the call yourself and decide whether it is a fax or a telephone call The procedure for answering a call is as follows A A A A Pick up the handset of the exter nal telephone and listen to the other end B B B B If you hear a voice continue your conversation as you would nor mally C C C C If you hear a fax tone remove any originals fro...

Page 42: ...it 1 See p 83 User Parame ters Checkered Mark When this function is turned on a checkered mark is printed on the first page of fax messages to help you sep arate them Note You can turn this function on or off with the User Parameters Switch 02 Bit 4 See p 83 User Parame ters TSI Print Usually the sender s Fax Header is printed on received messages If the sender has not programmed their Fax Header ...

Page 43: ...age of the message can be split and printed on several sheets or reduced and printed on a single sheet For example when the paper size is A4 L this function splits the message if the message length is 92mm 3 7 or longer than the paper used The message is re duced if it is less than 92mm 3 7 When the paper size is 81 2 11 L this function splits the message if the message length is 85mm 3 4 or longe...

Page 44: ... message check the A5K column of the table below The paper size at the top has the highest priority In this case since 81 2 11 L is a higher priority than A4L the message is printed on 81 2 11 L Priority Table KK and LL indicate that the message is split over two pages of paper with the orientation and size shown Note The paper size used to print a received message may be different from the size o...

Page 45: ...Printing Options 39 4 Reference p 37 Page Separation and Length Reduction ...

Page 46: ...Reception Features 40 4 ...

Page 47: ...5 bit 6 Place your original and select any scan settings in the same way as for fax transmission Multiple copy sets are sorted and delivered in page order If you wish to prevent passersby from freely making copies you can disable the copy feature with the User Parameters See p 83 User Parameters switch 12 bit 7 You can specify between 1 and 99 copies A A A A Press the Copy key Note Pressing the Co...

Page 48: ...n special paper You can copy the original on special paper using the bypass tray Place the paper face down on the bypass tray Important When the paper is curved flatten the paper to avoid a paper jam Note Do not place more than one sheet of special paper on the bypass tray The following special paper can be used for copying Envelopes Transparent paper OHP transparencies Post cards Adhesive labels ...

Page 49: ...ng faxes Print Pages The combined total number of pages that have been printed through fax reception copying A A A A Make sure that the machine is in standby display B B B B Press the User Tools key Confirm that 1 Counter is dis played C C C C Press the OK key The number of pages transmitted is displayed You can display the number of pages received scanned or printed by pressing 0 or 1 D D D D Onc...

Page 50: ...oring a Program You can register the following items in Keystroke Programs Memory Transmission Immediate Transmission Confidential Trans mission Free Polling Polling Re ception Printing reports or lists destinations Personal Codes Con fidential ID codes Polling ID codes SUB Code Transmission and SEP Code Polling Reception Simply perform the usual proce dure and then instead of pressing the Start k...

Page 51: ...6 Deleting a Program and p 44 Storing a Program Editing the Program Name To edit the program name perform the following procedure A A A A Press the User Tools key B B B B Press 0 0 0 0 or 1 1 1 1 until 2 Fax Fea tures is displayed C C C C Press the OK key Confirm that 1 Program Delete is displayed D D D D Press the OK key E E E E Press 0 0 0 0 or 1 1 1 1 until 7 Change Prog Name is displayed F F F...

Page 52: ...me is also delet ed A A A A Press the User Tools key B B B B Press 0 0 0 0 or 1 1 1 1 until 2 Fax Fea tures is displayed C C C C Press the OK key Confirm that 1 Program Delete is displayed D D D D Press the OK key E E E E Press 0 0 0 0 or 1 1 1 1 until 8 Delete Pro gram is displayed F F F F Press the OK key G G G G Press the Quick Dial that contains the program you want to delete Press the Quick D...

Page 53: ...Auto Documents are deleted If this happens use the Power Failure Report to identify which messages have been lost See p 101 Power Failure Report Note The maximum number of Auto Documents you can register is 30 You can only send one Auto Docu ment per transmission You cannot register Auto Docu ments in Quick Dials that are al ready programmed If you register Auto Documents the amount of memory rese...

Page 54: ...machine returns to standby display Sending an Auto Document as an Attachment To send an Auto Document as an at tachment perform the following pro cedure To send an Auto Document only perform the following proce dure from step B Note Although you can specify scan set tings when sending an Auto Docu ment these settings will only apply to the document you send along with the Auto Document The setting...

Page 55: ... or scroll us ing 0 or 1 and press the OK key H H H H Press the Clear Stop key and then enter the Auto Document s name If you do not want to change the name go to step I I I I I Press the OK key The name is changed If you want to change another Auto Document s name repeat the above steps from step F J J J J Press the User Tools key The machine returns to standby display Deleting an Auto Document T...

Page 56: ... of the Quick Dial where the document you want to delete is registered Press the Quick Dial or scroll us ing 0 or 1 H H H H Press the OK key I I I I Press 0 0 0 0 or 1 1 1 1 to select Yes De lete J J J J Press the OK key If you want to delete another Auto Document repeat the above steps from step F K K K K Press the User Tools key The machine returns to standby display ...

Page 57: ...es Basic Features Print Journal Use when you want to print out a Journal See p 16 Printing the Journal TX Result Report Use this to have a result report printed after every transmission b See p 30 Communica tion Result Report Switch 03 Bit 0 and p 31 Transmission Re sult Report Immediate Transmission Switch 03 Bit 5 Fax Header Print You can turn this function on or off b See p 5 Fax Header Print G...

Page 58: ...t to assign I I I I Press the OK key If you want to register another User Function key repeat the above steps from step F J J J J Press the User Tools key The machine returns to standby display Using a User Function Key To use a User Function key F1 to F5 press the User Function key that contains the desired registered function The display for Group function is reg istered The display changes for ...

Page 59: ...layed G G G G Press the OK key H H H H Press the User Function key you want to delete I I I I Press 0 0 0 0 or 1 1 1 1 to display None J J J J Press the OK key If you want to delete another User Function key repeat the above steps from step G K K K K Press the User Tools key The machine returns to standby display ...

Page 60: ...m List See p 44 Programs Auto Document Original See p 47 Storing an Often Used Document Auto Document User Function List See p 51 User Function Keys A A A A Press the User Tools key B B B B Press 0 0 0 0 or 1 1 1 1 until 2 Fax Fea tures is displayed C C C C Press the OK key D D D D Press 0 0 0 0 or 1 1 1 1 until 2 Reports Lists is displayed E E E E Press the OK key Printing the Journal A Confirm t...

Page 61: ...0 or 1 1 1 1 until 3 Dial List is displayed B Press the OK key C Press 0 0 0 0 or 1 1 1 1 until 3 Group Dial List is displayed D Press the OK key Note If you make a mistake press the Cancel key and try again Printing the All Lists You can print all Dial Lists Quick Dial List Speed Dial List and Group Dial List by the following operation A Press 0 0 0 0 or 1 1 1 1 until 3 Dial List is displayed B P...

Page 62: ...6 Auto Doc Orig is displayed B Press the OK key Note If you make a mistake press the Cancel key and tray again C Scroll 0 0 0 0 or 1 1 1 1 or press the Quick Dial key that contains the Auto Document Original you want to print D Press the OK key Printing the User Function List A Press 0 0 0 0 or 1 1 1 1 until 7 U Func tion List is displayed B Press the OK key Note If you make a mistake press the Ca...

Page 63: ...2 Fax Fea tures is displayed C C C C Press the OK key D D D D Press 0 0 0 0 or 1 1 1 1 until 3 Setup is displayed E E E E Press the OK key F F F F Press 0 0 0 0 or 1 1 1 1 until 2 Display Contrast is displayed G G G G Press the OK key H H H H Press 0 0 0 0 or 1 1 1 1 to adjust the bright ness of the display I I I I Press the OK key J J J J Press the User Tools key to re turn to the standby display...

Page 64: ...0 0 0 0 or 1 1 1 1 until 3 Setup is displayed E E E E Press the OK key F F F F Press 0 0 0 0 or 1 1 1 1 until 3 Date Time is displayed G G G G Press the OK key H H H H Use the number keys to enter the year I I I I Press the OK key J J J J Press 0 0 0 0 or 1 1 1 1 to select the correct month K K K K Press the OK key L L L L Use the number keys to enter the correct number for the date 1 to 31 M M M ...

Page 65: ...ols key B B B B Press 0 0 0 0 or 1 1 1 1 until 2 Fax Fea tures is displayed C C C C Press the OK key D D D D Press 0 0 0 0 or 1 1 1 1 until 3 Setup is displayed E E E E Press the OK key F F F F Press 0 0 0 0 or 1 1 1 1 until 5 No of Rings is displayed G G G G Press the OK key H H H H Enter the new number using the number keys Note If you make a mistake press the Clear Stop key and try again I I I ...

Page 66: ...or 1 1 1 1 until 7 Tray Paper Size is displayed G G G G Press the OK key H H H H Press 0 0 0 0 or 1 1 1 1 to display the tray whose paper size you want to change If the optional tray unit or bypass tray are not installed they are not displayed Proceed to step J I I I I Press the OK key If you choose bypass tray on step H press 0 or 1 to choose Stan dard Size or Custom Size and then press the OK ke...

Page 67: ...et the paper type for bypass tray A A A A Press the User Tools key B B B B Press 0 0 0 0 or 1 1 1 1 until 2 Fax Fea tures is displayed C C C C Press the OK key D D D D Press 0 0 0 0 or 1 1 1 1 until 3 Setup is displayed E E E E Press the OK key F F F F Press 0 0 0 0 or 1 1 1 1 until 8 Bypass Pa per Type is displayed G G G G Press the OK key H H H H Choose the paper type using 0 0 0 0 or 1 1 1 1 I ...

Page 68: ...r the period A A A A Press the User Tools key B B B B Press 0 0 0 0 or 1 1 1 1 until 2 Fax Fea tures is displayed C C C C Press the OK key D D D D Press 0 0 0 0 or 1 1 1 1 until 3 Setup is displayed E E E E Press the OK key F F F F Press 0 0 0 0 or 1 1 1 1 until 9 Fax Reset Timer is displayed G G G G Press the OK key H H H H Press 0 0 0 0 or 1 1 1 1 to select a period of time I I I I Press the OK ...

Page 69: ...utes ten minutes for the period A A A A Press the User Tools key B B B B Press 0 0 0 0 or 1 1 1 1 until 2 Fax Fea tures is displayed C C C C Press the OK key D D D D Press 0 0 0 0 or 1 1 1 1 until 3 Setup is displayed E E E E Press the OK key F F F F Press 0 0 0 0 or 1 1 1 1 until 10 On Hook Timeout is displayed G G G G Press the OK key H H H H Press 0 0 0 0 or 1 1 1 1 to select a period of time I...

Page 70: ...following this procedure If the standby dis play is not shown when you start the display may become tempo rarily jumbled up A A A A Press the User Tools key B B B B Press 0 0 0 0 or 1 1 1 1 until 4 Language is displayed C C C C Press the OK key D D D D Press 0 0 0 0 or 1 1 1 1 to display the lan guage you want to select E E E E Press the OK key F F F F Press the User Tools key The machine returns ...

Page 71: ...printed from a different tray This item is available only after the optional Second Paper Cassette has been installed p 72 Specified Tray 5 Forwarding Allows you to automatically forward fax messages to the fax machines of speci fied senders p 74 Forwarding 6 Energy Save Timer Allows you to have the fax switch off and on at specified times to save energy p 80 Energy Save Timer 7 User Param eters A...

Page 72: ...mple when your fax machine runs out of toner p 95 Memory File Transfer 14 Margin Ad just Allows you to adjust paper settings when you receive fax messages that are blank or partially missing p 95 Margin Adjust 15 RDS On Off Allows you to switch on RDS Remote Diagnostic System so a service repre sentative can test your fax machine re motely from a service station diagnose the problem and can change...

Page 73: ...l 2 Fax Fea tures is displayed C C C C Press the OK key D D D D Press 0 0 0 0 or 1 1 1 1 until 4 Key Op Tools is displayed E E E E Press the OK key F F F F Press 2 2 2 2 G G G G Press the OK key H H H H Confirm that 1 ADF Counter Re set is displayed I I I I Press the OK key J J J J Press 0 0 0 0 or 1 1 1 1 to select Reset K K K K Press the OK key The counters are cleared L L L L Press the User Too...

Page 74: ... 4 Key Op Tools is displayed E E E E Press the OK key F F F F Press 2 2 2 2 G G G G Press the OK key H H H H Press 0 0 0 0 or 1 1 1 1 until 2 Authorized RX is displayed I I I I Press the OK key J J J J Follow the procedures below to switch Authorized Reception On Off register a Specified Send er or print a list of Specified Senders Switching Authorized Reception On Off A Press the OK key B Press 0...

Page 75: ...20 characters long You can confirm the names and fax numbers of Specified Send ers by name in the printed Jour nal You can also confirm Specified Senders by printing a Specified Sender list In order to change a Specified Sender entry you must first de lete the entry and then re enter it A Press 0 0 0 0 or 1 1 1 1 until 2 Program Sender is displayed B Press the OK key C Enter the name for the speci...

Page 76: ...tand by display Memory Lock This is a security function to prevent unauthorized individuals from read ing printed fax messages When Memory Lock is switched on all re ceived messages are stored in memo ry and are not automatically printed To print the messages you have to enter the Memory Lock ID Limitation Memory Lock cannot be selected until you have registered the Memory Lock ID To use this func...

Page 77: ...0 0 or 1 1 1 1 to On to switch this function on or select Off to switch this function off C Press the OK key Registering a Specified Sender for Memory Lock You can register Specified Senders for this function A Press 0 0 0 0 or 1 1 1 1 to display 2 Program Sender B Press the OK key C Enter Own Name or Own Fax Number for the Specified Sender Enter the other party s Own Name or Own Fax Number D Pres...

Page 78: ...rent paper For example imagine green paper placed in the main paper tray and white paper placed in the optional paper tray unit By choosing to have fax messages from specified senders printed on green paper and all others printed on white paper you can distinguish between them at a glance Limitation This item is available only after the optional paper tray unit has been installed Note To use this ...

Page 79: ...ied Senders Switching Specified Tray On Off A Press the OK key B Press 0 0 0 0 or 1 1 1 1 to select On to switch this feature on or select Off to switch this feature off C Press the OK key Registering a Specified Sender for Specified Tray You can register Specified Senders for this function A Press 0 0 0 0 or 1 1 1 1 until 2 Program Sender is displayed B Press the OK key C Enter the name for the s...

Page 80: ...Authorized Re ception Memory Lock Specified Tray and Memory File Transfer are printed in the same list K K K K Press the User Tools key The fax machine returns to stand by Forwarding Use this function to print fax specified from Specified Senders on your own machine and then forward the mes sages to other fax machines This is useful for example if you are visiting another office and would like cop...

Page 81: ...ng in the destination name column of the Journal Forwarding Mark You can print a forwarding mark on forwarded messages See p 83 User Parameters Switch02 Bit0 Switching Forwarding On Off A A A A Press the User Tools key B B B B Press 0 0 0 0 or 1 1 1 1 until 2 Fax Fea tures is displayed C C C C Press the OK key D D D D Press 0 0 0 0 or 1 1 1 1 until 4 Key Op Tools is displayed E E E E Press the OK ...

Page 82: ...key B B B B Press 0 0 0 0 or 1 1 1 1 until 2 Fax Fea tures is displayed C C C C Press the OK key D D D D Press 0 0 0 0 or 1 1 1 1 until 4 Key Op Tools is displayed E E E E Press the OK key F F F F Press 2 2 2 2 G G G G Press the OK key H H H H Press 0 0 0 0 or 1 1 1 1 until 5 Forward ing is displayed I I I I Press the OK key J J J J Press 0 0 0 0 or 1 1 1 1 until 2 Prog Sta tion is displayed K K K...

Page 83: ...mbers of Specified Send ers on the Journal You can confirm registered Spec ified Senders using the Speci fied Sender list U U U U Press the User Tools key to re turn to the standby display Editing a Forwarding Station To edit a Forwarding Station that is already registered perform the fol lowing procedure A A A A Press the User Tools key B B B B Press 0 0 0 0 or 1 1 1 1 until 2 Fax Fea tures is di...

Page 84: ...want to edit See p 79 Deleting a Specified Send er and then register it as a new Specified Sender See p 76 Register ing Forwarding Stations Deleting a Forwarding Station To delete a Forwarding Station per form the following procedure A A A A Press the User Tools key B B B B Press 0 0 0 0 or 1 1 1 1 until 2 Fax Fea tures is displayed C C C C Press the OK key D D D D Press 0 0 0 0 or 1 1 1 1 until 4...

Page 85: ...G G Press the OK key H H H H Press 0 0 0 0 or 1 1 1 1 until 5 Forward ing is displayed I I I I Press the OK key J J J J Press 0 0 0 0 or 1 1 1 1 until 2 Prog Sta tion is displayed K K K K Press the OK key L L L L Press 0 0 0 0 or 1 1 1 1 to display the fax number of the Forwarding Sta tion that contains the Specified Sender you want to delete M M M M Press the OK key N N N N Press the OK key O O O...

Page 86: ... K K K K Press the OK key L L L L Press the Start key The list is printed M M M M Press the User Tools key to re turn to the standby display Energy Save Timer Use this function to have the fax ma chine turn its heater on and off auto matically at specified times For example by having the heater turned off during the evening on weekends and during long holidays you can re duce power costs Note You ...

Page 87: ...Energy Save Timer On Off A Press the OK key B Press 0 0 0 0 or 1 1 1 1 to select On to switch this feature on or select Off to switch this feature off C Press the OK key Programming the Energy Save Timer A Press the 0 0 0 0 or 1 1 1 1 key to select 2 Date Time Set B Press the OK key C Press 0 0 0 0 or 1 1 1 1 to select the day of the week D Press the OK key E Press 0 0 0 0 or 1 1 1 1 to select AM ...

Page 88: ... week repeat from step C C C C K K K K Press the User Tools key The fax machine returns to stand by display Note When the heater is powered off the display is blank When the fax machine heater is switched off with the Energy Save Timer you can restore the fax machine to normal operation temporari ly by pressing the Energy Sav er Clear Modes key so fax messages in the memory can print If the fax ma...

Page 89: ...to switches and each switch is divided into eight bits The right most bit is bit 0 and the left most is bit 7 The User Parameter switches are outlined below Bit Number 7 6 5 4 3 2 1 0 Bit Value 0 1 0 0 0 0 0 0 Switch Bit Item 1 0 00 5 4 5 4 Default resolution when you send a message RESOLUTION 00 Standard 01 Detail 10 Fine 11 Auto 6 Default setting for trans mission TRANSMISSION MODE Immediate Mem...

Page 90: ...the Communication Result Re port Memory TX On Off 2 Automatic printing of the File Reserve Report Mem ory TX On Off 3 Automatic printing of the File Reserve Report Poll ing RX On Off 4 Automatic printing of the Communication Result Re port Polling RX On Off 5 Automatic printing of the Transmission Result Re port Immediate TX On Off 7 Automatic printing of the Journal On Off 04 0 Print the Confiden...

Page 91: ...SS On Off 6 Default setting for the En ergy Saving function ENERGY SAVER Fax Standby Heater half cool Energy Saving Standby Heater Off 06 0 Default settingfor a header with each page FAX HEADER PRINT On Off 2 Default setting for Closed Network Transmission CLOSED NETWORK TRANSMISSION On Off 4 Default setting for Batch Transmission BATCH TRANSMISSION On Off 07 2 Parallel Memory Trans mission On Off...

Page 92: ...d messages from Specified Senders only 1 Forward messages from non Specified Senders only 09 0 Memory Lock On Off 1 Memory Lock 0 Messages from Specified Senders are not printed unless you en ter the Memory Lock ID 1 Messages from non Specified Senders are not printed unless you enter the Memory Lock ID 6 ADD DESTINATIONS WITH A SERIES OF QUICK DIALS On Off 10 5 Selection of purpose for bypass tra...

Page 93: ...s 0 0 0 0 or 1 1 1 1 until 4 Key Op Tools is displayed E E E E Press the OK key F F F F Press 2 2 2 2 G G G G Press the OK key H H H H Press 0 0 0 0 or 1 1 1 1 until 7 User Pa rameters is displayed I I I I Press the OK key 12 1 Distinctive Ring On Off 2 Toner Saving Mode On Off 7 Copy Mode Not Possible Possible 13 0 Use the G3 line as an internal extension or an outside line PABX PSTN 1 PABX 0 PST...

Page 94: ...ing adjustments press the OK key L L L L Press the User Tools key to re turn to the standby display Printing the User Parameter List Print this list to see the current User Parameter settings A A A A Press the User Tools key B B B B Press 0 0 0 0 or 1 1 1 1 until 4 Fax Fea tures is displayed C C C C Press the OK key D D D D Press 0 0 0 0 or 1 1 1 1 until 4 Key Op Tools is displayed E E E E Press t...

Page 95: ...s long and you can enter the fol lowing numbers and symbols 0 to 9 p and spaces You can register up to 30 Personal Codes Each Personal Code name can be up to 20 characters long Registering and Editing A A A A Press the User Tools key B B B B Press 0 0 0 0 or 1 1 1 1 until 2 Fax Fea tures is displayed C C C C Press the OK key D D D D Press 0 0 0 0 or 1 1 1 1 until 4 Key Op Tools is displayed E E E ...

Page 96: ... 0 0 0 0 or 1 1 1 1 until 2 Delete is displayed K K K K Press the OK key L L L L Press 0 0 0 0 or 1 1 1 1 to display the Per sonal Code you want to delete M M M M Press the OK key The Personal Code is deleted If you want to delete another Per sonal Code repeat the above steps from step K N N N N Press the User Tools key to re turn to the standby display Printing the Personal Code List Print this l...

Page 97: ... Switch 05 Bit 4 Note The machine returns to the state where a Personal Code must be en tered to use the machine in the fol lowing situations The machine is not used for a certain time A previously set original is re moved The current operation is com pleted When Restricted Access is turned on incoming faxes are received and printed as normal A A A A Check that the Restricted Access display is sho...

Page 98: ...dure The following example is for Memory Lock ID A A A A Press the User Tools key B B B B Press 0 0 0 0 or 1 1 1 1 until 2 Fax Fea tures is displayed C C C C Press the OK key D D D D Press 0 0 0 0 or 1 1 1 1 until 4 Key Op Tools is displayed E E E E Press the OK key F F F F Press 2 2 2 2 G G G G Press the OK key H H H H Press 0 0 0 0 or 1 1 1 1 until 9 ID Code is displayed I I I I Press the OK key...

Page 99: ... 0 0 0 0 or 1 1 1 1 until 10 Line Type is displayed I I I I Press the OK key J J J J Press 0 0 0 0 or 1 1 1 1 to set your machine for a tone dial line or a pulse dial line K K K K Press the OK key L L L L Press the User Tools key to re turn to the standby display Select Line When your machine is connected through a PABX change the Select Line setting to Extension If it is con nected directly to th...

Page 100: ...Hook mode or when di aling from an external telephone Note After you have registered PSTN access number select the line to PABX on User Parameters Switch 13 Bit 0 PSTN access numbers can be up to 2 digits long To register an PSTN access number perform the following procedure A A A A Press the User Tools key B B B B Press 0 0 0 0 or 1 1 1 1 until 2 Fax Fea tures is displayed C C C C Press the OK ke...

Page 101: ... Press the User Tools key B B B B Press 0 0 0 0 or 1 1 1 1 until 2 Fax Fea tures is displayed C C C C Press the OK key D D D D Press 0 0 0 0 or 1 1 1 1 until 4 Key Op Tools is displayed E E E E Press the OK key F F F F Press 2 2 2 2 G G G G Press the OK key H H H H Press 0 0 0 0 or 1 1 1 1 to display 13 Mem File Trans I I I I Press the OK key If no files are available No Files Exist is displayed J...

Page 102: ...K K K K Press the OK key L L L L Press 0 0 0 0 or 1 1 1 1 and select 1 Top Margin or 2 Left Margin Note You can view the margins by using 0 or 1 to select 3 Test Print and then press the OK key M M M M Press the OK key N N N N Press 0 0 0 0 or 1 1 1 1 and adjust the mar gins Press the 0 key to move the arrow T to the left and reduce the im age Press the 1 key to move the arrow T to the right and e...

Page 103: ...e s settings if you request it A A A A Press the User Tools key B B B B Press 0 0 0 0 or 1 1 1 1 until 2 Fax Fea tures is displayed C C C C Press the OK key D D D D Press 0 0 0 0 or 1 1 1 1 until 4 Key Op Tools is displayed E E E E Press the OK key F F F F Press 2 2 2 2 G G G G Press the OK key H H H H Press 0 0 0 0 or 1 1 1 1 until 15 RDS On Off is displayed I I I I Press the OK key J J J J Press...

Page 104: ...Key Operator Settings 98 7 ...

Page 105: ...s brief descriptions about the following features Immediate Memory Transmission Canceling Memory Transmission Programming ClearingQuickDials Printing lists of Quick Dials and User Function keys Programming ClearingSpeedDials Printing the Speed Dial List Printing the Journal Printing the Quick Dial Key Label and User Function Key Label ...

Page 106: ...y Fax or Print Jam in the Optional Paper Tray Unit To clear jams in the optional paper tray unit perform the following pro cedure A A A A Open the lower right cover B B B B Pull the jammed paper out slowly C C C C Close the lower right cover mak ing sure it clicks firmly into place ...

Page 107: ...sion or Reception If a file has been deleted from memo ry a Power Failure Report is auto matically printed as soon as power is restored This report can be used to identify lost files If a memory stored for Memory Transmission was lost re send it If a message received by Memory Reception or Substitute Re ception was lost ask the sender to re send it Important Make sure that 100 is shown on the Fax ...

Page 108: ...s a problem a ser vice representative can perform vari ous diagnostic tasks over the telephone line from the service sta tion to try to find out what is wrong with your machine The service repre sentative can also use RDS to change some of your machine s settings if you request it ...

Page 109: ...ay Important If paper is left in the paper tray and then you add paper a mis feed might occur Do not stack paper over the lim it mark Load paper so that the paper touches the right side of the tray or misfeeds might oc cur Note Shuffle the paper before loading it in the tray If the paper is curled load the paper up side down E E E E Readjust the back fence and side fences Important When loading sm...

Page 110: ...ease lever C C C C Gently insert the copy paper face down and adjust the paper guides 1 Horizontal size 2 Vertical size 3 Extender 4 Paper guides Important If the guides are not flush with the copy paper a skew image or paper misfeeds might occur Note Set the direction of the paper to L Swing out the extender to sup port paper sizes larger than A4L 81 2 14 L Fan paper to get air between the sheets...

Page 111: ...f you set A4 81 2 14 or larg er paper hold the edge of the paper and push down the paper guide release lever If you do not push down the pa per guide release lever a mis feed might occur You can specify the type of pa per used for the bypass tray See p 61 Changing the Paper Type for Bypass Tray ...

Page 112: ...tray until it stops Note Remove any remaining paper C C C C Adjust the back fence Note When you load A4L paper place the back fence in the cor ner pocket on the left D D D D While pressing the release lever adjust the side fences E E E E Push the metal plate down F F F F Square the paper and load it in the tray Important Do not stack paper over the lim it mark ...

Page 113: ...When setting small quantities of paper be careful not to squeeze in the side fence too much or pa per will not be fed properly H H H H Push the paper tray in until it stops I I I I Before you can use it you must change the paper size setting for this tray using Tray Paper Size function See p 60 Changing the Paper Size Setting ...

Page 114: ... fence Note When you load 81 4 14 L or 81 2 14 L paper place the back fence in the corner pocket on the left D D D D While pressing the release lever adjust the side fences E E E E Push the metal plate down and then square the paper and load it in the tray Important Do not stack paper over the lim it mark Load paper so that the paper touches the right side of the tray or misfeeds might occur Note ...

Page 115: ...tant When loading small quantities of paper be careful not to squeeze in the side fence too much or paper will not be fed properly G G G G Push the paper tray in until it stops H H H H Before you can use it you must change the paper size setting for this tray using Tray Paper Size function See p 60 Changing the Paper Size Setting ...

Page 116: ...arly A A A A While pushing the release button open the ADF unit B B B B Wipe the white strip 1 and expo sure glass 2 Use a soft dry cloth If dirt is hard to remove wipe with a well wrung damp cloth then wipe dry with a soft dry cloth C C C C Close the ADF unit making sure it clicks firmly into place ...

Page 117: ...y display so you can continue using the fax ma chine However after you scan an additional 100 originals with the ADF you will be prompted once again to replace the ADF Mainte nance Kit After Change ADF Maintenance Kit message appears in the dis play you can continue to send fax messages and perform other oper ations A A A A A message on the display prompts you to replace the ADF Mainte nance Kit w...

Page 118: ...Open the right cover C C C C Open the front cover D D D D Push the lever A A A A and pull out the toner cassette holding A A A A and B B B B E E E E Take the cord off the hook and re move the connector F F F F Pull the PCU while pushing A A A A Note If the PCU can not be pulled make sure the right cover is opened ...

Page 119: ... the PCU holding the han dle H H H H Take out the new PCU from the box and remove the black paper Do not touch the blue part I I I I Insert the new PCU J J J J Push the PCU until it locks into place K K K K Insert the connector L L L L Place the cord on the hook ...

Page 120: ...ng Your Machine 114 9 M M M M Pull the two red tags to remove the plastic strips N N N N Return the toner cassette Push the toner cassette until it locks into place O O O O Close the right cover and front cover ...

Page 121: ...B B B Push the lever A A A A and pull out the old toner cassette holding A A A A and B B B B Important Do not incinerate waste toner Toner dust may ignite suddenly when exposed to an open flame C C C C Prepare the new toner cassette Hold the cassette horizontally and shake it gently from side to side a few times Do not incinerate spilled toner or used toner Toner dust might ignite when exposed to ...

Page 122: ... toner cassette and make sure it locks securely into place F F F F Close the front cover When Toner Runs Out Even if toner runs out and the Add Toner indicator D is lit transmis sion operations are possible Reference p 25 Memory Transmission Ba sic Features p 29 Immediate Transmission Basic Features ...

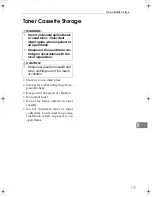
Page 123: ...o not lay heavy objects on toner cassette Do not incinerate toner or toner containers Toner dust may cause flashback when exposed to an open flame Do not incinerate spilled toner or used toner Toner dust might ignite when exposed to an open flame Dispose of the used toner car tridge in accordance with the local regulations Keep toner used or unused and toner cartridge out of the reach of children ...

Page 124: ...Maintaining Your Machine 118 9 ...

Page 125: ... to the machine C Open the front cover and remove the tapes from a toner cassette and a photo conductor unit D Attach the accessories and load the paper in the paper tray E Connect the power See p 121 Connecting the Power and Switching On F Connect the phone line See p 122 Connecting to a Telephone Line G Enter all necessary information and settings in your machine s memo ry See p 41 Registering B...

Page 126: ...ich satisfies the following conditions Not exposed to direct sunlight Level Not subject to vibrations Away from other electronic equip ment to avoid interference Away from areas containing corro sive gas Dust free Condensation free Temperature 15 to 25 C 59 to 77 F Humidity 30 to 70 RH do not in stall near a humidifier Away from heaters and air condi tioners to avoid sudden changes in temperature ...

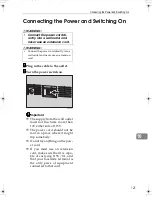
Page 127: ...de of 115V The power cord should not be laid in a place where it might trip somebody Do not lay anything on the pow er cord If you must use an extension cord make sure that it is capa ble of carrying 115V 7A and that your facsimile terminal is the only piece of equipment connected to that cord Connect the power cord di rectly into a wall outlet and never use an extension cord Connect the power cor...

Page 128: ...lephone line connection Important By law in the United States you must program your phone number identification your OWN FAX NUMBER into your machine be fore you can connect the public phone system See p 41 Own Name Fax Header Own Fax Number Basic Features A A A A Insert the line cable into the sock et labeled LINE B B B B Connect the other end of the line cable to your telephone line Connecting a...

Page 129: ... Standard 480 pages ITU T 1 test original Slerexe letter at standard res olution With optional 40Mbyte memory card 1500 pages Mode Standard With Option Energy Saver Mode 1 2W and lower 10W and lower Standby Mode 15W and lower 20W and lower Transmission 25W and lower 30W and lower Reception 400W and lower 400W and lower Copying 400W and lower 400W and lower Maximum 1000W and lower 1000W and lower M...

Page 130: ... 33 600 31 200 28 800 26 400 24 000 21 600 19 200 16 800 14 400 12 000 9 600 7 200 4 800 2 400bps auto shift down system Available Options Memory Card 40MB Increases memory capacity Paper Tray Unit Holds 500 sheets of paper Handset Handset Type 1018 This permits voice communication Printer Controller Enables the machine to be connected to a personal computer and used as a printer Furthermore if yo...

Page 131: ...ng types of originals in the Document Feeder because they may be damaged Originals containing staples or clips Perforated or torn originals Curled folded or creased originals Pasted originals Originals with any kind of coating such as thermosensitive paper art paper aluminum foil carbon paper or conductive paper Originals with index tabs tags or other projecting parts Sticky originals such as tran...

Page 132: ...0 Changing the Paper Size Setting 60 90g m2 16 24 lb 500 sheets 1 Bypass tray Stan dard sizes A4L A5KL 81 2 11 L 51 2 81 2 KL 81 2 14 L 8 13 L 81 2 13 L 81 4 13 L 81 4 14 L Note You can specify the paper size See p 60 Changing the Paper Size Setting 60 157g m2 16 42 lb 100 sheets 1 Custom sizes Metric version Vertical 90 216mm Horizontal 140 356mm Inch version Vertical 3 5 8 5 Horizontal 5 5 14 En...

Page 133: ...r Thin paper that has low stiffness Paper with much paper dust on its surface If you make copies on rough grain paper the copy image might be blurred Do not use envelopes in the following conditions damp excessively curled or twisted stuck together damaged in any way with stamps attached with windows holes perforations cutouts or embossing with metal clasps string ties or metal folding bars design...

Page 134: ...r is heated to full temperature only when a message needs to be printed Two available types of Energy Saving mode are shown in the table below Values vary according to options installed and settings of the User Parameters In Fax Standby mode letting the heating roller cool to room temperature will re duce the amount of electricity the fax machine consumes However the fax ma chine will not print in...

Page 135: ...icator lights exit Energy Saving mode and take ap propriate action Entering Energy Saving mode The machine enters Energy Saving mode when Nobody uses the machine for about 5 minutes The user holds down the Energy Saver Clear Modes key for about 2 seconds Note If you want to change the five minute period to one or three minutes or if you do not want your machine to enter the Energy Saving mode auto...

Page 136: ...meters switch 05 bit 6 Switch 05 Bit 6 Energy Saving Standby To let the heating roller cool to room temperature set bit 6 to 0 Fax Standby To let the heating roller cool halfway set bit 6 to 1 Reception in Energy Saving mode Once in Energy Saving mode you can still receive messages When a message is received the machine prints it and returns to Energy Saving mode ...

Page 137: ...ages for all files 500 1500 The number of destinations you can specify for one file 140 140 The number of destinations you can specify for all files 300 300 The number of Quick Dials you can register 30 30 The number of Speed Dials you can register 100 100 The number of Group Dials you can register 5 5 The number of destinations you can specify by the number keys 69 69 The number of destinations y...

Page 138: ...Time Send Later Fax Header Print You can add a Fax Header e g registered name to the message you send so it ap pears on the message printed by the receiving machine p 5 Fax Header Print Sending Confidential Messag es Sends a confidential message It will not be printed until the confidential ID is entered p 6 Sending Confidential Messages Polling Reception Use this function if you want to poll a me...

Page 139: ...ing a List of Files in Memory Print File List Printing a Stored Mes sage Prints the contents of a fax that is stored in mem ory and has not been sent yet p 13 Printing a Stored Message Print TX File Printing a Confidential Fax Message Prints messages received with the confidential re ception function p 14 Printing a Confidential Fax Mes sage Printing a Memory locked Message The Memory locked messa...

Page 140: ...oke programs p 44 Programs Auto Document Registers and deletes Auto Documents p 47 Storing an Often Used Document Auto Document Assigning User Function Keys Stores a frequently used func tion in a User Function Key F1 to F5 p 51 User Function Keys Reports Lists This function allows you to print various reports and lists manually You can print the following reports and lists Journal Transmission Fi...

Page 141: ...o change paper size setting p 60 Changing the Paper Size Setting Changing the paper type for bypass tray Explains how to set paper type for the bypass tray p 61 Changing the Paper Type for Bypass Tray Fax Reset Timer You can select a period of time before this machine automati cally returns to the standby display p 62 Setting the Fax Reset Timer On Hook Timeout You can select a period before the m...

Page 142: ...nd Paper Cas sette has been installed p 72 Specified Tray Forwarding Transfers received messages to a registered receiver for warding destination p 74 Forwarding Energy Save Timer Allows you to have the fax switch off and on at specified times to save energy p 80 Energy Save Timer Changing User Parameters Allows you to change the function settings to meet your needs p 83 User Parameters Printing U...

Page 143: ...ly stored in memory to another fax and have them printed out there p 95 Memory File Transfer Margin Adjust Allows you to adjust paper settings when you receive fax messages that are blank or partially missing p 95 Margin Adjust RDS On Off Allows you to switch on RDS Remote Diagnostic system to a service representative can test your fax machine remote ly from a service station diag nose the problem...

Page 144: ...Report Polling RX 10 Confidential File Report 31 Confidential ID 92 Confidential Messages 132 Confidential Reception 14 Confidential Transmission 6 Connecting an External Telephone 122 Connecting the Power 121 Connecting to a Telephone Line 122 Copying 41 special paper 42 Counters 43 D Date and Time 58 Date Time 134 Deleting Forwarding Station 78 Specified Sender 79 Specified Sender for Memory Loc...

Page 145: ...eduction 37 Paper 126 Paper Size Changing 60 Paper Tray Unit 124 Paper Type for Bypass Tray Changing 61 Parallel Memory Transmission 29 PCU Replacing 112 Personal Code 89 136 Personal Code List 90 Photo Conductor Unit Replacing 112 Polling ID 91 Polling Reception 9 132 Polling Reserve Report File Reserve Report Polling RX 10 Polling Result Report Communication Result Report Polling RX 10 Power 121...

Page 146: ... Report Immediate Transmission 31 Reports Lists 54 134 Resetting the ADF Counter 136 Restricted Access 91 S Scanner Cleaning 110 Scanner Cleaning Message 25 Secured Polling Reception 9 Selecting the Display Language 135 Select Line 137 Sending Confidential Messages 6 Send Later 3 132 SEP Code 23 SID 24 Solving Operation Problems 99 Solving Operation Problems 99 Specifications 123 Specified Sender ...

Page 147: ...In accordance with IEC 60417 this machine uses the following symbols for the main power switch a a a a means POWER ON b b b b means POWER OFF Copyright 2004 ...

Page 148: ...Type for 3725e F530 LF311 3310Le Printed in China EN USA H555 8400 ...

Reviews: