background image


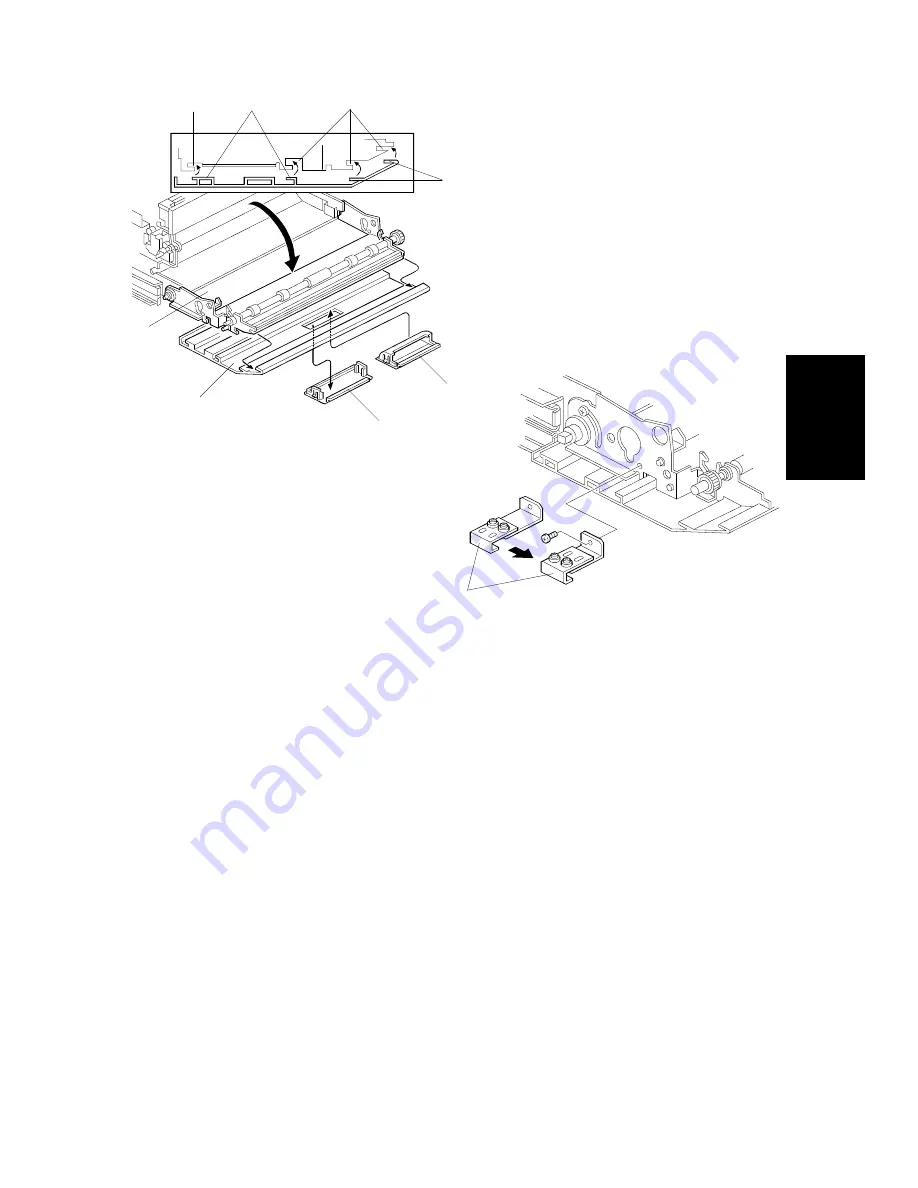
16. Replace the 3rd cover cap [A] of the 3rd cover with the 3rd roll grip [B].

NOTE: The 3rd cover open lever should come out of the 3rd roll grip [B]

for the next step.

17. Open the 3rd roll feed unit [C] and install the 3rd cover [D] (Hook the

projections [E] onto the cutouts [F] in the roll feeder side plates.).

18. Change the screw positions of the 3rd cover securing plates [G] as

shown and install the 3rd cover securing plates (1 screw each).

[D]

[A]

[B]

[C]

[E]

[F]

[E]

[F]

A613I508.wmf

[G]

A613I509.wmf

Inst

allat

ion

25 July 1996

ROLL FEEDER INSTALLATION PROCEDURE (A613)

3-19

Summary of Contents for FW870

Page 1: ...witch is tuned on the machine will suddenly start turning to perform the developer initialization Keep hans away from any mechanical and electrical components during this period HEALTH SAFETY CONDITIO...

Page 2: ...er developer and organic photoconductor according to local regulations These are non toxic supplies 3 Dispose of replaced parts in accordance with local regulations 4 When keeping used RAM boards in o...

Page 3: ...SECTION 1 OVERALL MACHINE INFORMATION...

Page 4: ...r drum Drum Charge Single wire with grid plate Negative Charge Reproduction Ratio 1 1 0 5 Exposure System Slit exposure via fiber optic array Exposure Lamp Fluorescent lamp 26 W Development Dual compo...

Page 5: ...mption Maximum 1 41 kW Warm up 1 21 kW Ready 0 1 to 1 2 kW Copy cycle 1 36 kW Dimensions W x D x H 1230 x 690 x 1065 mm 48 4 x 27 2 x 41 9 Weight 195 kg 429 lb Optional Equipment and Machine Configura...

Page 6: ...E A174V502 wmf A Original Path Switching back B Paper from the manual feed C Paper from the roller feed D Original Path from Rear Feeder E Upper Copy Exit F Lower Copy Exit Overall Information 25 Jul...

Page 7: ...otoconductive drum has a high electrical resistance in the dark 2 Exposure High intensity light from a fluorescent lamp is reflected from the moving original through the fiber optic array The charge o...

Page 8: ...negative charge is applied to the back side of the paper The negative charge pulls the toner particles from the drum surface onto the paper 6 Paper Separation A strong ac corona discharge is applied t...

Page 9: ...4 MECHANICAL COMPONENT LAYOUT 1 25 21 22 23 24 20 19 18 17 16 15 14 13 12 11 10 9 8 7 6 5 4 3 2 A174V500 wmf MECHANICAL COMPONENT LAYOUT 25 July 1996 1 6...

Page 10: ...Unit 11 Paper Spool 12 3rd Roll Feeder 13 Cutter Unit 14 Paper Registration Rollers 15 Manual Feed Table 16 Development Unit 17 Toner Cartridge 18 Charge Corona Unit 19 Original Table 20 Original Exit...

Page 11: ...evelopment Relay Gear 5 Development Motor 6 Main Motor 7 Drum Drive Relay Gear 8 Transport Unit Drive Belt 9 Fusing Drive Motor 10 Fusing Unit 11 Exit Unit Drive Belt 12 Original Feed Drive Pulley 9 8...

Page 12: ...motor drive to the 1st roll feed roller 55 Roll Feed Clutch 2 Transmits the roll feed motor drive to the 2nd roll feed roller 58 Roll Feed Clutch 3 Transmits the roll feed motor drive to the 2nd roll...

Page 13: ...Original Exit Sensor 2 Detects jams in the original exit section 3 Original Exit Sensor 3 Detects jams in the original exit section 18 Original Lead Edge Sensor Detects the original leading edge to de...

Page 14: ...s Charge Bias Grid Power Pack Provides high voltage for the charge corona grid and development bias 40 T S Power Pack Provides high voltage for the transfer corona and separation 30 Thermistors Hot Ro...

Page 15: ...SECTION 2 DETAILED SECTION DESCRIPTIONS...

Page 16: ...es when the drum is exposed to light The conductivity of the OPC drum is greatly enhanced by exposure to light It dissipates an amount of charge that is in direct proportion to the intensity of the li...

Page 17: ...ive is transmitted to the drum in the following way main motor drive gear C idle gears D drum drive gear E drum flange F drum When the drum knob is tightened the right flange presses firmly against th...

Page 18: ...ive voltage is applied to it by the charge grid power pack To make the negative corona uniform a grid consisting of 8 wires is installed on the charge corona unit between the corona wire and the drum...

Page 19: ...a negative corona charge The grid limits the maximum corona charge to 860 volts This ensures that the charge does not fluctuate and an even charge is applied to the drum surface The copy grid voltage...

Page 20: ...on the wire cleaner motor turns on to bring the wire cleaner to the rear end and then back to the home position When the wire cleaner moves from the rear to the home position the wire cleaner pads cl...

Page 21: ...ge stays in the charge corona area it may cause uneven corona charging to the drum To prevent this ozone is vacuumed out through the exhaust fan A and changed to oxygen by the ozone filter before bein...

Page 22: ...eral velocity The platen roller D presses the original E flat against the exposure glass F just above the fiber optic array This ensures that the image is properly focused The original must be within...

Page 23: ...n 2 5 seconds later the original feed motor starts rotating to turning the original feed roller B and the original registration roller C An original feed starts The 2 5 second delay allows time for th...

Page 24: ...ber of steps as the roll feed motor stepper motor turns The roll feed motor stops at the appropriate time and the cutter motor rotates to cut the copy paper Repeat copies When making repeat copies to...

Page 25: ...lers is detected by the original mode change sensor in the rear feed table assembly When the original cover is closed 00 is blinking on the copy counter to distinguish this mode from the normal origin...

Page 26: ...de When turning on the main switch or when roll paper is replenished the roll feed motor rotates and the leading edge of the roll paper is fed until the roll lead edge sensor E is activated Then the l...

Page 27: ...pull out rollers H previous page paper feed fails In this case roll end is indicated instead of a paper misfeed indication 3 3 2 Drive Mechanism The roll feed roller B is driven by the roll feed moto...

Page 28: ...riven through the original feed drive pulley B and belt C by the original feed motor D The platen roller E is rotated by the original feed motor D through the gears F and belt G G B D E F C A A174D510...

Page 29: ...ined either by the image density selected at the operation panel manual ID control or by the original s background level as sensed by the ADS The CPU uses the light sensor to monitor the actual light...

Page 30: ...2 627 10 1 510 23 2 725 11 1 627 24 2 824 12 1 745 25 2 922 13 1 843 26 3 118 3 5 1 Manual ID Control When in manual image density mode the user can select one of 26 manual ID levels For each level th...

Page 31: ...62 0 63 2 118 0 89 1 333 VS Light Sensor Voltage VOD Original Density Detecting Voltage VSD Standard Pattern White Plate Density Detecting Voltage When automatic image density sensing ADS is used the...

Page 32: ...te plate by emitting light from ADS standard white which is located above the ADS prior to the arrival of the original This standard white level VSD is used for comparison with the background level of...

Page 33: ...charged toner In this way the latent image is developed Negative bias is applied to the development roller to prevent toner from being attracted to non image areas on the drum that may have residual...

Page 34: ...ing auger D in the development unit are driven through the development drive belt E and gears F The toner agitator shaft G is rotated through the gears H by the toner supply clutch I engaged in the to...

Page 35: ...r A is split into two parts by the doctor blade B One part the magnetic brush goes on to develop the latent image on the drum However the other part is trimmed off by the doctor blade and directed to...

Page 36: ...4 45 4 30 VTS 4 40 4 20 VTS 4 35 4 20 VTS 4 30 4 00 VTS 4 25 3 20 VTS 3 60 5 4 45 VTS 4 40 VTS 4 35 VTS 4 30 VTS 4 25 VTS 3 60 VTS H 0 VTS 4 00 VTS 3 00 VTS 2 50 VTS 2 00 VTS 1 90 VTS 1 40 1 4 00 VTS...

Page 37: ...oner near end condition 16 more meters A1 D size 27 copies can be copied Then the add toner indicator will light and the machine will not operate 4 4 2 Recovery From Toner End Condition After replacin...

Page 38: ...s an analog signal The active sensor element is a very small transformer with three coils When iron ferrite carrier is near the sensor element the inductance of the coils changes causing the current t...

Page 39: ...use dirty background A negative bias that is a little larger than the residual charge is applied to the development roller This prevents the positively charged toner from being attracted to the backgr...

Page 40: ...64 0 65 200 0 46 0 47 280 0 66 0 67 180 0 48 0 49 280 0 68 0 69 180 0 50 0 51 280 0 70 0 71 180 0 52 0 53 280 0 72 0 73 180 0 54 0 55 240 0 74 0 75 180 0 56 0 57 240 0 76 0 80 180 0 58 0 59 200 0 81 0...

Page 41: ...s B on the ends of the agitator force toner through small holes 0 5 mm in diameter in a plastic strip C along one side of the toner cartridge The toner particles thus ejected from the cartridge fall i...

Page 42: ...ns are applied to the copy paper and the negative charge attracts the positively charged toner away from the drum and onto the paper In addition the paper is held against the drum by the positive coun...

Page 43: ...tates clockwise and the pick off pawls C touch the drum surface Just after the leading edge of the copy paper passes the pick off pawls the pick off solenoid turns off again The pick off spring D then...

Page 44: ...pply approximately 5 0 kV ac and 200 V dc to the separation corona wires A larger transfer current is applied when the fusing unit is in high or low temperature mode than in normal temperature mode In...

Page 45: ...drum after the image is transferred to the copy paper The toner that is wiped off by the cleaning blade drops onto the toner collection coil B which then moves it to the toner collection bottle The c...

Page 46: ...oner from making 6 km 10K A1 capacity 4000 ml copies The toner overflow sensor E detects when the used toner tank is full The toner overflow indicator starts flashing in the operation panel While the...

Page 47: ...he quenching lamp B neutralizes any charge remaining on the drum The quenching lamp turns on and off at the same time as the main motor The main board turns on the quenching lamp LEDs by dropping CN10...

Page 48: ...it The fusing lamp G which is located at the hot roller axis turns on and off to maintain the operating temperature The temperature control circuit on the main board monitors the surface temperature o...

Page 49: ...t roller The fusing rollers turn constantly when the fusing drive motor D is on driven via the gear E through the fusing drive chain F sprocket G and gear H to the hot roller drive gear The exit secti...

Page 50: ...24 volts at CN201 2 The ac power is applied to the drive circuit the fusing lamp and the triac TRC201 The dc power drives PTC201 and RA201 To turn on the fusing lamp the main board drops CN102 A20 to...

Page 51: ...gh The input from TH1 Hot Roller Thermistor goes to pin 3 of IC17 as well as to the CPU As the temperature of TH1 increases its resistance decreases and therefore the voltage at pin 3 of IC17 increase...

Page 52: ...8 4 TEMPERATURE CONTROL 8 4 1 Normal A174D534 wmf Detailed Descriptions 25 July 1996 FUSING AND PAPER EXIT 2 37...

Page 53: ...e 420 or nar rower 195 1 185 185 105 C or lower 115 130 C 9 180 185 110 C or lower 0 175 180 120 C or lower 175 Copy unconditionally disable 2 All size 205 200 125 C or lower 145 160 C 195 200 130 C o...

Page 54: ...d using SP 8 The ready condition When the hot roller temperature reaches the ready temperature the copier enters the ready condition and copying is possible The ready temperature is anywhere that is 5...

Page 55: ...red setting with and keys then press the key to store the setting normal 1 to 12 high 1 to 3 low 1 to 2 NOTE The setting input by this procedure does not overwrite the settings that are stored in SP m...

Page 56: ...ing of SP 61 By changing SP 61 Fusing temperature recovery setting setting other 3 selections can be chosen Low temperature mode The hot roller temperature may come into the copy disable conditions du...

Page 57: ...ratio is approximately 14 The waiting time until the copier returns to the ready condition is approximately 60 seconds NOTE The above energy saving ratio is a standard value measured in laboratory te...

Page 58: ...T Paper creasing may occur depending on the type of paper used The fusing entrance guide A height is changed by adjusting a lever there are three settings A A174D531 wmf Detailed Descriptions 25 July...

Page 59: ...gainst the transport belts two vacuum fans A underneath the transport belt unit suck air As the vacuumed air includes ozone the air is changed to oxygen by the ozone filter B before blown out of the c...

Page 60: ...er the last copying job The time can be adjusted from 1 to 120 minutes This mode cannot be canceled Default 30 minutes SP Mode Not available Mode No 19 Function Auto off time can be selected Settings...

Page 61: ...SECTION 3 INSTALLATION...

Page 62: ...s follows a Where it will not be subjected to sudden temperature changes from low to high or vice versa b Where it will not be directly exposed to cool air from an air conditioner in the summer c Wher...

Page 63: ...k 600 mm 24 in 3 Right 600 mm 24 in 4 Left 600 mm 24 in 1 2 MACHINE LEVEL 1 Front to back Within 5 mm 0 2 of level 2 Right to left Within 5 mm 0 2 of level Make sure that the machine is level using a...

Page 64: ...S A version 220 V 230 V 240 V 50 Hz More than 7 A for European version 2 Permissible Voltage Fluctuation 10 3 Do not set anything on the power cord NOTE a Make sure the plug is firmly inserted in the...

Page 65: ...e Wire 2 4 Copy Guide 1 5 End Guide Stocker Holder 2 6 Middle Guide Stocker Holder 1 7 Guide Stocker 3 8 Original Tray 1 2 9 Original Tray 2 2 10 Original Guide 2 11 Total Counter Cover 1 12 Right Inn...

Page 66: ...ove the strips of filament tape A and cardboard B 3 Open the fusing exit cover C and remove the shipping blocks D 4 Open the original feed unit E and remove the cushion F A174I500 wmf A B A174I501 wmf...

Page 67: ...The upper shipping retainers F are required when removing the image producing unit Keep them for future use refer to 5 42 7 Remove the upper shipping retainers F and pull out the 1st and 2nd roll fee...

Page 68: ...tion B and remove the two strips of shipping tape C and protection sheet D 10 Remove the drum protection sheet E and remove the screw F to apply cleaning blade pressure to the drum A A A A174I507 wmf...

Page 69: ...r Machine feet 12 Remove the rear cover C 2 screws and place the level in the middle of the base as shown in the illustration Adjust the level of the machine in the same way 13 Attach the guide wires...

Page 70: ...he total counter cover B 1 M4 x 8 tapping screw 16 Hook the original guides C into the cutouts D in the stay and install the pin screws E A A174I513 wmf D D C C E A174I514 wmf B A174I515 wmf Installat...

Page 71: ...original trays Otherwise the toner cartridge cover will drop 19 Install the two end guide stocker holders F 2 M4 x 6 screws each and 1 middle guide stocker holder G 2 screws NOTE To distinguish betwe...

Page 72: ...loper entrance Pour 1 kg of developer E into the development unit evenly across its width as shown 23 Close the toner supply cover and original feed unit Plug in the power supply cord and turn on the...

Page 73: ...ion panel Clear Modes Stand by key A key B key Clear Stop key C 25 Press the Clear Stop key again for longer than 3 seconds The wrench and tone end indicators will blink SP INPUT OUTPUT mode 26 Select...

Page 74: ...than 3 seconds The roll paper end and wrench mark indicators will blink SP mode 30 Select 40 using the and keys Enter 1 by pressing the following keys key E key key Five minutes later the copier will...

Page 75: ...stall the toner cartridge A as shown Remove the sealing tape B from the cartridge and turn the knob C until it stops 33 Reinstall all the covers 34 Check the copy quality and copier operation A A174I5...

Page 76: ...st Description Q ty 1 3rd Feeder Harness 1 2 Bushing 1 3 Roll End Sensor Stay 1 4 Left Guide 1 5 Screw M4 x 6 7 6 Screw M4 x 8 1 7 3rd Clutch Unit 1 8 Interlock Switch Assembly 1 9 Oil Dumper Bracket...

Page 77: ...ve the 3rd support plates E 2 screws each and 3rd cover F 4 Remove the 3rd harness cover G 1 screw left inside 5 Replace the dummy connector H with the 3rd feeder harness connector I Pass the 3rd feed...

Page 78: ...t and a M4 x 8 screw E to the right 9 Remove the drive section bracket F 2 screws and replace sprocket G with the 3rd clutch unit H While fitting the clutch stoppers I to the drive section bracket rei...

Page 79: ...C as shown Otherwise the damper may be broken 14 Close the 3rd feed unit Install the white oil damper G to the left and blue oil damper H to the right NOTE Although R or L is indicated on the dampers...

Page 80: ...he 3rd roll feed unit C and install the 3rd cover D Hook the projections E onto the cutouts F in the roll feeder side plates 18 Change the screw positions of the 3rd cover securing plates G as shown a...

Page 81: ...he lower part is not necessary 21 Adjust the plate positions C so that the the gaps D and E between the 3rd cover and copier side plates are the same 22 Attach the 3rd roll decal F to the left upper p...

Page 82: ...n 3 seconds The roll paper end and wrench mark indicators will blink SP mode 27 Select 44 using the and keys Enter 1 by pressing the following keys key F key key 28 Input values into SP modes 48 and 4...

Page 83: ...n indicator lights when the 3rd roll feed door is closed adjust the position of the interlock switch bracket A 31 Check the roll feeder operation A A613I514 wmf ROLL FEEDER INSTALLATION PROCEDURE A613...

Page 84: ...ld be procured locally 1 Right Lower Cover 1 2 Key Counter Bracket 1 3 Key Counter Harness 1 4 Screws 6 1 Remove the right upper front cover A 2 screws right corner cover B 1 screw right lower cover C...

Page 85: ...de plate Pass the the key counter harness through the clamps to the main control board and connect it to CN110 F of the main control board 6 Install the right lower cover G included with the key count...

Page 86: ...SECTION 4 SERVICE TABLES...

Page 87: ...ure Glass C C C C C Water Development Developer R R Side Seals I I I I Replace if necessary Cartridge Holder C C C C Dry Cloth Entrance Seal C C Development Filter R R Registration Upper Guide Plate C...

Page 88: ...Feed Table C C C C Water Roll Feeder Roll Feed Rollers 1st 2nd and 3rd C C C C Water Roll Exit Rollers C C C C Water Roll Lead Edge Sensor C C C C Dry cloth Cutter C C C C Blower brush Replace at 120k...

Page 89: ...necessary Fusing Exit Guide Plate Clean using suitable solvent if necessary Exit Turn Guide C C C C Alcohol Others Ozone Filters R R R R Timing Belts I I I I Adjust tension if necessary Chain L L L L...

Page 90: ...an the ADS pattern using alcohol 3 Clean the platen roller using water or alcohol 4 Clean the exposure glass using water 4 Development every 10K 1 Inspect the side seals Replace them if necessary 2 Cl...

Page 91: ...grid wire using a blower brush 3 Clean the charge corona end blocks and casing using a dry cloth 4 Clean the PTL using a dry cloth 5 Clean the transfer and separation corona wires using a dry cloth 6...

Page 92: ...manual feed table using water 8 Roll Feeder every 10k 1 Clean the 1st 2nd and 3rd feed rollers using water 2 Clean the roll exit rollers using water 3 Clean the roll lead edge sensor using a dry cloth...

Page 93: ...vent 3 Clean the pressure roller strippers using suitable solvent Fusing every 50k Replace the hot roller Fusing every 60k Replace the pressure roller 10 Others every 10k 1 Replace the ozone filter 2...

Page 94: ...11 Copy Quality every 10k 1 Check copy quality 2 Perform the light sensor adjustment PREVENTIVE MAINTENANCE SCHEDULE 25 July 1996 4 8...

Page 95: ...1 Charge Corona Voltage Caution VR1 should not be changed in the field Charge corona can be adjusted using SP mode T S Power Pack Number Function VRT Transfer Corona Voltage VRD DC Separation Corona V...

Page 96: ...ccess the SP mode for customers and sales representatives SP modes 1 to 39 are accessible by a customer with this procedure Press Clear key then hold down Clear Stop key more than 3 seconds until the...

Page 97: ...or 4 Select the setting using the and keys then press the key to enter the selected setting 5 Leave the SP mode How to read data 1 Access the SP mode and select the program number 2 Press the key and...

Page 98: ...2 3 Mode 3 3 Fusing Temperature 3 Low Selects the fusing temperature for translucent film 1 Mode 1 2 Mode 2 4 Copy Count Up Down Selects the copy count amount up or down 0 Up 1 Down 5 Beeper On Off S...

Page 99: ...automatically released when an original is inserted 0 No 1 Yes 14 Leading Edge Increase Decrease Speed Setting To change the leading edge margin print number increase decrease speed the customer hold...

Page 100: ...Light 5 Lighter 6 Lightest 19 Auto Shut off Time Setting 115 V machines only Determines the auto shut off time 1 30 120 1 minute step 20 Synchro cut Manual Feed Display Determines whether Auto when s...

Page 101: ...tart Time Setting Long Narrow Original Mode Selects the time when the original registration roller starts rotating after the original lead edge sensor is actuated 0 3 seconds 1 4 seconds 2 5 seconds 3...

Page 102: ...condition 42 Not Used 43 Key Counter Identification Enables key counter operation 0 No 1 Yes 2 For Japanese machines only 3 For Japanese machines only 44 3rd Roll Feeder Identification Enables 3rd ro...

Page 103: ...e paper transportation and minimizes creasing of long sheet However if this mode is selected the paper cut length will become 62 6 mm longer than original when Synchro cut is selected 0 Paper buckle m...

Page 104: ...ion Start key is accepted even if the fusing temperature have not reached the target value 61 Fusing Temperature Recovery Setting Determine how the machine recovers when the fusing temperature becomes...

Page 105: ...66 Toner End Detection Setting Determines the possible number of copies when A1 paper is used after the toner near end condition 0 27 sheets 1 9 sheets 2 18 sheets 3 36 sheets 67 Toner Overflow Detect...

Page 106: ...ion is done 74 Toner Counter Display Displays the total length of copied paper m after a new toner cartridge is installed dt XX XXX This counter is automatically cleared when the new toner cartridge i...

Page 107: ...n be changed by pressing the Paper Select key t1 to t3 Roll Feed tF Total tH Manual Feed 87 Total Cutter Counter Displays the total cutter count ct XXX XXX 88 Total Charge wire Cleaner counter Display...

Page 108: ...manual feed jam detected before the registration sensor FH Number of manual feed jam detected after the registration sensor P1 to P3 Number of roll feed jam detected before the registration sensor F1...

Page 109: ...isfeed Record Display Displays the location of the last five copy paper misfeeds one after the other P1 XX Last jam P2 XX 1 before the last jam P3 XX 2 before the last jam P4 XX 3 before the last jam...

Page 110: ...e service calls one after the other E1 XX The last error code E2 XX 1 before the last error code E3 XX 2 before the last error code E4 XX 3 before the last error code E5 XX 4 before the last error cod...

Page 111: ...selected Note 2 This counter is not used for the toner density step control described on page 2 16 0 Not Used 1 Copy Number Counter The memory for SP85 2 Copy Length Counter SP80 to 84 and 86 3 OPC C...

Page 112: ...t Used 28 Not Used 29 Factory use 30 Clear all the memories and change the setting to the Japanese version 31 Clear all the memories and change the setting to the U S A version 32 Clear all the memori...

Page 113: ...t Change the pressure roller temperature setting 0 Standard 9 0 9 C Decrease Increase 8 Hot Roller Pressure Roller Temperature Display Displays the hot roller temperature and pressure roller temperatu...

Page 114: ...0 Low High 16 Transfer Voltage at Setting 2 Determines the transfer corona voltage at the paper trailing edge in Roll Feed mode In this mode the transfer corona can be turned on and off using the Lead...

Page 115: ...velopment bias voltage for the non image area In this mode the bias voltage can be turned on and off using the Leading Edge Cut key ON Indicator on OFF Indicator off 4 Standard 0 4 8 Low High 1 step 2...

Page 116: ...9 9 1 step 0 1 mm 36 Synchro cut Length Auto Adjustment 1189 mm Adjusts the original cut length in Synchro Cut mode at 1189 mm Insert the 1189 mm length original five times this number displayed on t...

Page 117: ...stment 1st roll feed 1189 mm translucent paper Adjusts the cutting length of 1189 mm in the translucent paper mode This adjustment affects the 1189 mm cut length of the 2nd and 3rd feed in translucent...

Page 118: ...stration sensor voltage dr X XX 53 Synchro cut Length Auto Adjustment 1189 mm Long Narrow Original Mode Adjusts the original cut length in Synchro Cut mode at 1189 mm in narrow and long mode Insert th...

Page 119: ...mode the development motor main motor QL and the bias voltage for non image area can be turned or and off using the Roll Edge Cut 80 Standard 50 90 120 Low High 62 Toner Sensor Voltage Display Last Co...

Page 120: ...nes the hot roller idling time after the fusing temperature reaches the ready condition Even if the selected time has not past the fusing motor stops when the pressure roller temperature reaches 130 C...

Page 121: ...the pressure roller from the fusing extra waiting time 0 130 C 1 133 C 77 Temperature Selection Recovery Setting Determines the condition when the machine becomes Ready condition after the fusing tem...

Page 122: ...Number 85 Toner Full Supply Mode In the Special Toner Supply mode SP62 if the clear stop key is pressed while the Emergency Stop key is pressed 100 toner supply is done 0 No 1 Toner Full Supply Mode...

Page 123: ...m the rear side even if Synchro cut mode is selected This mode cannot be used with the trailing edge margin function In this mode the copy will be 194 mm longer than the original 0 Normal 1 Synchro cu...

Page 124: ...0 1 142 0 128 0 96 0 72 0 64 0 48 0 36 0 24 0 18 0 12 0 2 142 0 44 0 34 0 22 0 17 0 11 0 3 142 0 128 0 96 0 72 0 64 0 44 0 34 0 22 0 17 0 11 0 4 142 0 48 0 44 0 36 0 34 0 24 0 22 0 18 0 17 0 12 0 11...

Page 125: ...ar Stop key is pressed hold it down for more than 3 seconds until the and indicators blink How to leave the input output check mode Press the following keys in sequence or turn off the main switch NOT...

Page 126: ...when the main motor rotates properly 16 Development Roller Lock Signal ON is displayed when the development motor rotates properly 17 Wire Cleaner Motor Overcurrent Detection Signal ON is displayed w...

Page 127: ...opment Motor 3 Pick off Pawl Solenoid 4 Exit Gate Solenoid 5 Registration Clutch 6 Fusing Lamp The light intensity depends on the manual ID setting 7 Anti humidity Heater The heater turns off when the...

Page 128: ...tion of rotation is determined by No 35 37 Original Gate Solenoid 38 ADS Sensor Lamp 39 ADS Reset 40 Roll Feed Motor Drive Direction Determines the roll feed motor rotation when output No 41 is used O...

Page 129: ...ter motor on time is displayed 3 3 POWER ON INITIAL SETTING MODE The initial setting when the main switch is tuned on can be changed in this mode The procedure is as follows 1 Turn on the main switch...

Page 130: ...same time dJ21 The original leading edge sensor does not turn on within 10 seconds after the original transport motor starts rotation dJ22 Original is pulled out after the original registration sensor...

Page 131: ...tion sensor OFF check at original trailing edge when the original transportation is reversed dJ58 Original registration sensor ON check at original leading edge when the original transportation is rev...

Page 132: ...030 2 Deluxe Test Lead Accessory Kit 54209508 BECKMAN DL241 3 Grease Mobil Temp 78 54479078 400 g can 4 Grease G501 52039501 5 Current Measuring Drum A0239520 6 Test Chart OS A1 2 sheets set A0239504...

Page 133: ...m as the drum layer is thin and is easily damaged 7 Never expose the drum to corrosive gases such as ammonia gas 8 Always keep the drum in the protective sheet when inserting or pulling the drum unit...

Page 134: ...E CORONA 1 The wire can also be cleaned with a blower brush If the wire is cleaned with a dry cloth make sure that the wire does not become stretched Do not use sand paper or a solvent 2 Do not touch...

Page 135: ...s at both sides open the paper path section forcibly if the paper path section is released If you close the paper path section take care not to injure yourself by opening the paper path section Also r...

Page 136: ...and paper etc as this will damage the corona wire 7 Do not use any solvent to clean the wire as this will cause uneven charge on the drum 6 6 CLEANING UNIT 1 Be careful not to damage the edge of the c...

Page 137: ...e pressure roller 5 The fusing unit is heavy Take care not to injure yourself by dropping the fusing unit when removing and installing it 6 8 ORIGINAL FEED 1 Do not touch the original feed rollers ori...

Page 138: ...ard in the copier 2 After installing the new main board with a new RAM clear the RAM memory Do not clear RAM memory if you have placed the old RAM on the new main board 3 Take care not to damage the m...

Page 139: ...SECTION 5 REPLACEMENT AND ADJUSTMENT...

Page 140: ...ptics parts replacement 1 Remove the left upper front A and right upper front B covers 2 screws each and left upper rear C and right upper rear D covers 1 screw each 2 Remove the copy tray E A C E D B...

Page 141: ...are dislodged make sure that the pawl positions are aligned into the hole on the copier Then reinstall the pawls Please note that there is one sensor hole in the middle of the copier This hole is not...

Page 142: ...and remove the retaining rings B at both ends 7 Turn the original feed unit and install the stopper screws D NOTE 1 Be careful not to hit the gas springs E to the exposure lamp and other parts nearby...

Page 143: ...bracket C 1 screw and exposure lamp D NOTE 1 Make sure that the direction of the aperture E of the exposure lamp is towards the fiber optics array side rear side when reinstalling 2 Make sure that the...

Page 144: ...steps from 1 to 2 of the exposure lamp removal 2 Remove the rear original guide plate A 5 screws 3 Remove the right and left spring plates B 1 screw each 4 Lift up the fiber optics array C and remove...

Page 145: ...297 mm and input the difference between the measured length and 297 mm 3 Press the key The copy quantity indicator blinks Input the test copy number default 5 4 Press the key 5 Place the measured orig...

Page 146: ...1200 mm SP 47 3rd roll feed 300 mm SP 48 1200 SP 49 Regarding the translucent paper and film adjusting cut length for the 1st roll feed for translucent paper or film adjust the 2nd and 3rd roll feed c...

Page 147: ...ht upper front cover 2 Open the paper path section and original feed unit 3 Remove the toner supply cover A 4 Remove the manual entrance feed cover B 2 pins 5 Remove the paper feed driven unit C 2 scr...

Page 148: ...of the cutout D 8 Remove the development unit E CAUTION Do not loosen the painted screws F which determine the development doctor blade height and do not push the doctor blade G too strongly otherwis...

Page 149: ...roller knob D clockwise The developer will fall out onto the paper 5 Repeat step 4 until all of the developer has been dumped out 6 Clean the development unit prior to reassembling Especially clean th...

Page 150: ...arness from the 2 clamps B 3 Remove the 2 screws C of the toner density sensor holder 4 Pull out the harness from the toner density sensor side until the relay connector D appears 5 Replace the toner...

Page 151: ...EMENT 1 Remove the paper feed driven unit follow the steps from 1 to 5 of the development unit removal 2 Remove the PTL assembly A 4 screws 3 connectors and 4 clamps B B A A174R511 wmf DEVELOPMENT 25...

Page 152: ...bias grid power pack 3 Set the multimeter range to dc 1500 V 4 Turn on the main switch 2 5 1 Bias Voltage for Image Area ADJUSTMENT STANDARD dc 180 10 V 1 Access SP mode and select No 25 2 Press the R...

Page 153: ...d select No 26 2 Press the Roll Edge Cut key to turn on the bias voltage 3 Check the multimeter If the voltage is not that of the standard voltage press the key and then change the voltage using and k...

Page 154: ...ve the charge wire cleaner motor D gear E and collar F 2 screws 5 Remove the drum unit G 6 Place the drum unit on the flat floor NOTE 1 When reinstalling the drum unit hook the drum unit guides H on t...

Page 155: ...off pawls when removing or reinstalling the drum 4 Remove the drum C with the drum shaft 5 Loosen the drum knob D by turning it clockwise as shown 6 Remove the drum flange E 7 Replace the drum with n...

Page 156: ...e release the pressure E several times manually and then hold down the cleaning blade gently along its entire length to ensure that the cleaning blade contacts the drum Even if the drum is installed a...

Page 157: ...move the ground springs A 3 Remove the charge corona unit B 2 connectors NOTE When reinstalling the charge corona unit make sure that the 2 connectors C for the charge corona G for the grid bias are s...

Page 158: ...on the eight slots D are all straight and not crossed 2 Handle the new wire by the ends only Oil from your hands may cause uneven charge on the drum 3 Do not expand and bend the corona wires and grid...

Page 159: ...ce it as shown 2 Remove the pressure spring A and pick off pawl unit B 2 screws and 1 connector NOTE When installing and or removing the pick off pawl unit do not press too strongly Otherwise the drum...

Page 160: ...oltage terminal to TP2 on the charge bias grid power pack 3 Set the multimeter range to dc 1500 V 4 Turn on the main switch 5 Access SP mode and select No 14 6 Press the Roll Edge Cut key to turn on t...

Page 161: ...rect problems with paper separation incomplete toner transfer or image density 3 Make sure that the main switch is turned off when you change the range on the digital multimeter If it is not the multi...

Page 162: ...unit A on the machine CAUTION Be careful not to turn on the main motor If the main motor accidentally turns on some parts around the drum may be damaged A A174R525 wmf Replacement Adjustment 25 July 1...

Page 163: ...t the charge corona terminal of the charge bias grid power pack 3 Connect the multimeter as shown in the illustration 4 Set the multimeter range at dc 2 mA 5 Plug in the machine and turn on the main s...

Page 164: ...er range at dc 200 A 3 Plug in the machine and turn on the main switch 4 Access SP mode and select No 15 5 Press the Roll Edge Cut key to turn on the transfer corona 6 Check the multimeter Press the k...

Page 165: ...multimeter Press the key and then change the current using and keys so that the ac separation current is ac 250 10 A 7 If the voltage is within that of the standard voltage press the key 8 Select SP m...

Page 166: ...eparation current is dc 10 1 A 16 If the voltage is within that of the standard voltage press the key 17 Select SP mode No 21 18 Press the key to turn on the separation corona 19 Check the multimeter...

Page 167: ...the grounding wires 3 Disconnect the connector D and flex the hinge arms E of the exit cover slightly to the outside of the exit unit shafts and remove 4 Turn the exit unit F 1 4 of a turn to the fron...

Page 168: ...s C and disconnect lamp harness D from the clamps E 8 Pull out the fusing unit F NOTE Set the fusing unit on the guides G and align the cuts H to the side plates I at both ends when reinstalling the f...

Page 169: ...kets E and cushions F 1 screw each 5 Remove the fusing lamp G from the left side as shown 1 connector H rear view NOTE When reinstalling the fusing lamp straighten the short harness I to allow it of t...

Page 170: ...guide D 3 Remove the pressure roller stripper unit E 4 screws 4 Lift up the pressure roller access the hot roller from the cut F of the frame slide out the pressure roller shaft G to the left then re...

Page 171: ...4 screws 4 5 PRESSURE ROLLER THERMISTOR REPLACEMENT 1 Remove the pressure roller stripper unit 2 Remove the pressure roller thermistor B 1 screw 4 6 HOT ROLLER STRIPPER UNIT REPLACEMENT 1 Follow step...

Page 172: ...tor B from the fusing lamp harness C 4 Remove the hot roller thermistor D 1 screw and 1 spring 7 clamps E 4 8 FUSING THERMOFUSE REPLACEMENT 1 Follow step 1 to 3 of the hot roller thermistor replacemen...

Page 173: ...ng the emergency key turn on the main switch Select low mode by the fusing temperature key and turn off and on the main switch 4 Remove the copier rear cover 5 Remove the pressure roller thermistor sc...

Page 174: ...confirm the temperature 12 Reassemble the machine 4 10 FUSING NIP BAND CONFIRMATION Adjustment Standard 27 0 5 mm When the hot and or pressure roller s is replaced confirm the gap instead of measuring...

Page 175: ...lue target 30 and set SP 28 to 1 6 Make three copies of the test chart B from the 1st roll feeder using 841 mm width paper 7 Measure the difference of the length between each copy sample and the 1000...

Page 176: ...ut the T S corona unit B 2 connectors C NOTE 1 Make sure that the T S corona unit is set correctly by pressing it down when reinstalling 2 Remove the connector cover D 1 screw for connecting the 2 con...

Page 177: ...nd the corona wires 3 Do not rub the corona wires with rough material sand paper etc as this will damage the corona wire 4 Do not use any solvent to clean the wire as this will cause uneven charging o...

Page 178: ...right endblock 3 Hook the other side of the separation corona wire on the spring hook F special tool A1639504 A1639505 While pushing the spring G in the direction of the arrow hook the separation coro...

Page 179: ...er cover 2 Remove the left bracket B 2 screws and left lock lever C 1 screw and 1 spring 3 Remove the two screws D and disconnect the two connectors E of the cutter unit 4 Slide out the cutter unit F...

Page 180: ...screws each NOTE When re attaching the covers be careful not to pinch the harnesses with covers 3 Remove the screw C for the grounding wire 4 Remove the copier rear cover 5 Remove the left inner cover...

Page 181: ...rs C right and left 2 screws each which were removed at the installation CAUTION To lift up the image production unit two persons or more must hold the parts indicated by in the illustration The lock...

Page 182: ...ll the machine 7 4 RE INSTALLING ROLL FEED UNIT 1 Pull out the stand rails right E and left F completely 2 While aligning the positioning pins G right and left 2 each with the holes H place the roll f...

Page 183: ...he copy tray D 3 Remove the rear feed table assembly E 2 screws and 1 connector 4 Unhook the blower duct F and remove 5 Unhook the fan support plate G and remove 6 Replace the ozone filter H NOTE When...

Page 184: ...sted by the customer the overall image density can be changed by changing the toner density Normally this should be kept at the normal position factory setting The grid voltage and charge corona curre...

Page 185: ...tics Exposure glass fiber optics array Damp cotton and dry soft cloth 2 Corona wires charge transfer and separation and casing Dry cloth 3 PTL Dry cloth or blower brush 3 Remove the middle right cover...

Page 186: ...se To improve the copy image Perform SP 25 How Change the development bias voltage for image density control by SP 25 SP 25 3 Standard 0 3 8 Darker Lighter 1 Make a copy after adjusting the light inte...

Page 187: ...rn SP 61 to the initial value take memo when the value is changed 9 4 REGISTRATION ADJUSTMENT When Registration is not within the adjustment standard Purpose To maintain proper registration Adjustment...

Page 188: ...SECTION 6 TROUBLESHOOTING...

Page 189: ...e decrease in the special toner supply mode SP 64 Yes No Check the toner supply mechanism The amount of toner used exceeds the toner supply amount Supply toner until the toner sensor voltage reaches t...

Page 190: ...l in the development unit Yes No Check and correct the machine level Clean the charge corona wire grid wire and transfer corona wire Check if they are correctly set on the slots of the end blocks Clea...

Page 191: ...level 0 and 1 Check using SP 63 referring to Page 2 20 No Yes Check the main board and toner supply clutch Is the image density of solid areas high No Yes Check the toner sensor Make several blank co...

Page 192: ...ng items that corresponds to the position of the vertical line or band Charge corona wire Grid wires Light path Exposure lamp fiber optics array exposure glass Cleaning blade Development unit Drum NOT...

Page 193: ...the T S corona wire broken No Yes Replace the broken part Are the charge corona and transfer corona applied Yes No Check the main board charge bias grid power pack and T S power pack Does leakage occu...

Page 194: ...nsport direction if possible NOTE 1 Decrease the fusing temperature at the key operation refer to 2 39 NOTE 2 NOTE 1 If there is rib shape creasing the paper feed direction should be the same as the p...

Page 195: ...E E 1 EXPOSURE LAMP ABNORMAL Definition The light sensor voltage is less than 0 4 volts for 10 seconds Points to check Exposure lamp Light sensor FL regulator CN401 1 2 3 Main board CN102 B10 B11 B12...

Page 196: ...e Main board CN106 A4 A5 and CN102 A20 2 4 SC CODE E 4 HOT ROLLER THERMISTOR SHORT Definition The resistance of the the hot roller thermistor is less than 0 11 K Point to check Hot roller thermistor M...

Page 197: ...heck Pressure roller thermistor Main board CN106 A6 A7 2 7 SC CODE E 7 FUSING OVERHEAT Definition The temperature detected by the hot roller thermistor becomes higher than 220 C Point to check Hot rol...

Page 198: ...mofuse AC drive board CN203 2 T203 Main board CN102 A20 AC harness 2 9 SC CODE E 9 TONER DENSITY SENSOR ABNORMAL Definition The toner density sensor voltage is less than 0 5 volts or more than 4 5 vol...

Page 199: ...drive Main board CN102 A8 A9 2 11 SC CODE E 11 DEVELOPMENT MOTOR ABNORMAL Definition 1 Development motor does not output LOCK signal within 2 seconds after the motor is energized 2 LOCK signal is not...

Page 200: ...utes after the charge corona motor is energized Point to check Charge cleaner motor Mechanical interference of the charge cleaner motor 2 13 SC CODE E 13 TOTAL COUNTER ABNORMAL Definition Total counte...

Page 201: ...ROR Definition The toner density sensor voltage cannot be adjusted to its standard value 4 1 0 1 volts during the new developer initialization NOTE If clearing the SC condition the previous data of SP...

Page 202: ...stment SP 56 Point to check ADS pattern ADS sensor 2 18 SC CODE E 18 ORIGINAL REGISTRATION AUTO ADJUSTMENT FAILURE Definition The original registration sensor voltage cannot be adjusted to its standar...

Page 203: ...250V 6 3A FU304 250V 6 3A USA version Fuse No Specification Symptom FU1 125V 8A No power FU2 125V 6 3A No indication and Beeper sounds if 2 or more fuses are blown FU3 125V 6 3A FU4 125V 6 3A AC Drive...

Page 204: ...ELECTRICAL COMPONENT LAYOUT 23 24 25 1 4 10 8 6 5 2 19 18 16 15 17 14 13 12 11 62 20 21 22 3 9 7 61...

Page 205: ...34 33 32 31 30 29 45 38 37 35 40 44 43 42 41 36 39 26 47 28 27 46 64 66 65...

Page 206: ...58 50 51 52 53 54 55 56 57 49 48 60 59 63...

Reviews: