background image

RECO PLC ISP200-R/G2

Technical Data 

4-3

DOK-CONTRL-MTS-R0*.2G2-PR01-EN-P           

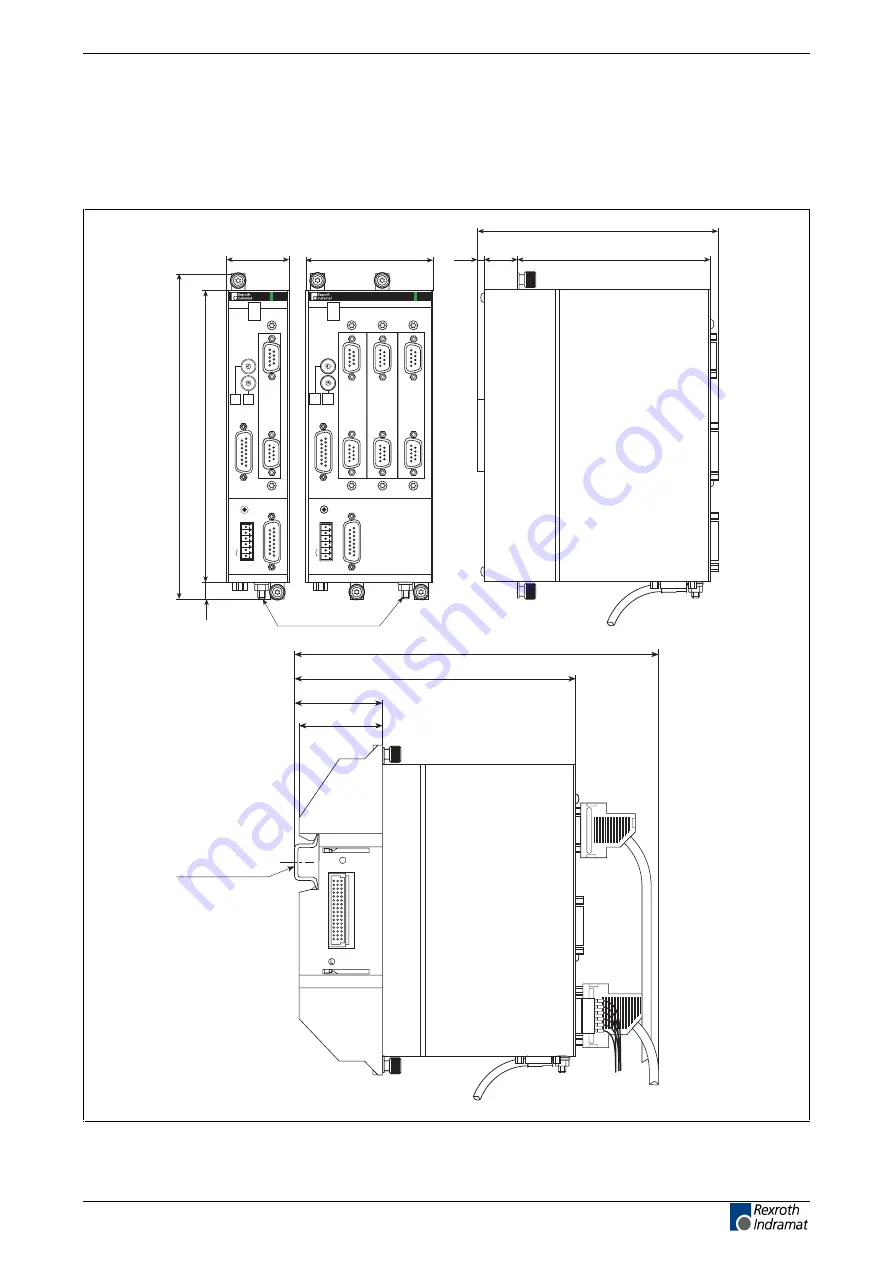
4.7 Dimensions

MTS-R01.2 and MTS-R02.2

IBS-

MASTER

X64

X60

MTS-R_Maß.FH7

0

5

1

6

2

7

3

8

4

9

0

5

1

6

2

7

3

8

4

9

RS 422

X41

X40

RS 232C

X36

X35

IBS-

MASTER

X64

X60

0

5

1

6

2

7

3

8

4

9

0

5

1

6

2

7

3

8

4

9

DEVICE-NO

X16

X10

RESET

H1

PROG

COM

X1

+24V
0V

NC

WD

1

2

3

4

5

6

U1

U2

U3

MTS-R02.2

8

NC

11

192

214

41,5

83,7

4,5

22

128

159

Top hat rail
TS 35 x 17 x 15

56

54,5

182,5

ca. 230

MTS-R01.2

RESET

H1

PROG

U1

X16

COM

1

2

3

4

5

6

X1

+24V
0V

NC

WD

DEVICE-NO

X10

8

RECO

NC

 M5 grounding bolt

RECO

MTS-R_Maß.FH7

Fig. 4-1:

Dimensional drawing of MTS-R01.2 and MTS-R02.2

Summary of Contents for DURADRIVE SYSTEM200

Page 1: ...Project Planning Manual DOK CONTRL MTS R0 2G2 PR01 EN P SYSTEM200 RECO PLC ISP200 R G2 ...

Page 2: ... All rights are reserved in the event of the grant of a patent or the registration of a utility model or design DIN 34 1 The specified data is for product description purposes only and may not be deemed to be guaranteed unless expressly confirmed in the contract All rights are reserved with respect to the content of this documentation and the availability of the product Rexroth Indramat GmbH Bgm D...

Page 3: ...arts 3 4 3 6 Protection Against Electric Shock by Protective Low Voltage PELV 3 5 3 7 Protection Against Dangerous Movements 3 5 3 8 Protection Against Magnetic and Electromagnetic Fields During Operation and Mounting 3 7 3 9 Protection Against Contact with Hot Parts 3 8 3 10 Protection During Handling and Mounting 3 8 3 11 Battery Safety 3 9 3 12 Protection Against Pressurized Systems 3 9 4 Techn...

Page 4: ... 5 6 4 RecoBus in the PLC Memory 6 6 6 5 RecoBus Diagnosis 6 7 Error Detection by the User 6 8 External Voltage Monitoring 6 9 Example of an External Power Failure 6 9 6 6 Status Information and Error Diagnosis 6 10 Indication of Operating States 6 10 Indication of Errors 6 10 6 7 Battery 6 11 6 8 Interface Assignment 6 11 7 RECO PLC MTS R01 2 7 1 7 1 Brief Description 7 1 7 2 Application Example ...

Page 5: ... Description 12 1 12 2 Address and Interrupt Settings 12 2 12 3 Function Blocks 12 2 12 4 Technical Data 12 3 12 5 Interface Assignment 12 3 13 Networking 13 1 13 1 Networking via the PROG and COM Interfaces 13 1 13 2 ISP200 R in Connection with the BTV20 30 13 2 14 Connection of Operator Terminals 14 1 14 1 Applications with the BTV04 05 06 14 1 14 2 Applications with the BTC06 14 3 15 Accessorie...

Page 6: ...IV Contents RECO PLC ISP200 R G2 DOK CONTRL MTS R0 2G2 PR01 EN P ...

Page 7: ...2 7 3 8 4 9 0 5 1 6 2 7 3 8 4 9 MTS R01 2 RESET H1 PROG U1 X16 COM 1 2 3 4 5 6 X1 24V 0V NC WD DEVICE NO X10 RECO 8 NC MTS R_Kurz FH7 RS 422 X41 X40 RS 232C X36 X35 IBS MASTER X64 X60 0 5 1 6 2 7 3 8 4 9 0 5 1 6 2 7 3 8 4 9 DEVICE NO X16 X10 RESET H1 PROG COM X1 24V 0V NC WD 1 2 3 4 5 6 U1 U2 U3 MTS R02 2 8 NC RECO MTS R_Kurz FH7 Fig 1 1 MTS R01 2 and MTS R02 2 ...

Page 8: ...ating modes RS232 RS422 RS485 see chapter 5 2 In addition the ISP200 R is provided with a BT BedienTerminal operator terminal bus which can be used to operate up to 4 operator terminals BTM15 BTM16 BTA20 etc This can be achieved using cable lengths of up to 50 m between the INTERBUS connection and the last user The ISP200 R is mounted by means of a module carrier system consisting of one RMB02 2 0...

Page 9: ...ch cases the guarantee and the right to payment of damages resulting from inappropriate use are forfeited The user alone carries all responsibility of the risks Before using Rexroth products make sure that all the pre requisites for appropriate use of the products are satisfied Personnel that in any way shape or form uses our products must first read and understand the relevant safety instructions...

Page 10: ...ed for use in electric control cabinets Typical areas of application of the MTS R01 2 and the MTS R02 2 are as follows Handling and mounting systems Packaging and food machines Printing and paper processing machines Machine tools The ISP200 R may only be operated under the assembly installation and ambient conditions as described here temperature system of protection humidity EMC requirements etc ...

Page 11: ...the person or persons responsible for the safe operation of this equipment If the equipment is resold rented or transferred or passed on to others then these safety instructions must be delivered with the equipment WARNING Improper use of this equipment failure to follow the safety instructions in this document or tampering with the product including disabling of safety devices may result in mater...

Page 12: ...ents WARNING High electrical voltage due to wrong connections Danger to life or bodily harm by electric shock WARNING Health hazard for persons with heart pacemakers metal implants and hearing aids in proximity to electrical equipment CAUTION Surface of machine housing could be extremely hot Danger of injury Danger of burns CAUTION Risk of injury due to improper handling Bodily harm caused by crus...

Page 13: ...ety regulations and requirements for the specific application as practiced in the country of use The equipment is designed for installation in industrial machinery The ambient conditions given in the product documentation must be observed Use only safety features and applications that are clearly and explicitly approved in the Project Planning Manual For example the following areas of use are not ...

Page 14: ...ions Before switching on power the ground wire must be permanently connected to all electrical units according to the connection diagram Do not operate electrical equipment at any time even for brief measurements or tests if the ground wire is not permanently connected to the points of the components provided for this purpose Before working with electrical parts with voltage higher than 50 V the e...

Page 15: ... to electric shock 3 6 Protection Against Electric Shock by Protective Low Voltage PELV All connections and terminals with voltages between 0 and 50 Volts on Rexroth products are protective low voltages designed in accordance with international standards on electrical safety WARNING High electrical voltage due to wrong connections Danger to life bodily harm by electric shock Only connect equipment...

Page 16: ...Keep free and clear of the machine s range of motion and moving parts Possible measures to prevent people from accidentally entering the machine s range of motion use safety fences use safety guards use protective coverings install light curtains or light barriers Fences and coverings must be strong enough to resist maximum possible momentum especially if there is a possibility of loose parts flyi...

Page 17: ...arrying conductors and permanent magnets in motors represent a serious health hazard to persons with heart pacemakers metal implants and hearing aids WARNING Health hazard for persons with heart pacemakers metal implants and hearing aids in proximity to electrical equipment Persons with heart pacemakers hearing aids and metal implants are not permitted to enter the following areas Areas in which e...

Page 18: ... Mounting Under certain conditions incorrect handling and mounting of parts and components may cause injuries CAUTION Risk of injury by incorrect handling Bodily harm caused by crushing shearing cutting and mechanical shock Observe general installation and safety instructions with regard to handling and mounting Use appropriate mounting and transport equipment Take precautions to avoid pinching an...

Page 19: ...lers corresponding to the information in the respective Project Planning Manual must be provided with pressurized media such as compressed air hydraulic oil cooling fluid and cooling lubricant supplied by external systems Incorrect handling of the supply and connections of pressurized systems can lead to injuries or accidents In these cases improper handling of external supply systems supply lines...

Page 20: ...3 10 Safety Instructions for Electric Drives and Controls RECO PLC ISP200 R G2 DOK CONTRL MTS R0 2G2 PR01 EN P Notes ...

Page 21: ...e avoided Operation 86 106 kPa Air pressure Storage temperature 70 106 kPa 4 2 Supply Voltage Nominal value 24 VDC Tolerance 15 20 according to EN 61131 2 1994 Ripple percentage 5 max Permissible voltage range 19 2 30 VDC including ripple content Max current consumption for 24 VDC MTS R01 MTS R02 0 5 A 0 7 A supply voltage for I O bus is up to max 2 3 A Required fuse in the supply cable Max 4 A ti...

Page 22: ...erion B 4 6 Interfaces Programming interface PROG RS232 RS422 RS485 D SUB 15 pins female connector General serial interface COM RS232 RS422 RS485 D SUB 15 pins female connector BT bus Rexroth BT bus D SUB 9 pins female connector Optional interfaces INTERBUS D SUB 9 pins female connector PROFIBUS DP D SUB 9 pins female connector DeviceNet COMBICON 5 pins male connector 2 x RS232 and 2 x RS422 485 D...

Page 23: ...35 IBS MASTER X64 X60 0 5 1 6 2 7 3 8 4 9 0 5 1 6 2 7 3 8 4 9 DEVICE NO X16 X10 RESET H1 PROG COM X1 24V 0V NC WD 1 2 3 4 5 6 U1 U2 U3 MTS R02 2 8 NC 11 192 214 41 5 83 7 4 5 22 128 159 Top hat rail TS 35 x 17 x 15 56 54 5 182 5 ca 230 MTS R01 2 RESET H1 PROG U1 X16 COM 1 2 3 4 5 6 X1 24V 0V NC WD DEVICE NO X10 8 RECO NC M5 grounding bolt RECO MTS R_Maß FH7 Fig 4 1 Dimensional drawing of MTS R01 2...

Page 24: ...217 120 47 77 Top hat rail TS35 x27 x15 54 5 56 7 2 RMB02 2 2_Maß FH7 Locking screw for locking the chassis on the top hat rail RMB02 2_Maß FH7 Fig 4 2 RMB02 2 02 module carrier RMB02 2 2 02 2 4_Maß FH7 98 42 217 120 47 2 182 98 121 42 61 121 189 RMB02 2 02 02 2 04_Maß FH7 Fig 4 3 Connection of one RMB02 2 02 and several RMB02 2 04 module carriers ...

Page 25: ... FH7 S1 182 42 121 217 120 47 77 Top hat rail TS 35 x 27 x15 54 5 56 2 7 9 12 4 5 2 25 Locking screw for locking the chassis on the top hat rail RMB02 2 04_Maß FH7 Fig 4 4 RMB02 2 04 module carrier 42 182 121 182 47 120 217 182 RMB02 2 04 02 04_Maß FH7 S1 S1 RMB02 2 04 02 04_Maß FH7 Fig 4 5 Connection of several RMB02 2 04 module carriers ...

Page 26: ...4 6 Technical Data RECO PLC ISP200 R G2 DOK CONTRL MTS R0 2G2 PR01 EN P ...

Page 27: ... be easily disassembled by removing the 4 screws on the rear and the lateral wall of the housing as well as the 2 threaded bolts of the BT bus As a standard the PROG interface is delivered as an RS232 interface with a baud rate of 19 2 kbaud Other settings are shown in Fig 5 2 Default setting OFF 1 2 3 4 5 6 7 8 O P E N OFF ON MTS R_Adress FH7 Remove screws to open housing Fig 5 1 DIP switch for p...

Page 28: ...P 5 3 BT Bus The BT bus can be used to connect up to four operator terminals of type BTM15 16 or BTA20 The total maximum length of the BT bus may be up to 50 m This applies both to the connection of only one device and to the connection of the permissible maximum number of 4 devices It is not possible to quickly access the I O data of the operator terminals from the PLC e g IBP The address assignm...

Page 29: ... 2 bytes for digital I Os always assigned 2 additional bytes for each module except handwheel 4 additional bytes for handwheel module BTM16 14 bytes BTA20 6 bytes Fig 5 4 Storage requirements of operating devices Depending on the physical order of the operating devices connected to the BT bus the addresses of the devices are assigned in the input and output core image storage without any gaps acco...

Page 30: ...5 4 Communication RECO PLC ISP200 R G2 DOK CONTRL MTS R0 2G2 PR01 EN P ...

Page 31: ...nly once S1 S1 S1 S1 RMB02 2_Adress FH7 Slot Setting for basic carrier no 1 Setting for basic carrier no 2 Setting for basic carrier no 4 Setting for basic carrier no 3 S1 S1 S1 S1 00 01 02 03 04 05 06 07 08 09 10 11 12 13 14 15 Slot 00 Slot 01 Slot 02 Slot 03 Slot 04 Slot 05 Slot 06 slot 07 I Q 0 7 I Q 8 15 I Q 16 23 I Q 24 31 Basic carrier 1 Basic carrier 2 3 2 1 0 Slot 08 Slot 09 Slot 10 Slot 1...

Page 32: ...ontrols like the MTC R or the PPC R For the connection an additional backplane is required Thus there s the danger to cause a short circuit between the backplane and the fixing screw One RMB02 2 02 and or up to four RMB02 2 04 module carriers can be connected in series during assembly If the RMB02 2 02 module carrier is used it must always be mounted to the left of an RMB02 2 04 module carrier For...

Page 33: ...right of the ISP200 R When doing this gaps may be left so that additional modules may be fitted at a later point Contrary to the RMB02 2 04 module carrier the modules must always be aligned to the right if the RMB02 2 02 is used Here the following combinations can be made Slot 1 Slot 2 MTS R01 2 MTC R01 1 Gateway MTS R01 2 Empty MTS R01 2 MTS R02 2 Fig 6 4 Fitting variants for RMB02 2 02 Note Befo...

Page 34: ...ounding bolt of the control to the central grounding point of the machine Wiring to further users of the machine must be established as star wiring see Fig 6 5 MTS R_Erdung FH7 MTS R MTC R I O I O MTS R I O I O I O Drive Drive Drive Central machine grounding point Operator terminal Visualization Connect devices to the grounding bolt Fig 6 5 System grounding in connection with the ISP200 R ...

Page 35: ...nce the power supply unit of the ISP200 R is a switching power supply with startup currents of up to 20 A being possible we warn against connecting a further ISP200 R to the same supply voltage during running operation Owing to the high startup current this might result in the supply voltage breaking down and thus in the POWER FAIL signal being triggered 1 2 3 5 6 0V PLC READY For DosPCL only if s...

Page 36: ...wing modules by the data width of the plugged in module 31 30 29 28 27 26 25 24 23 22 21 20 19 18 17 16 15 14 13 12 11 10 9 8 7 6 5 4 3 2 1 0 Error Module status Slot address Error No Diagnostic double word I_VALID Bit Memory assignment in the input area Memory assignment in the output area 0 Byte 0 X1 X2 X3 X4 RMA02 2 32 DC024 050 X1 RME02 2 16 DC024 X2 RME02 2 32 DC024 X1 X2 X3 X4 X41 X40 X36 X3...

Page 37: ...nformation Status and error information diagnosed by the module Status and error information diagnosed by the user Reco bus processor Such as error number and slot address or slot number Structure of the diagnosis double word ID 0 0 31 Byte access Word access Double word access IW 0 IW 2 0 0 15 15 IB 3 IB 2 IB 1 IB 0 0 0 0 0 7 7 7 7 Fig 6 8 Division of diagnosis double word status information Bit ...

Page 38: ...10 Error detection Value Bit no Explanation 40 00 00 00 h 30 The I O user signals an error The slot number and an error number is delivered in the low word 20 00 xx xx h 29 The I O user detected a defective module i e the module is not fitted in the slot any longer or it is defective This results in the output information of all of the output modules being set to 0 21 00 xx xx h 24 29 The programm...

Page 39: ... an error message 16 15 14 13 12 11 10 9 8 7 6 5 4 3 2 1 0 Slot Bit x corresponds to slot x 1 24V at missing at slot x RMK_Sgs Überw FH7 Ext voltage monitoring Fig 6 12 Voltage monitoring Value Bit no Explanation 80 01 xx xx h 16 0 the 24 V voltage applied to the output modules is OK If the 24 V voltage fails this bit and the corresponding bit in the low word for the slot concerned are set to 1 Fi...

Page 40: ...r service must be notified immediately Indication of Errors Error states are indicated by three digit error codes on the successively flashing seven segment display The error codes represented correspond to the system error messages of the user interface BOF GBO Code Description 007 Software version error 008 Self test unsuccessful 052 PLC program not valid 055 Max cycle time of the PLC exceeded 0...

Page 41: ...itions the battery life is 7 to 10 years Permanent charging of the battery does not affect its life continuous control operation 6 8 Interface Assignment The assignments of the COM and PROG interfaces are shown in Fig 6 17 The BT bus is shown in Fig 6 18 PIN Signal name PIN Signal name 1 NC 2 Transmit Data RS232 3 Receive Data RS232 4 RS485 or RxD RS422 5 RS485 or RxD RS422 6 NC 7 GND 8 NC 9 TxD R...

Page 42: ...6 12 Startup RECO PLC ISP200 R G2 DOK CONTRL MTS R0 2G2 PR01 EN P ...

Page 43: ...fit components on open field bus interfaces such as INTERBUS PROFIBUS DP or DeviceNet IBS MASTER X64 X60 Diagnosis connector For Service only Default setting H1 Status indicator U1 Optional slot e g INTERBUS module X10 Programming interface PROG RS232 RS422 RS485 X16 Serial interface COM RS232 RS422 RS485 X1 Voltage supply and Watchdog SPC Ready System no 0 15d e g 07 0 7 0 5 1 6 2 7 3 8 4 9 0 5 1...

Page 44: ... 4 I 2 5 I 2 6 I 2 7 I 1 0 I 1 1 I 1 2 I 1 3 I 1 4 I 1 5 I 1 6 I 1 7 I 0 0 I 0 1 I 0 2 I 0 3 I 0 4 I 0 5 I 0 6 I 0 7 RME02 2 32 DC024 X1 X2 X3 X4 1 2 3 4 5 6 7 8 9 0VL 1 2 3 4 5 6 7 8 9 0VL 0VL 1 2 3 4 5 6 7 8 9 1 2 3 4 5 6 7 8 9 I 3 0 0VL I 3 1 I 3 2 I 3 3 I 3 4 I 3 5 I 3 6 I 3 7 I 2 0 I 2 1 I 2 2 I 2 3 I 2 4 I 2 5 I 2 6 I 2 7 I 1 0 I 1 1 I 1 2 I 1 3 I 1 4 I 1 5 I 1 6 I 1 7 I 0 0 I 0 1 I 0 2 I 0 ...

Page 45: ...RECO PLC ISP200 R G2 RECO PLC MTS R01 2 7 3 DOK CONTRL MTS R0 2G2 PR01 EN P 7 3 Type Code Fig 7 3 MTS R01 2 type code ...

Page 46: ...7 4 RECO PLC MTS R01 2 RECO PLC ISP200 R G2 DOK CONTRL MTS R0 2G2 PR01 EN P ...

Page 47: ...eld bus interfaces such as INTERBUS PROFIBUS DP and DeviceNet or on additional serial interfaces Diagnosis connector For Service only H1 Status indicator U1 U3 Optional slots X10 Programming interface PROG RS232 RS422 RS485 X16 Serial interface COM RS232 RS422 RS485 X1 Voltage supply and Watch Dog SPC Ready System no 0 15d e g 07 MTS R02_Kurz FH7 0 5 1 6 2 7 3 8 4 9 0 5 1 6 2 7 3 8 4 9 DEVICE NO X...

Page 48: ...6 I 3 7 I 2 0 I 2 1 I 2 2 I 2 3 I 2 4 I 2 5 I 2 6 I 2 7 I 1 0 I 1 1 I 1 2 I 1 3 I 1 4 I 1 5 I 1 6 I 1 7 I 0 0 I 0 1 I 0 2 I 0 3 I 0 4 I 0 5 I 0 6 I 0 7 6 SYSTEM200 BTV05 BTV05 RS232 IKB0005 or IKB0012 max 15 m RS422 IKB0015 max 400 m X10 Notebook PC 6 SYSTEM200 BTV05 BTV05 6 SYSTEM200 BTV05 BTV05 RS422 IKB0016 max 400 m X40 X41 RS422 IKB0016 max 400 m X16 ISP200 R X1 RMA12 1 16 DC024 200 1 2 3 4 5...

Page 49: ...RECO PLC ISP200 R G2 RECO PLC MTS R02 2 8 3 DOK CONTRL MTS R0 2G2 PR01 EN P 8 3 Type Code Fig 8 3 MTS R02 2 type code ...

Page 50: ...8 4 RECO PLC MTS R02 2 RECO PLC ISP200 R G2 DOK CONTRL MTS R0 2G2 PR01 EN P ...

Page 51: ...oses interface RS232 C INTERBUS module B1 INTERBUS RS 232 IBS MASTER X64 X60 S1 Fig 9 1 P C B LK IBM 2 The printed circuit board IBM 2 is an INTERBUS master connection of the 4 th generation in PC104 format It can be used for the connection of sim ple sensors and actuators as well as of intelligent field devices via the INTERBUS The INTERBUS permits bridging of distances of up to 12 8 km from the ...

Page 52: ...of the WinPCL programming interface see DOK CONTRL WINPCL 4VRS AW For the configuration the interface cable IKB0030 is required 9 2 Setting of the I O Address The setting of the DIP switch S1 must be as follows default setting so that the P C B IBM 2 can be addressed via the PC 104 bus 1 2 3 4 5 6 7 8 Address OFF OFF ON OFF OFF ON OFF OFF 120h Fig 9 2 Setting of DIP switch S1 9 3 Technical Data Su...

Page 53: ...l name 1 NC 2 TxD Transmit Data 3 RxD Receive Data 4 NC 5 SGND Ground 6 NC 7 RTS Ready To Send 8 CTS Clear To Send 9 NC Fig 9 4 Pin assignment of the INTERBUS diagnosis interface X64 RS232 C Pin Signal name Pin Signal name 1 DO 2 DI 3 COM 4 GND 5 5V 6 DO 7 DI 8 Vcc 9 RBST Fig 9 5 Pin assignment of the INTERBUS interface X60 remote bus ...

Page 54: ...9 4 INTERBUS Master Connection RECO PLC ISP200 R G2 DOK CONTRL MTS R0 2G2 PR01 EN P ...

Page 55: ... interface slave X79 PROFIBUS diagnosis interface RS232 C planning interface 1 6 1 6 DP MASTER X74 X70 RDY STA RUN ERR DP SLAVE X79 X75 RDY STA RUN ERR 1 6 1 6 Fig 10 1 PROFIBUS connections The P C B s DPM01 master and DPS01 slave are intelligent PROFIBUS DP connections in PC104 format They are used to process the protocols of the data transfer between the PLC and the decentralized PROFIBUS input ...

Page 56: ...ansfer rate of 1 5 Mbaud the link lengths are reduced to max 200 m with a rate of 12 Mbaud to max 100 m The master LK DPM01 can be connected with maximum 244 bytes inputs and maximum 244 bytes outputs The sum of inputs and outputs of all slaves must not exceed 512 bytes The slave LK DPS01 has to be configured in a manner that the sum of the inputs or outputs of the single modules is maximum 244 by...

Page 57: ...es cyclically Bootstrap loader active Flashes irregularly Hardware or system error Off Hardware defective RUN Green LED RUN communication On Communication runs Flashes cyclically Ready for communication Flashes irregularly Wrong configuration Off No communication ERR Red LED Error On Error of the communication interface Off Communication interface OK STA Yellow LED Status On Data exchange with sla...

Page 58: ...ceive Data 3 TxD Transmit Data 4 DTR Data Terminal Ready 5 GND Operating ground 6 NC 7 RTS Ready To Send 8 CTS Clear To Send 9 NC Fig 10 3 Pin assignment of the diagnosis interface RS232C X74 X79 PIN Signal name PIN Signal name 1 RGND Reference ground 2 NC 3 RxD TxD P Send receive 4 NC 5 DGND Reference potential 6 VP Supply voltage plus 7 NC 8 RxD TxD N Send receive 9 NC Fig 10 4 Pin assignment of...

Page 59: ...e I O address CE000 Diagnostic display A 19 A 18 A 17 A 16 A 15 A 14 A 13 LK DNM3_Anschl EPS Fig 11 1 LK DNM03 The printed circuit board DNM03 is an intelligent DeviceNet master connection in PC104 format As master it provides for data exchange at the DeviceNet network between the bus devices and an internal process image and thus does not affect the PLC The process image is stored in the dual por...

Page 60: ... m for 500 kbaud The configuration and commissioning of the LK DNM03 occurs by the system configurator SyConDN description see DOK CONTRL SYCON DN It communicates via a serial connection between the COM port of the PC and the diagnostic interface X84 of the LK DNM03 The configuration is stored on the LK DNM03 and is thus immediately available when it is started The technical data of the LK DNM03 a...

Page 61: ...ation ON Communication runs Flashes cyclically Communication stopped Flashes irregularly Missing or wrong configuration OFF No communication NET ON green Communication at the bus established Flashes green No communication at the bus ON red Critical connection error Flashes red Time monitoring error OFF No operating voltage not at the bus MOD ON green Device works Flashes green Ready for operation ...

Page 62: ...NC 2 RxD Receive Data 3 TxD Transmit Data 4 DTR Data Terminal Ready 5 GND Ground 6 NC 7 RTS Ready To Send 8 CTS Clear To Send 9 NC Fig 11 4 Pin assignment of the DeviceNet diagnostic interface X84 Pin Signal name Signal color 1 Ground Black 2 CAN_LOW Blue 3 Shield 4 CAN_HIGH White 5 24 V Red Fig 11 5 Pin assignment of the DeviceNet interface X80 ...

Page 63: ...ceive data of each interface are made available in buffers of 256 bytes length each Using these buffers the PLC user program indirectly communicates with the interfaces via available function blocks RS232 C module X35 RS232 C interface DEVICE 0 SERNR 1 X40 RS422 RS485 interface DEVICE 0 SERNR 3 RS422 module X36 RS232 C interface DEVICE 0 SERNR 2 X41 RS422 RS485 interface DEVICE 0 SERNR 4 6 1 6 1 6...

Page 64: ...ng and opening a serial interface CLOSE_COM Closing a serial interface RD_BYTE Reading a byte from the serial interface WR_BYTE Writing a byte to the serial interface RD_STR Reading a string from the serial interface WR_STR Writing a string to the serial interface CTRL_COM Finding out the status of the serial interface CLR_COM Finding out the transmitter and receiver buffer of the serial interface...

Page 65: ... of the serial interfaces are as follows PIN Signal name PIN Signal name 1 DCD Data Carrier Detect 2 RxD Receive Data 3 TxD Transmit Data 4 DTR Data Terminal Ready 5 SGND Ground 6 DSR Data Set Ready 7 RTS Ready To Send 8 CTS Clear To Send 9 RI Ring Indicator Fig 12 4 Pin assignment of RS 232C X35 X36 PIN Signal name PIN Signal name 1 GND Frame Ground 2 NC 3 TxD A Transmit Data 4 RxD A Receive Data...

Page 66: ...12 4 Serial Interfaces RECO PLC ISP200 R G2 DOK CONTRL MTS R0 2G2 PR01 EN P ...

Page 67: ...The RS422 connection can be established by means of the Rexroth ca bles IKB0015 and IKB0016 see Fig 15 1 or the connector INS0945 Fig 13 2 In RS422 and RS485 operation the distance between the first and the last user can be max 400 m If several controls are networked via an RS485 interface it must be en sured that each first and last physical user must be terminated in the bus This is achieved by ...

Page 68: ... bus system see Fig 13 3 CNC I O PLC I O DP Master DP Slave MTS R_Vernetz FH7 I O PLC I O I O I O I O DP Master I O I O PLC I O CNC MTC 200R ISP 200R MTC 200R ISP 200R PROFIBUS Slave I Os RS485 RS485 RS485 RS485 PROFIBUS PROFIBUS PROFIBUS PROFIBUS PROFIBUS PROFIBUS PLC DP Master DP Slave DP Master DP Slave PROFIBUS System 00 System 01 System 02 System 15 PROFIBUS Slave I Os PROFIBUS Slave I Os PRO...

Page 69: ...2 3 4 1 OR X40 41 5 1 4 2 3 INS0645 Termination on 7 4 11 5 9 INS0645 Termination on 7 9 5 11 4 5 3 2 4 1 COM1 5 1 4 2 3 7 4 11 5 9 X16 SGND SGND X1 X1 COM1 INS0645 Termination on central machine ground central machine ground COM1 X16 BTV06 BTV05 MTS R SYSTEM200 BTV06 MAIN MENU HELP L1 R1 ESC OK 1 3 2 0 7 ABC 9 GHI 8 DEF 4 JKL STU DEL NEXT 6 PQR 5 MNO F1 F2 F3 F4 F5 F6 F7 F8 VW XYZ RS422 IKB0016 R...

Page 70: ...85 IKB0018 SYSTEM200 BTV06 MAIN MENU HELP L1 R1 ESC OK 1 3 2 0 7 ABC 9 GHI 8 DEF 4 JKL STU DEL NEXT 6 PQR 5 MNO F1 F2 F3 F4 F5 F6 F7 F8 VW XYZ X1 INS0619 Termination on X16 X1 central machine ground INS0619 Termination on X1 X40 41 5 9 4 3 6 TxD TxD RxD RxD SGND OR INS0619 Termination on RS485 operation either at X16 and or at X40 41 min 6mm min 6mm MTS R_RS485 FH7 RS 422 X41 X40 RS232C X36 X35 IB...

Page 71: ...70 60 50 40 30 BTA20 3 X8 BTC06 RS422 IKS 190 MACHINE CONTROL E STOP 0 1 2 4 6 8 10 20 120 100 80 70 60 50 40 30 F X9 Additional BTA10 20 units RS422 IKB0015 MTS R X8 RS232 IKB193 5 2 7 3 4 RxD SGND TxD DTR RTS 5 3 7 2 4 RxD RTS DTR X35 36 TxD SGND BTA20 MTS R_BTC232 FH7 RS 422 X41 X40 RS232C X36 X35 IB S MASTER X64 X60 0 5 1 6 2 7 3 8 4 9 0 5 1 6 2 7 3 8 4 9 DEVICE NO X16 X10 RESET H1 PROG COM X1...

Page 72: ...ICE NO X16 X10 RESET H1 PROG COM X1 24V 0V NC WD 1 2 3 4 5 6 U1 U2 U3 MTS R02 2 NC RECO MTS R RS422 IKB0015 X40 X41 BTC06 BTA20 Module NA VA RS422 IKS 190 14 13 10 2 1 12 11 RxD SGND RxD TxD TxD 24V 0V SGND 2 1 14 13 10 12 11 TxD TxD RxD RxD 24V 0V X1 24 VDC 0VL 2 3 4 1 X1 24 VDC 0VL 2 3 4 1 0VL 24 VDC central machine ground min 6mm min 6mm MTS R RS422 IKB0016 RxD SGND RxD TxD TxD TxD TxD RxD RxD ...

Page 73: ...connector 9 pin female connector IKB0012 000 0 MN 281 715 RS232 max 15 m INS439 INS588 INK572 9 pin female connector 15 pin male connector IKS0106 000 0 MN 260 838 RS232 max 15 m INS588 INK572 INS526 9 pin female connector 9 pin female connector IKS0190 MN 279 743 3 m MN 279 743 5 m MN 279 744 10 m MN 279 745 15 m RS422 max 15 m INS0624 C INS0631 C IKB0193 MN 282041 RS232 max 15 m INS0525 L01 INS0...

Page 74: ...or 15 pin male connector IKB0019 000 0 MN 282 875 RS485 max 400 m INK572 INS619 Connector sleeves 15 pin male connector IKB0030 000 0 MN 291 736 Configuration INTERBUS max 15 m 1 9 INS0702 L01 IKB0030 IKB0030 1 9 INS0702 L01 INK0572 9 pin female connector 9 pin female connector IKB0031 000 0 MN 291 805 INTERBUS max 400 m IKB0031 000 5 MN 291 806 INTERBUS 0 5 m INS0703 L01 INS0702 L01 1 9 1 9 IKB00...

Page 75: ...MN 255 968 INTERBUS max 400 m INK234 INS525 INS526 9 pin female connector 9 pin male connector INS0619 K01 MN 279 583 INS0619 RS485 15 pin male connector Y connector for self finishing with termination INS0645 K01 MN 282 040 INS0645 RS422 Connector for self finishing with termination INS0540 K01 MN 279 538 INS0540 Profibus male PROFIBUS connector for self finishing with termination INS0541 K01 MN ...

Page 76: ...ils are labeled by means of the enclosed labeling program which is designed on Word basis and permits labeling of 1 to 6 modules per labeling foil When doing this the user can select whether the module concerned is a 16 bis a 32 bit an input or an output module and whether the label is to be adhered onto the left or onto the right side of the module To ensure correct operation of the labeling prog...

Page 77: ...B02 2 02 and RMB02 2 04 carriers fitted 6 3 Fig 6 4 Fitting variants for RMB02 2 02 6 3 Fig 6 5 System grounding in connection with the ISP200 R 6 4 Fig 6 6 Connection of the supply connector X1 6 5 Fig 6 7 RecoBus I O modules in the memory of the PLC 6 6 Fig 6 8 Division of diagnosis double word status information 6 7 Fig 6 9 Explanation of status bit 31 6 7 Fig 6 10 Error detection 6 8 Fig 6 11 ...

Page 78: ...the DeviceNet diagnostic interface X84 11 4 Fig 11 5 Pin assignment of the DeviceNet interface X80 11 4 Fig 12 1 P C B SIO 04 B 12 1 Fig 12 2 Jumper settings on the P C B SIO 04 B 12 2 Fig 12 3 Function blocks for interface handling 12 2 Fig 12 4 Pin assignment of RS 232C X35 X36 12 3 Fig 12 5 Pin assignment of RS422 485 X40 X41 12 3 Fig 13 1 RS485 connection with INS0619 connector 13 1 Fig 13 2 R...

Page 79: ...gen mit Kundendienst Außerhalb Deutschlands nehmen Sie bitte zuerst Kontakt mit unserem für Sie nächstgelegenen Ansprechpartner auf Die Angaben in der vorliegenden Dokumentation können seit Drucklegung überholt sein At www boschrexroth de you may find additional notes about service repairs and training in the Internet as well as the actual addresses of our sales and service facilities figuring on ...

Page 80: ...0 89 127 14 0 Fax 49 0 89 127 14 490 Vertriebsgebiet West Germany West Bosch Rexroth AG Regionalzentrum West Borsigstrasse 15 40880 Ratingen Tel 49 0 2102 409 0 Fax 49 0 2102 409 406 Gebiet Südwest Germany South West Bosch Rexroth AG Service Regionalzentrum Süd West Siemensstr 1 70736 Fellbach Tel 49 0 711 51046 0 Fax 49 0 711 51046 248 Gebiet Südwest Germany South West Bosch Rexroth AG Regionalze...

Page 81: ...exroth S p A Via Paolo Veronesi 250 10148 Torino Tel 39 011 224 88 11 Fax 39 011 224 88 30 Italy Italien Bosch Rexroth S p A Via del Progresso 16 Zona Ind 35020 Padova Tel 39 049 8 70 13 70 Fax 39 049 8 70 13 77 Italy Italien Bosch Rexroth S p A Via Mascia 1 80053 Castellamare di Stabia NA Tel 39 081 8 71 57 00 Fax 39 081 8 71 68 85 Italy Italien Bosch Rexroth S p A Viale Oriani 38 A 40137 Bologna...

Page 82: ...87 35 service 48 22 738 18 42 Poland Polen Bosch Rexroth Sp zo o Biuro Poznan ul Dabrowskiego 81 85 60 529 Poznan Tel 48 061 847 64 62 63 Fax 48 061 847 64 02 Rumania Rumänien Bosch Rexroth Sp zo o Str Drobety nr 4 10 app 14 70258 Bucuresti Sector 2 Tel 40 0 1 210 48 25 40 0 1 210 29 50 Fax 40 0 1 210 29 52 Russia Russland Bosch Rexroth OOO Wjatskaja ul 27 15 127015 Moskau Tel 7 095 785 74 78 7 09...

Page 83: ...exroth India Ltd Rexroth Indramat Division Plot 96 Phase III Peenya Industrial Area Bangalore 560058 Tel 91 80 41 70 211 Fax 91 80 83 94 345 mohanvelu t boschrexroth co in India Indien Bosch Rexroth India Ltd 1st Floor S 10 Green Park ext Market New Delhi 110016 Tel 91 1 16 56 68 88 Fax 91 1 16 56 68 87 Indonesia Indonesien PT Rexroth Wijayakusuma Building 202 Cilandak Commercial Estate Jl Cilanda...

Page 84: ...5 11 Fax 1 905 335 41 84 michael moro boschrexroth ca Canada West Kanada West Bosch Rexroth Canada Corporation 5345 Goring St Burnaby British Columbia Canada V7J 1R1 Tel 1 604 205 5777 Fax 1 604 205 6944 david gunby boschrexroth ca Mexico Bosch Rexroth Mexico S A de C V Calle Neptuno 72 Unidad Ind Vallejo 07700 Mexico D F Tel 52 5 754 17 11 52 5 754 36 84 52 5 754 12 60 Fax 52 5 754 50 73 52 5 752...

Page 85: ......

Page 86: ...Printed in Germany 2 9 4 6 9 1 ...

Reviews: