CUSTOMER SERVICE: 800-973-8374
15
Headboard Bracket Installation (Optional)
STEP 11
Power Base Assembly Instructions
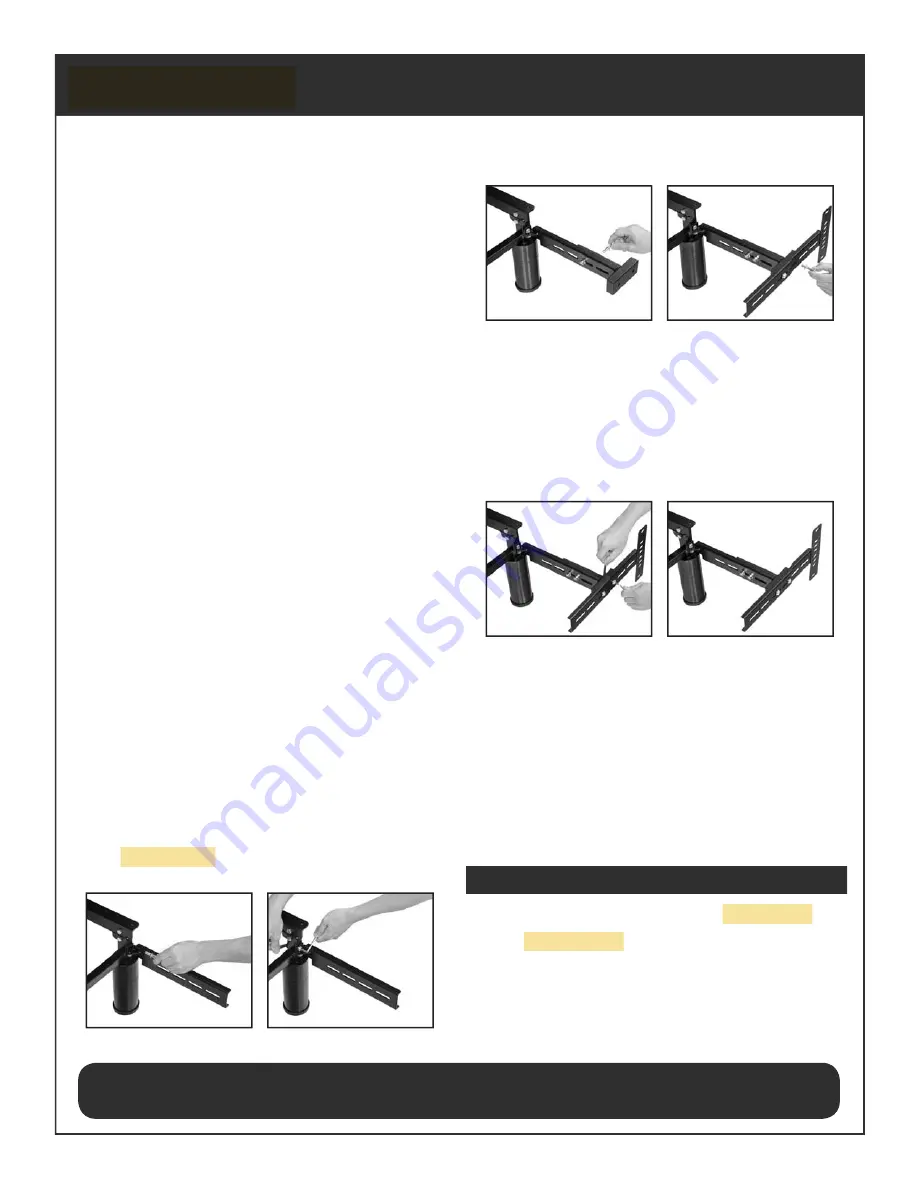
5. Ensure the headboard bracket is assembled a
distance of 1.5 (38.1 mm) to 2 inches (50.8 mm)
between the edge of the bed base and the
headboard bracket assemblies.
6. Firmly tighten the headboard bolts (not included)
to the end of the headboard bracket assembly.
Place your mattress on top of your Power Base.
Typical
Power Base
installation is now complete.
If the bed is equipped with a programmable setting
or options, refer to the Remote Control Guide for
more information.
7. Measure the distance of the center to center
mounting holes in the headboard.
8. Measure the distance of the center to center
mounting holes in the headboard bracket assemblies.
9. If the headboard brackets require adjustments,
loosen the bolts that are holding the outer headboard
brackets and move them to the necessary distance.
Reinstall the bolts and firmly tighten.
Install the headboard brackets to the bed base
frame. Place one bracket on the left-hand side
of the base and one bracket on the right-hand
side of the base.
1. Use the hand control to raise the head of the
bed in order to gain access to the bed power
base.
2. Bolt the Leg Clamp Bracket (A) to the leg
using the headboard bracket bolts (D), and
the 5/16” lock nut (G).
3. Bolt the inner Headboard Bracket (B) to the
Leg Clamp Bracket (A) using the Headboard
Bracket Bolts (E), the 5/16” washer (F), and
the 5/16” lock nut (G).
4. Place the open side of the outer headboard
bracket (C) onto the exposed square tube of
the inner head board bracket (B). This will
create a tight fit between (B) and (C).
Place a Headboard Bracket Bolt (E) with a
5/16 Inch Washer (F) through the Outer
Headboard Bracket (C) and into the Inner
Headboard Bracket (B). Use a 5/16 Inch
Washer (F) and 5/16 Inch Locking Nut (G)
and hand tighten to allow for adjustment.
Repeat same procedure for opposing side of
the power base.


