24
25
15180-101 Rev. F
15180-101 Rev. F
Operation
(continued)
Measurement Mode
(continued)
Progressive Lens
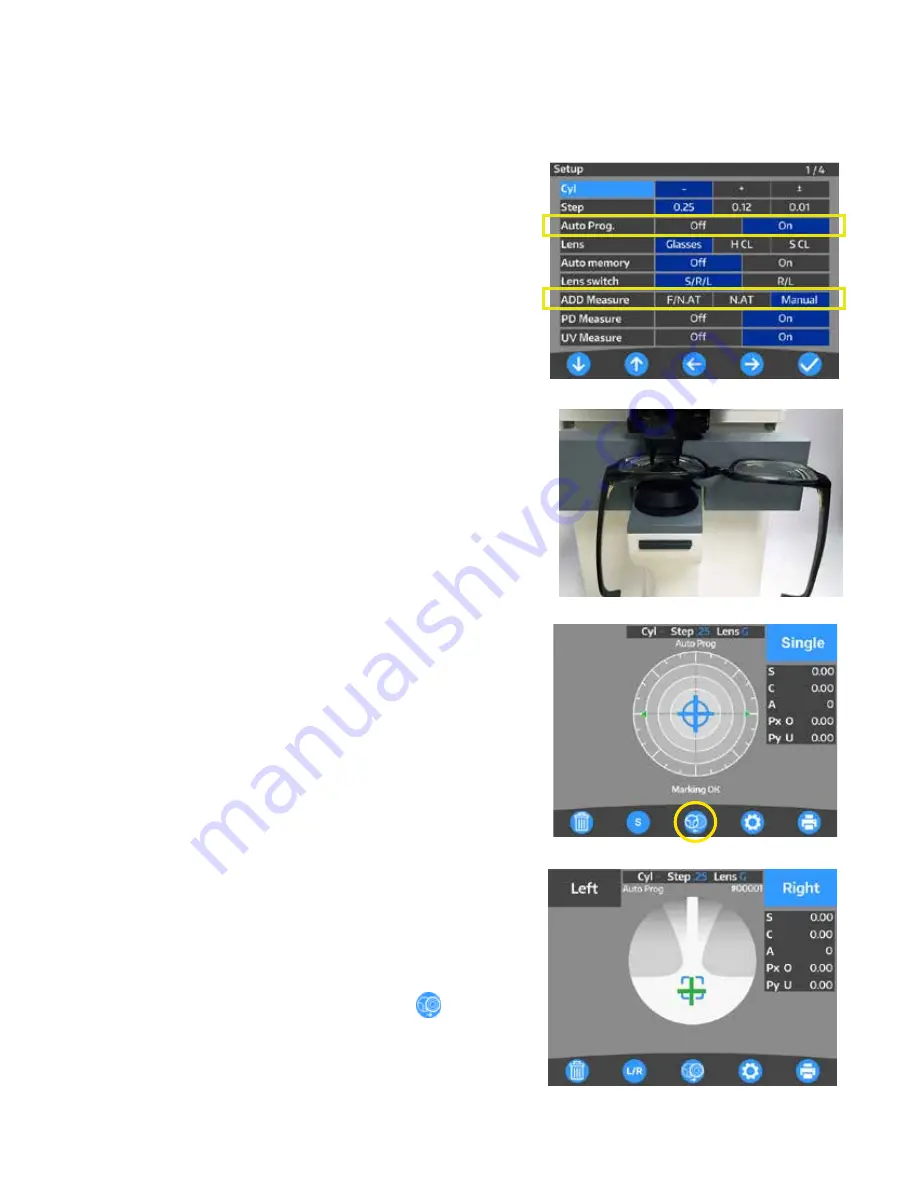
1. Set the “Auto Prog.” and “ADD Measure” preferences in the
Setup Menu. Refer to Figure OP-13.
Set Auto Prog.
Off:
Unit will not automatically determine if a progressive lens
is being measured, and will remain in single/left/right mode.
On:
Unit will automatically determine if a progressive lens is
being measured, and switch to progressive mode.
Note:
If Auto Prog is set to “On”, the lens is automatically
judged whether the lens is a progressive lens or not.
If “Auto Prog.” is “On”, it is indicated on the measure-
ment screen of the single focus lens.
Note:
When a lens is placed with the near point facing the
Lens Table, the LensChek Plus/Pro will determined if
it is a progressive lens or not. Refer to Figure OP-
14. Once the lens is identified as a progressive lens,
the screen will automatically switch to the progressive
lens measurement screen. If not, the measurement
screen remains in single focus lens mode. Select the
Progressive Icon to switch to the progressive mea-
surement screen. Refer to Figure OP-15.
Note:
If the lens is placed with the far point facing the Lens
Stand, then the unit will
NOT
be able to detect the
progressive lens.
Note:
If the ADD value is small, the unit may not automati-
cally detect the progressive lens.
Set ADD Measure
F/N.AT:
Automatically measures the far and near points
N.AT:
Automatically measures the near point
Manual:
Manually measures the far and near points
Note:
If the lens is dirty or has some flaws, the far point
and near point may not be automatically measured,
and manual measurements may be necessary,
2. If the unit does not automatically detect a progressive lens,
switch to progressive mode by pressing the
button.
Refer to Figure OP-15.
3. The screen in Figure OP-16 will appear once progressive
mode has been activated or selected.
Figure OP-14 Proper Orientation
Figure OP-13 Page 1, Setup Screen
Figure OP-15 Progressive Icon
Figure OP-16 Align Near Point


