Connections and Setup
TV
AUDIO
OUT
COMPONENT
VIDEO OUT
Pr
Pb
Y
PROGRESSIVE
SCAN
VIDEO
OUT
5.1 CH AUDIO OUT
DIGITAL
OUT
COAXIAL
VIDEO
OUTPUT
S-VIDEO
S-VIDEO
OUT
COMPONENT/
PROGRESSIVE
SCAN
DIGITAL
OUT
OPTICAL
L
R
WOOFER
CENTER
L
R
REAR
FRONT
VIDEO
L
R
INPUT1
INPUT2
Y
P
B
P
R
COMPONENT VIDEO INPUT
CABLE/ANTENNA
S-VIDEO
VCR
OUT TO TV
IN FROM
ANTENNA
From Cable Line
Notes:
The back of your TV and VCR might
look different than the ones pictured
here. Details about the different kinds
of cables used to connect your DVD
player are on page 4.
Don’t connect the DVD player to the
VCR, or through the VCR. Doing so
could negatively affect the picture
quality and/or disable the DVD player.
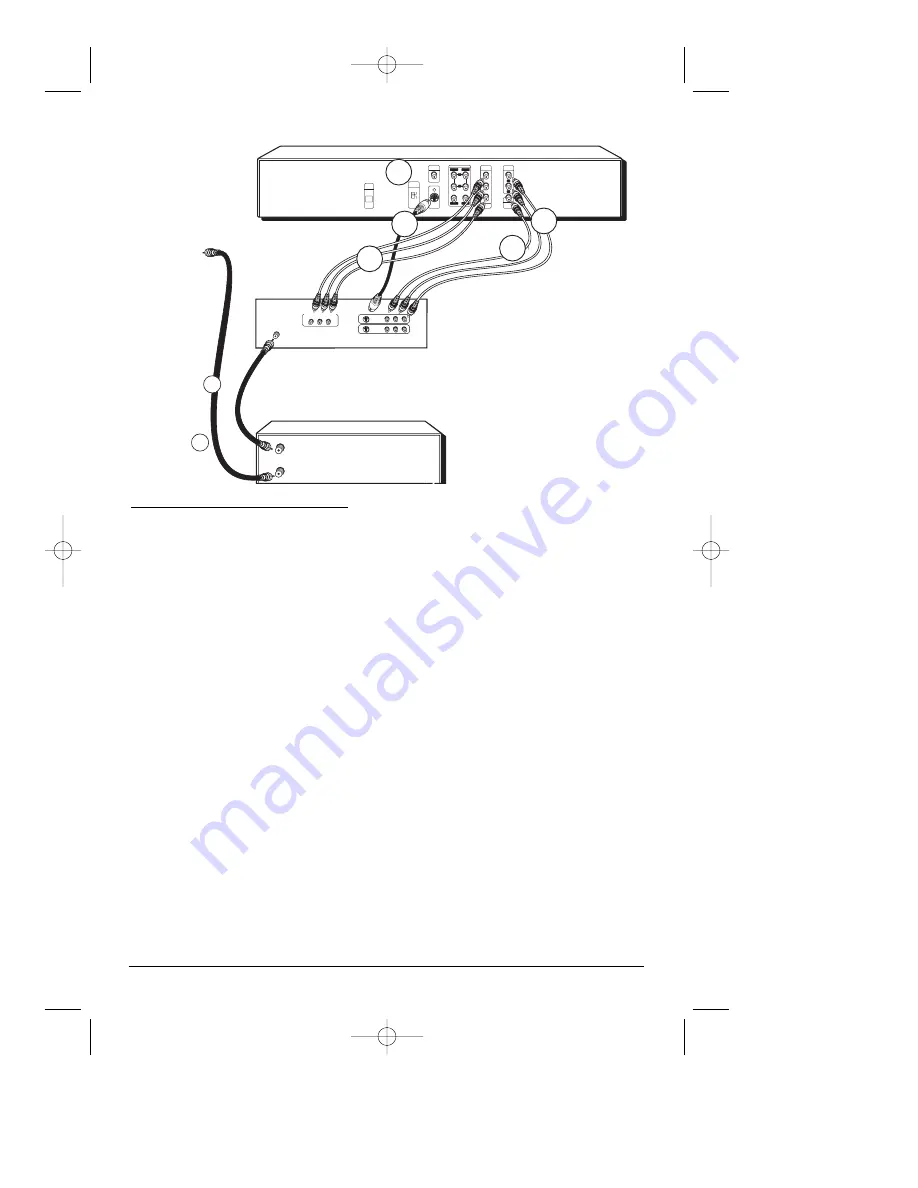
Connection: DVD + TV + VCR
1. Connect the audio cables to the AUDIO OUT L (left – white) and R (right – red) jacks on
the back of your DVD Player, and to the corresponding Audio Input jacks on your TV
(sometimes labeled AUDIO IN L and R).
2. Connect the video cable.
2a.
Basic video connection – Connect the video cable (yellow) to the
TV VIDEO OUT jack on the back of your DVD Player, and to the Video Input jack on your TV
(sometimes labeled VIDEO IN).
– OR –
2b.
S-Video (optional) – If your TV has an S-Video jack, connect the S-Video cable (not
provided) to an S-VIDEO OUT jack on the back of your DVD Player and to the S-VIDEO jack
on your TV.
– OR –
2c.
If your TV has component/progressive scan video (Y, Pb, Pr) jacks, use video-grade
cables (not provided) to connect the TV to the DVD player (Y to Y, Pb to Pb, etc.). It is
essential to match the color coded connectors with a compatible TV.
Note: If your TV or monitor has progressive scanning capability, you need to set the Progressive Scan
menu (p. 32)
3. Connect the antenna or cable to the Antenna Input jack on the VCR (sometimes labeled IN
FROM ANTENNA).
4. Connect a coaxial cable to the Antenna Output jack on the VCR (OUT TO TV) and to the
Antenna Input jack (CABLE/ANTENNA) on the TV.
5. Insert the AC power cord into an AC outlet.
6. Set the VIDEO OUT SELECT switch to S-VIDEO or COMPONENT/PROGRESSIVE SCAN,
depending upon the type of connection you used. Either setting works for the Basic video
connection (2A).
Go to page 6
chapter 1
3
Graphics are for representation only. Your unit might differ from pictures in this book.
1
1
2c
2c
2a
2a
2c
2c
3
3
4
4
6
6
DRC700N.part1.7.26.02 8/1/02 11:05 AM Page 3


