


8
4. If the selected location is empty,
ENTER NAME
appears.
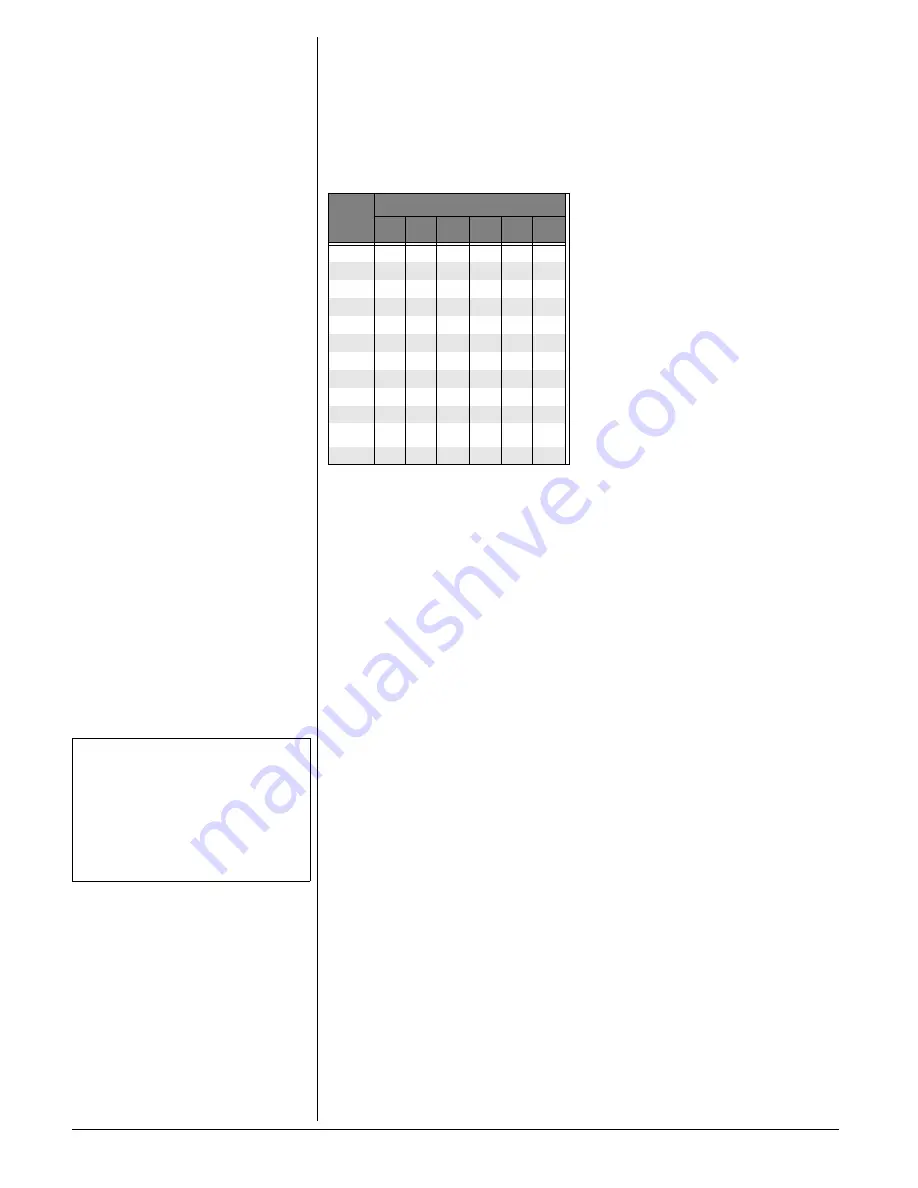
5. To enter a name, use the number keys.
Using the chart below, enter up to 15
characters for the name you're storing with
the number. Use
f
to backspace and make
corrections; use
g
to advance and add a
space.
6. When you finish entering the name,
press
SELECT
or
PROG/CHAN
.
The
screen displays
ENTER NUMBER
.
7. Enter the telephone number. Use
f
to
backspace and make a correction.
Press
REDIAL/PAUSE
to insert a pause
in the dialing sequence. You can add
more pause entries for a longer pause.
8. Press
SELECT
or
PROG/CHAN
to store
your entry. The screen displays
DISTINCT RING?
and the current setting.
9. Press
f
or
g
to change the setting.
Choose
Y
(Yes) if you wish the phone to
alert you to calls from this number by
changing to a distinctive ringing pattern
after the first ring. Choose
N
(No) for a
normal ringing pattern.
10. Press
SELECT
or
PROG/CHAN
to
confirm your selection. If you chose
Y
,
ª
is displayed with the memory entry.
Editing a Number/Name Stored
in Memory
1. Press
MEM
. The screen displays
ENTER 0-9
.
2. Press the memory location key of the
entry you wish to edit. If the location is
empty, the handset sounds an error
tone. Press another location key.
3. When the screen displays the number
you want to edit, press
SELECT
. Then
press
f
or
g
until
EDIT
flashes.
4. Press
SELECT
. The screen displays the
name and number. The flashing cursor
appears at the end of the name. Use
f
or
g
and the dial pad keys to edit the
name. Press
SELECT
again to edit the
number. Press
SELECT
again to edit the
Distinctive Ring setting.
5. Press
SELECT
to save the edited
information.
Deleting a Number/Name Stored in
Memory
1. Press
MEM
. The screen displays
ENTER 0-9
.
2. Press the memory location key of the
entry you wish to delete.
3. When the screen displays the number
you want to delete, press
SELECT
. Then
press
g
until
ERASE
flashes.
4. Press
SELECT.
The screen displays
ERASE NO YES
and the number.
5. Press
g
until
YES
flashes.
6. Press
SELECT.
Dialing a Memory Number
1. Press
MEM
. The screen displays
ENTER 0-9
.
2. Press the memory location key of the
entry you wish to dial.
3. When the screen displays the number
you want to dial, press
TALK.
OR
press
SELECT
.
DIAL
flashes.
4. Press
SELECT
. The phone automatically
dials the number.
Chain-Dialing Service Numbers
For quick recall of numbers for special
services (such as bank-by-phone), store
each group of numbers in its own memory
location. Dial the service’s main number
first. Then, at the appropriate place in the
call, press
MEM
and enter the number for the
memory location where the additional
information is stored. Press
TALK
.
T
ELEPHONE
D
IRECTORY
This cordless phone can store an additional
40 telephone numbers with names, each up
to 16 digits long. Entries are stored
alphabetically. For consistency with
Caller ID entries, you may wish to enter last
names first.
Storing a Number/Name in the
Directory
1. Lift the handset and press
PROG/CHAN
.
The screen displays
DIRECTORY
.
Ô
2. Press
SELECT
. The screen displays
ENTER NAME
.
3. Using the chart below, enter up to 15
characters for the name you're storing
with the number. Use
f
to backspace
Key
Pad
Button
Number of Presses
1
2
3
4
5
6
1
1
2
A
B
C
2
3
D
E
F
3
4
G
H
I
4
5
J
K
L
5
6
M
N
O
6
7
P
Q
R
S
7
8
T
U
V
8
9
W
X
Y
Z
9
0
0
*
*
#
&
,
,
-
.
#
Ô
NOTE
Ô
• Press OFF at any time to exit directory.
• While setting, if you do not press any button
within about 20 seconds, the normal display
returns and no setting is stored.
• When memory is full the screen displays
MEMORY FULL
, an error tone sounds, and you
will not be able to store a new number until
you delete a stored number.


