


12
Getting Started
2.1.1.3 Using a Hub and Two Straight-Through Cables
The Ethernet connection does not have to be direct. The EM1500 and the host PC may be connected to the
same LAN through a hub. This way has the benefit of allowing more than one EM1500 unit to be config-
ured in the same configuration session.
Of course, the hub can also be connected to a larger LAN, e.g., your company network or a test network.
Always check with your network administrator before physically connecting to an existing network.
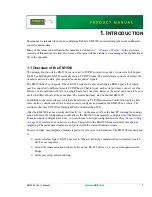
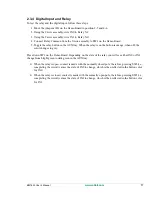
2.1.2 Power Supply
To supply power to the EM1500 use the specified AC adapter
1
.
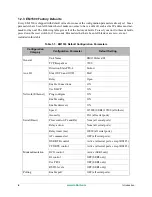
Connect the bare wires from the AC adapter to the V_INPUT
(“+”) and GND (“-”) terminals of the screw terminal connec-
tor.
2
The wire with the red sleeve should be connected to the
“+” terminal (left side of screw terminal), the black wire to the
“-” terminal (right side of screw terminal). If the wires on your
power supply do not have the red and black sleeves, you may
determine which wire is which by looking on the label of the
adapter. Plug in the adapter and verify that the LED labeled PWR comes on steady.
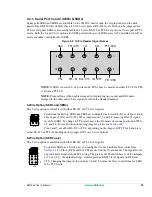
2.1.3 Serial Port Connection
After making the Ethernet hardware connections and supplying power to the EM1500, the unit is ready for
complete configuration. Before delving into all the configuration parameters, we will step through a sim-
ple example that will require minimal configuration. A serial port connection is not required to configure
the unit, but is required for this example.
You must have a free COM port on an available PC. This can be the same PC that has the Ethernet access.
The following directions assume there is only one host PC, and that it has both serial and Ethernet access
to the EM1500.
Connect the COM port of the PC to SER2 on the EM1500 using a serial straight-through cable. The con-
nector for SER2 is located on the upper right side of the back panel of the EM1500.
1. The adapter specification is 9 V to 36 V DC, with 1.5 W typical.
2. The screw terminal connector snaps into place and is easily removed from the EM1500 for ease of use.
GND
V_INPUT
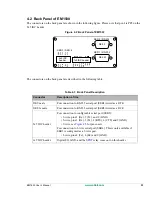
Summary of Contents for EM1500
Page 14: ...10 www rabbit com Introduction...
Page 22: ...18 www rabbit com Getting Started...
Page 76: ...72 www rabbit com EM1500 Configuration...
Page 90: ...86 www rabbit com EM1500 Specifications...
Page 104: ...100 www rabbit com Serial and TCP Protocols...
Page 118: ...114 www rabbit com EM1500 FAQ...


