background image

When the Indicator Lamp for [Check Status] Is

Lit or Flashing

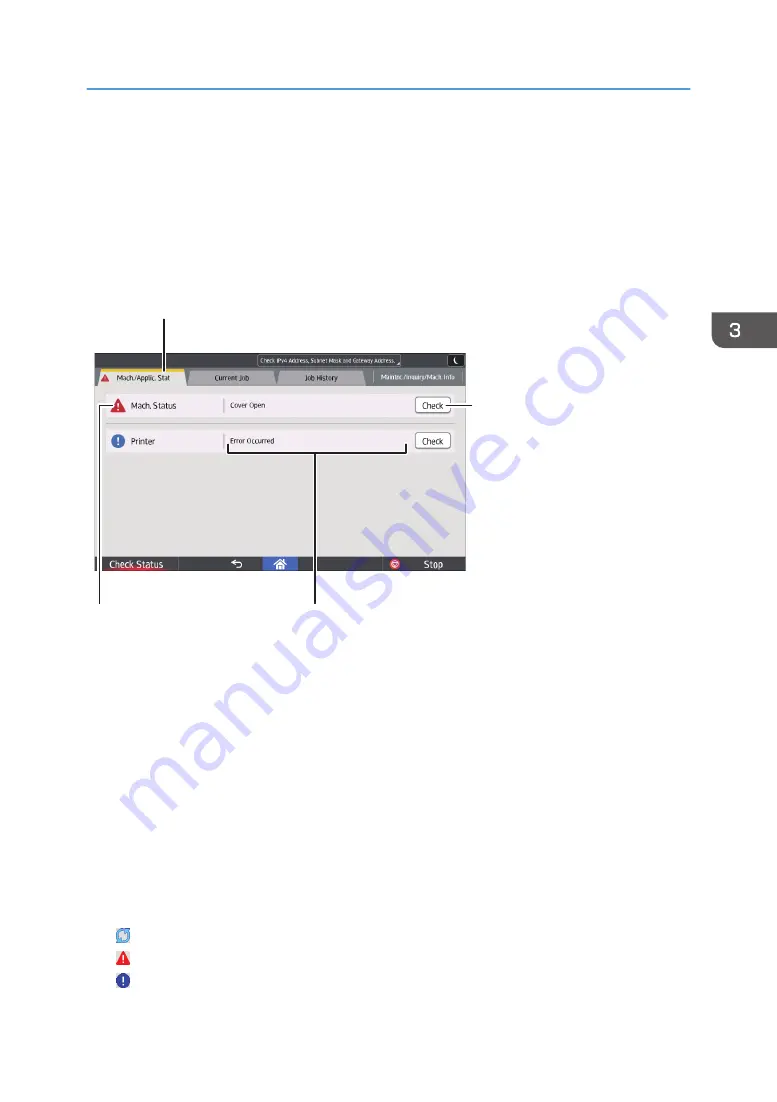
If the indicator lamp for [Check Status] lights up or flashes, press [Check Status] to display the [Check
Status] screen. Check the status of each function in the [Check Status] screen.
[Check Status] screen

DRA320

3

1

4

2

1. [Mach./Applic. Stat] tab

Indicates the status of the machine and each function.

2. [Check]

If an error occurs in the machine or a function, press [Check] to view details.
Pressing [Check] displays an error message or the corresponding function screen. Check the error message
displayed on the function screen and take the appropriate action. For details about how to resolve the
problems described in error messages, see "When Messages Appear and the Machine Cannot Be
Operated", Operating Instructions, page 74 "Messages Displayed When You Use the Printer Function", or
page 79 "When Other Messages Appear".

3. Messages

Displays a message that indicates the status of the machine and each function.

4. Status icons

The status icons that can be displayed are described below:

: The function is performing a job.
: The machine cannot be used because an error has occurred in the machine.
: The function cannot be used because an error has occurred in the function or machine. This icon may also

appear if the toner is running low.

When the Indicator Lamp for [Check Status] Is Lit or Flashing

67

Summary of Contents for HD-MB50D

Page 1: ...User Guide B W Document Printer HD MB50D ...

Page 2: ... was obtained from several different sources that are deemed reliable by all industry standards To the best of our knowledge that information is accurate in all respects However neither Quadient nor any of its agents or employees shall be responsible for any inaccuracies contained herein RICOH is a registered trademark For safe and correct use be sure to read the Safety Information in Read This Fi...

Page 3: ...Control Panel 19 Changing the Display Language 20 How to Use the Home Screen 21 Main Icons on the Home Screen 23 Printer Classic Screen 24 Information Screen 25 Possible Operations on the Screen 26 Adding Icons to the Home Screen 28 Turning On Off the Power 30 Turning On Off the Power 30 Saving Energy 31 Accessing User Tools 33 Changing Default Settings 33 Quitting User Tools 34 Using Web Image Mo...

Page 4: ... 65 When a Status Icon Is Displayed 66 When the Indicator Lamp for Check Status Is Lit or Flashing 67 When You Have Problems Operating the Machine 69 If USB Connection Fails 73 Messages Displayed When You Use the Printer Function 74 Messages Displayed on the Control Panel When You Use the Printer Function 74 Messages Printed on the Error Logs or Reports When You Use the Printer Function 77 When Ot...

Page 5: ...ly Europe 97 Note for the Battery and or Accumulator Symbol For EU countries only mainly Europe 98 Environmental Advice for Users mainly Europe 98 Notes to users in the state of California Notes to Users in USA mainly North America 99 Trademarks 100 INDEX 103 3 ...

Page 6: ...nstallation Procedure Read This First Before using the machine be sure to read the section of this manual entitled Safety Information It also describes each regulation and environmental conformance Start Guide Operations Panel Basics How to log in out of machine How to change display language How to Enable Security Settings Network Security Configuring User Authentication Etc Quick Installation Gu...

Page 7: ...e Describes how to install and configure the PCL6 printer driver 5 Regarding the basic usage of this machine frequently used functions troubleshooting when an error message appears etc summaries are provided for each user manual User Guide ...

Page 8: ...6 Page intentionally left blank ...

Page 9: ...ns on resolving user errors Indicates the names of keys on the machine s display or control panels Region A mainly Europe and Asia mainly Europe or mainly Asia Region B mainly North America Differences in the functions of Region A and Region B models are indicated by the two symbols Read the information indicated by the symbol that corresponds to the region of the model you are using For details a...

Page 10: ...nment you are using Model Specific Information This section explains how to identify the region to which your printer belongs There is a label on the rear of the printer located in the position shown below The label contains details that identify the region to which your printer belongs Read the label DUL004 The following information is region specific Read the information under the symbol that co...

Page 11: ... If your printer is a Region B model refer to the imperial units List of Options This section provides a list of options for this printer and the names commonly used in this manual Option name Description Hiigh Capacity Trays with Casters HD MB50 HCTRAY Lower Paper Trays 2000 Sheet Tray with Casters HD MB50 TRAY2K Tray 3 LCT Before You Start 9 ...

Page 12: ...1 Getting Started 10 Page intentionally left blank ...

Page 13: ... 3 Control panel See page 19 Guide to the Names and Functions of the Machine s Control Panel 4 Main power switch To operate the machine the main power switch must be on If it is off open the main power switch s cover and turn the switch on 5 Front cover Open to access the inside of the machine 6 Paper trays Trays 1 2 Load paper here For details see page 43 Loading Paper 7 Optional Lower paper tray...

Page 14: ...ls and paper that cannot be loaded in the paper trays For details see page 45 Loading Paper into the Bypass Tray 3 Paper guides When loading paper in the bypass tray align the paper guides flush against the paper 4 Extender Pull this extender out when loading sheets larger than A4 81 2 11 in the bypass tray 5 Vents Prevent overheating 1 Getting Started 12 ...

Page 15: ...6 Lower right cover Open this cover when a paper jam occurs Rear and left view DUL007 1 1 1 Vents Prevent overheating Guide to Names and Functions of Components 13 ...

Page 16: ...1 Getting Started 14 Page intentionally left blank ...

Page 17: ...Guide to Names and Functions of Components 15 Page intentionally left blank ...

Page 18: ...ray can hold up to 550 sheets 2 2000 Sheet Paper Tray with Casters HD MB50 TRAY2K Adds one additional Paper Tray Tray 3 to printer Referred to as Tray 3 LCT in manual NOTE This is a tandem tray configured for 8 5 x 11 paper only It can hold two stacks of 1000 sheets of 8 5 x 11 paper When right stack is empty paper in left stack will automatically shift to the right for feeding In addition half of...

Page 19: ...Guide to Functions of the Machine s Options 17 Page intentionally left blank ...

Page 20: ...1 Getting Started 18 Page intentionally left blank ...

Page 21: ...he main power switch When the machine is in Sleep mode the main power indicator flashes slowly In Fusing Unit Off mode the main power indicator is lit 3 Status indicator Indicates the status of the system Stays lit when an error occurs or the toner runs out 4 Data In indicator printer mode Flashes when the machine is receiving print jobs from a computer 5 Media slots Use to insert an SD card or a ...

Page 22: ...uage used on the display English is set as default 1 Press Home at the bottom of the screen in the center 2 Flick the screen to the left and then press the Change Langs Widget icon 3 Select the language you want to display 4 Press OK 1 Getting Started 20 ...

Page 23: ...creens flick your finger to the right or left on the screen DUL009 5 6 13 1 3 4 7 8 9 10 12 11 2 1 Logged in user icon When user authentication is enabled an icon is displayed that indicates that users are logged in Press the icon to show the names of the users that are currently logged in 2 System message Displays messages from the machine system and applications 3 Login Logout These keys are dis...

Page 24: ... or not in some applications For details about the settings see Screen Features Operating Instructions 11 Media Information Press to remove the inserted SD card or USB flash memory device from the media slot For details see Removing an SD Card or Removing a USB Flash Memory Device Operating Instructions 12 Check Status Press to check the machine s system status operational status of each function ...

Page 25: ...r using the machine as a printer easily For details see Checking the Printer Status from the Printer Icon Operating Instructions Print Memory Storage Device Allows you to print files from a memory storage device For details see Using the Print Memory Storage Device Function Operating Instructions Quick Print Release Allows you to print files easily For details see Using the Quick Print Release Fun...

Page 26: ...emaining In Energy Saver mode this widget is dimmed and no longer reflects the tray s settings or the amount of paper remaining Embedded software applications When an embedded software application is installed a function icon for the application is displayed on the Home screen You can add icons to the Home screen to customize the machine For details about adding icons to the Home screen see page 2...

Page 27: ...input buffer 8 Spooling Job List Press to display spooled jobs 9 Error Log Press to display the error logs of print jobs sent from a computer 10 Simplfied Scrn Press to switch to a simplified screen For details see Switching Screen Patterns Operating Instructions 11 Print Jobs Press to display print jobs sent from a computer Information Screen To raise awareness of resource conservation you can co...

Page 28: ...right of the balloon to display the following items Total Print Pages Total number of pages printed in the current count period is displayed 2 sided Utilization The ratio of 2 sided prints to the total number of prints is displayed The higher the ratio is the more leaves are displayed Combine Utilization The ratio of combined prints to the total number of prints is displayed The higher the ratio i...

Page 29: ...r on the screen and then spread the fingers apart to zoom in the screen Double tapping can also be effective for this operation DNE104 Flick Flick your finger to the right or left on the screen to switch between screens DNE102 Long tap Place your finger on the screen and hold it there until the next screen appears You can display the menu screen of the application you are using How to Use the Home...

Page 30: ...ter you delete them from the Home screen 1 Press Home at the bottom of the screen in the center 2 Press 3 Press the Apps tab to add a shortcut to an application other than Printer Classic Press the Program tab to add a shortcut to Printer Classic 4 Press and hold down the application icon to add a shortcut to an application other than Printer Classic Press and hold down the Classic Applications ic...

Page 31: ...dgets to the Home screen to show the remaining amount of toner or change the display language 1 Press Home at the bottom of the screen in the center 2 Press 3 Press the Widget tab 4 Press and hold down the widget icon you want to add The image of where the widget is to be placed on the Home screen is displayed 5 Drag the icon to where you want to place it on the screen How to Use the Home Screen 2...

Page 32: ...e control panel goes out When this is done machine power is off This machine automatically enters Fusing Unit Off mode or Sleep mode if you do not use it for a while For details see page 31 Saving Energy Turning on the main power 1 Make sure the power cord is firmly plugged into the wall outlet 2 Open the main power switch cover and push the main power switch The main power indicator goes on DLV01...

Page 33: ...d after an operation the machine makes a clicking sound and enters Fusing Unit Off mode When the machine is in Fusing Unit Off mode the display is on but the fusing unit heater is off to save energy In this mode you can change the machine s settings on the control panel However the machine must exit this mode to print You can change the amount of time that the machine waits before switching to Fus...

Page 34: ...g The machine does not enter Sleep mode in the following cases During communication with external equipment When the hard disk is active When the service call message appears When the Add Toner message appears When toner is being replenished When one of the following screens is displayed Machine Features Counter Inquiry Address Book Management Tray Paper Settings When data is being processed When ...

Page 35: ... inquiries Address Book Management You can manage user information of the machine Tray Paper Settings Specify the settings of the paper Operations for system settings differ from normal operations Always quit User Tools when you have finished Any changes you make with User Tools remain in effect even if the main power switch or operation switch is turned off or Energy Saver or Reset is pressed Cha...

Page 36: ...Press Home at the bottom of the screen in the center When configuring Machine Features Maintenance Print Counter Inquiry Address Book Management or Tray Paper Settings Press User Tools on the top right of the screen and then press Home at the bottom of the screen in the center When configuring Machine Features Maintenance Print Maintenance Image Counter Inquiry Address Book Management or Tray Pape...

Page 37: ...y Interrupting currently printing jobs Resetting the machine Managing the Address Book Making machine settings Making network protocol settings Making security settings Configuring the machine To perform the operations from Web Image Monitor TCP IP is required After the machine is configured to use TCP IP operations from Web Image Monitor become available Recommended web browser Windows Internet E...

Page 38: ...nment which server authentication is issued enter https machine s IP address or host name Web Image Monitor is divided into the following areas 5 3 4 2 1 DUL013 1 Menu area If you select a menu item its content will be shown 2 Header area Display icons for the links to Help and the keyword search function This area also displays Login and Logout which allows you to switch between the administrator...

Page 39: ...5 Work area Display the contents of the item selected in the menu area Using Web Image Monitor 37 ...

Page 40: ...g messages on the plastic bag used in this product s packaging Keep the polythene materials bags etc supplied with this machine away from babies and small children at all times Suffocation can result if polythene materials are brought into contact with the mouth or nose Do not crush or squeeze toner containers Doing so can cause toner spillage possibly resulting in dirtying of skin clothing and fl...

Page 41: ... 95 F or high humidity Store toner horizontally Do not shake the toner cartridge with its mouth down after removing it Residual toner may scatter Do not repeatedly install and remove toner cartridges This will result in toner leakage Follow the instruction on the screen regarding how to replace a toner cartridge If Toner Cartridge is almost empty appears on the system message widget the toner has ...

Page 42: ...r off before replacing parts Not allowing the printer to cool may result in burns The Front Cover Right Cover and Transfer Unit must be open to remove or install Drum Unit Exposure to light reduces drum unit performance Replace the unit as quickly as possible Do not pull out the drum unit quickly or with force as it may fall Take care that nothing comes into contact with the photo conductor area o...

Page 43: ...eplacement Kit Please make sure you have Maintenance Kit B HD MB50 FUSER on hand when the following message appears on the display Replacement of Maintenance Kit B will soon be necessary A new unit is required Please contact your local vendor The Fusing Unit in this kit is a user replaceable supply that is compatible with the Quadient HD MB50D printer The Fusing Unit in this kit will be used to re...

Page 44: ...1 Getting Started 42 Page intentionally left blank ...

Page 45: ...eeding may occur Remove any remaining paper stack them with the new sheets of paper and then fan the entire stack before loading it into the tray Straighten curled or warped paper before loading For details about the paper sizes and types that can be used see page 51 Recommended Paper Sizes and Types You might at times hear a rustling noise from paper moving through the machine This noise does not...

Page 46: ...1 Check that paper in the paper tray is not being used and then pull the tray carefully out until it stops DRY222 2 Square the paper and load it print side up Do not stack paper over the limit mark DUL049 3 Align the end and side fences gently against the paper you loaded Make sure that there is no space between the paper and the side fences or end fence DUL048 4 Carefully push the paper tray full...

Page 47: ...ypass tray to use OHP transparencies adhesive labels translucent paper and paper that cannot be loaded in the paper trays The maximum number of sheets you can load at the same time depends on paper type Do not stack paper over the limit mark For the maximum number of sheets you can load see page 51 Recommended Paper Sizes and Types 1 Open the bypass tray DUL008 2 Load the paper face down until you...

Page 48: ...Envelopes Specify the sizes of paper that are not automatically detected For details about the sizes that can be detected automatically see page 51 Recommended Paper Sizes and Types For details about how to specify sizes see page 61 Printing from the Bypass Tray When printing from a computer using the bypass tray see page 61 Printing from the Bypass Tray When Notification Sound is set to No Sound ...

Page 49: ...g from the tray For the right stack align the right edge of the paper with the right edge of the tray For the left stack align the left edge of the paper to the left edge of the tray 1 Carefully pull out the paper tray until it stops CVA017 2 Square the paper and load it print side up Do not stack paper over the limit mark Whole tray pulled out CVA018 Left half of the tray pulled out Loading Paper...

Page 50: ...he paper tray fully in You can load paper even if Tray 3 LCT is in use It is okay to pull out the left half of the tray while Tray 3 LCT is in use Load 30 or more sheets of paper in the left half of the tray 2 Loading Paper 48 ...

Page 51: ...aper are placed Settings for the User Tools Specify Auto Detect or On Always for Letterhead Setting in System under the Printer Features menu and then place the paper as shown below For details about the letterhead settings see System Operating Instructions Paper orientation The meanings of the icons are as follows Icon Meaning Place or load paper printed side face up Place or load paper printed s...

Page 52: ...nting from one sided to two sided printing one sided output after the first print may be printed facing a different direction To ensure all paper is output facing the same direction specify different input trays for one sided and two sided printing Note also that two sided printing must be disabled for the tray specified for one sided printing For details about how to make two sided prints see Pri...

Page 53: ... these may stick to the fusing unit and cause a misfeed When you load OHP transparencies check the front and back of the sheets and place them correctly or a misfeed might occur Trays 1 4 Paper type and weight Paper size Paper capacity 60 300 g m2 16 lb Bond 110 lb Cover Plain Paper 1 Thick Paper 4 Paper sizes that can be detected automatically 1 A3 A4 A5 B4 JIS B5 JIS 81 2 11 A4 A5 B5 JIS 11 17 8...

Page 54: ...A3 A4 A5 A6 B4 JIS B5 JIS B6 JIS 81 2 13 81 4 14 81 4 13 8 13 8 10 71 4 101 2 51 2 81 2 8K 16K 11 15 10 14 550 sheets 60 300 g m2 16 lb Bond 110 lb Cover Plain Paper 1 Thick Paper 4 Custom size 2 Vertical 90 0 297 0 mm Horizontal 148 0 431 8 mm Vertical 3 55 11 69 inches Horizontal 5 83 17 00 inches 550 sheets Envelopes Select the paper size using the Tray Paper Settings menu 41 8 91 2 37 8 71 2 C...

Page 55: ...A6 B4 JIS B5 JIS B6 JIS A5 B5 JIS 11 17 81 2 11 51 2 81 2 71 4 101 2 12 18 100 sheets up to 10 mm in height Thick Paper 1 40 sheets Thick Paper 2 Thick Paper 3 20 sheets Thick Paper 4 16 sheets 52 300 g m2 14 lb Bond 110 lb Cover Thin Paper Thick Paper 4 1 11 17 81 2 14 81 2 13 81 2 11 81 4 14 81 4 13 8 13 8 10 71 4 101 2 51 2 81 2 8K 16K 12 18 11 15 10 14 81 2 132 5 A3 A4 A5 A6 B4 JIS B5 JIS B6 J...

Page 56: ...ls B4 JIS A4 30 sheets Envelopes 1 41 8 91 2 37 8 71 2 C5 Env C6 Env DL Env 10 sheets 1 Select the paper size See page 61 Specifying Regular Sizes Using the Control Panel 2 Enter the paper size See page 61 Specifying a Custom Size Paper Using the Control Panel 3 When only the Internal Multi Folding unit is installed the vertical size range is limited to 90 0 297 0 mm 3 55 11 69 inches 4 Paper that...

Page 57: ...izes specified above contact your service representative Paper Thickness Paper Thickness 1 Paper weight Thin Paper 2 52 59 g m2 14 15 lb Bond Plain Paper 1 60 74 g m2 16 20 lb Bond Plain Paper 2 75 81 g m2 20 lb Bond Middle Thick 82 105 g m2 20 28 lb Bond Thick Paper 1 106 169 g m2 28 lb Bond 90 lb Index Thick Paper 2 170 220 g m2 65 80 lb Cover Recommended Paper 55 ...

Page 58: ... them Depending on the paper sizes and types the print speed may be slower than usual When loading thick paper of 106 300 g m2 28 lb Bond 110 lb Cover see page 57 Thick paper When loading envelopes see page 58 Envelopes When printing onto letterhead paper the paper placing orientation is different depending on which function you are using For details see page 49 Loading Orientation fixed Paper or ...

Page 59: ...b Bond 110 lb Cover follow the recommendations below to prevent misfeeds and loss of image quality Store all your paper in the same environment a room where the temperature is 20 25 C 68 77 F and the humidity is 30 65 When loading paper in the paper trays be sure to load at least 20 sheets Also be sure to position the side fences flush against the paper stack Jams and misfeeds can occur when print...

Page 60: ...pen can be loaded in the orientation When loading envelopes in the orientation load them with flaps fully open Otherwise they might not feed into the machine Before loading envelopes press down on them to remove any air from inside flatten out all four edges If they are bent or curled flatten their leading edges the edge going into the machine by running a pencil or ruler across them The way to lo...

Page 61: ...ur local dealer For details about the sizes of envelopes you can load see page 51 Recommended Paper Sizes and Types Load only one size and type of envelope at a time The Duplex function cannot be used with envelopes To get better output quality it is recommended that you set the right left top and bottom print margin to at least 15 mm 0 6 inches each Output quality on envelopes may be uneven if pa...

Page 62: ...n types of envelopes might come out creased dirtied or misprinted If you are printing a solid color on an envelope lines may appear where the overlapped edges of the envelope make it thicker 2 Loading Paper 60 ...

Page 63: ...Printer Bypass Paper Size is Auto Detect Specifying Regular Sizes Using the Control Panel 1 Press Home at the bottom of the screen in the center 2 Flick the screen to the left and then press the User Tools icon 3 Press Tray Paper Settings 4 Press Printer Bypass Paper Size 5 Select the paper size 6 Press OK 7 Press User Tools on the top right of the screen 8 Press Home at the bottom of the screen i...

Page 64: ...Paper Thin Paper or OHP Transparencies for Paper Type Using the Control Panel Use A4 or 81 2 11 size OHP transparencies and specify their size Usually only one side of OHP transparencies can be used for printing Be sure to load them with the print side down When printing onto OHP transparencies remove printed sheets one by one 1 Press Home at the bottom of the screen in the center 2 Flick the scre...

Page 65: ... Hidden on the Paper Type area and then select the appropriate paper thickness in the Paper Thickness area 9 Press OK 10 Press User Tools on the top right of the screen 11 Press Home at the bottom of the screen in the center We recommend that you use specified OHP transparencies For details about paper thickness see Tray Paper Settings Operating Instructions Printing from the Bypass Tray 63 ...

Page 66: ...2 Loading Paper 64 Page intentionally left blank ...

Page 67: ...ect 2 long beeps Machine has warmed up When the power is turned on or the machine exits Sleep mode the machine has fully warmed up and is ready for use 5 long beeps repeated four times Soft alert Paper tray is empty 5 short beeps repeated five times Strong alert The machine requires user attention because paper has jammed the toner needs replenishing or other problems have occurred Users cannot mu...

Page 68: ...t loading paper see page 43 Loading Paper Add Toner icon Appears when toner runs out For details about adding toner see page 38 Adding Toner and see document titled Black Toner Bottle HD MB5TNR KK Replacement Instructions Waste Toner Full icon Appears when the waste toner bottle is full For details about replacing the waste toner bottle see document titled Maintenance Kit A HD MB50 DRKIT Replaceme...

Page 69: ...reen and take the appropriate action For details about how to resolve the problems described in error messages see When Messages Appear and the Machine Cannot Be Operated Operating Instructions page 74 Messages Displayed When You Use the Printer Function or page 79 When Other Messages Appear 3 Messages Displays a message that indicates the status of the machine and each function 4 Status icons The...

Page 70: ...ate action For details about error messages and their solutions see When Messages Appear and the Machine Cannot Be Operated Operating Instructions page 74 Messages Displayed When You Use the Printer Function or page 79 When Other Messages Appear You can use other functions normally The machine is unable to connect to the network A network error has occurred Check that the machine is correctly conn...

Page 71: ...Operating Instructions The user code entry screen is displayed Users are restricted by User Code Authentication For details about how to log in when User Code Authentication is enabled see When the Authentication Screen is Displayed Operating Instructions The Authentication screen appears User Authentication is set See When the Authentication Screen is Displayed Operating Instructions An error mes...

Page 72: ...s side or end fences may not be set properly Remove the misfed paper For details about removing jammed paper see page 92 Removing Jammed Paper Check that the side or end fences are set properly Also check that the side fences are locked For details about setting the side and end fences see Changing the Paper Size Operating Instructions Misfeeds occur frequently Paper of undetectable size has been ...

Page 73: ...ting For details about setting Paper Type see Tray Paper Settings Operating Instructions The machine does not turn off in 5 minutes after the main power is turned off The machine cannot perform the shutdown procedure Repeat the shutdown procedure If the machine does not turn off contact your service representative An error has occurred when the Address Book is changed from the display panel or Web...

Page 74: ...s Book backup is complete the function will be performed Paper is bent Paper may be bent when it is ejected from the finisher upper tray Change the output tray to the finisher shift tray There are times when images might not turn out as you want because of paper type paper size or paper capacity problems use the recommended paper For details about recommended paper see page 51 Recommended Paper Si...

Page 75: ...upported device Open Windows Device Manager and then under Universal Serial Bus controllers remove any conflicting devices Conflicting devices are indicated by a or icon Be careful not to remove required devices accidentally For details see Windows Help The machine does not recognize the USB connection even when a USB cable is inserted If the USB cable is connected while the machine is off the mac...

Page 76: ...Cause Solution Hardware Problem Ethernet An error has occurred in the Ethernet interface Turn off the power and then back on again If the message appears again contact your service representative Hardware Problem HDD An error has occurred in the hard disk Turn off the power and then back on again If the message appears again contact your service representative Hardware Problem USB An error has occ...

Page 77: ...o be changed in User Tools The printer driver settings are incorrect or the tray does not contain paper of the size or type selected in the printer driver Check that the printer driver settings are correct and then load paper of the size selected in the printer driver into the input tray For details about how to change the paper size see Changing the Paper Size Operating Instructions Select the tr...

Page 78: ...for slip sheets Reset the job Be sure the tray you select for slip sheets is not providing paper for other pages When using direct print from a memory storage device Message Cause Solution Exceeded the limit value for total data size of the selected files Cannot select more files The size of the selected file exceeds 1 GB The total size of the selected files exceeds 1 GB Files or groups of files l...

Page 79: ...logs or reports When print jobs are canceled Message Cause Solution 91 Error Printing was canceled by the auto job cancel function due to a command error Check that the data is valid A job via the network that was not printed exists because an error occurred It was stored as a job not printed Jobs with errors were stored because an error occurred with a print job via the network while the error jo...

Page 80: ...uthorized Copy Prevention Printing for the printer driver For details about how to cancel the settings see the printer driver Help Collate Cancelled Collate was canceled Turn off the power and then back on again If the message appears again contact your service representative You reach the usage limit This job has been cancelled The number of pages the user is permitted to print has been exceeded ...

Page 81: ...30 seconds elapse Do not turn off the power switch during the firmware update Failed to read the PDF file There is a possibility that the PDF version is not supported by the browser s PDF viewer or an unsupported encryption level is specified With this machine s browser PDF files other than those whose versions and encryption levels are specified below cannot be viewed PDF version 1 3 1 7 PDF encr...

Page 82: ...nd printing factors such as number of prints paper size and paper type Wait for the machine to resume operation When Problems Occur While Logging In Message Cause Solution Authentication has failed The entered login user name or login password is not correct For details about the correct login user name and login password see Basic Authentication Security Guide Authentication has failed The machin...

Page 83: ...n The interface cable is not connected correctly For details about how to connect interface cables correctly see Connecting to the Interface Operating Instructions The correct interface cable is not being used The type of interface cable you use depends on the computer Be sure to use the correct one If the cable is damaged or worn replace it For details about the interface cable see Connecting to ...

Page 84: ...nded Security Functions Security Guide A mechanical error might have occurred Contact your service representative When the Data In indicator does not light up or flash after a print job starts data is not being sent to the machine When a cable is used to connect the computer directly to the machine check whether the print ports are configured correctly When the computer is connected to the network...

Page 85: ...type The printed image is faded over the entire page The paper is damp Use paper that has been stored in the recommended temperature and humidity conditions For details about the paper storage conditions we recommend see Paper Storage Operating Instructions The printed image is faded over the entire page The paper is unsuitable Use recommended paper Printing on coarse or treated paper might result...

Page 86: ...s configured to use the graphics command the graphics command from the machine is used to print If you want to print accurately set the printer driver to print without using the graphics command For details about settings for printer driver see the printer driver Help Lines of garbled or unwanted alphanumeric characters appear An incorrect printer language might have been selected Select the corre...

Page 87: ...kness of the lines Images appear only partially The paper is damp Use paper that has been stored in the recommended temperature and humidity condition For details about the paper storage conditions we recommend see Paper Storage Operating Instructions The image on the back side of duplex copies has mottled blank patches or is smudged Missing patches and smudges are caused by moisture leaking from ...

Page 88: ... slant The paper is fed in at a slant Load the paper correctly For details about loading paper see page 43 Loading Paper Misfeeds occur frequently The number of sheets loaded exceeds the capacity of the machine Load paper only as high as the upper limit markings on the side fences of the paper tray or the markings on the paper guides of the bypass tray Misfeeds occur frequently The paper tray s si...

Page 89: ...ne at a time Sheets are fed in together resulting in jams Sheets are sticking together Fan the sheets thoroughly before loading them Alternatively feed the sheets into the machine one at a time Printed paper becomes creased The paper is damp Use paper that has been stored in the recommended temperature and humidity conditions For details about the paper storage conditions we recommend see Paper St...

Page 90: ...tting Apply Duplex see Tray Paper Settings Operating Instructions Duplex printing cannot be applied You have selected a paper type that cannot be used for duplex printing In Tray Paper Settings select a paper type that can be used for duplex printing For details about setting Paper Type see Tray Paper Settings Operating Instructions White stripes appear on the OHP transparency Fragments of paper a...

Page 91: ...on setup might be different Make sure the machine s feed orientation and the printer driver s feed orientation match For details about printer driver settings see the printer driver Help Optional components connected to the machine are not recognized Bidirectional communication is not working Set up optional devices on the Properties of the printer For details about how to set up optional devices ...

Page 92: ...t start even though the specified print time passed Jobs Not Printed As Machn Was Off was set to Do not Print in Printer Features but when the specified printing time came the power was turned off Set Jobs Not Printed As Machn Was Off to Print When Machine On in Printer Features Printing did not start even though the specified print time passed The time set on the machine or computer is incorrect ...

Page 93: ...Problem Cause Solution If the problem cannot be resolved contact your service representative Other Printing Problems 91 ...

Page 94: ...se areas explicitly indicated in the manual Do not remove the fusing unit Doing so will result in loss of print quality To remove paper that has not been fed into the fixing section correctly remove the jammed paper through the underside of the fusing unit If the jammed paper cannot be removed through the underside of the fusing unit remove it from the top If a detailed removal instruction appears...

Page 95: ...e press Next To go back to the previous step press Previous 2 When the jammed paper is removed restore the machine to the original state Multiple paper misfeed locations may be indicated at the same time When this happens check all the areas indicated If there is no misfed paper in the area you check first see the other areas that are indicated Removing Jammed Paper 93 ...

Page 96: ...3 Troubleshooting 94 Page intentionally left blank ...

Page 97: ...r office equipment The program backs the development and dissemination of products that feature energy saving functions It is an open program in which manufacturers participate voluntarily Targeted products are computers monitors printers facsimiles copiers scanners and multi function devices Energy Star standards and logos are internationally uniform For details about the default delay time see p...

Page 98: ...hen packaged with or used with a duplex tray and the duplex function is enabled as an option Region B mainly North America Specification Reduced electrical consumption in Sleep mode 1 0 79 W Time of switch into Sleep mode 1 minute Time of switch out from Sleep mode 1 7 seconds Duplex Function 2 Standard 1 The time it takes to switch out from energy saving functions and electrical consumption may d...

Page 99: ...of separately via the appropriate return and collection systems available By following these instructions you ensure that this product is treated correctly and help to reduce potential impacts on the environment and human health which could otherwise result from inappropriate handling Recycling of products helps to conserve natural resources and protect the environment For more detailed informatio...

Page 100: ... or service representative to change the battery Environmental Advice for Users mainly Europe Users in the EU Switzerland and Norway Consumables yield Please refer to either the User s Manual for this information or the packaging of the consumable Recycled paper The machine can use recycled paper which is produced in accordance with European standard EN 12281 2002 or DIN 19309 For products using E...

Page 101: ...tches to an energy saving mode In these modes the machine consumes less power watts If the machine is to print again it needs a little longer to return from an energy saving mode than from Ready mode For maximum energy savings we recommend that the default setting for power management is used Products that comply with the Energy Star requirement are always energy efficient Notes to users in the st...

Page 102: ...ries The SD and SD logo are trademarks of SD 3C LLC This product includes RSA BSAFE Cryptographic software of EMC Corporation RSA and BSAFE are registered trademarks or trademarks of EMC Corporation in the United States and other countries The proper names of Internet Explorer 7 and 8 are as follows Windows Internet Explorer 7 Windows Internet Explorer 8 The proper names of the Windows operating s...

Page 103: ...re as follows Microsoft Windows Server 2012 Foundation Microsoft Windows Server 2012 Essentials Microsoft Windows Server 2012 Standard The product names of Windows Server 2012 R2 are as follows Microsoft Windows Server 2012 R2 Foundation Microsoft Windows Server 2012 R2 Essentials Microsoft Windows Server 2012 R2 Standard The product names of Windows Server 2016 are as follows Microsoft Windows Se...

Page 104: ...4 Information for This Printer 102 Page intentionally left blank ...

Page 105: ...vironmental regulations 95 Internal options 17 Internal tray 1 12 L Label paper 51 Large capacity tray 16 LCT 16 46 48 54 55 Loading paper 43 45 46 48 Logging in the machine 80 Long tap 27 Lower paper trays 12 16 Lower right cover 13 M Main power indicator 19 Main power switch 11 30 31 Manuals 4 Message 69 74 76 77 79 80 Model specific information 8 N Note for the battery and or accumulator symbol...

Page 106: ... 28 29 Sleep mode 95 Status icon 66 Status indicator 19 Symbols 7 T Thick paper 57 Trademarks 100 Translucent paper 51 Tray 11 Tray 1 51 Tray 2 51 Tray 3 16 46 51 54 Tray 4 51 Turning off the power 31 Turning on the power 30 Two sided paper 49 U User information on electrical and electronic equipment 97 V Vents 12 13 W Web Image Monitor 35 36 Widget 29 104 EN GB EN US M0AN 7109A ...

Page 107: ......

Page 108: ... Quadient November 21 2022 ...

Reviews: