6.
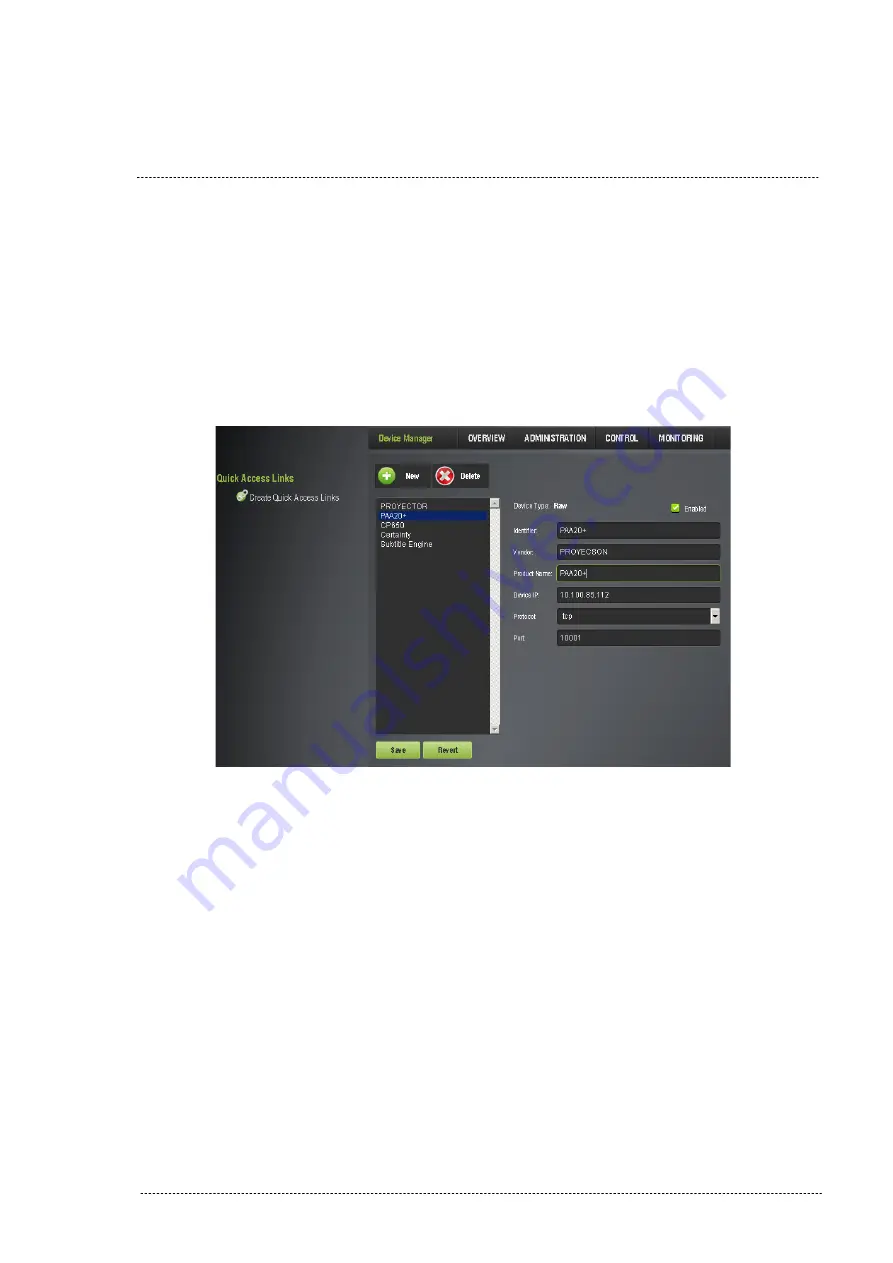
Write the IP of the PAA20+ in the field “Device IP”.
7.
Select TCP protocol on the drop-down tab “Protocol”.
8.
Write “10001” in the field “Port”.
9.
You may see the Device Manager window with this configuration on
Figure 8.3.1B
.
10.
Click on “
Save
” to save the new device.
Figure 8.3.1B
11.
You need to be authenticated as ‘admin’ in order to save
changes and to be able to configure new devices.
12.
Now the Paa20+ is configured and ready for the associated
automation and trigger cues, to be created.
INSTALLATION MANUAL: PAA20+ V 2.0 (10/2021)
66
Summary of Contents for PAA20+
Page 1: ...INSTALLATION MANUAL PAA20 V 2 0 ...
Page 40: ...Figure 7 2 7D INSTALLATION MANUAL PAA20 V 2 0 10 2021 40 Figure 7 2 7E Figure 7 2 7F ...
Page 110: ...9 2 OUTPUT 2 CONNECTOR Figure 9 2A Picture 9 2B INSTALLATION MANUAL PAA20 V 2 0 10 2021 110 ...
Page 111: ...9 3 OUTPUT 3 CONNECTOR Figure 9 3A Figure 9 3B INSTALLATION MANUAL PAA20 V 2 0 10 2021 111 ...
Page 112: ...9 4 INPUT CONNECTOR Figure 9 4A Picture 9 4B INSTALLATION MANUAL PAA20 V 2 0 10 2021 112 ...
Page 114: ...9 5 2 INPUT WITH A POSITIVE COMMON Picture 9 5 2A INSTALLATION MANUAL PAA20 V 2 0 10 2021 114 ...


