background image

Bundled Software

6-13

PL-5700 Series User’s Manual

d

d

d

d

d

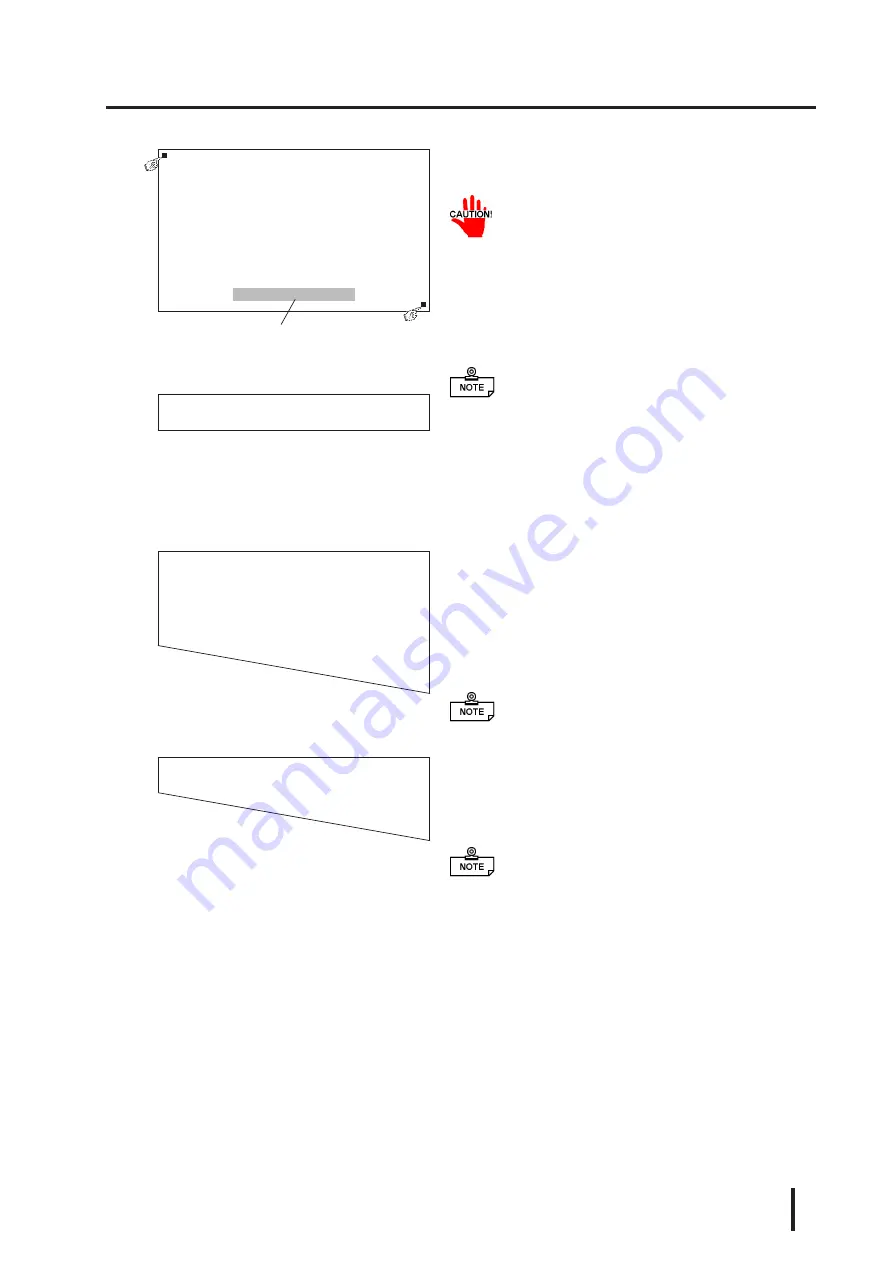
Touch each point, in the order it appears.

• Do not touch both points simultaneously.

• Touch the panel exactly on the lit up areas.

• The measured value is redisplayed if you
   touch the panel again.

The difference between the logic value and the
measured value is obtained.

• To quit programming, press the [Esc] key.

Then, when the message shown on the left
appears, press the [Y] key. The program
will end without saving data. Here, press-
ing the [N] key will return you to the cali-
bration mode.

e

e

e

e

e

Start up the “Test Mode” with the [

↵↵

↵↵

] key.

This mode tests the calibrated value to deter-
mine if it is correct or not.
The perimeter is OK if it is drawn along the path
you traced by finger. Otherwise, return to the
“Calibration Mode” and touch the lit up areas
again.

• You can return to the “Calibration Mode”

with the [Esc] key.

f

f

f

f

f

 If test results are OK, press the [Enter] key.

When the message shown at the left appears,
input the data file name and press the [

] key.

• When specifying the data file name for the pa-

rameter (-C=[path name]) at the
PLCALIB.EXE start-up, the program ends
without displaying the message shown on the
left.

Terminate program without saving calibration data?(Y/N)

Analog Touch Panel Calibration PLCALIB.EXE Version X.XX

Copyright (c) 199X Digital Electronics Corporation

Calibration Mode

Touch upper left and lower right corner of the screen.

[Enter   : Go to test mode.

   [Esc]  : Terminate program.

Upper left    Lower right

(0039.0026)  (0997.0988)

The measured value is
displayed on the screen.

Analog Touch Panel Calibration PLCALIB.EXE Version X.XX

Copyright (c) 199X Digital Electronics Corporation

Test Mode

  [Enter] : Save calibration data and Exit.

[Esc] : Return to calibration mode.

Calibration data name?  PLATPH.CAL_

Summary of Contents for PL-5700 Series

Page 1: ...ual in whole or in part without the permission of the Digital Electronics Corporation 2 The information in this manual is subject to change without notice 3 This manual was written with care however i...

Page 2: ...ates a potentially hazardous situation which could result in serious injury or even death if the instructions are not followed Indicates a potentially hazardous situation which could result in minor i...

Page 3: ...ect an appropriate installation loca tion for the PL Before either plugging in or unplugging a board or interface connector be sure to turn the PL s power OFF To prevent a possible explosion do not in...

Page 4: ...ill depend on the screen s current dis play and the LCD s contrast adjustment Any brightness variations that result are normal for LCD displays i e dark and light points There are minute grid points o...

Page 5: ...nt Specifications 2 1 3 Dimensions 2 2 2 2 Performance Specifications 2 3 1 Performance Specifications 2 3 2 Display Functions 2 4 3 Expansion Slots 2 6 2 3 Interface Specifications 2 7 1 Printer Inte...

Page 6: ...15 8 Installing an Expansion Board 3 16 Chapter 4 Installation and Wiring 4 1 Installing the PL 4 1 1 Installation Procedures 4 1 4 2 Wiring the PL 4 5 1 Connecting the Power Cord 4 5 2 Cautions 100V...

Page 7: ...7 2 Replacing the 100V Unit s Backlight 7 2 7 3 Periodic Check 7 3 Appendices 1 Hardware Configuration A 1 1 I O Mapping A 1 2 Memory Mapping A 3 3 IRQ Mapping A 4 2 Serial Communications A 5 3 Print...

Page 8: ...eUnit PL MC000 3 2 6 Installing the IDE Slave Adapter PL SA000 3 2 7 Installing the Flash ROM Board PL FR000 Turn the PL ON Refer to 4 2 Wiring the PL System Setup Refer to Chapter 5 System Set up OS...

Page 9: ...a service life of 45 000 hours Easy Front Panel Installation The PL is designed to be installed easily into the front of any panel or device It is also rugged enough for use in harsh industrial enviro...

Page 10: ...Indicates pages containing related information 1 2 Indicates steps used to accomplish a given task Be sure to follow these steps in the order they are written Unpacking the PL The PL package should in...

Page 11: ...board Peripheral device Peripheral device Printer RS 232C I F RS 485 I F Printer I F 12 VDC output Inverter power supply FDD unit memory card I F unit FD I F Analog resistance film touch panel Displa...

Page 12: ...0 3 MB silicon disk unit compatible with hard disks P L FF001 10 MB silicon disk unit compatible with hard disks Flash ROM board P L FR000 Flash ROM board which accommodates up to two 2 MB R O M drive...

Page 13: ...LCD PL 5701L1 PL 5700L1 STN color LCD PL 5701S1 PL 5700S1 TFT color LCD PL 5701T1 PL 5700T1 PL5700T1 24VC 1 Slot type 3 Slot Type 1 3 PL Series Panel Types Model number P L 5 7 0 0 T 1 24VC PL 5700 se...

Page 14: ...PL 5700 Series User s Manual 1 4 MEMO This page is intentionally left blank...

Page 15: ...ns 2 4 PL External Features 2 5 PL Dimensions Power suppl y voltage 85 132 VAC 50 60 Hz Power consumption P L 5700T 1 P L 5700S1 P L 5700L1 Max 150 VA P L 5701T1 PL 5701S 1 PL 5701L1 Max 120 VA Allowa...

Page 16: ...1T1 0 C 4 to 5 C PL 5700S1 PL 5701S1 PL 5700L1 PL 5701L1 0 C to 40 C Ambient humidity 30 R H 85 R H non condensing S torage temperature 10 C to 60 C Operating ambient atmos phere Free of corrosive gas...

Page 17: ...P hoenix P C compatible Touch pan el Method Analog resistance film system R es olution 1024 x 1024 Effective area 10 4 screenand surrounding function key areas Interface S erial R S 232C C OM1 DB 9 p...

Page 18: ...rove the display quality The higher the contrast between the foreground and background colors is the more likely that crosstalk will occur Either changing the color combination or decreasing the contr...

Page 19: ...w your program will appear on the PL Black and white tiled displays often appear better than multi colored displays If you wish to use halftones be sure to check their display quality during actual PL...

Page 20: ...Manual 3 Expansion Slots The PL does not supply 5 or 12 V As a result ISA AT bus compatible boards which require 5 or 12 V are not available All the DB connectors for external interfaces are equipped...

Page 21: ...25 24 23 22 21 20 19 18 17 16 15 14 Mini DIN 6 pin female connector 6 4 2 1 3 5 TCS7568 43 201 manufactured by HOSHIDEN or equivalent 6 5 Common to keyboard connectors on front and side panels 2 Keybo...

Page 22: ...them This unit s RS 485 RS 422 Port is not isolated there fore it is crucial that you connect the SG GND Signal Ground terminals If this is not done the RS 485 RS 422 circuit may be damaged 4 RS 232C...

Page 23: ...tenance panel PL Rear Panel J10 J9 J5 In the drawing below indicates a shorted jumper and indicates an open jumper 1 2 3 1 2 3 1 2 3 Jumper Setting Factory default J5 COM2 To set pin 9 to RI input 5V...

Page 24: ...e SETUP utility CONTSET EXE or WCONTSET EXE for contrast adjustment instead of this contrast knob See 5 2 1 Main Backlight Contrast and 6 1 File List Normally contrast adjustments are not required sin...

Page 25: ...COM3 RS 485interface whichallowscommunication with other computers or connection to periph eral devices H RS 232C connector COM1 I RS 232C connector COM2 RS 232Cinterfaces DB9 pinmaleconnectors which...

Page 26: ...ntenance cover Remove this cover to install the optional external cache board flash ROM board or DIM module Q Power switch Use this switch to turn the PL s power ON or OFF R Power input terminal strip...

Page 27: ...Top panel 290 Measured in mm excluding projections Effective area 211 2 W x 158 4 H 312 272 129 3 116 1 Side panel 13 2 250 312 272 Side panel Rear panel Front panel 2 5 PL Dimensions 1 PL 5700T1 24VC...

Page 28: ...es User s Manual 2 PL 5701T1 PL 5701S1 PL 5701L1 General Dimensions Measured in mm excluding projections Side panel Rear panel 96 3 83 1 Side panel 13 2 312 Front panel Top panel 290 272 Effective are...

Page 29: ...anual 3 Installation Hole Dimensions Measured in mm Allowable panel plate thickness is from 1 6 to 10 mm To obtain maximum moisture resistance be sure to mount the PL on a flat smooth panel free of an...

Page 30: ...Specifications 2 16 PL 5700 Series User s Manual MEMO This page intentionally left blank...

Page 31: ...T compati ble 3 5 F DD unit for development and maintenance E xternally connected Us eas e ithe r a sta nd alone unit or atta ch to P L s rear panel The memory card interface unit can be also used whe...

Page 32: ...y not be compatible with Digital s PL unit Installing incompatible boards may result in either damage to or failure of the PL and will void your warranty Main Memory Be sure to use only DIM modules ma...

Page 33: ...it may damage the equipment The procedures explained in this section apply to all PL models even though only the PL 5700T1 is shown 1 Installing DIM Modules PL EM000 EM001 EM002 Be careful when inser...

Page 34: ...DIM module Carefully spread the clips on both edges of the DIM module in the direction of the arrows to remove the module 2 Hold the DIM module connector at an angle to the DIMM socket and insert the...

Page 35: ...nscrew the screw on the rear mainte nance hatch and remove the hatch 2 Attach the external cache memory board to the cache board connector and lock it down by tightening the two screws which came with...

Page 36: ...000 FF001 1 Loosen the attachment screw on the side panel of the PL to remove the HDD cover Remove the HDD cover HDD connector HDD cover Note This drawing shows the PL 5700T1 unit 3 slot type 2 Insert...

Page 37: ...with the seal is facing up PL HD000 4 Insert the cable into the PL HD000 unit s connector Be careful that the pins are aligned as shown in the drawing here The four pins on the far right will be unus...

Page 38: ...s adhesive strip s cover 4 As shown in the figure here align the Heat Protector s bent edges with the spaces in the edge s of the HD unit See Reference Line 5 Screw the left and right side spacers int...

Page 39: ...il drawing to be sure the cable is connected correctly The four pins on the far right will be unused 8 Place the cover back in place and fasten its attachment screws in place When the Heat Protector i...

Page 40: ...panels of the PL to remove the dummy unit If the PL FD000 is installed the dummy unit will no longer be neces sary 2 Attach the PL FD000 cable to the FDD connector 4 Installing the FDD Unit PL FD000 F...

Page 41: ...e REAR panel of the PL use the four screws which came with the FDD unit to attach the mounting brackets on the top and bottom panels of the FDD unit To install the PL FD001 on the PL s other panel use...

Page 42: ...le with the PL FD001 s cable clamps When installing the PL MC000 keep the cable away from the memory card s interface Otherwise the memory card cannot be installed 2 Insert the PL FD001 cable into the...

Page 43: ...unit is no longer needed after the memory card interface unit is installed 2 Attach the PL M000 cable to the PL s memory card connector 3 To insert the PL MC000 slide the unit downwards towards the fr...

Page 44: ...ct the DC power cord which came with the PL SA000 to the DC OUT con nector 4 To connect a commercially available CD ROM drive first attach the PL SA000 s CD ROM drive connection cable to the PL SA000...

Page 45: ...the attachment screw on the rear maintenance cover and remove the cover 2 Attach the PL FR000 to the optional board connector and lock it in place with the four mounting screws which came with the PL...

Page 46: ...ex pansion slot 3 Secure the board in place with the two mounting screws If your expansion board does not have a front panel fasten it in place with the PL s internal screw holes and externally attac...

Page 47: ...rewdriver to insert the two cover attach ment screws into their respective cover holes use only M3x6 screws When the maintenance cover is secured replace the previously removed unit Front maintenance...

Page 48: ...These two items the moisture resistant packing and the mounting brackets are required when installing the PL See 2 5 External Appearance and Dimensions To obtain the maximum level of mois ture resista...

Page 49: ...0 C for the PL 5700T1 24VC PL 570 S1 and PL 570 L1 and 45 C for the PL 570 T1 KeepthePLawayfromarc generatingdevicessuch as magnetic switches and non fuse breakers Must be 30 degrees or less OK OK OK...

Page 50: ...hole and slide the bracket backwards Use a driver to tighten the bracket s adjustment screw To ensure a high degree of moisture resistance the torque should be 0 5 to 0 6 N m Excessive torque may dam...

Page 51: ...rs of fire electric hazards and damage to equipment use only the specified power supply voltage The power cord must be connected to the power terminals on the rear of the PL WARNING Power switch Screw...

Page 52: ...re the POWER switch is OFF Then remove the power in put terminals transparent cover located on the rear panel of the PL 2 Loosen and remove the middle three screws from the terminal board Align crimp...

Page 53: ...es and power supply devices sepa rately To improve noise immunity it is recom mended to attach a ferrite core to the power cord Isolate the main circuit high voltage large current line I O signal line...

Page 54: ...d wires and run them through conduits c Shared ground not allowed PL PL Other device Other device Other device Class III Ground Class 3 PL 4 Cautions When Connecting I O Signal Lines I O signal lines...

Page 55: ...td Main Advanced Power Exit System Time 15 00 00 System Date 08 25 1995 Diskette A Not Installed Diskette B Not Installed IDE Adapter 0 Master None IDE Adapter 0 Slave None Video System EGA VGA Memory...

Page 56: ...enu Changes the value at the cursor position F9 Returns the parameters listed in the system setup area to the default val ues ESC Goes to the Exit menu Changes the menu screens Enter If the Enter key...

Page 57: ...nges given below Month 01 12 Day 01 31 Year four digits Use the Enter key to place the cursor on an item you want to change and enter the desired value Diskette A Diskette B These parameters are requi...

Page 58: ...k settings from 1 to 39 which matches your hard disk specifications If a correct set is not found select the User option and set val ues for the Cylinders Heads Sectors Track and Write Precomp param e...

Page 59: ...the drive from which you want to start the OS BackLight Contrast With the PL 5700L1 and PL 5701L1 adjust the brightness and contrast for the display With the PL 5700S1 and PL 5701S1 only the contrast...

Page 60: ...e default value 2 Advanced Select the Advanced menu from the menu bar to display the following window PhoenixBIOS Setup Copyright 1985 95 Phoenix Technologies Ltd Main Advanced Power Exit Warning Sett...

Page 61: ...ss The selec tions include Disabled 3BC IRQ7 378 IRQ7 or 278 IRQ5 When using any setting other than Disabled the LPT mode setting must be changed to Outout Only or Bi Directional The factory setting i...

Page 62: ...Enter key to set advanced parameters for the chipset Normally use the default value System Information Default values ATCLK Selection Multiple ALE xtra bus wait states Master mode byte swap Parity che...

Page 63: ...the key is pressed the selections are highlighted in the following order Disabled 1min 2min 3min 4min 5min 10min 16min Each press of the key moves the selection in the opposite direction PhoenixBIOS...

Page 64: ...meter settings to the default Load Previous Values Select this option to load the parameter settings from the CMOS Save Changes Select this option to store your changes in the CMOS PhoenixBIOS Setup C...

Page 65: ...ed s of t wa re The following software runs on Windows 3 1 3 11 and or Windows 95 File name Des cription WCONTSET E XE C ON TS ET uti li ty s e xp la na ti o n a nd up d a te fo r W ind o ws 3 1 W in...

Page 66: ...ution 640 x 480 It is also compatible with Digital P anel Computers of the PL 386 family P LC ALIB E XE Touch panel data calibration Bytouching the specified position on the panel the difference betwe...

Page 67: ...The relationship between touch panel coordinates and display coordinates is as fol lows Function area Touch panel Virtual coordinates coordinates 0 40 1024 1024 Display coordinates Display coordinate...

Page 68: ...he PLCALIB EXE application touch panel data calibration When defaulted to the PLATPH CAL of the current directory is specified Example platph a2e8 q10 cc platph cal Normally only platph is needed At s...

Page 69: ...put AH 0 Successfully completed BX Y coordinate in 640 x 480 mode 40 519 DX X coordinate in 640 x 480 mode 0 639 CX Number of valid input buffers on touch panel 8101h Touch panel input immediate resto...

Page 70: ...Output AH 0 Successfully completed 8500h Touch panel status detection Returns touch panel status Input AX 8500h Output AH Status in 640 x 480 mode For an explanation on how to use the function see fun...

Page 71: ...00h Touch panel status detection 0000h Touch panel initialization Same as 0200h Input buffer clear Input AX 0000h Output AH 0 Successfully completed 0100h Touch panel input unrestricted wait Returns c...

Page 72: ...gment from coordinate code management table DI Offset from coordinate code management table Output AH 0 Successfully completed Relationship between coordinate code management table and coordinate code...

Page 73: ...nate code of 1st area code Left side X coordinate of nth area X1 Top side X coordinate of nth area Y1 R ight side X coordinate of nth area X2 Bottom side X coordinate of nth area Y2 Coordinate code of...

Page 74: ...inate codes 0402h Coordinate code non destructive input Returns coordinates of the area position touched Does not update the touch panel input buffer Input AX 0402h Output AH 0 Input on 1 when input i...

Page 75: ...g until touch panel area is released Touch panel area held down Function 0500h Bit 0 Bit 1 To next touch panel input Coordinates changed while touch panel area is pressed or Function 0101h Input Proce...

Page 76: ...nterrupt level IRQ of the touch panel s SIO port Default 10 COM4 n 4 COM1 3 COM2 11 COM3 10 COM4 c path name Specifies the data file containing the calibrated value obtained from the PLCALIB EXE appli...

Page 77: ...de and touch the lit up areas again You can return to the Calibration Mode with the Esc key f f f f f If test results are OK press the Enter key When the message shown at the left appears input the da...

Page 78: ...check the fan There is no function for silencing the buzzer Only turning the power OFF will turn it off In a multitasking environment such as Windows the buzzer may be turned off by another task 3 BLS...

Page 79: ...come dirty use a soft cloth moistened with neu tral detergent to wipe away dust or stains Do not clean the unit with thinner organic solvents or strong acids Do not use sharp or hard objects such as a...

Page 80: ...the 100V unit s display becomes dark while running the PL there may be a problem with the backlight If a problem is found or if the backlight is burnt out you will need to replace it with a new one Wi...

Page 81: ...00T1 24VC PL 5701S1 PL 5700L1 and PL 5701L1 Is the ambient humidity within the specified range 30 to 85 RH Is the atmosphere free of corrosive gas Electrical specifications check Is the voltage adequa...

Page 82: ...Maintenance and Inspection 7 4 PL 5700 Series User s Manual MEMO...

Page 83: ...NMI mask 0080H 009FH DMA bank register 00A0H 00BFH Interrupt controller 8259A 00C0H 00DFH DMA controller 2 8237 00F0H 00FFH Numeric data processo r 0103H Used by main board 016CH 016FH Used by main bo...

Page 84: ...n it to other devices Bit name Des cription REG0 R ead Write 1 R EG1 R ead Write 1 R EG2 R ead Write 1 S EL1 S u per I O S ELEC T 1 FDD MODE 2MB 1 6MB 1 IO INIT S u per I O initialization 1 Normal ope...

Page 85: ...K B IOS Bank area 3 VGA BIOS V R AM Main memory 640 K B 2000000H 1000000H 0EC0000H 0CC0000H 0C80000H 0C00000H 0CE0000H 0A00000H 0000000H 2 Memory Mapping 1 This area is reserved for extended boards 2...

Page 86: ...erial port 2 C OM2 General purpose port IRQ 4 S erial port 1 C OM1 General purpose port IRQ 5 Available LPT2 IRQ 6 Floppy disk controller IRQ 7 P arallel port 1 LP T1 Printer port IRQ 8 R eal time clo...

Page 87: ...ommunications by interrupt Therefore install a reception interrupt function in the application include stdio h include dos h union REGS ir or main ir h ah 0x00 Initialization ir h al 0xe3 9600bps 8bit...

Page 88: ...ort Printer 36 pin port PL Dsub 25 pin male connector 11 1 STROBE 19 14 AUTOFD 12 2 DATA 0 20 15 ERROR 13 3 DATA 1 21 16 INIT 14 4 DATA 2 22 17 SLCTIN 15 5 DATA 3 23 18 GND 16 6 DATA 4 24 19 GND 17 7...

Page 89: ...ade with the Touch Panel Handler Compiler Method cl sample c If not adding GRAPHICS LIB to SLIBCE LIB add link graphics lib This sample program is designed to perform processing based on the touch pan...

Page 90: ...61 Buzzer ON OFF define BEEP_TIME 20000 Beep s ON period define FALSE 0 define TRUE 1 struct function_coordinate short sx X coordinate left upper short sy Y coordinate left lower short ex X coordinate...

Page 91: ...on Sheet 7 280 479 319 519 0x0938 Function Sheet 8 320 479 359 519 0x0a39 Function Sheet 9 360 479 399 519 0x0b30 Function Sheet 0 400 479 439 519 0x342e Function Sheet 440 479 479 519 0x272b Function...

Page 92: ...0x35 Function Sheet 5 6 0x36 Function Sheet 6 7 0x37 Function Sheet 7 8 0x38 Function Sheet 8 9 0x39 Function Sheet 9 0 0x30 Function Sheet 0 0x2e Function Sheet 0x2b Function Sheet B S 0x08 Function...

Page 93: ...void buzzer_off void outp CTRL8042 inp CTRL8042 0xfc Buzzer Off WAIT TOUCHPANEL OFF void wait_touch_off void while 1 inregs x ax TP_CONDITION int86 ATPH_SYS_CALL inregs outregs if outregs h ah 3 Touc...

Page 94: ...regs outregs if outregs h ah 0 Touch Panel On value FALSE for i 0 tpcd i sx i if Time in area short outregs x dx tpcd i sx short outregs x bx tpcd i sy short outregs x dx tpcd i ex short outregs x bx...

Page 95: ...ut of area wait_touch_off KEYBOARD INPUT int keyboard_on void int i ky if kbhit ky getch for i 0 kbcd i keycode i if ky kbcd i keycode printf push key is s r kbcd i keyname if ky ZKEYCODE printf push...

Page 96: ...printf error can t set graphics mode exit 1 ERROR Program End _rectangle _GBORDER tpcd 0 sx tpcd 0 sy tpcd 0 ex tpcd 0 ey MAKE A SCREEN FRAME printf please push touchpanel or key n printf End program...

Page 97: ...nt cursor line position C u rrent cursor column position R e ading light pen position AH 04h AH B X C H C X DH DL 0 Light pen switch is off 1 Light pen switch is on X coordinate 0 319 639 Y coordinate...

Page 98: ...L B H C X DX 0Ch Attribute P age No X coordinate Y coordinate R eading point in graphic mode AH B H C X DX 0Dh P age No X coordinate Y coordinate AL Attribute Writing character attribute at cursor pos...

Page 99: ...ting pallet page AH AL B L B H 10h 13h 01h E x pansion pallet page No R eading expansion pallet register AH AL B X 10h 15h E x pansion pallet register to read R eading block in expansion pallet regist...

Page 100: ...dress in user defined table 8 x 14 dot font registration PC character set inside video BIOS R OM Video controller auto set AH AL B L 11h 11h C h aracter generator bank No 8 x 8 dot font registration P...

Page 101: ...e turn 8 x 8 font 80h address with 4 E S BP register 5 R e served C X DL E S BP Number of vertical bits per character Number of lines per screen 1 Address of data specified in B H P erformance selecti...

Page 102: ...character in character string Top address in character string C haracter output and attribute selection without cursor movement AH AL BH C X DH DL ES BP 13h 02h P age No Number of characters S t arti...

Page 103: ...allet register ssa ve restore Address of data save area AL 1Ch S u ccessf ully executed S t atus save as AH AL C X ES BX 1Ch 02h R equest status Bit 0 Video hardware status Bit 1 Video BI OS data area...

Page 104: ...erflowed Hard disk status table S t atus Description 00h 01h 02h 04h 07h 08h 10h 20h 40h 80h BBh S u ccessf ully completed Wrong command sent C annot find address mark C annot find requested sector Dr...

Page 105: ...ack C y linder No Insignificant 8 bits Track C y linder No S ignificant 2 bits Bits 7 8 Head No Drive No Top address in format data table C Y AH 0 S u ccessf ully completed 1 Error S t atus R eading d...

Page 106: ...y 00h No disk 01h Floppy disk unchanged 02h Disk was changed 03h Hard disk Media change check AH DL 16h Drive No AH 00h Disk unchanged 01h Inconsistent parameter 06h Disk was changed C arry bit ON 80h...

Page 107: ...byte data AH AL DX 01h Data to send P ort No AH Line control status Bit 7 Time over error Bit 6 Transmission shift register empty Bit 5 Transmission hold register empty Bit 4 Break detected Bit 3 Fram...

Page 108: ...its C Y 0 S u ccessf ully completed 1 Already triggered or not supported Transmitting memory block in protect mode AH E S SI 87h Top address in descriptor ZF C Y AH 1 S u ccessf ully completed 1 Error...

Page 109: ...h S econdary code P rimary code AL 00h Successf ully completed 01h No available space in buffer CY 1 Wiring data by key input 101 AX keyboard compatible AH 10h AH AL S econdary code P rimary code C ha...

Page 110: ...C H C L DH DL 03h Hours B CD Minutes B CD S e conds B CD S u mmertime option 0 or 1 R e ading date AH 04h C H C L DH DL C Y Western calendar Year given as 2 digit BC D significant 2 bits 19 or 20 Year...

Reviews: