Replacement of Parts - Page 45
6.15
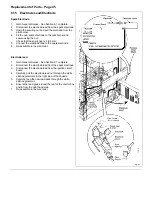
Electrode Lead/Electrode
Spark Electrode.
1.
Gain General Access - See Section 6.1 complete.
2.
Disconnect the electrode lead from the spark electrode.
3.
Undo the securing nut and pull the electrode from the
pilot burner.
4.
Fit the new spark electrode to the pilot burner and
secure using the nut.
Check that the spark gap is 3 to 4mm.
5.
Connect the electrode lead to the spark electrode.
6.
Re-assemble in reverse order.
Electrode lead.
1.
Gain General Access - See Section 6.1 complete.
2.
Disconnect the electrode lead from the spark electrode.
3.
Disconnect the electrode lead from the ignition circuit
board.
4.
Carefully pull the electrode lead out through the white
silicone grommets in the right side of the chassis.
5.
Carefully feed the new lead back through the white
silicone grommet.
6.
Ensure the lead goes around the rear of the control box
and in from the right hand side.
7.
Re-assemble in reverse order.
Summary of Contents for Ultra 2
Page 6: ...Installation Requirements Page 6 Fig 1 ...
Page 7: ...Installation Requirements Page 7 Fig 2 ...
Page 9: ...Installation Requirements Page 9 ...
Page 37: ...Routine Maintenance Page 37 ...
Page 51: ...7 Wiring Diagrams Page 51 ...
Page 52: ...Wiring Diagrams Page 52 Ultra 2Dv ...
Page 53: ...Wiring Diagrams Page 53 Ultra 2 ...
Page 54: ...54 Fault Finding Part No 405 0522 8 Fault Finding Guide Page 54 ...
Page 55: ...Part No 405 0522 Fault Finding 55 Fault Finding Guide Page 55 ...
Page 56: ...56 Fault Finding Part No 405 0522 Fault Finding Guide Page 56 ...
Page 57: ...Part No 405 0522 Fault Finding 57 Fault Finding Guide Page 57 ...

