


60
z
ESC = n
Select peripheral device
Format: ASCII
ESC
= n
Decimal 27
61
n
Hex 1B
3D
n
Range: 0
≤
n
≤
255
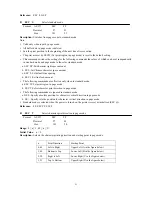
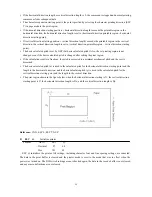
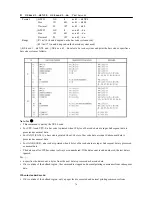
ESC = n selects the device to which the host computer sends data, based on the value of n as follows:
Bit Off/On Hex Decimal
Function
Off 00 0
Printer
disabled
0
On 01 1
Printer
enabled
1-7 - - -
Undefined
When the LSB (least significant bit) of n is 1, the printer is enabled; when it is 0, the printer is disabled.
When the printer is disabled, it ignores all received data with the exception of DLE ENQ 1 and DLE ENQ 2.
The default setting is n. If ASB is enabled when the printer is disabled by ESC =, the printer transmits a 4-byte
status message whenever the status changes.
z
ESC
*
Select bit-image mode
Format: ASCII
ESC
*
m nL nH d1 ... dk
Decimal 27
42
m nL nH d1 ... dk
Hex
1B
2A
m nL nH d1 ... dk
Range: m=0, 1, 32, 33
0
≤
nL
≤
255
0
≤
nH
≤
3
0
≤
d
≤
255
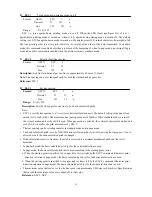
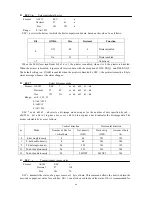
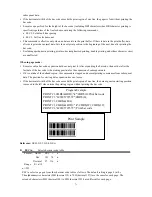
ESC * m nL nH d1 ... dk selects a bit-image mode using m for the number of dots specified by (nL +
nH×256). Set a bit to 1 to print a dot, or set a bit to 0 to not print a dot. d indicates the bit image data. The
modes selectable by m are as follows:
Vertical direction
Horizontal direction
m Mode Number of bits for
vertical data
Dot density
(DPI)
Dot density
(DPI)
Amount of data
(k)
0 8-dot
single-density
8
68
101
192
1 8-dot
double-density
8
68
203
384
2 24-dot
single-density
24
203
101
192
33 24-dot
double-density
24
203
203
384
39 24-dot
double-density
24
203DPI
203DPI
384
z
ESC v
Transmit paper sensor status
Format: ASCII
ESC
v
Decimal 27
118
Hex 1B
76
ESC v transmits the status of a paper sensor as 1 byte of data. This command allows the host to obtain the
near-end or paper-out status for each line. GS r 1 can also be used to check the status. GS r is recommended for
Summary of Contents for PP7X Series
Page 1: ...PP7X PRINTER OPERATION MANUAL Pinnacle Technology Corp ...
Page 2: ......
Page 17: ...14 Click Finish to finish USB driver installation Click Install ...
Page 18: ...15 Finally click Finish to finish printer driver installation Click Finish ...
Page 20: ...17 Select the connecting port Click it ...
Page 25: ...22 Choose Device Manager Here you can see the connecting port ...
Page 30: ...27 Input the printer IP address Click Next ...
Page 31: ...28 Choose device type we suggest that you choose the standard type Click Next Click Finish ...
Page 32: ...29 Click it ...
Page 39: ...36 Select this item Click Next ...
Page 41: ...38 Installing the BT device automatically Here shows the connecting port is COM3 Click Finish ...
Page 43: ...40 Click Next Click Install ...
Page 44: ...41 Click Finish ...
Page 46: ...43 Double click it to search Double click it ...
Page 47: ...44 Double click it Input the passkey 0000 to create paired relationship ...
Page 76: ...DPP701ENV0 12 ...


