


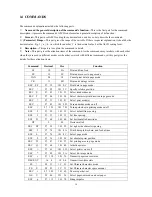

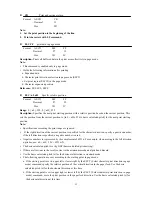


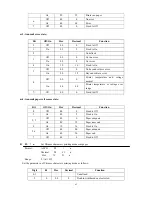

51
GS !
29 33
1D 21 Select character size
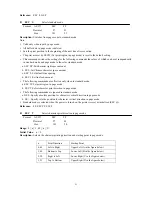
GS $
29 36
1D 24
Specify absolute position for character vertical direction
in page mode
GS L
29 76
1D 4C Set left margin
GS \
29 92
1D 5C
Specify relative position for character vertical direction
in page mode
GS P
29 80
1D 50 Set basic calculated pitch
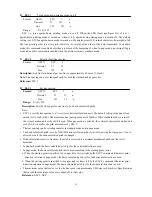
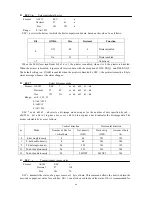
Command Decimal Hex
Function
GS H
29 72
1D 48 Select printing position of HRI characters
GS h
29 104
1D 68 Set bar code height
GS w
29 119
1D 77 Set bar code width
GS k
29 107
1D 6B Print bar code
ESC t
27 116
1B 74 Select character code table
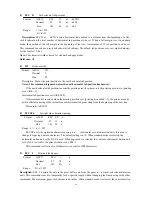
z
LF
Print and line feed
Format: ASCII
LF
Decimal
10
Hex
0A
Note:
1.
LF prints the data in the print buffer and fed per line based on the current line space.
2.
Print characters with CR command.
z
FF
Print and recover to page mode
Format: ASCII
FF
Decimal
12
Hex
0C
Description:
Prints all buffered data to the print region collectively, then recovers to the standard mode.
Note:
∗
All buffer data is deleted after printing.
∗
The print area set by ESC W (Set print region in page mode) is reset to the default setting.
∗
No paper cut is executed.
∗
Sets the print position to the beginning of the next line after execution.
∗
This command is enabled only in page mode.
Reference:
ESC FF, ESC L, ESC S
z
CAN
Cancel
Format: ASCII
CAN
Decimal
24
Hex
18
Description:
Deletes all print data in the currently set print region in page mode.
Note:
.
∗
This command is enabled only in page mode.
∗
Portions included in the currently set print region are also deleted, even if previously set print region data.
Reference:
ESC L, ESC W
Summary of Contents for PP7X Series
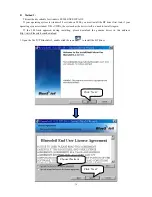
Page 1: ...PP7X PRINTER OPERATION MANUAL Pinnacle Technology Corp ...
Page 2: ......
Page 17: ...14 Click Finish to finish USB driver installation Click Install ...
Page 18: ...15 Finally click Finish to finish printer driver installation Click Finish ...
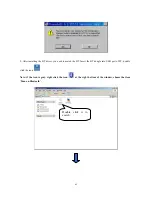
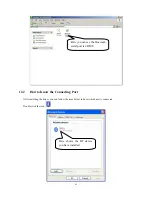
Page 20: ...17 Select the connecting port Click it ...
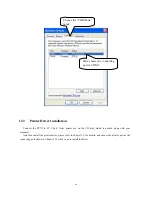
Page 25: ...22 Choose Device Manager Here you can see the connecting port ...
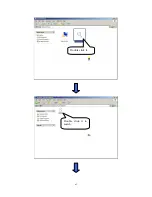
Page 30: ...27 Input the printer IP address Click Next ...
Page 31: ...28 Choose device type we suggest that you choose the standard type Click Next Click Finish ...
Page 32: ...29 Click it ...
Page 39: ...36 Select this item Click Next ...
Page 41: ...38 Installing the BT device automatically Here shows the connecting port is COM3 Click Finish ...
Page 43: ...40 Click Next Click Install ...
Page 44: ...41 Click Finish ...
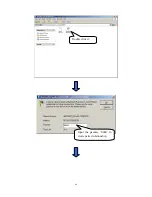
Page 46: ...43 Double click it to search Double click it ...
Page 47: ...44 Double click it Input the passkey 0000 to create paired relationship ...
Page 76: ...DPP701ENV0 12 ...


