


49
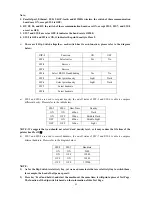
Note:
1.
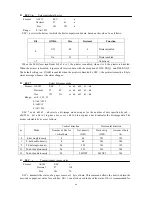
Parallel port, Ethernet, USB, 2.4G P-tooth, and 433MHz wireless, the switch of these communication
boards are ON, except SW-5 is OFF;
2.
BT, P8, P6, and D9, the switch of these communication boards are ON, except SW-5, SW-7, and SW-8
are set as OFF;
3.
SW-7 and SW-8 are set as OFF, it indicates the baud rate is 115200;
4.
SW-5 is OFF and SW-6 is ON, it indicates the print density is Class 2.
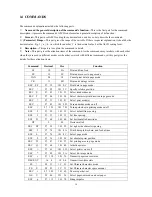
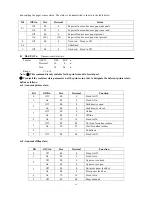
¾
There are 8 Dip Switch altogether, each switch has its own function, please refer to the diagram
below:
a)
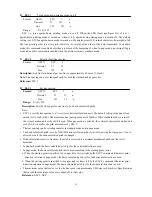
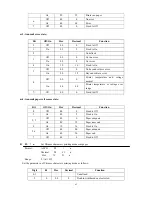
SW-5 and SW-6 are used to set print density, the on/off status of SW-5 and SW-6 is able to compose
differernt desity. Please refer to the table below:
SW-5 SW-6 Heat
Time
Density
ON ON 600us
Dark
ON OFF 500us Middle
Dark
OFF ON 420us Middle
Light
OFF OFF 360us
Light
NOTE: We suggest that you should not select ‘dark’ density level, or it may reduce the life time of the
printer head for 15
%
.
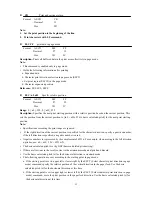
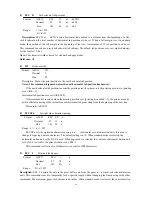
b)
SW-7 and SW-8 are used to control baudrate, the on/off status of SW-7 and SW-8 is able to compose
diferent baudrate. Please refer to the diagram below:
SW-8 SW-7
Baudrate
ON ON
9600
ON OFF
19200
OFF ON
38400
OFF OFF
115200
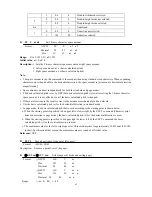
NOTE:
1)
As for the Dip Switch is relatively tiny, yet we need some tools that are relatively tiny to switch them,
for example, the head of ball pen or pencil.
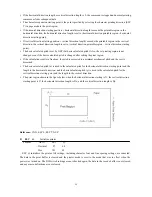
2)
Press key ‘Feed’ and hold it, and start the machine at the same time, it will print a piece of Test Page.
The function of the dip switch is based on the information of this Test Page.
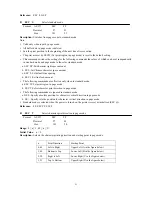
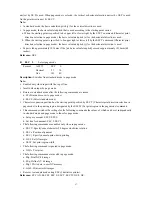
DIP-8 Function
ON
OFF
SW-1 Select
cutter
Yes No
SW-2 Reserve
SW-3 Reserve
SW-4 Select
RS232
HandShaking
Yes
No
SW-5 Select
density
Light
Dark
SW-6 Select
density
Light Dark
SW-7 Select
baudrate
SW-8 Select
baudrate
Summary of Contents for PP7X Series
Page 1: ...PP7X PRINTER OPERATION MANUAL Pinnacle Technology Corp ...
Page 2: ......
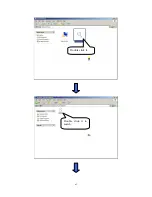
Page 17: ...14 Click Finish to finish USB driver installation Click Install ...
Page 18: ...15 Finally click Finish to finish printer driver installation Click Finish ...
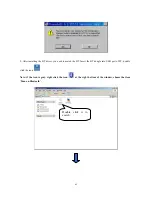
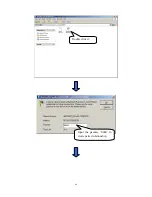
Page 20: ...17 Select the connecting port Click it ...
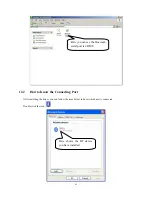
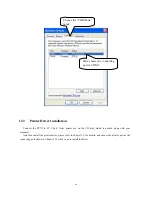
Page 25: ...22 Choose Device Manager Here you can see the connecting port ...
Page 30: ...27 Input the printer IP address Click Next ...
Page 31: ...28 Choose device type we suggest that you choose the standard type Click Next Click Finish ...
Page 32: ...29 Click it ...
Page 39: ...36 Select this item Click Next ...
Page 41: ...38 Installing the BT device automatically Here shows the connecting port is COM3 Click Finish ...
Page 43: ...40 Click Next Click Install ...
Page 44: ...41 Click Finish ...
Page 46: ...43 Double click it to search Double click it ...
Page 47: ...44 Double click it Input the passkey 0000 to create paired relationship ...
Page 76: ...DPP701ENV0 12 ...