background image

Wiring

Operating Manual PMCprotego S2-2(-C)
1002529-EN-04

51

6.3

Shielding

For immunity reasons, the signal lines for the digital inputs and outputs must be shielded:

}

All shielded cables are to be attached at both ends to the shield terminals provided.

}

Use cables with a braided shield, with a minimum coverage of 80 %.

}

Any interruptions to the shielding e.g. at terminals, should be bridged at low impedance
over a wide area.

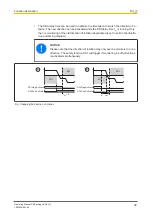
The shields for the digital inputs and outputs should be connected to the front of the servo
amplifier, as shown in the diagram below.

(1)

(2)

(3)

Remove the outer cable sheath and the
braided shield to the required wire length.
Secure the wires with a cable tie.

Remove the outer cable sheath to a length
of approx. 30 mm. Be careful not to damage
the braided shield.

Strip all the wires and fit end ferrules.

Use the cable ties to attach the cable to the
shielding plate on the side (1) or bottom (2)
of the servo amplifier. Press the cable's
braided shield firmly against the shielding
plate on the servo amplifier using a cable
tie.

Alternatively you can use the shielded con-
nection terminals (3) (available as an ac-
cessory). These hook into the bottom
shielding plate and guarantee optimum con-
tact between the shield and the shielding
plate.

Summary of Contents for PMCprotego S2-2

Page 1: ...PMCprotego S2 2 C Operating Manual 1002529 EN 04 PMCprotego Safe Motion...

Page 2: ...umentation will be gratefully received Source code from third party manufacturers or open source software has been used for some components The relevant licence information is available on the Interne...

Page 3: ...ion description 13 4 1 Overview 13 4 2 Inputs and outputs 14 4 2 1 Inputs 15 4 2 2 Outputs 16 4 2 2 1 Single pole outputs 16 4 2 2 2 Output test 17 4 3 Safety functions 19 4 3 1 Safe torque off STO 19...

Page 4: ...s SS1 Activate or Reset 60 7 3 2 2 Command CLRFAULT 61 7 3 3 Swap safety card 62 7 3 3 1 Download configuration from Configurator to safety card 63 7 3 3 2 Download configuration to SD card 64 7 3 3 3...

Page 5: ...the commissioning software PASmotion All these manuals can be found on the supplied DVD Motion Control You will need to be conversant with the information in these documents in order to fully un derst...

Page 6: ...tion in which the product or devices could be dam aged and also provides information on preventive measures that can be taken It also highlights areas within the text that are of particular import anc...

Page 7: ...2 fixed assignment Safety function Safe Stop 1 SS1 Input to reset the safety card after an error 7 single pole digital inputs which can be assigned the following safety functions in accord ance with...

Page 8: ...1 12 13 14 15 16 17 18 19 20 21 22 RUN POWER STO CONFIG X30 8176106 12 100001 1 3 4 5 2 1 3 Key 1 Screw for attachment to the servo amplifier 2 LEDs to display operating states 3 Inputs outputs and su...

Page 9: ...the safe pulse disabler The following is deemed improper use Any component technical or electrical modification to the servo amplifier Use of the servo amplifier outside the areas described in this ma...

Page 10: ...thin one mechanical revolution of the motor Linear synchronous motors Detected within the distance travelled in accordance with the following formula Distance Number of poles 2 Pole pair pitch Command...

Page 11: ...national European and international laws directives and standards It is the company s responsibility only to employ personnel who Are familiar with the basic regulations concerning health and safety...

Page 12: ...hinery Safety related parts of control systems Part 1 General principles for design Part 2 Safety validation EN 61508 Functional safety of safety related electrical electronic programmable elec tronic...

Page 13: ...nsists of the following Servo amplifier PMCprotego D Safety card PMCprotego S built into the servo amplifier Servo motor synchronous motor with Standard encoder system feedback Brake optional not safe...

Page 14: ...uch as E STOP pushbuttons Safety gates Light beam devices Two hand buttons Processes the safety card s status outputs Safe interconnection between safety card and safety control system Fault detection...

Page 15: ...safe input to reset the safety card after an error The single pole digital inputs I0 I6 are used to activate the safety functions Inputs are assigned to the safety functions in the safety card s Confi...

Page 16: ...a second feedback channel for the safety function STO The Ready output switches off if a problem occurs at the feedback signal STO Acknowledge The single pole digital outputs O0 O3 signal the status o...

Page 17: ...upplied to the load Safety function activated Supply voltage 24 VDC connection to supply the safety card s digital outputs 4 2 2 2 Output test The outputs are tested regularly Outputs that are switche...

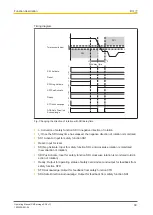
Page 18: ...and scan time of the power up test otherwise the load may switch on unintentionally Timing diagram 1 t1 t2 t1 t t2 t1 U 0 1 1 signal 0 0 signal t1 Pulse duration on on test see Technical details t2 Sc...

Page 19: ...aneous activation of safety functions All safety functions can be active at the same time However safety function SS1 has priority over all other safety functions If SS1 is activated the drive is stop...

Page 20: ...Reset 1 Signal 24 VDC Ready output 1 Signal 24 VDC The safety card is ready for operation STO Acknowledge output 0 Signal Safety function is activated By an error after limit values have been exceeded...

Page 21: ...o standstill in a controlled manner and removes the power to the motor After a defined period STO delay time or once the motor is at standstill the safety function safe torque off STO removes the powe...

Page 22: ...urator Safety function STO is activated when standstill is achieved while the STO delay time is running the STO delay time has elapsed Input and output assignment Input X30 1 SS1 Activate Outputs X30...

Page 23: ...plifier for controlled braking of the motor The braking ramp must only be configured in the Configurator if monitoring of the brak ing ramp is also activate there Safety Card Servo Amplifier M Input v...

Page 24: ...0 STO delay time Tolerance window Braking ramp Limit value Standstill detection Reset 1 0 STO Ready 1 0 t2 Timing diagram STO is started during the STO delay time Braking ramp STO delay time Tolerance...

Page 25: ...be monitored via a maximum position error specified in the Con figurator Braking ramp in normal operation The drive starts with the configured braking ramp when safety function SS2 has been activated...

Page 26: ...in the Configurator Controller activated After the safety function is triggered the control system is sues a command to the servo amplifier for controlled braking of the motor The braking ramp must o...

Page 27: ...for safety function SS1 Reset Input for reset SS2 Activate Input for safety function SS2 Ready Output for operating status of safety card and second output for feedback from safety function STO STO Ac...

Page 28: ...the SOS delay time has elapsed Input and output assignment in the Configurator Inputs I0 I6 SOS Activate Outputs O0 O3 SSA Safe Standstill Acknowledge Prerequisites for normal operation Input SS1 Act...

Page 29: ...knowledge Fig Safety function SOS t1 Activation of safety function SOS t2 Once the SOS delay time has elapsed standstill position is monitored SS1 Activate Input for safety function SS1 Reset Input fo...

Page 30: ...s exceeded safety function SS1 E STOP braking ramp is activated A tolerance range may also be set for the limit values used to monitor the speed This toler ance range modifies the set limit values As...

Page 31: ...ty function SLS without tolerance range activated ta Activation of safety function SLS te Once the SLS delay time has elapsed the speed is monitored SS1 Activate Input for safety function SS1 Reset In...

Page 32: ...d limit value ta Activation of safety function SLS te Once the SLS delay time has elapsed the speed is monitored ts Speed v exceeds the limit value and activates the tolerance range tolerance amount t...

Page 33: ...al If the limit value is exceeded safety function SS1 is activated A tolerance range may also be set for the limit values used to monitor the speed This toler ance range modifies the set limit values...

Page 34: ...R Fig Safety function SSR without tolerance range activated ta Activation of safety function SSR te Once the SSR delay time has elapsed the speed is monitored SS1 Activate Input for safety function SS...

Page 35: ...mit values maximum and minimum speed ta Activation of safety function SSR te Once the SSR delay time has elapsed the speed is monitored ts Speed v exceeds the limit value and activates the tolerance r...

Page 36: ...Input SS1 Activate and Reset 1 Signal 24 VDC Ready output 1 Signal 24 VDC The safety card is ready for operation STO Acknowledge output 0 Signal Input SDI Pos Activate 1 Signal 24 VDC Input SDI Neg Ac...

Page 37: ...I Neg Activate Input for safety function SDI anti clockwise rotation is monitored Ready Output for operating status of safety card and second output for feedback from safety function STO STO Acknowled...

Page 38: ...hen is monitoring of the old direction of rotation deactivated see Case B in the illustra tion and timing diagram NOTICE Please note that the direction of rotation may only ever be monitored in one di...

Page 39: ...nce the SDI delay time has elapsed the negative direction of rotation is monitored SS1 Activate Input for safety function SS1 Reset Input for reset SDI Neg Activate Input for safety function SDI anti...

Page 40: ...ecorded and the motor is monitored for compliance with the maximum increment Increment and speed within permitted limits Output SRA Safe Range Acknowledge 1 signal If an increment or the speed is exce...

Page 41: ...afety function SLI without automatic activation ta Activation of safety function SLI te Once the SLI delay time has elapsed the increment is monitored SS1 Activate Input for safety function SS1 Reset...

Page 42: ...andstill Acknowledge Fig Safety function SLI with automatic activation ta Activation of safety function SLI te Once the SLI delay time has elapsed the increment is monitored SS1 Activate Input for saf...

Page 43: ...put is disabled The servo amplifier applies speed controlled braking with the preset braking ramp until standstill is achieved and disables the servo amplifier s power element When the set delay time...

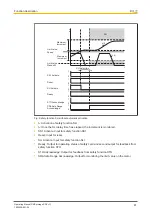
Page 44: ...al servo amplifier interfaces bus system or analogue input is once again permitted When OPMODE 8 the existing motion block can be continued via the CONTINUE command s v t t1 SOS delay time v t s t SOS...

Page 45: ...filter time temperature drift spread of components etc Internal processing times of the safety card TCYCLE Scan time of the safety card s processor system TOUT Processing time for the safety card s s...

Page 46: ...rd Download of the configuration to the safety card Online from configurator to safety card Save configuration to external SD card Order and serial numbers must be entered in the configuration to ensu...

Page 47: ...for the servo amplifier CAUTION Damage due to electrostatic discharge Electrostatic discharge can damage components Ensure discharge before touching the safety card e g by touching an earthed conduct...

Page 48: ...e servo amplifier When installing please note the guidelines given under Installation in the operating manual for the servo amplifier 1 Remove the film 2 Break the middle link 3 Break the top link and...

Page 49: ...Exclude the error by using separate multicore cable for supply voltages Use appropriate wiring to exclude short circuits between the outputs Signal lines must be shielded The outputs do not need supp...

Page 50: ...y function activated 8 O2 Status Safety function activated 9 O3 Status Safety function activated 10 24 V Supply Supply voltage for digital outputs 24 VDC 11 n c Not assigned 12 I3 Activate safety func...

Page 51: ...s shown in the diagram below 1 2 3 Remove the outer cable sheath and the braided shield to the required wire length Secure the wires with a cable tie Remove the outer cable sheath to a length of appro...

Page 52: ...on 13 I4 Activate safety function 14 I5 Activate safety function 15 I6 Activate safety function 20 Reset Input for reset Connector pin assignment Input circuit Digital input 1 I0 2 3 4 0V 12 24 V I O...

Page 53: ...in Name Description 1 2 3 4 5 6 7 8 9 10 11 12 13 14 15 16 17 18 19 20 21 22 X30 10 24 V Supply Supply voltage for digital outputs 24 V 21 22 0 V Supply Supply voltage for digital outputs 0 V Pins 21...

Page 54: ...O2 Status Safety function activated 9 O3 Status Safety function activated 10 24 V Supply Supply voltage for digital outputs 24 V 16 Ready Status Safety card ready for oper ation and second output for...

Page 55: ...ety card please read the safety guidelines in the Com missioning chapter in the instructions for the servo amplifier DANGER Risk of electrocution Never wire the electrical connections on the servo amp...

Page 56: ...vo amplifier 2 Wire up the safety card INFORMATION Please note the guidelines given under Wiring Connect the 24 VDC supply voltage to X30 10 to X30 21 INFORMATION Do not switch on the supply voltage a...

Page 57: ...n be selected individually for the down load The configuration is distributed to the safety cards via the motion control sys tem The configuration file is downloaded The CONFIG LED flashes The configu...

Page 58: ...e safety card CONFIG LED Downloading the configuration data RUN LED System is ready RUN System is ready for operation CONFIG Downloading the configuration data STARTUP System starts up with the downlo...

Page 59: ...Initial commissioning Servo Amplifier 24 V X4 1 BTB RTO X3B 14 15 L1 L2 L3 X0 X8 Safety Card Sx 24 V X30 1 Reset X30 20 Ready X30 16 STO Acknowledge X30 5 SS1 Activate X30 1 Servo Amplifier STO ENABLE...

Page 60: ...RMATION Please note the following in the STARTUP state The activation inputs of all the safety functions configured in the tool must be switched to 24 VDC 7 3 2 Recommissioning after error This sectio...

Page 61: ...ion STO RUN LED System is ready 7 3 2 2 Command CLRFAULT The safety card can be reset using the CLRFAULT command via the serial interface or fieldbus interface on the servo amplifier Prerequisites for...

Page 62: ...number of the new safety card We recommend that you swap the whole unit servo amplifier with safety card Please contact Pilz NOTICE Damage due to electrostatic discharge Electrostatic discharge can da...

Page 63: ...ard from an SD card in the servo amp lifier 5 Downloading a configuration via an SD card which is written by the servo ampli fier safety card 2 6 Inserting an SD card from the servo amplifier for safe...

Page 64: ...bed under Download configuration from SD card to safety card 2 option 5 Downloading a configuration via an SD card which is written by the servo amplifier Prerequisite Connection is established betwee...

Page 65: ...he following files must be available on the SD card 3 or 6 default pdis Configuration file for the safety card default bin or default s19 Firmware for the servo amplifier default par Parameter file fo...

Page 66: ...safety functions After exchanging the safety card or servo amplifier A full check comprises Proper execution of the employed safety functions Inspection of the parameters The result of the check on e...

Page 67: ...AFE OPERATION SS1 STO POWER ON Download configuration Safety function deactivated Safety function activated Demand upon Configurator Internal error Error STO Limit values Error SS1 Activate Error Rese...

Page 68: ...MAL OPERATION due to Reset of safety card see Recommissioning Prior POWER ON 8 2 Testing the safe pulse disabler The safety card meets the requirements of EN IEC 61508 up to SIL 2 and EN ISO 13849 1 u...

Page 69: ...TO Acknowledge LED RUN t2 t t1 t1 At least 2 ms time during which SS1 Activate or Reset must have a 0 signal t2 Approx 2 s safety card s run up time SS1 Activate Input for safety function SS1 Reset In...

Page 70: ...ply voltage is not present Green Supply voltage is present RUN System not ready Green System ready RUN status Green System boots Star tup status CONFIG Normal operation Yellow Downloading the configur...

Page 71: ...see sec tion on Display elements in this chapter Outputs on the safety card display the state of the safety functions e g STO Acknow ledge Errors and messages are entered in the safety card s error st...

Page 72: ...5 20 Typ output current at 1 signal and rated voltage of semiconductor output 0 50 A 0 50 A Permitted current range 0 50 A 0 50 A Residual current at 0 signal 0 02 mA 0 02 mA Monitoring threshold of s...

Page 73: ...N 61800 5 1 EN 61800 5 1 Overvoltage category II II Pollution degree 2 2 Protection type In accordance with the standard EN 60529 EN 60529 Mounting area e g control cab inet IP54 IP54 Housing IP20 IP2...

Page 74: ...nds in the servo amplifier Number of poles MPOLES Pole pair pitch MPITCH 9 1 1 1 MTTF 10 years Operating mode EN ISO 13849 1 2015 PL EN ISO 13849 1 2015 Category EN 62061 SIL CL EN 62061 PFHD 1 h IEC...

Page 75: ...perating Manual PMCprotego S2 2 C 1002529 EN 04 75 10 Order reference Order reference Product type Features Order no PMCprotego S2 2 Safety Card 680 006 PMCprotego S2 2 C Safety card with coated circu...

Page 76: ...function after an application specific time delay Safe Stop 2 SS2 Safety function in accordance with EN 61800 5 2 The PDS SR performs one of these functions a Either initiates and controls the length...

Page 77: ...NET p THE SPIRIT OF SAFETY are registered and protected trademarks of Pilz GmbH Co KG in some countries We would point out that product features may vary from the details stated in this document depen...

Reviews: