background image

2


IMPORTANT SAFETY INSTRUCTIONS

Read before operating equipment

1.  Read these instructions.
2.  Keep these instructions.
3.  Heed all warnings.
4.  Follow all instructions.
5.  Do not use this apparatus near water.
6.  Clean only with a dry cloth.
7.  Do not block any of the ventilation openings. Install in accordance with  
     the manufacturers instructions.
8.  Do not install near any heat sources such as radiators, heat registers, 
     stoves, or other apparatus (including amplifiers) that produce heat.
9.  Do not defeat the safety purpose of the polarized or grounding-type plug.  
     A polarized plug has two blades with one wider than the other. A 
     grounding type plug has two blades and third grounding prong. The wide 
     blade or third prong are provided for your safety. When the provided 
     plug does not fit into your outlet, consult an electrician for replacement 
     of the obsolete outlet.
10. Protect the power cord from being walked on or pinched particularly at 
     plugs, convenience receptacles, and the point where they exit from the 
     apparatus.
11. Only use attachments/accessories specified by the manufacturer.
12.              Use only with a cart, stand, tripod, bracket, or table specified by 
                  the manufacturer, or sold with the apparatus. When a cart is 
                  used, use caution when moving the cart/apparatus combination 
      to avoid injury from tip-over.
13. Unplug this apparatus during lightning storms or when unused for long 
      periods of time.
14. Refer all servicing to qualified service personnel. Servicing is required 
      when the apparatus has been damaged in any way, such as power-supply 
      cord or plug is damaged, liquid has been spilled or objects have fallen 
      into apparatus, the apparatus has been exposed to rain or moisture, 
      does not operate normally, or has been dropped.
15. This product may contain lead or mercury. Disposal of these materials 
      may be regulated due to environmental considerations. For disposal or 
      recycling information, please contact your local authorities or the 
      Electronic Industries Alliance:www.eiae.org.
16. Damage Requiring Service - The appliance should be serviced by 
      qualified service personnel when:
A.  The power supply cord or the plug has been damaged; or
B.  Objects have fallen, or liquid has been spilled into the appliance; or

C.  The appliance has been exposed to rain; or
D.  The appliance does not appear to operate normally or exhibits a 
      marked change in performance; or 
E.  The appliance has been dropped, or the enclosure damaged.
17. Tilt/Stability - All televisions must comply with recommended 
      international global safety standards for tilt and stability properties of its 
      cabinets design.
     • Do not compromise these design standards by applying excessive pull 
        force to the front, or top, of the cabinet which could ultimately 
        overturn the product.
     • Also,do not endanger yourself, or children, by placing electronic 
       equipment/toys on the top of the cabinet. Such items could 
       unsuspectingly fall from the top of the set and cause product damage 
       and/or personal injury.
18. Wall or Ceiling Mounting - The appliance should be mounted to a 
      wall or ceiling only as recommended by the manufacturer.
19. Power Lines - An outdoor antenna should be located away from 
      power lines.
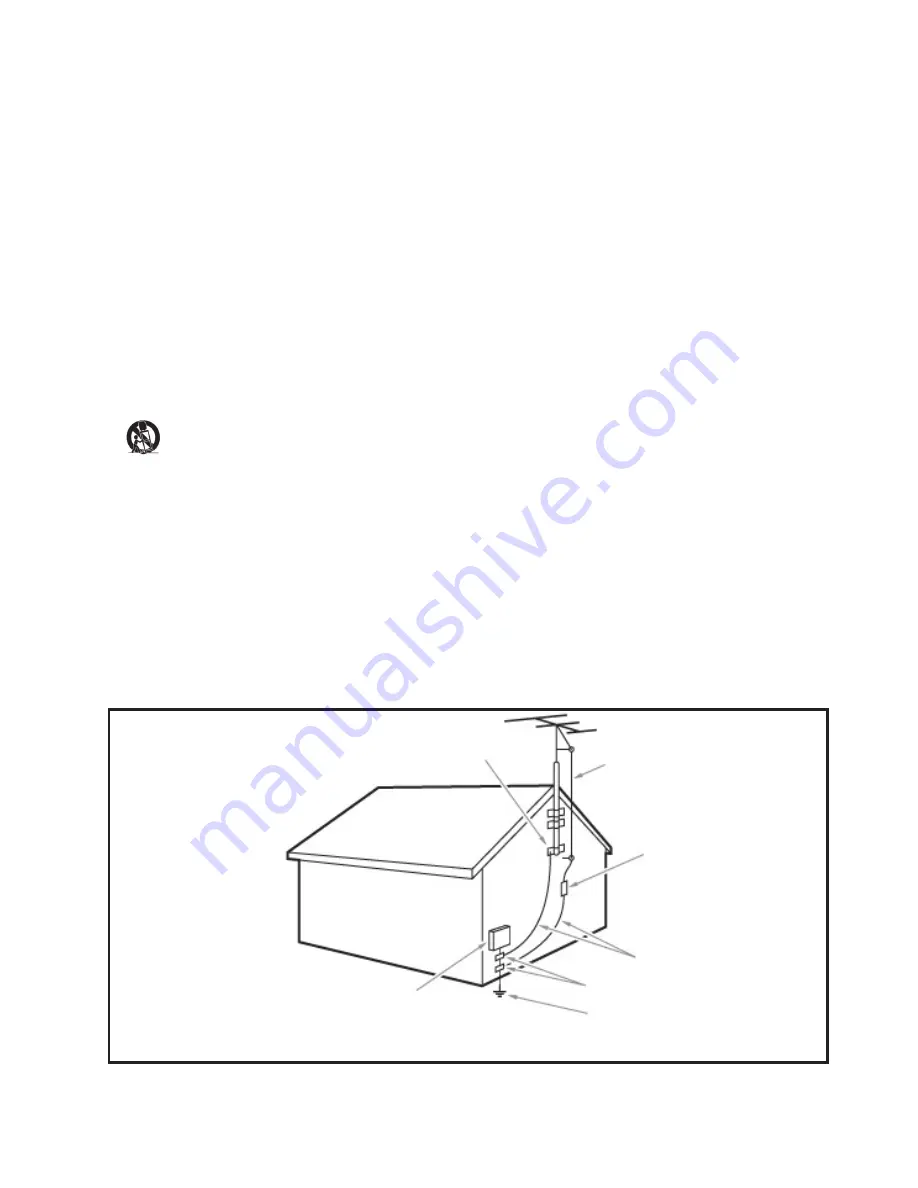
20. Outdoor Antenna Grounding - If an outside antenna is connected to 
     the receiver, be sure the antenna system is grounded so as to provide 
     some protection against voltage surges and built up static charges.
     Section 810 of the National Electric Code, ANSI/NFPA No. 70-1984, 
     provides information with respect to proper grounding of the mats and 
     supporting structure grounding of the lead-in wire to an antenna-
     discharge unit, size of grounding connectors, location of antenna-
     discharge unit, connection to grounding electrodes and requirements for 
     the grounding electrode. See Figure below.
21. Objects and Liquid Entry - Care should be taken so that objects do 
      not fall and liquids are not spilled into the enclosure through openings.
      a) Warning: To reduce the risk of fire or electric shock, this apparatus 
          should not be exposed to rain or moisture and objects filled with 
          liquids, such as vases should not be placed on this apparatus.
22. Battery Usage CAUTION - To prevent battery leakage that may 
      result in bodily injury, property damage, or damage to the unit:
     • Install all batteries correctly, with + and - alignment as marked on the 
        unit.
     • Do not mix batteries (old and new or carbon and alkaline, etc.)
     • Remove batteries when the unit is not used for a long time.

EXAMPLE OF ANTENNA GROUNDING AS PER
NATIONAL ELECTRICAL CODE (NEC)

GROUND CLAMP

ANTENNA LEAD IN WIRE

ANTENNA DISCHARGE UNIT 
(

NEC SECTION

 810-20)

GROUNDING CONDUCTORS 
(

NEC SECTION 

810-21)

GROUND CLAMPS

POWER SERVICE GROUNDING 
ELECTRODE SYSTEM
(

NEC ART

 250, 

PART H

)

ELECTRIC SERVICE EQUIPMENT

Note to the CATV system installer: this reminder is provided to call the CATV system installer’s attention to Article 820-40 of 
the NEC that provides guidelines for proper grounding and, in particular, specifies that the cable ground shall be connected to the 
grounding system of the building, as close to the point of cable entry as practical.

EN

Summary of Contents for 26HFL5561L/27

Page 1: ...27 26HFL5561V 27 32HFL5561D 27 32HFL5561L 27 32HFL5561V 27 32HFL4441D 27 32HFL4461F 27 37HFL4481F 27 37HFL5581D 27 37HFL5581L 27 37HFL5581V 27 42HFL5581L 27 42HFL5581V 27 52HFL5581L 27 52HFL5581V 27 EN User manual ...

Page 2: ......

Page 3: ...nguage 9 7 Select mode of communication 10 Select the communication protocol 10 Use Multi RC 10 8 Automatically install channels 11 Select a virtual or physical channel 11 Select a channel ring 11 9 Configure the channels 11 Select the mode for signal reception 11 Select a program 11 Select a source of input 12 Select a logo for a channel 12 Map to a digital channel 12 Assign digital major and min...

Page 4: ... 17 Tilt Stability All televisions must comply with recommended international global safety standards for tilt and stability properties of its cabinets design Do not compromise these design standards by applying excessive pull force to the front or top of the cabinet which could ultimately overturn the product Also do not endanger yourself or children by placing electronic equipment toys on the to...

Page 5: ...er of bright or dark pixels This is a structural property of the display within common industry standards and specifications and is not a malfunction Warranty No components are user serviceable Do not open or remove covers to the inside of the product Repairs may only be done by Philips Service Centres and official repair shops Failure to do so shall void any warranty stated or implied Any operati...

Page 6: ...ing wipe off water drops as soon as possible Environmental care The packaging of this product is intended to be recycled Contact your local authorities for information about how to recycle the packaging End of life directives 2 Important Registering your model with Philips makes you eligible for all of the valuable benefits listed below so don t miss out Complete and return your Product Registrati...

Page 7: ... 3 4 2 1 This set contains a lamp with mercury please dispose of according to all local state and federal laws Philips pays a lot of attention to produce environment friendly products in green focal areas Your newTV contains materials which can be recycled and reused At the end of its life specialized companies can dismantle the discardedTV to concentrate the reusable materials and to minimize the...

Page 8: ... with Philips DVD players only The guest remote control optional a Standby On Switches the product on or off The product is not powered off completely unless it is physically unplugged b CH GUIDE Accesses SmartGuide see Configure the control options on page 16 and or list of channels c PLAY Starts or resumes play d REW Searches backward e FF Searches forward f SMART PICTURE Launches the picture me...

Page 9: ...cesses the Customer Service Menu CSM The Philips Hospitality setup remote control not included in box a Standby On Switches the product on or off The product is not powered off completely unless it is physically unplugged b SLEEP Sets a delay after which the TV switches to standby c SMART Launches the picture menu d 0 9 Numeric buttons Selects a channel or setting e CH GUIDE Displays the list of c...

Page 10: ... setup remote control or MENU on the guest remote control to return to the previous menu Access the Philips Hospitality setup menu with guest remote control 1 Switch on the TV and select a TV channel 2 Press 3 1 9 7 5 3 followed by Mute within 10 seconds The Philips Hospitality setup menu is displayed COMMUNICATION AUTO INSTALL TV USE CHANNEL TABLE YES CURRENT RING DIGITAL SETUP SETUP CABLE TUNING...

Page 11: ...your preferred language Access the Philips Hospitality setup menu with Philips setup remote control 1 Switch on the TV and select a TV channel 2 Set the switch at the side of the remote control to SETUP 3 Press M to display the Philips Hospitality setup menu The Philips Hospitality setup menu is displayed M POWER SLEEP GUIDE SMART GUEST DCM SETUP TEXT RECALL CC RESET CH 8 0 1 4 5 6 7 9 2 3 M A CH ...

Page 12: ...vice connected to the TV STORE To store the settings that are modified using the COMMUNICATION menu PENDANT To enable or disable the healthcare pendant control This is available only when you select COMMUNICATION OFF Select the communication protocol 1 Enter the Philips Hospitality setup menu 2 Press to select COMMUNICATION COMMUNICATION 3 Press to select the communication protocol between the TV ...

Page 13: ...ram number configure the TV using the control options INPUT TUNER DIGITAL NO RINGS LABEL MUTE NONE CHANNEL INSTALL RF CHANNEL NUMBER 2 CHANNEL LOGO CHANNEL TV 2 8 Automatically install channels 1 Enter the Philips Hospitality setup menu 2 Press to select CABLE TUNING 3 Press to select one of the following YES To receive TV signals from a cable NO To receive TV signals from an antenna 4 Press to se...

Page 14: ...NEL INSTALL INPUT 3 Press to select a source of input Note External inputs can also be assigned to a program number Select a logo for a channel 1 Enter the Philips Hospitality setup menu 2 Press to select CHANNEL INSTALL CHANNEL LOGO 3 Press to enter a page containing logos 4 Press to select a logo for the channel 5 Press 0 to save the logo and exit the menu Map to a digital channel 1 Enter the Ph...

Page 15: ...gure closed caption text 1 Enter the Philips Hospitality setup menu 2 Press to select DIGITAL SETUP DIGITAL CC SETUP CAPTION TEXT 3 Press to select and configure options such as CAPTION SIZE CAPTION STYLE TEXT COLOR BG COLOR etc EMERGENCY ALERT ALWAYS SIGNAL STRENGTH 63 DIGITAL SETUP DIGITAL CC SETUP CHANNEL SETUP 5 Press to save or remove a channel from the ring The ring is marked by an X when th...

Page 16: ...ress to select CONFIGURATION SWITCH ON OSD WELCOME MESSAGE 3 Press to select one of the following options DISPLAY Select YES to display the welcome message Select NO to prevent the display of the welcome message LINE 1 To enter the first line of welcome message Press to select a character slot and to select an alphanumeric character LINE 2 To enter the second line of welcome message Press to selec...

Page 17: ...ch on volume 1 Enter the Philips Hospitality setup menu 2 Press to select CONFIGURATION SWITCH ON OSD SWITCH ON VOLUME 3 Press to set a volume that is used each time the TV is turned on Enable or disable the volume indicator 1 Enter the Philips Hospitality setup menu 2 Press to select CONFIGURATION SWITCH ON OSD VOLUME INDICATOR 3 Press to select one of the following YES To display the volume indi...

Page 18: ...MAX VOLUME NO 0 99 12 Configure the security settings 1 Enter the Philips Hospitality setup menu 2 Press to select CONFIGURATION SECURITY 3 Press to select one of the following SECURITY To specify the security level KEYBOARD LOCK To enable or disable local TV controls REMOTE CONTROL LOCK To enable or disable the guest remote control keys DECRYPTION CONTROL To convert the TV from Pay Per View mode ...

Page 19: ...lowing options ESP Energy saving programmability Set a time from 1 99 hours to enable ESP If the TV does not receive any command for this time period it enters the standby mode to save energy Select OFF to disable ESP DIGIT TIMEOUT Set a time between 1 9 9 seconds When you press a key on your RC the TV will wait for the specified time before assuming that you are finished entering digits and switc...

Page 20: ...ct HIGH for maximum power savings LOW POWER STANDBY To use minimum power when the TV is in standby mode SMARTCP Select YES to enable the autosensing feature to switch to source where a video signal is plugged to a side I O Select NO to disable the autosensing feature and to you have to select the video source manually SMARTSECURE See details in the note below SMARTGUIDE CATEGORIES To determine whi...

Page 21: ...cles when download ALL is selected Note Firmwares cannot be copied from the TV to USB only NVMs may be copied from the TV The STANDBY FIRMWARE is rarely updated and is not included when SW TYPE ALL is selected To update the STANDBY FIRMWARE the SW TYPE STANDBY FIRMWARE must be uniquely selected Configure theV chip and closed caption settings 1 Enter the Philips Hospitality setup menu 2 Press to se...

Page 22: ...pillow speaker e HDMI 3 Digital audio and video input from high definition digital devices such as Blu ray players f HDMI 2 Digital audio and video input from high definition digital devices such as Blu ray players g HDMI 1 Digital audio and video input from high definition digital devices such as Blu ray players h SERVICE For serial communication and use by service personnel i VGA Video input fro...

Page 23: ...ble the guest remote control see Enable or disable the remote control on page 16 Note If LOW POWER STANDBY is set to YES the TV can only be switched on with a remote control Please ensure the remote control is always available The control buttons at the side of the TV will not be able to switch on the TV Ensure that the TV is connected to the AC mains power outlet If it does not power on pull the ...

Page 24: ...itality setup mode cannot be accessed using the Philips Hospitality setup remote control Check that the switch at the side of the Philips Hospitality setup remote control is set to the SETUP position see Access the Philips Hospitality setup menu with Philips setup remote control on page 9 Picture issues The TV is on but there is no picture Check that the antenna or the cable is connected properly ...

Page 25: ...23 Eng lis h EN 1 3 2 4 5 x 4 ...

Page 26: ......

Page 27: ... 2010 Koninklijke Philips Electronics N V All rights reserved ...

Reviews: