Chapter 4
Settings — [ADVANCED MENU] menu
ENGLISH - 109
[ADVANCED MENU] menu
On the menu screen, select [ADVANCED MENU] from the main menu, and select an item from the sub-
menu.
Refer to “Navigating through the menu” (
x
page 87) for the operation of the menu screen.
[DIGITAL CINEMA REALITY]
The picture quality is enhanced by raising the vertical resolution higher performing the cinema processing when
interlace signal for moving image is input.
1) Press
as
to select [DIGITAL CINEMA REALITY].
2) Press
qw
to switch the item.
f
The items will switch each time you press the button.
[AUTO]
Automatically detects the signal and performs the cinema processing. (Factory default setting)
[OFF]
Does not perform cinema processing.
[30p FIXED]
When 60 Hz vertical scanning
frequency signals are input
Performs forced cinema processing (2:2 pulldown).
[25p FIXED]
When 50 Hz vertical scanning
frequency signals are input
Note
f
In [DIGITAL CINEMA REALITY], the picture quality will degrade when a signal other than the 2:2 pulldown is set as [25p FIXED] or [30p
FIXED]. (Vertical resolution will degrade.)
f
When the [ADVANCED MENU] menu
→
[FRAME RESPONSE] is set to [FAST], [DIGITAL CINEMA REALITY] cannot be set.
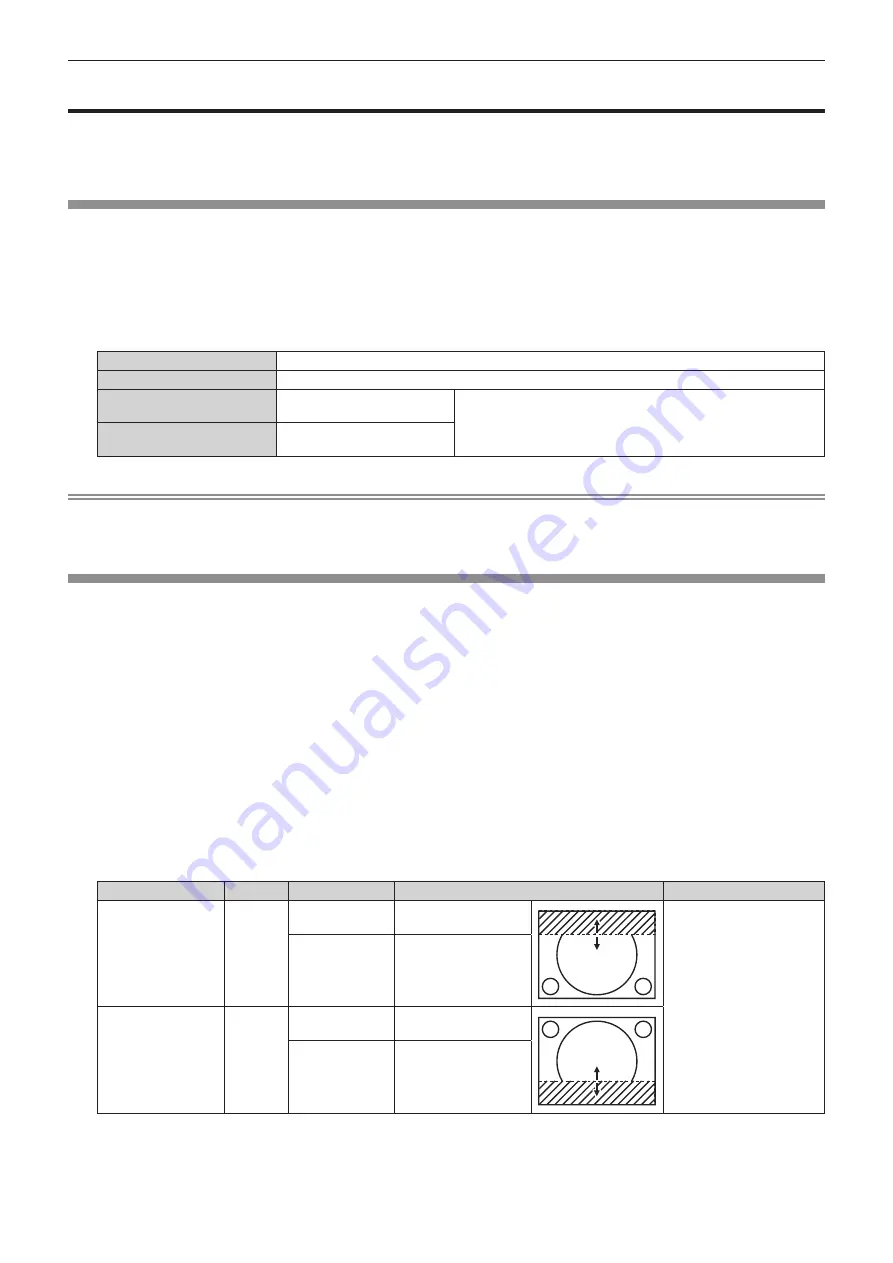
[BLANKING]
Adjust the blanking width if there are noises at the edge of the screen or the image is slightly running out from the
screen.
1) Press
as
to select [BLANKING].
2) Press the <ENTER> button.
f
The
[BLANKING]
adjustment screen is displayed.
3) Press
as
to select [UPPER], [LOWER], [LEFT], or [RIGHT].
f
The blanking width can be adjusted to arbitrary shape using a computer when [CUSTOM MASKING] is set
to anything other than [OFF] ([PC-1], [PC-2], or [PC-3]). Up to three blanking settings adjusted using the
computer can be saved.
To use the [CUSTOM MASKING] function, the optional Upgrade Kit (Model No.: ET-UK20) is required. To
purchase the product, consult your dealer.
4) Press
qw
to adjust the blanking width.
Blanking correction
Item
Operation
Adjustment
Range of adjustment
Top of the screen
[UPPER]
Press
q
.
The blanking zone
moves upward.
Top and bottom 0 - 1 198
Press
w
.
The blanking zone
moves downward.
Bottom of the
screen
[LOWER]
Press
w
.
The blanking zone
moves upward.
Press
q
.
The blanking zone
moves downward.


