background image

Commissioning and configuration

ISE SMART CONNECT KNX Panasonic

 1-000C-000

© 2019 ise Individuelle Software und Elektronik GmbH

S. 32 / 69

8.2.3 Programming a physical address

The physical address that you issued in the ETS must be assigned to the device. We refer here to "pro

-

gramming". To do this, you must put the device into programming mode.

Assigning a physical address

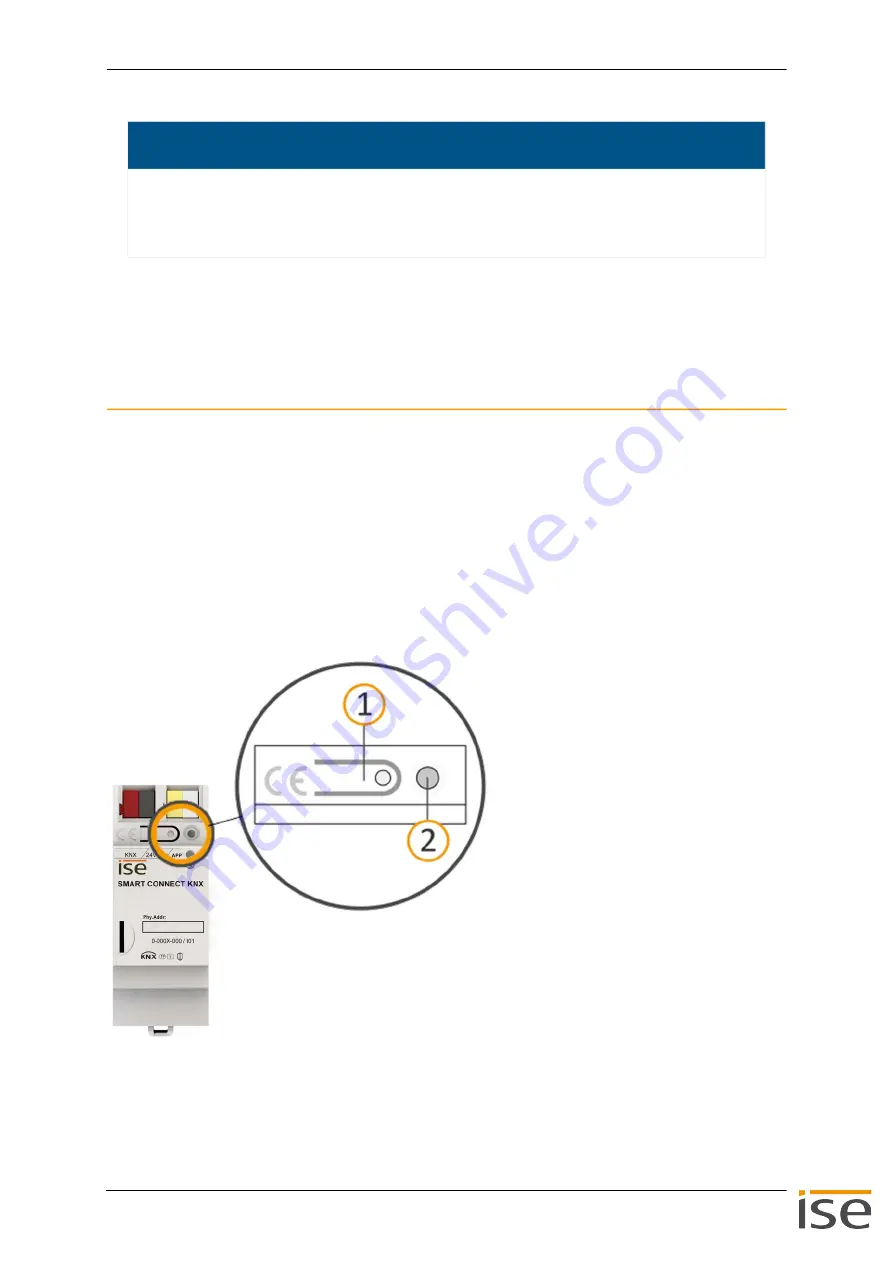
Requirements: Device and bus voltage switched on. Programming LED is off.

1.

Briefly press the programming button (see figure 19, item 1). The programming LED (see figure 

19, item 2) lights up red.

2.

In the ETS, assign the physical address to the device in accordance with the KNX topology and 

execute programming in the ETS.

3.

On the device, enter the assigned physical address with a permanent marker in the field 

<<Phy.Addr.>>.

 Figure 19: Programming

Serious misconfiguration

Default values are set if you select the setting <<Use permanent IP address>> but then forget to 

fill in the appropriate fields. This will result in the device not starting up properly.

Reset the device to its factory settings. 

 See Resetting to factory settings, p. 33.

If problems should persist, contact Support.

Summary of Contents for ISE SMART CONNECT KNX

Page 1: ...019 ise Individuelle Software und Elektronik GmbH Product Manual ISE SMART CONNECT KNX Panasonic 1 000C 000 Documentation valid for Product database entry v1 1 Firmware v1 0 Documentation date 15 11 2019 ...

Page 2: ... the prior written permission of ise Individuelle Soft ware und Elektronik GmbH Products to which reference is made in this document can be either brands or registered trademarks of the respective rights holder Ise Individuelle Software und Elektronik GmbH and the author make no claim to these brands The brands are named solely for the purpose of providing the necessary descrip tion Trademark KNX ...

Page 3: ...cking the installation conditions 16 6 3 Mounting the device 17 7 Device website 21 7 1 Calling up the start screen 21 7 2 Getting to know the interface of the device website 22 8 Commissioning and configuration 24 8 1 Reading off the device status using the LEDs 24 8 1 1 LEDs during device start up 25 8 1 2 LEDs in operation 27 8 2 Configuration 28 8 2 1 Creating the device in the ETS 29 8 2 2 IP...

Page 4: ...riction of rights of use 65 14 4 1 Copying modification and transmission 65 14 4 2 Reverse engineering and conversion technologies 66 14 4 3 Firmware and hardware 66 14 4 4 Transfer to a third party 66 14 4 5 Renting out leasing out and sub licensing 66 14 4 6 Software creation 66 14 4 7 The mechanisms of license management and copy protection 66 14 5 Property and confidentiality 66 14 5 1 Documen...

Page 5: ...1 1 Target group This documentation is aimed at qualified electricians and KNX processors ISE SMART CONNECT KNX Panasonic may only be assembled and installed by qualified elec tricians Specialist knowledge of KNX is a prerequisite ISE SMART CONNECT KNX Panasonic may be configured by anyone We recommend that configuration is done by a system integrator with sound specialist knowledge of KNX and us ...

Page 6: ...2017 2018 can be used with a reduced range of functions Configuration Compatible ETS versions Simple integration into the KNX System can be completely configured via ETS ETS4 from v4 2 ETS5 or higher Product database entry Download the product database entry from our website www ise de or from the ETS online catalogue free of charge 2 2 System ISE SMART CONNECT KNX Panasonic is connected to the KN...

Page 7: ...n LAN and then switch it on Volume control Switch the sound on and off Mute the TV device Increase Lower the volume In stages or directly To absolute or relative value Program control Change to the next or the previous program channel Change to a particular program channel Call up camera links Transfer camera images e g from an external camera Showing notices on the TV device Use up to ten self de...

Page 8: ...house It s not only the lighting that switches off your Panasonic TV device will turn to standby or become part of the occupied home simulation for burglary prevention Do you want to save energy If your Panasonic TV device is switched to standby the device socket outlet will be switched off after a defined period and will only switch on again through a TV scene or motion detector You ve had a busy...

Page 9: ...Secure Ready The required FDSK Factory Default Setup Key can be found on a sticker on the side of the device and is also enclosed with the device For maximum security we recommend removing the sticker from the device Keep the FDSK in a safe place You cannot restore the FDSK yourself Please contact our Support Department if you lose the FDSK despite utmost care Is your smart washing machine finishe...

Page 10: ...free If necessary clean the device with a dry cloth Warning Danger from incorrect use Incorrect use can result in damage to the device fire or other dangers Only qualified electricians may install and mount electrical devices Follow the instructions in this product manual This product manual is part of the product and must remain with the customer Important Damage to the device due to incorrect op...

Page 11: ...tegrated switch Ambient conditions Installation environment temperature 0 C to 45 C Device dimensions Installation width 34 mm 2 HP Installation height 90 mm Installation depth 74 mm DRA Plus KNX SPECIALIST Communication KNX KNX TP IP Ethernet 10 100 BaseT 10 100 Mbit s Installation method S mode Approvals and protection type Approvals Certifications CE KNX Protection type IP20 compliant with EN 6...

Page 12: ...n 5 1 Front Figure 1 Front No Description 1 Button Programming button 2 Connection KNX TP 3 Connection External power supply 4 LED Programming red 5 LED APP Operation indication green 6 LED COM Communication KNX TP yellow 7 Holding device Release lever for top hat rail termi nal 8 Connection microSD card slot No function Phy Addr TP S KNX 24VDC APP COM SMART CONNECT KNX 0 000X 000 I01 1 2 3 4 5 6 ...

Page 13: ... the device Figure 3 Top of device No Description 1 Product name 2 Rated voltage 3 Physical address Enter the assigned physical address in the field with a per manent marker 4 Index 5 KNX Secure Ready 6 Installation method here S mode 7 Transfer medium here TP 8 KNX certification 9 Order number No Index Description 1 Opening for securing the cover cap 2 Attached power connection terminal 3 Attache...

Page 14: ...ork connections Figure 4 Network connections 5 5 Device side Figure 5 Device side No Description 1 Communication LED 2 Connection speed LED 3 IP 2x RJ45 integrated switch No Description 1 Attached cover cap 2 Release lever for top hat rail terminal 3 RJ45 cable not included in the scope of supply con nected to RJ45 socket 1 2 1 2 3 3 ...

Page 15: ... terminal To connect the KNX TP bus lines 4 Power connection terminal To connect the external power supply 5 Installation instructions This product manual also provides you with the infor mation from the installation instructions but with addi tional details application examples and project planning notes 6 Sticker set Additional set of stickers with data for KNX Secure The same stickers are attac...

Page 16: ...tallation environment have been met Pay attention to the device depth see figure 7 item 1 DRA Plus 74 mm Figure 7 Device depth Important Device functional fault due to incorrect ambient temperature in the installation environment Pay attention to the temperature of the installation environment min 0 C to max 45 C Do the not mount the ISE SMART CONNECT KNX Panasonic above heat emitting devices Ensu...

Page 17: ... manual is part of the product and must remain with the customer Warning Danger of electric shock An electric shock can result from touching live parts in the installation environment Electric shock can cause death Pay attention to the installation regulations Route the bus line with the sheathing intact until it is close to the bus connection terminal Firmly press the bus line into the bus connec...

Page 18: ...the bus line with the sheathing intact until it is close to the bus connection terminal c Firmly press the bus line into the bus connection terminal as far as possible d Route the bus line to the back Figure 8 Connect the bus line 3 Connect the external power supply to the power supply terminal see figure 9 item 1 by means of the supplied power connection terminal see figure 9 item 2 Polarity left...

Page 19: ...er cap over the connection terminals c Press the cover cap together gently d Route the cover cap s fastening claws into the openings until the cover cap noticeably engages Figure 11 Attaching the cover cap Important Functional fault in all devices due to incorrectly dimensioned power supply The following applies if you use the non choked auxiliary supply output of a KNX power supply as an addition...

Page 20: ... GmbH S 20 69 5 Connect the network a Make sure that your network infrastructure router DNS server is in operation b The network connections are on the underside of the device c Connect the IP network cable RJ45 cable to the device s network connection RJ45 socket Figure 12 Connect the IP network cable ...

Page 21: ... Generating log files p 59 The device website is run on your installed browser You do not require any additional software As soon as the device is available you can access the device website via the IP 7 1 Calling up the start screen Call up the device website by actioning one of the following Enter the device s IP address in the address bar of your browser Alternatively select the device in the n...

Page 22: ...ektronik GmbH S 22 69 7 2 Getting to know the interface of the device website Figure 14 Device website start page Item Element Function 1 Menu bar Call up other pages or run functions 2 Page The Device status page is shown 3 Information Display of specific information 4 Status bar Change language ...

Page 23: ...Device status Information System information Application information System configuration Functions Changing logging mode p 59 Switch device to programming mode System Functions Network settings via the device website p 33 Restart device Resetting to factory settings p 33 Generating log files p 59 Updating firmware p 35 Information Disclaimer Licenses ...

Page 24: ...evice status using the LEDs The following status indicators LEDs can be found on the front panel Figure 15 Status indicators LEDs on the front of the device Table 4 Status indicators The Programming LED shows independently of the operating mode whether the device is in program ming mode or not No Element Description 1 Programming LED red Programming mode active inactive display 2 LED APP green Ser...

Page 25: ...fter the power supply is switched on or after power returns the device indicates its status using the following LED combinations Colour Description red continuously on Programming mode is active See Assigning a physical address p 32 off Programming mode is deactivated No Element Description 1 Connection speed LED LED lights up green 100 Mbit s LED is off 10 Mbit s There is no connection if LED 2 a...

Page 26: ...ode Configure the device in the ETS off green off green Slow flashing about 1 Hz off The device is fully started up but is not yet configured The system is configured S mode Configure the device in the ETS Connection to KNX is interrupted Check whether the KNX and voltage con nections are mixed up Check the bus connection Check whether the power supply is cor rectly connected off green off green o...

Page 27: ...on Wait until the device start up process is complete If the device is still out of operation check the connections and the power supply COM Description yellow The KNX connection has been established No KNX telegram traffic The LED is also deemed to be continuously on if brief irregular interruptions occur off yellow off yellow off yellow Rapid flashing KNX connection has been established KNX tele...

Page 28: ... the ETS see Creating the device in the ETS p 29 2 In the ETS assign the device and its physical address corresponding to the KNX topology 3 Select the option Receive IP address automatically or select Use a permanent IP address and complete the following fields IP address IP subnet mask and standard gateway address see Setting the IP address IP subnet mask and standard gateway address p 31 4 Set ...

Page 29: ...n in the toolbar 3 In the Open product file window open the product file and press the Open button to con firm your selection 4 Follow the further instructions in the ETS If necessary call up the Online Help with the F1 button Work steps Device already exists in the ETS catalogue Yes No Update product database During an update the old product database entry is replaced by the new one Importing pro...

Page 30: ...ion program tab 5 Select the Update button under the item Update application program version see figure 17 item 2 6 Select the newly added device and delete it again from your topology Figure 17 Updating the application program 8 2 2 IP settings Besides the physical address in the KNX network an IP address the subnet mask and the address of the standard gateway in the IP data network must be assig...

Page 31: ...eceive IP address automatically The address data are automatically obtained from a DHCP server on the data network The DHCP server must assign a valid IP address to ISE SMART CON NECT KNX Panasonic If you wish to contact a TV device via a host name the DHCP server must report a DNS server that can resolve this host name If there is no DHCP server available the device starts up after a waiting time...

Page 32: ...amming button see figure 19 item 1 The programming LED see figure 19 item 2 lights up red 2 In the ETS assign the physical address to the device in accordance with the KNX topology and execute programming in the ETS 3 On the device enter the assigned physical address with a permanent marker in the field Phy Addr Figure 19 Programming Serious misconfiguration Default values are set if you select th...

Page 33: ...es as if it were in the state of delivery The device is then unconfigured The device remains in the existing projects The device keeps the version of the application program in the ETS The entire parametrisation is rejected The IP settings are reset The device now once again has this as the physical address 15 15 255 You have the following possibilities for resetting the device to the factory sett...

Page 34: ... are all flashing rap idly at the same time Programming LED see figure 15 item 1 APP LED see figure 15 item 2 COM LED see figure 15 item 3 5 Release the programming button The factory settings are being reset You do not have to restart the device Warning Danger of electric shock An electric shock can result from touching live parts in the installation environment Electric shock can cause death Pay...

Page 35: ...e entry are compatible 8 3 1 Updating the firmware via the device website You can only import a firmware version that is newer than the current version on the device Previous versions cannot be imported There are two ways to update Online Import firmware automatically online Offline Import firmware offline For devices without Internet connection in the installation environ ment Import firmware aut...

Page 36: ...sion of the firmware used must be compatible with the version of the device s application program in the project The application program is part of the product database entry Compatibility at a glance The versions are fully compatible if the main version of the application program and firmware are iden tical The version numbers are structured according to the following scheme Main version no Sub v...

Page 37: ...ejected User data in the ETS is preserved Requirement New product database entry exists in the catalogue 1 In the ETS open the project for which the device is to be updated 2 Search for the new product database entry in the catalogue and add the new version of the device to your project See Importing a new product database entry p 29 3 Select the old version of the device in the topology for your ...

Page 38: ...neral settings tab 9 1 1 Number of Panasonic TV devices Select the number of connected Panasonic TV devices Up to four TV devices can be connected See figure 20 Parameters in the ETS Item Description 1 Settings that are valid for all connected TV devices 2 Settings that are valid only for the respective TV device 3 Configuration of parameters for the selected tab Parameter Description Number of Pa...

Page 39: ...fferent sources displayed as messages Texts that are sent from other devices see Text display p 53 Pre defined screen texts see Text selection p 53 All connected Panasonic TV devices can access the pre defined texts Save up to ten texts in the Screen texts section You define which of the texts is to be used via communication objects 30 130 230 330 Figure 21 Screen texts ...

Page 40: ...ronik GmbH S 40 69 9 1 3 Camera links If the TV device is connected to the Internet you can call up the pre defined links Save up to ten camera URLs in the Camera links section You define which of the links is to be used via communication objects 18 118 218 318 see Link selection p 54 Figure 22 Camera links ...

Page 41: ...and DNS address can be configured The aforementioned steps may vary depending on TV model Important In order to guarantee communication between the ISE SMART CONNECT KNX Panasonic and the TV device switch the TV device on manually before initial commissioning Configure the following settings under Menu Network TV Remote Settings TV Remote on Networked Standby on Parameter Description Panasonic TV ...

Page 42: ...onfiguring Parameters ISE SMART CONNECT KNX Panasonic 1 000C 000 2019 ise Individuelle Software und Elektronik GmbH S 42 69 Figure 23 IP address under Settings tab Figure 24 Host name under Settings tab ...

Page 43: ...temporarily For example a communication error is saved permanently because it influences every one of your further work steps However an error such as a non existent screen text will only be saved temporarily After a few seconds the error status will be reset as No error exists The error display communication object 1 101 201 301 tells you whether an error has occurred at all You can find out the ...

Page 44: ...nfig No IP address or host name is configured Configure the IP address or host name for the corresponding TV device in the ETS 14 TxOutOfRng The received value does not exist Check the values entered in commu nication object 30 130 230 330 Permissible 0 to 9 15 ExecuteCmd Control commands are not received The ISE SMART CONNECT KNX Panasonic cannot be contacted 16 GetState The ISE SMART CONNECT KNX...

Page 45: ...he TV device is in standby mode it may take up to 30 seconds before the TV device is switched on Possible values 0 Switch off TV device 1 Switch on TV device Data width 1 bit Data point type data type 1 001 switch Flags CRWTUI C W 11 111 211 311 Name On off status Function Indicates whether the TV device is currently on or off Communication object no TV 1 11 TV 2 111 TV 3 211 TV 4 311 Possible val...

Page 46: ... 999 Data width 2 bytes Data point type data type 7 001 pulse Flags CRWTUI C W 13 113 213 313 Name Station status Function Indicates the number of the current program Communication object no TV 1 13 TV 2 113 TV 3 213 TV 4 313 Details This communication object is only supported by TV models from manufacturing year 2019 onwards Station status is 0 if no programs are stored or another source e g HDMI...

Page 47: ...vious or next program Communication object no TV 1 14 TV 2 114 TV 3 214 TV 4 314 Possible values 0 Reduce switch to the previous program channel 1 Increase switch to the next program channel Data width 1 bit Data point type data type 1 007 step Flags CRWTUI C W 15 115 215 315 Name Select source Function Changes the source to the defined value More information see table Supported sources p 48 Commu...

Page 48: ...wn source The screen will be black if no device is connected to the selected source Communication object no TV 1 16 TV 2 116 TV 3 216 TV 4 316 Possible values 0 16 or 255 Number of the current source or unknown source Data width 1 byte Data point type data type 5 010 meter pulse Flags CRWTUI CR T No Source No Source 0 Switch off 9 Video2 1 TV mode 10 Component1 2 Analogue TV 11 HDMI1 3 DVB T 12 HD...

Page 49: ...0 Possible values 0 Sound is switched off 1 Sound is switched on Data width 1 bit Data point type data type 1 001 switch Flags CRWTUI C W 21 121 221 321 Name Loudspeaker status Function Indicates whether the TV device s sound is on or off The sound is considered as off if the TV device has been actively muted or the volume has been set to 0 Communication object no TV 1 21 TV 2 121 TV 3 221 TV 4 32...

Page 50: ...mmunication object no TV 1 22 TV 2 122 TV 3 222 TV 4 322 Possible values 0 Mute is off 1 Mute is on Data width 1 bit Data point type data type 1 001 switch Flags CRWTUI CR T 23 123 223 323 Name Mute status Function Indicates whether the mute function is currently on or off Communication object no TV 1 23 TV 2 123 TV 3 223 TV 4 323 Possible values 0 Mute is off 1 Mute is on Data width 1 bit Data po...

Page 51: ... object no TV 1 24 TV 2 124 TV 3 224 TV 4 324 Possible values Percentage as a number 0 1 2 3 100 0 No volume 100 Maximum volume Data width 1 byte Data point type data type 5 001 percent Flags CRWTUI C W 25 125 225 325 Name Volume state Function Indicates the currently set volume value Communication object no TV 1 25 TV 2 125 TV 3 225 TV 4 325 Possible values Volume value as a number 1 to 100 Data ...

Page 52: ...ance with the KNX standard Data width 4 bits Data point type data type 3 007 dimmer step Flags CRWTUI C W 27 127 227 327 Name Stepwise volume up down Function Increases or lowers the volume in steps of 5 starting from the current value Communication object no TV 1 27 TV 2 127 TV 3 227 TV 4 327 Details 100 corresponds to the maximum volume of the TV device If the sound is switched off muted increas...

Page 53: ...9 Possible values 0 9 No Number of text from the Screen text area Example Enter 1 for Text 1 Data width 1 byte Data point type data type 5 010 meter pulse Flags CRWTUI C W 31 131 231 331 Name Text Function Displays a 14 byte text that was sent from another device Communication object no TV 1 31 TV 2 131 TV 3 231 TV 4 331 Details If more than a 14 byte text is sent to this communication object the ...

Page 54: ...Number of the predefined URL Example Enter 1 for Link 1 Data width 1 byte Data point type data type 5 010 meter pulse Flags CRWTUI C W For all communication objects listed under 10 5 Special functions the follow ing applies The HbbTV feature on your TV device is used to display screen texts and cam era links The ISE SMART CONNECT KNX Panasonic switches to the last HbbTV capable source used DVB T S...

Page 55: ...s for displayed error codes and possible configuration errors Table 36 Image transmission The device website is not always updated automatically Use your browser s function to perform an update Problem Troubleshooting Camera image does not open Cause The transferred URL does not exist Solution Check the defined URL in the parameter Camera links URL is not opened Cause A link with the configured nu...

Page 56: ...ote settings TV Remote on Networked Standby on Problem Troubleshooting Text is not displayed Cause A link with the configured number does not exist only numbers 0 9 are valid Solution Check the available numbers ETS tab Screen texts Enter the number of the desired text as the value of the commu nication object 30 130 230 330 See Text selection p 53 You will not receive an error message if you have...

Page 57: ...S The TV device is in standby mode Solution Check the network connection between the TV device and ISE SMART CONNECT KNX Panasonic If you have entered an IP address in the ETS check that it is cor rect If you have entered a host name in the ETS check that it matches the host name of the connected router Switch the TV on using the remote control Configure the following settings under Menu Network T...

Page 58: ...ected Source not contactable Cause Selected sources are not connected Cables are loose Solution Check whether connected devices and network cables are cor rectly connected Source not contactable Error code SrcOutOfRng Cause The value sent for the source is not supported Solution Correct the value according to the desired source You will find te ID for the respective source under Supported sources ...

Page 59: ... p 21 1 On the Device status page in the System configuration area select the corresponding button for Logging mode 2 Confirm the confirmation prompt Generating log files Requirement The device website is open Calling up the start screen p 21 Our support may ask you to configure the logging mode 1 Select System Download log file in the menu bar 2 The log files are compiled and downloaded as a ZIP ...

Page 60: ... Press the Exit X button on the TV device remote control Why do I have to reconfirm the screen text display every time TV models manufactured in 2018 or before are not equipped with a function to automatically interrupt the current image From manufacturing year 2019 you can confirm the setting Always in the TV context menu in order to prevent the query from being repeated Why is no screen text or ...

Page 61: ...gure 25 item 1 2 Pull off the cover cap upwards see figure 25 item 2 Figure 25 Removing the cover cap Warning Danger from incorrect use Incorrect use can result in damage to the device fire or other dangers Only qualified electricians may install and disassemble electrical devices Follow the instructions in this product manual Warning Danger of electric shock An electric shock can result from touc...

Page 62: ... the device off the top hat rail Figure 26 Detaching the device from the top hat rail Disposal Make an active contribution to protecting the environment by disposing of all materials in an environ mentally responsible way Packaging and box Dispose of the packaging material appropriately in a card paper or plastic recycling bins Device Old devices must not be disposed of with domestic refuse You ca...

Page 63: ...S or for the en cryption of communication The FDSK is printed on a sticker on the side of the device A second sticker is enclosed with the product Firmware update tool Software which is embedded on the device hardware and enables operation of the device Function enhancements for the device are available via a new firmware version Flags CRTWUI Every communication object has so called flags with whi...

Page 64: ...st version of product data en tries from ise Individuelle Software und Elektronik GmbH can be downloaded free of charge from our website www ise de The product database entry is often also called the catalogue entry Updates You will find information on new versions of the firmware in this documentation under the search term Update Wake on LAN WoL The Wake on LAN function ensures that a device can ...

Page 65: ... Panasonic product including the operat ing data This includes in particular the firmware and the product database 14 2 Object of the agreement The object of this agreement is the ISE SMART CONNECT KNX Panasonic software provided on data media or through downloads and the corresponding documentation in written and electronic format 14 3 Software usage rights The licensor grants the licensee the no...

Page 66: ...ftware creation The licensee requires written approval from the licensor to create and distribute software which is de rived from the ISE SMART CONNECT KNX Panasonic software 14 4 7 The mechanisms of license management and copy protection The mechanisms of the license management and copying protection of the ISE SMART CONNECT KNX Panasonic software must not be analysed published circumvented or di...

Page 67: ... computer stations specified by the licensor The warranty shall be fulfilled with the supply of spare parts 14 7 2 Limitation of warranty No warranty shall be provided for the freedom from errors for the ISE SMART CONNECT KNX Panasonic software and its data structures Nor does the warranty cover defects due to improper use or other caus es outside the influence of the licensor Any additional warra...

Page 68: ...without the licensor specifically requesting their return No claim to reimbursement of the price paid shall be ac cepted in such a case The license to use the ISE SMART CONNECT KNX Panasonic software shall expire upon termination of the agreement The ISE SMART CONNECT KNX Panasonic product must be taken out of operation in such a case Further use of the ISE SMART CONNECT KNX Panasonic without a li...

Page 69: ...ublished within the framework of vari ous Open Source licenses The individual software packages used and their licenses are listed and described on the device website for this product under System Licenses The source code for the Open Source software used in this product can be obtained by sending an e mail to support ise de This offer is valid for 3 years after the service for this product has be...

Page 70: ...www ise de ise Individuelle Software und Elektronik GmbH Osterstr 15 26122 Oldenburg Deutschland Phone 49 441 680 06 11 Fax 49 441 680 06 15 E mail vertrieb ise de ...

Reviews: