Using Graffiti 2 writing to enter data
19
■
Graffiti 2 includes symbols made with a single stroke and symbols made with
multiple strokes. With some multi-stroke symbols, the first stroke is the same as
a single stroke symbol. As a result, the down stroke for the letter “i” cannot be
recognized as an “i” at the end of the down stroke. The “i” will not be
recognized as an “i” until you enter another symbol that establishes, by its
shape or position, that the down stroke was not part of a two-stroke character
(such as a “t” or “k”), or until a limited time window expires. Similarly,
recognition of a space symbol (a horizontal stroke from left to right) or a period
symbol after a down stroke is dependent upon where the down stroke was
drawn.
■
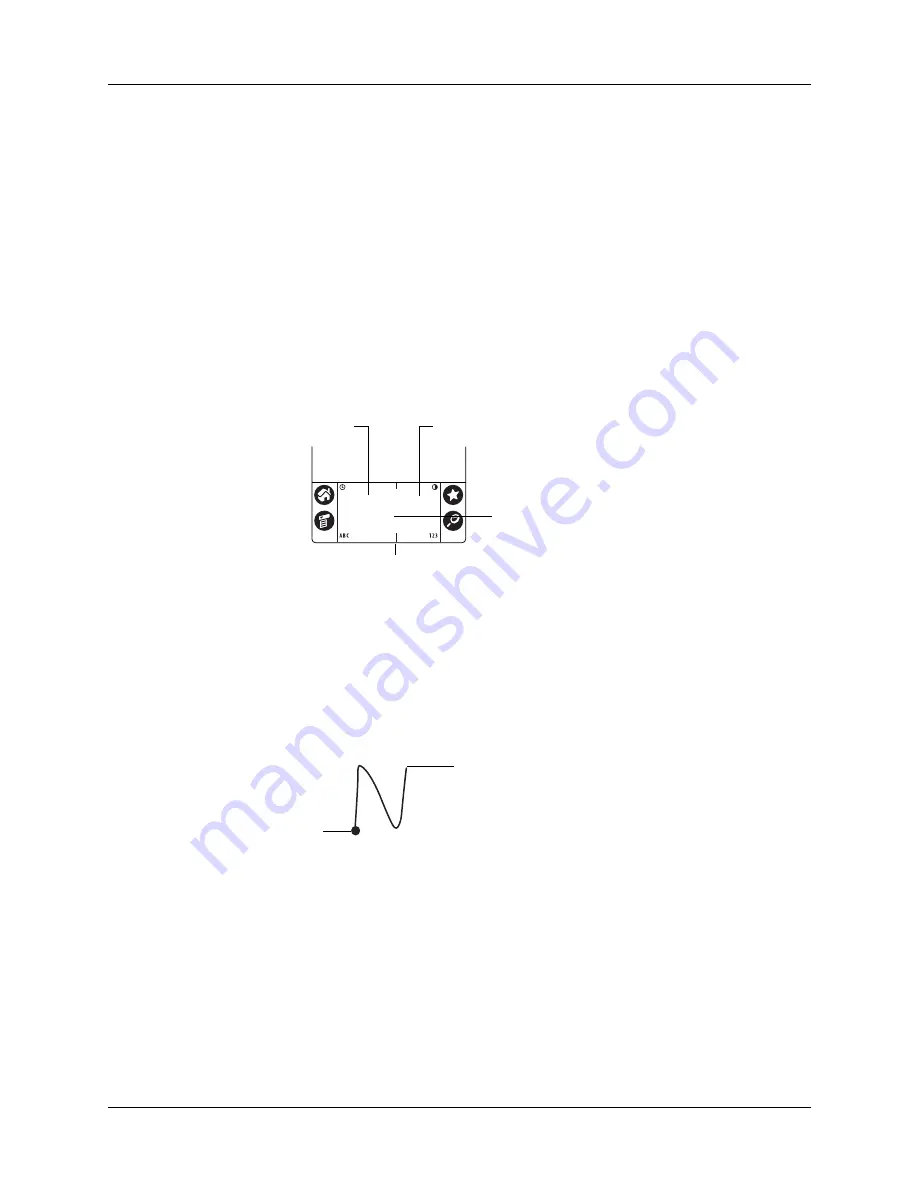
The input area is divided into two parts: one for writing lowercase letters and
one for writing numbers. Capital letters are formed across the imaginary line
that divides the two areas. The small marks at the top and bottom of the input
area indicate the two areas.
To write Graffiti 2 characters:
1.
Tap the screen where you want your text to appear.
You need to tap above the input area, and you must see a blinking cursor before
you write the text.
2.
Use the tables on the following pages to find the stroke shape for the letter you
want to create. For example, the stroke shown below creates the letter
n
.
3.
Position the stylus in the left side of the input area.
4.
Start your stroke at the heavy dot, and draw the stroke shape as it appears in
the tables.
5.
Lift the stylus from the screen at the end of the stroke shape.
When you lift the stylus from the screen, your handheld recognizes your stroke
immediately and prints the letter at the insertion point on the screen.
As soon as you lift the stylus from the screen, you can begin the stroke for the next
character you want to write.
Write letters here
Write numbers here
Division marks
Write capital letters
across the imaginary
division line
Start stroke
at heavy dot
Lift stylus
here
Summary of Contents for Zire 21
Page 1: ...Handbook for the Palm Zire 21 Handheld...
Page 10: ...About This Book 2...
Page 16: ...Chapter 1 Setting Up Your Palm Zire 21 Handheld 8...
Page 24: ...Chapter 2 Exploring Your Handheld 16...
Page 86: ...Chapter 7 Using Date Book 78...
Page 110: ...Chapter 12 Using World Clock 102...
Page 130: ...Chapter 13 Performing HotSync Operations 122...
Page 166: ...Chapter 14 Setting Preferences for Your Handheld 158...
Page 172: ...Appendix A Maintaining Your Handheld 164...
Page 184: ...Appendix B Frequently Asked Questions 176...
Page 196: ...Index 188...


