background image

Verifying O3b Files Availability 

System Commissioning 


4-18 

OceanTRx™4-500 O3b System Installation Guide 

4

4

.

.

6

6


V

V

e

e

r

r

i

i

f

f

y

y

i

i

n

n

g

g


O

O

3

3

b

b


F

F

i

i

l

l

e

e

s

s


A

A

v

v

a

a

i

i

l

l

a

a

b

b

i

i

l

l

i

i

t

t

y

y


Verify that up-to-date Schedule, Channel and TLE files are available on the O3b 
server. 

These files are required by the CCU. The CCU extracts the necessary information from the 
Schedule,  Channel  and  TLE  files  supplied  by  the  O3b  server  and,  based  on  this 
information, automatically configures the O3b Constellation. 
The satellite constellation files folder is location in the folder: 

C:\CCU\o3bdata\gw_sat


4

4

.

.

7

7


O

O

3

3

b

b


C

C

o

o

n

n

s

s

t

t

e

e

l

l

l

l

a

a

t

t

i

i

o

o

n

n


a

a

n

n

d

d


P

P

a

a

r

r

a

a

m

m

e

e

t

t

e

e

r

r

s

s


C

C

o

o

n

n

f

f

i

i

g

g

u

u

r

r

a

a

t

t

i

i

o

o

n

n


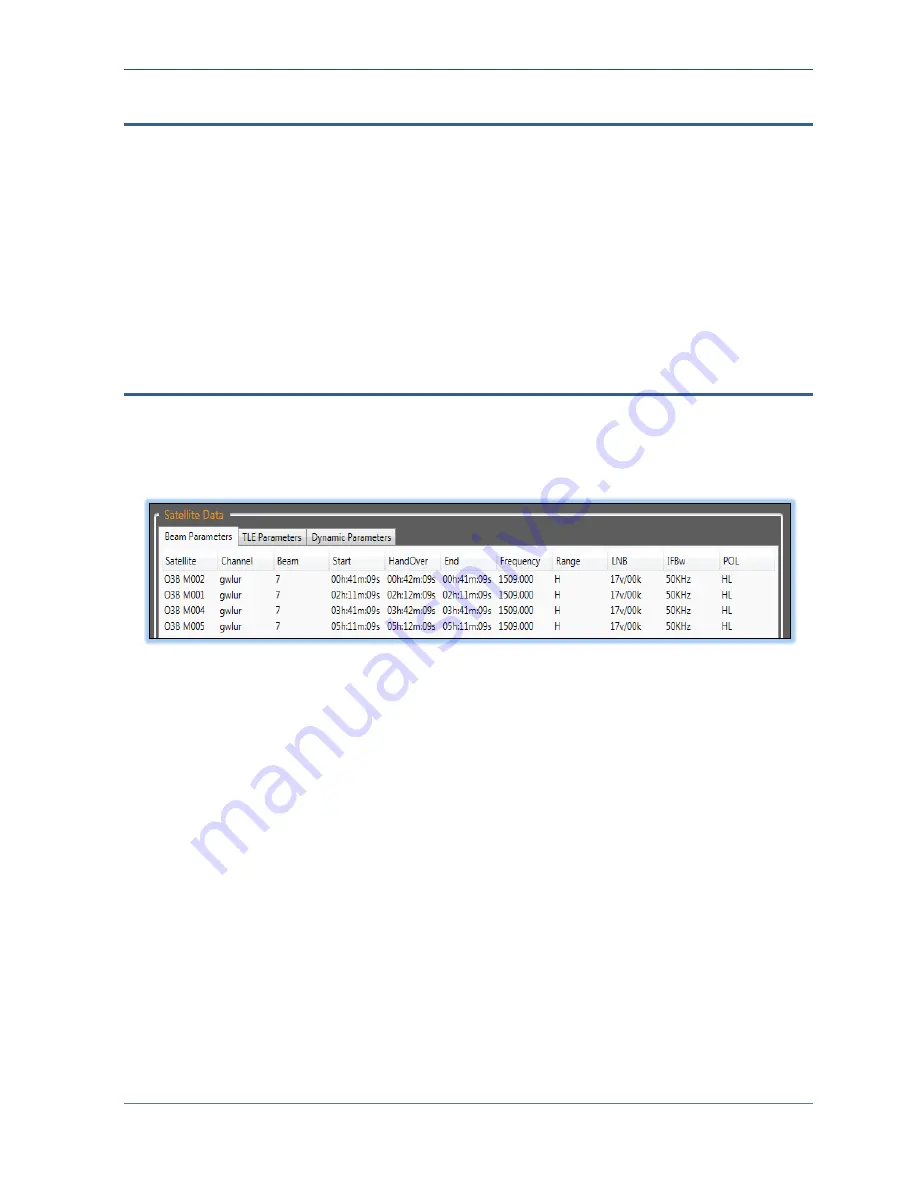
Verify that the O3b files are uploaded correctly into the O3bLink application.  
To verify the O3b files are uploaded correctly, click the O3bLink application 

Info 

tab and 

view the parameters. 


Figure 

4-17: Partial Satellite Info Tab 

 Satellite Data 


Summary of Contents for oceanTRX 4-500

Page 1: ...OceanTRx 4 500 O3b System Installation Guide Installation Guide 1 15m 45 Linear Ka Band Maritime Stabilized VSAT System For O3b System Doc P N MAN34 0659 Rev X1...

Page 2: ...cument and reserves the right to make changes to the document without notice Orbit Communication Systems Ltd makes no warranty of any kind in regard to this document including but not limited to the i...

Page 3: ...3 1 2 System Physical and Electrical Specifications 3 1 3 2 Antenna GND and Power Connection 3 2 3 2 1 GND Connection 3 2 3 2 2 Power Cable Connection 3 2 3 2 3 Power cable Disconnection 3 2 3 3 BDE I...

Page 4: ...3 4 Satellite Data Dynamic Parameters 5 14 5 4 System Messaging 5 15 5 5 General System Status Review Advanced Debug 5 16 6 O3b Operation and Maintenance from MtsVLink ACU 6 1 6 1 Operational TLE Base...

Page 5: ...by default performed automatically to provide continuous coverage over the changeover period of two satellites one satellite descending and the other ascending to compensate for defined blockage zone...

Page 6: ...U for switching up to 3 systems L Band Signals CCU Control and Communication Unit installed below deck Provides single source management and control of the system The following figure shows the RF and...

Page 7: ...if one of the antennas is identified as faulty and another antenna takes over The backup antenna if installed takes over only if the currently operating antennas cannot provide full coverage over exi...

Page 8: ...antenna is shown as being in Standby mode by default in most configurations the backup antenna tracks the satellites as well A Both antennas primary and secondary track the same descending satellite o...

Page 9: ...es and transmits to a different satellite Figure 1 5 During Handover both Antennas Rx and Tx to Different Satellites D After a set period of time following Step C the antennas exchange roles o The pri...

Page 10: ...blockage zones handover will be made to the backup antenna The system takes into account some angular extension for the defined Blockage Zones above the ship This is used to cover for Blockage Zone me...

Page 11: ...or managing the system IP addresses as well as for managing system configuration operation and calibration files 1 3 1 MTSVLink Application MTSVLink is a dedicated antenna management application used...

Page 12: ...b System By default the system is already set up and the O3b Link application only used to monitor system operation The O3bLink application is described in detail in Chapter 1 The following figure sho...

Page 13: ...ing Modifying the IP Address for the CCUs ACUs and updating the system with the modified CCU and ACU addresses and with the modem IP Addresses Saving and restoring system configuration operation and c...

Page 14: ......

Page 15: ...es the descriptions of the CCU and OSS 2 2 1 1 C CC CU U The CCU provides single source local and remote management capabilities for the system It is connected to the network and manages the OSS throu...

Page 16: ...It supports a coax connection to a single antenna and depending on the physical topology can provide RF switching functions between two or three L band simplex inputs to the satellite modem The OSS o...

Page 17: ...nals Tx1 3 UL F type interface Simplex RF L band interfaces corresponding to each antenna Modem Rx 1 2 DL Modem Tx UL F type interfaces Connect to Modem Rx Tx ports Rx 1 2 receive signals from port Te...

Page 18: ......

Page 19: ...ment must be connected via UPS Uninterrupted Power Supply When choosing power cables take into account the electrical specifications according to Systems Power consumption Equipment grounding ADE equi...

Page 20: ...single or dual pole circuit breaker according to regulations and the electrical infrastructure on your vessel 3 2 1 GND Connection Connect an 16 AWG at least protective earthing conductor cable betwe...

Page 21: ...ion Guide 3 3 3 3 3 3 B BD DE E I In ns st ta al ll la at ti io on n 3 3 1 BDE Rack Installation Recommended installation of BDE equipment in rack CCU OSS OSS Figure 3 1 O3b Module Installation Rear V...

Page 22: ...1 1 Overview of the Connections Dual Antennas Connections Tx Rx 1 Antenna 1 Antenna 2 Switch Ships GPS Compass Rx 2 Figure 3 2 O3b Dual Antennas Connections Triple Antennas Connections Tx Rx 1 Antenn...

Page 23: ...7 NC 8 NC 9 GND Pins 1 and 3 are reserved for internal use only and must be left open The following figure shows the mating connector wiring diagram for the RS 422 NMEA 0183 compass signal The recomm...

Page 24: ...e Antenna Installation Connect the cables between the OSS MODEM Tx Rx 1 and Rx 2 to the Modem Tx UL including 10MHz Rx Demod A and Rx Demod B ports 3 3 1 5 LAN Connection Each BDE unit is connected to...

Page 25: ...and tested before it is shipped Tampering with any of the system settings that are not explicitly mentioned in this manual can impair the functioning of the system For MTSVLink setup procedures make s...

Page 26: ...be pulled and damaged as the antenna continuously repositions itself 4 1 2 Power on Power on the following recommended order Verify that the UPS and circuit breakers for the ADE and BDE are powered ON...

Page 27: ...Management Applications run on the CCU Task Bar O3bLink MTSVLink one instance per antenna In addition verify that following application are running background CCU Manager Modem Bridge Other applicati...

Page 28: ...nd ACU IP Addresses Detect IP Addresses of ACUs and configure the ACUs IP Addresses Detect IP Addresses of the CCU and configure the CCU IP Address Configure external hardware IP address Always do thi...

Page 29: ...ses of all ACUs connected to the CCU Figure 4 2 List of detect ACU IP Addresses 3 Click the Edit Reboot button 4 In the displayed dialog enter New Settings parameters and click Update Figure 4 3 Modif...

Page 30: ...pen the MTSVLink application select the Host drop menu and choose Communication The following dialog appears 7 To configure the IP address of the relevant ACU Click the TCP IP tab Enter the IP Address...

Page 31: ...ock application To detect configure the IP address of the CCU 1 Launch the MtsDock application on the CCU Start Programs MtsDock and choose the RemoteCCU menu Figure 4 4 Modifying CCU IP Address 2 Fro...

Page 32: ...stem Installation Guide 3 From the RemoteCCU menu Select Edit Network Parameters Figure 4 6 Modify CCU IP Address Configure the required network parameters and click OK 4 Select the RemoteCCU menu aga...

Page 33: ...ed using the MTSVLink application It is required to update the ACUs with the modified IP Address of the CCU To associate each ACU with the modified address of the CCU 1 Select the Config menu and choo...

Page 34: ...he MtsDock application on the CCU Start Programs MtsDock and choose the O3b menu The O3b System Configuration dialog appears Figure 4 8 O3B IP System Configuration 2 For each element relevant to the s...

Page 35: ...nterface To configure the compass interface 1 Using the MTSVLink From the Config menu select Compass Figure 4 9 Compass Dialog Box 2 Perform the following operations and click OK Verify On Host field...

Page 36: ...30 Figure 4 10 Compass Offset Variables 4 Enter a preliminary compass Offset value This will be updated during the Compass Offset procedure Compass offset is the angle between the OceanTRxTM 4 500 Sy...

Page 37: ...NMEA compass and the CCU Data Sharing parameter configuration is required for O3b system installations To set compass communication parameters 1 Using the MTSVLink From the Host menu select Hardware I...

Page 38: ...ass baud rate default 4800 bps Set Format according to compass communication format default 8_NON_1 Click Apply verify Reading field displays a value and click OK 4 4 1 3 Configuring the NMEA 0183 Com...

Page 39: ...nfiguration should be set to Sun After the offset procedure has been completed set the Program Route configuration back to Satellite Failure to do so will cause the Solar Outage protection to be de ac...

Page 40: ...muth deviation as a parameter of the Antenna Step Track subgroup Setting the antenna to Peak Mode and calculating the difference between the resulting azimuth and the nominal azimuth previously record...

Page 41: ...ation on blockage zones configuration and antenna behavior refer to the OceanTRx 4 500 User Manual To configure the Blockage Zones 1 Using the MTSVLink From the Config menu select Antenna Blockage Fig...

Page 42: ...nel and TLE files supplied by the O3b server and based on this information automatically configures the O3b Constellation The satellite constellation files folder is location in the folder C CCU o3bda...

Page 43: ...lowing window Figure 4 18 Partial Control Tab Operation Handover Configuration For dual Antennas installation the selected number of Antennas shall be 2 4 4 8 8 R Ru un n t th he e O O3 3b b S Sy ys s...

Page 44: ......

Page 45: ...ontrol configuration and monitoring options the MTSVLink antenna dedicated application can be accessed for each antenna from the O3b Link The program can run on the CCU itself or on an external comput...

Page 46: ...ws real time parameters for each ACU and antenna handover Quit Exits O3bLink application 5 5 2 2 O Ov ve er rv vi ie ew w o of f s sy ys st te em m M Mo on ni it to or r o ov ve er rv vi ie ew w The S...

Page 47: ...antenna Azimuth and Elevation angles of this antenna Tx status Tx status BUC mode of this antenna ON antenna is currently transmitting OFF antenna is not transmitting Track Status Shows if antenna is...

Page 48: ...and Satellite Display Item Description Satellite real time position Satellite position relative to blockage zones of antennas Trajectory points Representation of satellites calculated Route NOTE over...

Page 49: ...with the Antenna 5 2 3 Status Bar The Status Bar provides information on the currently transmitting system Figure 5 5 Status Bar Item Description Active Control Unit Active state may be inactive for...

Page 50: ...switching criteria Modify system configuration antenna role and several parameters of the switching algorithm usually system operation is factory set View the IP Addresses of each system management el...

Page 51: ...example ACU1 is Not Ready the roles will be ACU1 Backup ACU2 Primary ACU3 Secondary 2 Impractical Examples Since the software does not prevent senseless settings such as defining all three Antennas ro...

Page 52: ...toggles to Run Re enable CCU control Click Run Antennas continue operation but can now be controlled via the CCU The button toggles to Stop Stop running state of antennas and set antennas to Standby...

Page 53: ...g System Operation Mode Option Description Select Number of Antennas By default two or three antennas are defined according to installation two are operational and one is on standby Use this parameter...

Page 54: ...rol Buttons Load Settings Load the current settings from the CCU must be applied at least once before updating the settings Apply Update the settings to the CCU 5 2 4 4 Viewing Antenna Names and IP Se...

Page 55: ...o calculate satellite route Real time information on satellite position handover time and other paraemters 5 3 1 Constellation Parameters The Satellite Info tab shows various constellation parameters...

Page 56: ...ameters Figure 5 12 Partial Satellite Data Tab Beam Parameters The following Satellite Data Beam Parameters are provided Satellite name Channel name Beam number Start time the next time the ascending...

Page 57: ...nt set Epoch Right ascension the angle measured eastward from the Vernal Equinox to the ascending node Mean motion the reciprocal of the period BSTAR term Inclination orbital plane s tilt angle with r...

Page 58: ...me when one of the antennas should start tracking the next ascending satellite This occurs about four times per day for each satellite The time is determined by a file that is continuously received co...

Page 59: ...M Me es ss sa ag gi in ng g This tab shows warnings and errors of the system operation the errors are divided into 4 groups ACU1 ACU2 ACU3 and CCU For example ACU1 communication error CCU No GPS data...

Page 60: ...ers some of the important parameters are Handover run condition system operation OK Handover Configuration Status corresponds to the parameters configured in the Control screen Configuration and statu...

Page 61: ...in Yaw Pitch and Roll TLE Based Modes Operational Trigonometry Based Modes Maintenance Program Route Point to Satellite Program Track and Peak Manual Acquire Program Tack Satellite Preset Re Acquire O...

Page 62: ...Antenna to revert straight to Program Route in case of signal loss Note that Program Track cannot be activated from the Operational screen as a stand alone mode It is used as a sub mode in Acquire Pro...

Page 63: ...enance from MtsVLink ACU Operational TLE Based Modes OceanTRx 4 500 O3b System Installation Guide 6 3 In any case the Acquire Program Track mode implements the following time states Figure 6 1 Handove...

Page 64: ...until the point of descend below Minimal Elevation The movement is calculated as per simple trigonometric trajectory based on the parameters fed in the General Parameters of the O3b Constellation scr...

Page 65: ...a predefined epsilon the Antenna reverts back to Step track 6 2 6 Peak Point the Antenna to the Point of maximal reception as found by the last Step Track or Program Track iteration Keep Antenna movin...

Page 66: ...Periodically re peak the Antenna on signal maxima with respect to O3b Satellite Arc with the Azimuth Elevation Satellite view angles constantly trigonometrically recalculated using Altitude and Const...

Page 67: ...s C Ccu CcuManager CcuManager utility components CcuManager exe executable file CcuManager lnk shortcut to run the program not in O3b mode O3b_CcuManager lnk shortcut to run the program in O3b mode C...

Page 68: ...nge i e new files set is completely received CcuManager reads gw_sat files and combines then in O3bNcns xml next constellation data file in C Ccu O3b folder C Ccu O3bLink The folder contains O3bLink u...

Page 69: ...tartup folder C Ccu SwitchCcu Components of utility which fulfills active CCU selection It should be used only in debugging purposes SwitchCcu exe executable file SwitchCcu exe config configuration C...

Page 70: ...ll ACU did it 3 Case ACU Action ADD If loaded O3bNcns Start time is less than current UTC the replacement is fulfilled immediately Otherwise the replacement is fulfilled on switch to new satellite if...

Page 71: ...Satellite File Read Error Restart timed out REBOOTING CPU power out of tolerance CPU Temp out of tolerance System Reboots Axes Jammed Azimuth Stuck Elevation Stuck PolSkew Stuck Tilt Stuck Azimuth Ini...

Reviews: