background image

6

How to Proceed in This
Manual

DVD is an incredible format that presents the highest
quality digital audio and video available today. Because
using the DVD changer and DVDs may be confusing at
first, following the order below should help you get
through the important stages of getting set up so you
can start using your changer as soon as possible.

Get familiar with the changer.

Refer to the section “Before Using” on page 8 to
confirm that all the accessories were included with the
changer. If you are new to DVD, it might be beneficial for
you to go through the “Names and Functions” section
starting on page 9 to get familiar with the parts and
buttons on the main unit and remote controller.

There is also a list of terms that can be found on page 76
if you are having trouble understanding some of the
terminology associated with DVD.

Make the necessary connections.

No entertainment system seems to be set up exactly
the same way. The “Making Connections” section
starting on page 15 shows how video and audio
connections may be made to suit your home
entertainment system.

Set up the changer.

Before you can begin to enjoy the benefits of the DVD
format, it is first necessary to set up the changer to
output the video and audio corresponding to your
system. The section “Setting Up the Changer” starting
on page 20 explains how to use the Setup Navigator, a
function that automatically sets up your changer. The
Setup screen menus, described in the section starting
on page 39, are also used in a number of other
functions. Learning the procedure for operating these
menus will make using this changer much easier and
more enjoyable.

Load the disc rack and play discs.

When all the connections and setups have been made,
you are ready to play your DVDs, Video CDs, and CDs
with the changer. The section “Getting Started Using
Your DVD Changer” starting on page 23 outlines the
basic changer operations.

Organize the discs in the disc rack.

The section “Disc Management” on page 30 helps you
manage the discs you have loaded in the rack by making
use of the Sub Setup screen menus. By taking advantage
of this changer’s text input and cross-referencing
capabilities, it is quick and easy to find the disc you want.

Enjoy the other features available.

Once you are comfortable using the basic changer
functions, you are ready to take advantage of the various
options DVD and this changer have to offer. The section
“Advanced Functions” starting on page 49 describes a
number of functions available with this changer.

Differences in Disc
Composition

DVD

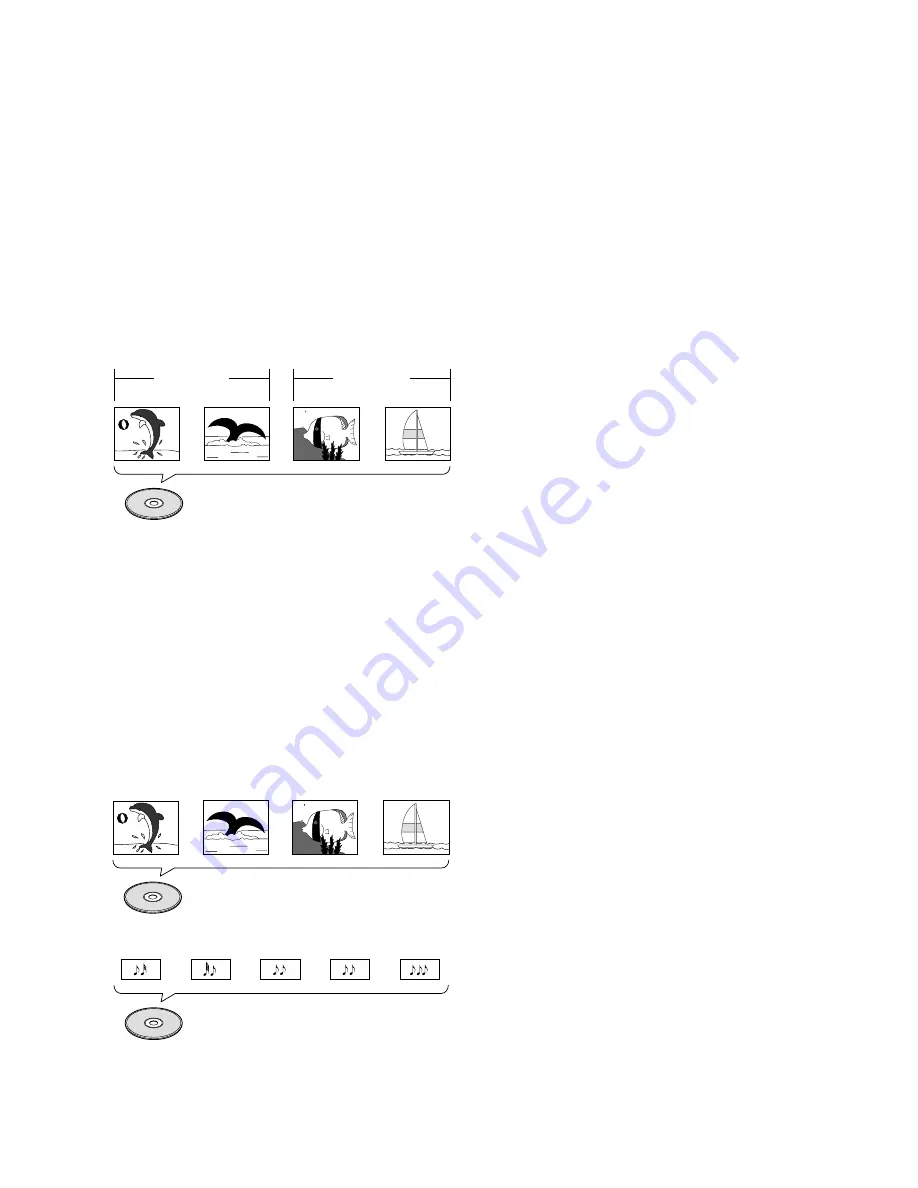
DVDs are divided into units referred to as titles, and
titles are divided into chapters. A DVD which contains a
movie may have only one title with many or no chapter
divisions. Karaoke DVDs may have many titles, assigning
a title to each song on the DVD. Menu screens do not
belong to any title.

DVD player functions generally apply to titles on a DVD
or chapters within a selected title. The player functions
available may also vary from title to title, depending on
the DVD. When DVDs have a unique title division, it
should be noted that search and program functions may
be affected.

Video CD/CD

Video CDs and CDs are divided into units referred to as
tracks (Video CD tracks may also be referred to as
scenes). One song generally corresponds to one track.
Some tracks are further divided into units referred to as
indexes. Video CDs with PBC (Playback Control) also
contain menus recorded on the disc which enable easy
access to the contents of the disc.

When played back on a DVD player, both Video CDs and
CDs are considered to be a single title, regardless of the
number of tracks.

Title 1

Title 2

Chapter 1

Chapter 2

Chapter 2

DVD

Chapter 1

Video CD

Track 1

Track 2

Track 3

Track 4

CD

Track 2

Track 4

Track 3

Track 1

Track 5

Summary of Contents for DV-M301

Page 1: ...re reference Before Using 8 Names and Functions 9 Making Connections 15 Setting Up the Changer 20 STANDBY ON STANDBY DVD CHANGER DV M301 DIRECT CUSTOM DISC CHARACTER PUSH TO ENTER CLEAR UPDATE AUDIO V...

Page 2: ...the National Electrical Code ANSI NFPA 70 provides information with regard to proper grounding of the mast and supporting structure grounding of the lead in wire to an antenna discharge unit size of g...

Page 3: ...tes uses and can radiate radio frequency energy and if not installed and used in accordance with the instructions may cause harmful interference to radio communications However there is no guarantee t...

Page 4: ...s and disc types as well as minor scratches dust fingerprints or condensation on the disc or pickup lens playback may not be possible with some discs If a CD R disc has not undergone a process called...

Page 5: ...Not Used Start Easy setup and adjustment using on screen menus You ll find setting up and adjusting the system easy to do with on screen menus conveniently organized and arranged Additionally on scree...

Page 6: ...hanger The section Getting Started Using Your DVD Changer starting on page 23 outlines the basic changer operations Organize the discs in the disc rack The section Disc Management on page 30 helps you...

Page 7: ...the Language Options 44 Selecting a Subtitle Language Multi Language Subtitles 44 Changing the Audio Language Multi Language Function 45 Setting Language and Subtitle Preferences in the Setup Screen M...

Page 8: ...the following were received with the changer Audio cord Video cord Master Slave control cord Remote controller AA R6P batteries Remote control operation When operating the remote controller point it...

Page 9: ...ile begins automatically page 38 AUDIO VIDEO button Press repeatedly to select the audio or video custom file bank page 38 8 UPDATE button Use to update information on the discs loaded in the rack pag...

Page 10: ...INGLE CUSTOM AUDIO VIDEO 1 2 3 6 4 5 7 8 9 0 _ Display Window 1 Character display Displays text information already recorded on the disc such as CD TEXT or DVD text and also text manually input into t...

Page 11: ...57 REPEAT indicator Indicates repeat playback is being performed page 55 LAST MEMORY indicator Indicates the Last Memory location is registered in memory for the DVD currently playing page 61 COND ME...

Page 12: ...m into a shortcut list that is stored in memory and can be called up at any time page 63 9 PLAY 3 button Press to start disc playback pages 24 and 29 0 STOP 7 button Press to stop playback page 29 4 b...

Page 13: ...ed in the rack pages 23 and 26 Dial mode indicator Lights red when the changer is in the Jog Mode and green when the changer is in the Select Disc Number mode pages 23 26 and 53 JOG MODE button Press...

Page 14: ...tom position page 18 7 AUDIO OUT jacks Connect to the stereo audio inputs of a TV or stereo AV component If you are connecting to an AV component that has both digital and analog input jacks for DVD p...

Page 15: ...offers a wide array of audio and video output options which allows playback to be enjoyed in any number of system configurations from a standard TV with stereo audio input to a home theater system wi...

Page 16: ...annel Surround Speaker System S video cord Not included 4 1 2 3 1 S video connection to a TV or monitor with S video inputs page 18 2 When using the S VIDEO OUT jack set VIDEO SELECT to the top positi...

Page 17: ...changer to the coaxial digital input on an AV component AV amplifier or receiver with built in Dolby Digital DTS or MPEG decoder etc AV component with built in Dolby Digital DTS or MPEG decoder etc M...

Page 18: ...able to connect the VIDEO OUT jack on the changer to the video input on the TV or monitor Be sure to match the color of the plug with the color of the jack yellow When making video connections make su...

Page 19: ...19...

Page 20: ...he Setup Navigator move the cursor control joystick to select Not Used at this time The Setup Navigator function may still be used at a later time in manual Setup screen menu operation page 39 4 Press...

Page 21: ...een Video menu TV Screen setting to either Wide or 4 3 Pan Scan page 43 Additionally make sure that your system is set up to output the 96 kHz bitstream using either the Setup Navigator or the Setup s...

Page 22: ...96 kHz output The 96 kHz PCM Audio screen establishes whether or not the AV component the changer is connected to is capable of processing an audio signal with a sampling rate of 96 kHz This screen o...

Page 23: ...n the opposite direction 5 Repeat steps 3 and 4 to continue loading discs in the rack 6 When you have finished loading discs into the rack press OPEN CLOSE 0 OPEN CLOSE on the front panel The hood sli...

Page 24: ...e previous section or made the necessary settings in the Setup screen menus as outlined in the section starting on page 39 to set up the player to correspond to your home system Having made these sett...

Page 25: ...R is used for selection Occasionally the number buttons may also be used to make selections If this is possible using number buttons serves to directly select an option on a menu screen Only number bu...

Page 26: ...the dial mode indicator lights green and then turn MULTI DIAL to select a disc number When using the front panel turn the selection dial to select a disc number The disc numbers increase when MULTI D...

Page 27: ...playback Release 1 when you reach the desired location Normal playback resumes Two speeds of scanning SCAN 1 and SCAN 2 are performed in the reverse direction with SCAN 2 being the faster of the two...

Page 28: ...ADER ACCESS on the front panel The rack rotates to the single loader slot and the hood opens automatically 2 Load a disc in the single loader slot with the label side facing the right When loading dou...

Page 29: ...disc is selected Note If you want to continue viewing a DVD at a later time or date it is recommended to use the Last Memory function described on page 61 About the Last Disc Memory function Even aft...

Page 30: ...stem restarts Disc Management Text Auto Update Custom Add Disc Update New disc update title artist info input On completion system is reset All Disc Update i Move SUB SETUP Exit ENTER Select This chan...

Page 31: ...elect the Auto Update menu 3 Move the cursor control joystick down to select All Disc Update 4 Press ENTER Auto Update is displayed as the rack starts to rotate as each new disc is read by the changer...

Page 32: ...e finished with the title move the cursor control to select OK 9 Press ENTER The cursor returns to the Text menu screen 10 Move the cursor control joystick right to highlight the artist s field 11 Pre...

Page 33: ...is applied to the name of the custom file and not to the title or artist s name of the currently selected disc Inputting characters using a PS 2 compatible keyboard Be sure to turn off the power to t...

Page 34: ...e sure to use only an IBM compatible keyboard Certain commercially available PS 2 mouse models PS 2 keyboard models and Y cables may not be compatible with this unit For details please consult Onkyo t...

Page 35: ...artist name information in the Text menu page Refer to the section Inputting and Changing Text Information on page 31 To perform a disc search for a particular disc number title or artist in the Text...

Page 36: ...n this case press TOP MENU to display the menu screen and then make your selection With some DVDs the search operation may not be possible and may stop shortly after being performed In this case the m...

Page 37: ...Return Chara SUB SETUP Exit ENTER Select To perform a disc search using controls on the front panel 1 Press TEXT SEARCH The type of search changes which each press as follows 2 Turn the selection dial...

Page 38: ...ars in the R column when a disc has been successfully added When adding discs to a custom file please note that only DVDs and Video CDs can be registered in a video custom file and only CDs can be reg...

Page 39: ...ight when the setting is selected The current setting appears with the setting indicator lit 6 Move the cursor control joystick right to enter the setting options Not all menu options can be changed w...

Page 40: ...select another menu 9 Press SETUP to close the Setup screen The Setup screen closes How to interpret the setting indicator colors in the Setup screen menus When setting up the system or when making ad...

Page 41: ...ur speakers 96 kHz PCM Out This changer is capable of outputting digital signals with a sampling frequency of 96 kHz If you have made connections to a component capable of processing this signal rate...

Page 42: ...ve Exit English fran ais Espa ol SETUP Setup player s OSD language Turning the on screen display on or off Expert If you would rather not have the operation indicators Play Stop Resume etc and other m...

Page 43: ...is programmed in the wide screen format If you have a standard TV select either 4 3 Letter Box or 4 3 Pan Scan based on your personal preference If you have a wide screen TV select 16 9 Wide TV Scree...

Page 44: ...e subtitle data in multiple languages recorded on them Press SUBTITLE repeatedly during playback Pressing SUBTITLE once displays the currently selected subtitle language Subsequent presses rotates thr...

Page 45: ...briefly pause or shake This is not a malfunction If a DTS audio soundtrack is selected there is no output from the analog audio jacks Audio 1 English Dolby Digital 5 1CH Audio 2 Spanish HELLO HOLA Do...

Page 46: ...elect other languages see When Other is selected on the following page Factory setting OSD Language English Audio Language English Subtitle Language Japanese Auto Language Japanese Audio1 General Lang...

Page 47: ...anges press RETURN Selecting a DVD menu language preference Expert In addition to containing different audio languages DVD may also contain menu screens in different languages as well Setting a DVD la...

Page 48: ...ction to turn the subtitles on or off Also some DVDs provide assist subtitles that give additional explanations of scenes in addition to the standard subtitles for viewers who are hard of hearing Sele...

Page 49: ...e Audio Soundtrack DVD Audio DRC stands for Audio Dynamic Range Compression When Audio DRC is on soft sounds such as dialog can be heard more clearly without making loud sounds even louder Select from...

Page 50: ...stments Sports Preset designed to be appropriate for sports and similar media Art Preset designed to be appropriate for art films and similar media If there is a DVD or Video CD playing the effects of...

Page 51: ...o select either 1 2 or 3 in the Memory setting to establish which memory location to save the new settings in Please note that if you select a location where settings have already been saved the old s...

Page 52: ...is engaged During slow playback the speed of playback can be adjusted from 1 16 normal playback speed to 1 2 normal playback speed in four steps using STEP SLOW e and E 1 16 1 8 1 4 1 2 Press and hol...

Page 53: ...AN 2 SCAN 2 SCAN 1 SLOW PLAY 2 During scanning turn MULTI DIAL quickly in the opposite direction of the search to resume normal playback Note Pressing PLAY 3 also ends slow or scan playback and return...

Page 54: ...ngle mark set Angle Indicator to Off in the Setup screen Video menu described in the section below Turning the angle indicator on and off Expert When a picture recorded in different angles is played b...

Page 55: ...ks will be played in a different random order To cancel repeat play Press STOP 7 Press CLEAR if you want to cancel repeat playback and continue normal playback Repeat play of a specified section Press...

Page 56: ...rformed DVDs will be ignored To change titles chapters or tracks during random play Press and the next randomly selected track starts playing Press 4 and playback of the current track starts again fro...

Page 57: ...rent disc is a DVD and you want to program chapters proceed to the next step If the current disc is a Video CD or CD or if you want to program entire titles on a DVD proceed to step 7 5 Use the cursor...

Page 58: ...tick up or down to select the step you want to delete 4 Press CLEAR 5 Press PROGRAM to exit the program screen To clear the entire program Pressing CLEAR when the disc is stopped will clear all progra...

Page 59: ...emorized step and proceeds in reverse chronological order When Best play is being performed Best appears in the upper right corner of the screen when the discs are being changed Press 4 to return to m...

Page 60: ...disc in the current play mode When Hi Lite scan is being performed Hi Lite appears in the upper right corner of the screen when the discs are being changed When HI LITE is pressed during Program play...

Page 61: ...tion the Last Memory function is effective even if the DVD is removed from the changer Memorizing a Last Memory location to return to later 1 Press LAST MEMORY during play The LAST MEMORY indicator li...

Page 62: ...rized settings Play a disc that has memorized settings and press CLEAR while Condition Memory is being displayed Settings memorized for that disc will be cleared Notes Settings are stored in memory fo...

Page 63: ...t appears on the screen 2 Move the cursor control joystick to select the item you want to adjust and press ENTER The Setup screen opens and the cursor is moved to the appropriate menu and menu item as...

Page 64: ...t information about the disc currently playing You can get information about the titles and chapters on a DVD or tracks on a Video CD or CD When viewing DVDs you can also check the digital bitstream t...

Page 65: ...deo CD Bottom Row remaining time of Video CD total time of Video CD Track information Top Row disc number track number total elapsed time of Video CD Bottom Row track time total time of current track...

Page 66: ...jack on the Master changer Use a commercially available coaxial cable to connect the DIGITAL COAXIAL OUT jack on the Slave changer to the DIGITAL COAXIAL IN jack on the Master changer The digital aud...

Page 67: ...changed during playback stop disc playback before attempting to make changes Notes The power of the Slave player is turned on and off when the Master player is turned on and off STANDBY ON on the Slav...

Page 68: ...ernal Input Audio1 General Language Video 2 Move Exit Audio Video Audio and Video Off SETUP Setup Menu Mode Expert Utilizing the Audio Video Output of Another AV Component The input jacks on this chan...

Page 69: ...joystick right or left to move the cursor to a different position in the password When all four numbers of the password have been entered ENTER appears on the screen 3 Press ENTER to set the new passw...

Page 70: ...a length of time Make changes to the Screen Saver setting in the Setup screen General menu in the Expert menu mode page 40 Settings On Off Factory setting Screen Saver Parental Lock Level 8 Setup Nav...

Page 71: ...ving Never insert more than one disc at a time into one slot This can scratch or damage the discs To prevent malfunction be sure to use an adapter when loading 8 cm 3 in CDs in the changer To prevent...

Page 72: ...eat radiation and could result in damage AVOID HEAT Do NOT place the unit on equipment which generates heat such as an amplifier When installing the unit in a rack place it on the lowest shelf possibl...

Page 73: ...ks Kurdish ku Kirghiz ky Latin la Lingala ln Laothian lo Lithuanian lt Latvian lv Malagasy mg Maori mi Macedonian mk Malayalam ml Mongolian mn Moldavian mo Marathi mr Malay ms Maltese mt Burmese my Na...

Page 74: ...lies to DVD performance The settings will be effective the next time a DVD is loaded Settings are canceled When the power is turned off by power failure or by unplugging the power cord settings will b...

Page 75: ...r terminal is dirty Check that the plugs and terminals are wiped clean of dirt etc Audio cable connection is wrong Check to make sure that the audio cables are connected correctly page 17 Connection i...

Page 76: ...dio inputs as the digital signal cannot be decoded Digital output Optical Normally audio is converted to an electric signal and transmitted through an electric wire from the changer to the amplifier e...

Page 77: ...l lock restrictions are restrictions incorporated into titles which include scenes that parents may not wish their children to view PBC Playback Control This refers to signals recorded on a Video CD V...

Page 78: ...tput level Y 1 0 Vp p 75 PB PR 0 7 Vp p 75 Jacks RCA jack Audio input output Output level During audio output 200 mVrms 1 kHz 20 dB Number of channels 2 Jacks RCA jack Digital audio characteristics Fr...

Page 79: ...elp to prevent hearing damage or loss in the future After all we want you listening for a lifetime WeWantYouListeningForA Lifetime Used wisely your new sound equipment will provide a lifetime of fun a...

Page 80: ...201 825 7950 Fax 201 825 8150 E mail onkyo onkyousa com ONKYO EUROPE ELECTRONICS GmbH Industriestrasse 20 82110 Germering GERMANY Tel 089 849 320 Fax 089 849 3265 E mail info onkyo de ONKYO CHINA LIMI...

Reviews: