Print Media
40
Wet (or damp)
"
Keep media between 35% and 85% relative humidity. Toner does
not adhere well to moist or wet media.
Layered
Adhesive
Folded, creased, curled, embossed, warped, or wrinkled
Perforated, three-hole punched, or torn
Too slick, too coarse, or too textured
Different in texture (roughness) on the front and back
Too thin or too thick
Stuck together with static electricity
Composed of foil or gilt; too luminous
Heat sensitive or cannot withstand the fusing temperature (180°C
[356°F])
Irregularly shaped (not rectangular or not cut at right angles)
Attached with glue, tape, paper clips, staples, ribbons, hooks, or buttons
Acidic
Any other media that is not approved
Thick Stock
Paper thicker than 90 g/m
2
(24 lb bond) is referred to as thick stock. Test all
thick stock to ensure acceptable performance and to ensure that the image
does not shift.
You can print continuously with thick stock. However, this could affect the
media feed, depending on the media quality and printing environment. If
problems occur, stop the continuous printing and print one sheet at a time.
"
43 lb bond is also referred to as 90 lb index stock.
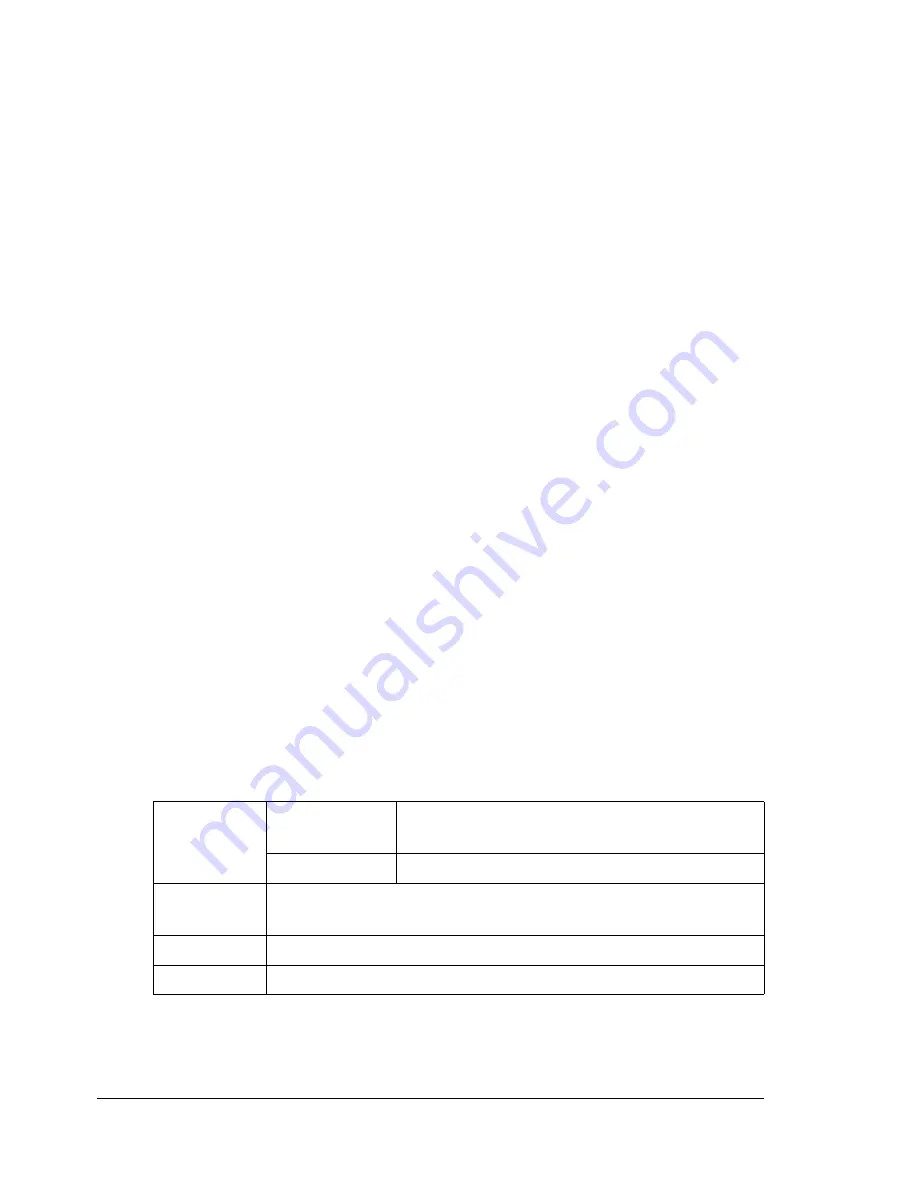
Capacity
Tray 1
Up to 50 sheets, depending on their thick-
ness
Tray 2
Not supported
Driver
Media Type
Thick Stock
Weight
91 to 163 g/m² (25 to 43 lb bond)
Duplexing
Not supported
Summary of Contents for Omega 2030CN
Page 1: ...Omega 2030CN Printer Copier Scanner User s Guide ...
Page 10: ......
Page 11: ...1 Introduction ...
Page 19: ...2 Control Panel and Configuration Menu ...
Page 46: ...Configuration Menu Overview 36 ...
Page 47: ...3 Media Handling ...
Page 65: ...Loading Media 55 10 ...
Page 68: ...Loading Media 58 4 5 ...
Page 69: ...Loading Media 59 Tray 2 Only plain paper can be loaded in Tray 2 Loading Plain Paper 1 2 ...
Page 71: ...Loading Media 61 6 7 ...
Page 81: ...4 Using the Printer Driver ...
Page 97: ...5 Using Direct Print ...
Page 100: ...Camera Direct Photo Printing 90 ...
Page 101: ...6 Using the Copier ...
Page 114: ...Making Advanced Copies 104 ...
Page 115: ...7 Using the Scanner ...
Page 131: ...8 Replacing Consumables ...
Page 146: ...Replacing the Drum Cartridge 136 ...
Page 147: ...9 Maintenance ...
Page 155: ...Cleaning the Machine 145 6 7 BOTTOM VIEW Laser lens ...
Page 156: ...Cleaning the Machine 146 8 9 ...
Page 157: ...Cleaning the Machine 147 Cleaning the Duplex Option Feed Rollers 1 2 3 ...
Page 158: ...Cleaning the Machine 148 Cleaning the Media Feed Rollers for Tray 2 1 2 ...
Page 159: ...Cleaning the Machine 149 3 4 ...
Page 160: ...Cleaning the Machine 150 Cleaning the Media Feed Rollers for the ADF 1 2 3 ...
Page 162: ...Storing the Machine 152 ...
Page 163: ...10 10 Troubleshooting ...
Page 173: ...Clearing Media Misfeeds 163 8 9 ...
Page 174: ...Clearing Media Misfeeds 164 10 11 12 ...
Page 176: ...Clearing Media Misfeeds 166 16 17 18 19 ...
Page 177: ...Clearing Media Misfeeds 167 20 ...
Page 179: ...Clearing Media Misfeeds 169 Clearing a Media Misfeed from the ADF 1 2 3 ...
Page 180: ...Clearing Media Misfeeds 170 4 5 6 ...
Page 205: ...11 11 Installing Accessories ...
Page 210: ...Duplex Option 200 6 Make sure that both knobs are securely locked 7 ...
Page 212: ...Tray 2 202 2 Be sure to place Tray 2 on a level surface ...
Page 213: ...A Appendix ...
Page 221: ...Index 3 W Watermark tab 83 Z Zoom ratio 94 ...
Page 222: ...Index 4 ...


