background image

1-16

d-COLOR MF654/MF554/MF454/MF364/MF304/MF254

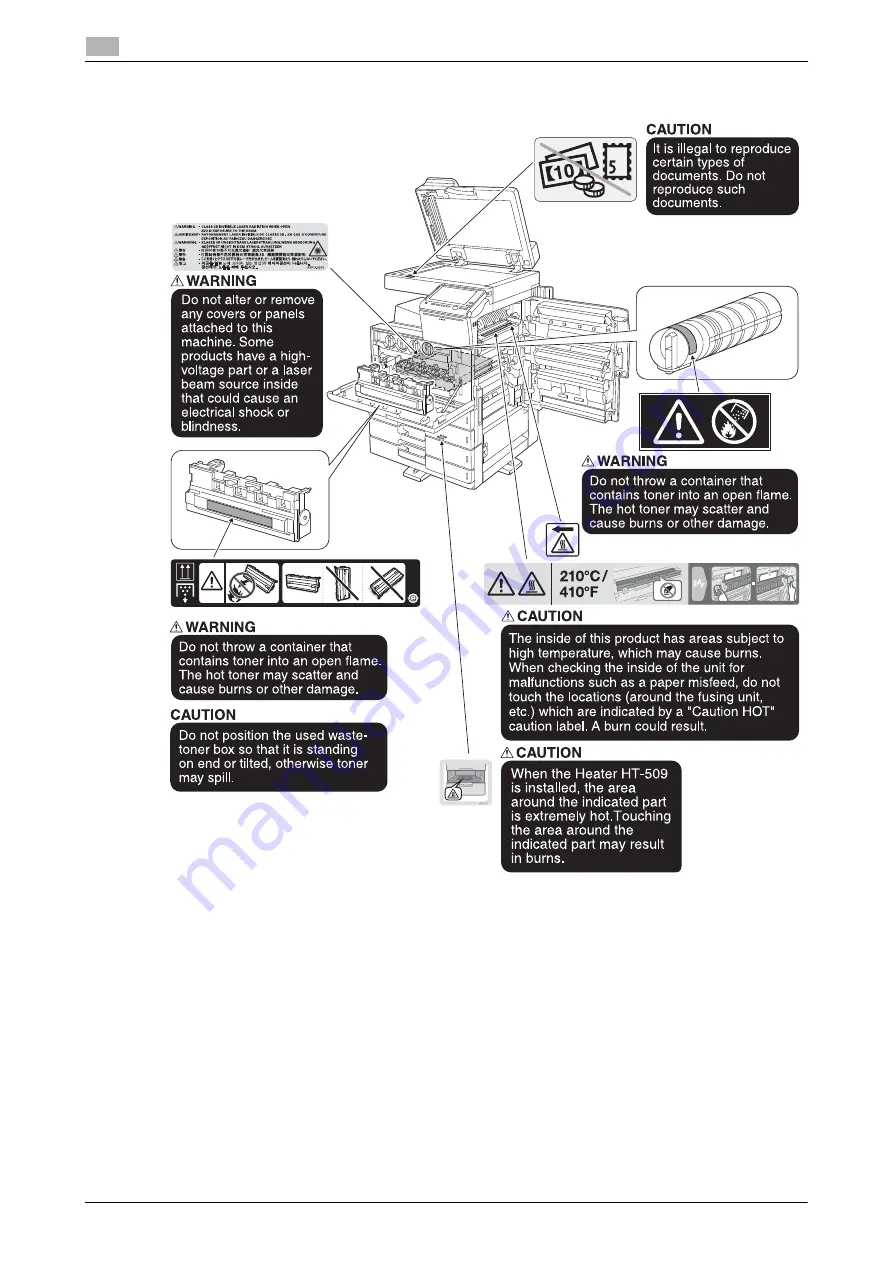
Caution notations and labels

1

1.4

d-COLOR MF364/MF304/MF254

NOTICE

Do not remove caution labels or notations. If any caution label or caution notation is soiled, please clean to 
make legible. If you cannot make them legible, or if the caution label or notation is damaged, please contact 
your service representative.

Summary of Contents for d-COLOR MF254

Page 1: ...d COLOR MF654 MF554 MF454 MF364 MF304 MF254 QUICK GUIDE ...

Page 2: ......

Page 3: ...0 Laser safety 1 10 Internal laser radiation 1 11 CDRH regulations 1 12 For European users 1 12 Laser safety label 1 12 Ozone release 1 13 Acoustic noise for European users only 1 13 For EU member states only 1 13 Telephone cable for users in countries subject to class B regulations 1 14 USB Host 1 14 Graphic symbols used on this machine 1 14 1 4 Caution notations and labels 1 15 d COLOR MF654 MF5...

Page 4: ...ZU 609 d COLOR MF654 MF554 MF454 2 20 Job Separator JS 602 d COLOR MF654 MF554 MF454 2 22 Post Inserter PI 507 d COLOR MF654 MF554 MF454 2 23 Finisher FS 533 Punch Kit PK 519 d COLOR MF554 MF454 MF364 MF304 MF254 2 24 Job Separator JS 506 d COLOR MF554 MF454 MF364 MF304 MF254 2 25 Finisher FS 536 Finisher FS 534 Saddle Stitcher SD 511 Punch Kit PK 520 2 26 Large Capacity Unit LU 302 LU 207 d COLOR...

Page 5: ...hecking the cable connection 3 4 Checking network settings of this machine 3 4 Installing the printer driver 3 5 Printing data 3 5 Types of printer drivers 3 6 3 1 2 Required settings and basic operations for Mac OS 3 6 Preparation flow 3 6 Operation flow 3 7 Checking the cable connection 3 7 Checking network settings of this machine 3 8 Installing the printer driver 3 10 Adding and configuring a ...

Page 6: ...g the fax driver 3 47 Sending data 3 48 3 4 Copy function 3 49 Basic operations 3 49 User authentication 3 51 3 5 Registering a destination 3 52 3 5 1 Registering an address book 3 52 Using the Control Panel to register an address book Registration from Utility 3 52 Using the Control Panel to register an address book Registration from Address book 3 54 Using the Control Panel to register an addres...

Page 7: ...o replace consumables or carry out cleaning 5 3 5 1 2 When a paper jam message persists 5 4 5 1 3 When an error message appears 5 4 5 1 4 When Stabilizing image appears 5 5 5 2 When printing quality has deteriorated 5 6 5 2 1 Cleaning the Print Head Glass 5 6 5 3 When the machine cannot be powered on 5 8 5 4 When the Touch Panel is not visible 5 9 5 5 When a message appears to replace consumables ...

Page 8: ...Contents 6 d COLOR MF654 MF554 MF454 MF364 MF304 MF254 ...

Page 9: ...1 Introduction ...

Page 10: ......

Page 11: ...perate the machine safely and properly be sure to read the safety information on page 1 5 of this manual before use In addition this manual contains the following information Be sure to read the manual before using the ma chine Items that must be observed to use the machine safely Information regarding product safety Precautions when using the machine Descriptions on trademarks and copyrights The ...

Page 12: ...of inactivity An ENERGY STAR product uses energy more efficiently saves you money on utility bills and helps protect the environment Environmental benefits of power management Electricity consumption of a device depends on both its properties and the way of using the device Suitable power management setting offers you resource saving usage way By setting the time to go into power saving modes e g ...

Page 13: ...plary graphical symbols Power source connection Pictorial indication Description WARNING Improper handling can cause serious injury or death CAUTION Improper handling can cause minor injury or damage to houses and property Graphic symbols Descriptions Graphic symbols Descriptions Graphic symbols Descriptions General prohibition Do not disassemble Do not touch General instruction Ground Earth Unplu...

Page 14: ...the product is not long enough to be plugged into a wall outlet contact your Technical Representative Do not unplug and plug in the power cord with a wet hand as an electri cal shock could result Plug the power cord all the way into the power outlet Failure to do this could result in a fire or electrical shock Make sure to ground this product Connect the power cord to an elec trical outlet that is...

Page 15: ...wer cord resulting in a fire or electric shock CAUTION If instructed to use fixing legs When the product has been installed fix the product using the fixing legs Not using the fixing legs could cause the product to move or topple over Do not place the product in a dusty place or a site exposed to soot or steam near a kitchen table bath or a humidifier A fire electrical shock or breakdown could res...

Page 16: ... module limited only to 13 56 MHz for use in inside the ma chine proximity communication or electromagnetic induction heating IH technology limited only to 20 05 kHz to 100 kHz is being used This machine generates a weak magnetic field If you experience any un usual symptoms with your implantable medical equipment cardiac pacemaker etc while near the machine move away from the machine and see a do...

Page 17: ...bles from the toner bottle take utmost care to avoid inhaling it or even getting skin contact If toner lands on your skin or clothing wash thoroughly with soap and water If you inhale toner move to a place with fresh air and gargle with a lot of water repeatedly Should you get symptoms such as coughing seek medical advice If you get toner into your eyes immediately rinse them with running water fo...

Page 18: ...likely to result in interference with radio communications and is prohibited under FCC rules INTERFERENCE CAUSING EQUIPMENT STANDARD ICES 003 ISSUE 5 for Canada users This Class A digital apparatus complies with Canadian ICES 003 Cet appareil numérique de la classe A est conforme à la norme NMB 003 du Canada For users in countries not subject to class B regulations 7WARNING This is a Class A produ...

Page 19: ...0 nm d COLOR MF654 MF554 770 800 nm d COLOR MF454 MF364 MF304 MF254 This product employs a Class 3B laser diode that emits an invisible laser beam The laser diode and the scanning polygon mirror are incorporated in the print head unit The print head unit is NOT A FIELD SERVICE ITEM Therefore the print head unit should not be opened under any circumstances d COLOR MF654 MF554 MF454 d COLOR MF364 MF...

Page 20: ... of controls adjustments or performance of procedures other than those specified in this manual may result in hazardous radiation exposure This is a semiconductor laser The maximum power of the laser diode is 25 mW and the wavelength is 775 800 nm d COLOR MF 654 MF554 or 770 800 nm d COLOR MF454 MF364 MF304 MF254 For European users 7WARNING Use of controls adjustments or performance of procedures ...

Page 21: ...olongée de l appareil est effectuée Pour avoir la certitude de travailler dans un environnment réunissant des conditions de confort santé et de sécurité il est préférable de bien aérer la pièce ou se trouve l appareil Acoustic noise for European users only Der höchste Schalldruckpegel beträgt 70 dB A oder weniger gemäß EN ISO 7779 For EU member states only This symbol means Do not dispose of this ...

Page 22: ...es directly to the USB host If an extension cable is used electromagnetic interference could occur Graphic symbols used on this machine These are some of major exemplary graphical symbols Graphic symbols Descriptions Graphic symbols Descriptions Graphic symbols Descriptions ON position OFF position STAND BY push push type switches Ground Earth Pro tective bonding ter minal Ground Earth Pro tective...

Page 23: ...ions Be very careful that an accident does not occur when operations such as removing paper jams and staple jams are performed d COLOR MF654 MF554 MF454 NOTICE Do not remove caution labels or notations If any caution label or caution notation is soiled please clean to make legible If you cannot make them legible or if the caution label or notation is damaged please contact your service representat...

Page 24: ... 1 4 d COLOR MF364 MF304 MF254 NOTICE Do not remove caution labels or notations If any caution label or caution notation is soiled please clean to make legible If you cannot make them legible or if the caution label or notation is damaged please contact your service representative ...

Page 25: ...C for pan European single terminal connection to the public switched telephone network PSTN However due to differences between the individual PSTNs provided in different countries the approval does not of itself give an unconditional assurance of successful operation on every PSTN network terminal point In the event of problems you should contact your equipment supplier in the first instance ...

Page 26: ...F454 PC 215 FS 537 SD 512 RU 513 PI 507 LU 207 97 1 2 2477 24 11 16 627 49 1244 49 7 8 1267 61 7 16 1560 5 37 1 2 953 13 15 16 353 5 16 9 16 420 33 3 8 847 10 254 17 13 16 452 Unit inch mm 15 16 24 5 1 8 130 d COLOR MF654 MF554 MF454 PC 215 FS 536 SD 511 RU 513 PI 507 LU 302 Unit inch mm 82 3 8 2092 20 13 16 528 38 11 16 982 49 7 8 1267 61 7 16 1560 5 37 1 2 953 13 15 16 353 5 16 9 16 420 33 3 8 8...

Page 27: ...24 25 7 8 658 38 13 16 986 48 13 16 1240 61 1550 35 3 8 898 15 11 16 398 16 7 8 428 31 15 16 812 10 254 18 7 8 480 Unit inch mm d COLOR MF364 MF304 MF254 DF 704 PC 210 FS 533 6 11 16 170 43 6 9 1107 Unit inch mm 36 7 8 937 49 1 16 1246 61 1 8 1553 35 15 16 913 15 3 16 386 16 7 8 428 32 3 16 818 10 254 d COLOR MF364 MF304 MF254 DF 629 PC 210 JS 506 MK 730 CU 101 MK 745 45 3 4 1162 Unit inch mm 34 1...

Page 28: ...llow the recommendation listed below Copies that are to be kept for a long time should be kept where they are not exposed to light in order to prevent them from fading Adhesive that contains solvent e g spray glue may dissolve the toner on copies Color copies have a thicker layer of toner than normal black and white copies Therefore when a color copy is folded the toner at the fold may peel off Da...

Page 29: ...ernment agencies Internal revenue stamps canceled or uncanceled Passports Immigration papers Motor vehicle licenses and titles House and property titles and deeds General Identification cards badges or insignias Copyrighted works without permission of the copyright owner In addition it is prohibited under any circumstances to reproduce domestic or foreign currencies or works of art without permiss...

Page 30: ...r porated Copyright 1995 2009 Adobe Systems Incorporated All rights reserved Adobe and Reader are trademarks of Adobe Systems Incorporated Ethernet is a registered trademark of Xerox Corporation PCL is a registered trademark of Hewlett Packard Company Limited This machine and Box Operator are based in part on the work of the Independent JPEG Group Compact VJE Copyright 1986 2009 Yahoo Japan Corp R...

Page 31: ...F554 MF454 MF364 MF304 MF254 1 23 1 9 Trademark acknowledgements 1 Note User s Guide may not be reproduced in part or in full without permission Information included in User s Guide is subject to change without notice ...

Page 32: ...one copy of the Software only for backup or installation purpose in the support of the normal and intended use of the Software v transfer the Software to other party by transferring a copy of this Agreement and all documentation along with the Software provided that a you must at the same time either transfer to such other party or destroy all your other copies of the Software b such transfer of p...

Page 33: ...hey shall remain in full force and effect as if such part or parts determined illegal or void had not been included 10 NOTICE TO US GOVERNMENT END USERS The Software is a commercial item as that term is defined at 48 C F R 2 101 October 1995 con sisting of commercial computer software and commercial computer software documentation as such terms are used in 48 C F R 12 212 September 1995 Consistent...

Page 34: ...IBILITY OF SUCH DAMAGES OR FOR ANY CLAIM BY ANY THIRD PARTY KM OR ITS LICENSOR DISCLAIMS ALL WARRANTIES WITH REGARD TO THE PROGRAM EXPRESS OR IMPLIED INCLUDING WITHOUT LIMITATION IMPLIED WARRAN TIES OF MERCHANTABILITY FITNESS FOR A PARTICULAR PURPOSE TITLE AND NON INFRINGE MENT OF THIRD PARTY RIGHTS SOME STATES OR JURISDICTIONS DO NOT ALLOW THE EXCLUSION OR LIMITATION OF INCIDENTAL CONSEQUENTIAL O...

Page 35: ...2 About This Machine ...

Page 36: ......

Page 37: ...scan destinations such as FTP WebDAV and E mail The intended use also requires that The system is used within the limits of device specifications and specifications of optional components All safety instructions in the related user s guides are observed Legal restrictions on reproduction see page 1 21 are observed Inspection and maintenance instructions are adhered to General national and company ...

Page 38: ...anual This manual describes basic procedures users will need to know in order to use this machine as well as set ting procedures It also introduces major functions and basic troubleshooting procedures to make use of this machine more conveniently This manual also contains notes and precautions that should be followed in order to use this machine Please be sure to read this manual before using this...

Page 39: ...ost reductions 4 Search by Illustration Searches for the required operations of this machine based on the output result functions and operation images 2 3 4 1 Item Specifications Supported Operating Systems Windows Vista SP2 Windows 7 SP1 Windows 8 1 Windows 10 Mac OS X 10 7 10 8 10 9 10 10 10 11 Supported Web browsers Windows Microsoft Internet Explorer 9 x 10 x Desktop version 11 x Desktop versi...

Page 40: ...This check mark symbol shows a precondition of a procedure 1 This format number 1 represents the first step 2 This format number represents the order of serial steps This symbol indicates a supplementary explanation of a procedural instruction User Persons using the system for its intended use see page 2 3 as well as managing system functions and consumables according to the assigned user rights A...

Page 41: ...ns required to use a function dReference This symbol indicates reference functions related to a topic Related setting This shows the settings related to a particular topic for any user Related setting for the administrator This shows the settings related to a topic only for administrators Symbols Notations Description 0 This check mark symbol shows a precondition of a procedure This symbol indicat...

Page 42: ...nents can be added to meet your office requirements List of optional components No Name Description 1 Main Unit Scans the original in the scanner section and prints a scanned im age in the printer section 2 Fax Kit FK 514 Required to use the fax function 3 Clean Unit CU 102 Collects small particles UFP generated in this machine to prevent them from escaping this machine ...

Page 43: ...f SRA3 or 11 e 17 A3 size paper 15 Image Controller IC 416 Built in Image Controller Installing this unit provides higher quality printing results 16 Desk DK 705 Used to place this machine on the floor 17 Desk DK 510 Used to place this machine on the floor 18 Paper Feed Cabinet PC 415 Can load up to 2500 sheets of 8 1 2 e 11 A4 size paper 19 Paper Feed Cabinet PC 215 Can load up to 500 sheets resp...

Page 44: ... to add a unicode font that is one of special fonts 9 i Option LK 108 Used to add an OCR font that is one of special fonts In the standard the OCR B font PostScript is available Installing the i Option LK 108 allows use of the OCR A font PCL 10 i Option LK 110 v2 Supports advanced functions such as a function that converts a file into a DOCX or XLSX type a function that generates highly func tiona...

Page 45: ...ge Capacity Unit LU 207 to function 18 Double feed detection Kit UK 501 This unit allows you to detect that pages of the original are multi plexed on the ADF 19 Mount Kit MK 735 Required to use the machine unit that has Authentication Unit AU 201S built in to it 20 Hard Disk HD 524 Install this unit to perform mirroring of the hard disk contained in the main unit No Name Description ...

Page 46: ...MF654 MF554 MF454 MF364 MF304 MF254 About this machine 2 2 3 2 3 2 Optional components d COLOR MF364 MF304 MF254 Various optional components can be added to meet your office requirements List of optional components ...

Page 47: ...ypad KP 101 It is equipped on the side of the Control Panel Allows you to enter numbers by using the Hardware Keypad 12 Keyboard Holder KH 102 Install this holder to use an external keyboard 13 Security Kit SC 508 Supports functions such as Copy Guard to prevent unauthorized copying 14 Fax Mount Kit MK 742 This unit is required to install FAX Kit FK 515 This option can be used in North America 15 ...

Page 48: ...special fonts In the standard the OCR B font PostScript is available Installing the i Option LK 108 allows use of the OCR A font PCL 10 i Option LK 110 v2 Supports advanced functions such as a function that converts a file into a DOCX or XLSX type a function that generates highly func tional and high quality data and the E mail RX Print function i Op tion LK 110 v2 includes the function licenses f...

Page 49: ...Cabinet PC 110 Paper Feed Cabinet PC 210 Paper Feed Cabinet PC 410 or Desk DK 510 18 Transformer kit TK 101 This unit is required to enable the Heater of the Large Capacity Unit LU 302 to function 19 Mount Kit MK 735 Required to use the machine unit that has Authentication Unit AU 201S built in to it 20 Hard Disk HD 524 Install this unit to perform mirroring of the hard disk contained in the main ...

Page 50: ... Paper Empty Indicator Flashes orange when a tray runs low on paper and lights up orange when the tray runs out of paper 6 Paper Tray Used to load standard size paper The number of trays varies de pending on the installed Paper Feed Cabinet 7 Lower Front Door Open this door to replace consumables or to maintenance this ma chine 8 Upper Front Door Open this door to replace a Toner Cartridge 9 Data ...

Page 51: ...nit CU 102 FAX Kit FK 515 and Fax Mount Kit MK 742 can be used in North America dReference For details refer to the User s Guide CD DVD No Name 1 Heater Power Switch 2 Power Cord 3 Telephone Jack 4 LINE PORT4 4 Telephone Jack 3 LINE PORT3 5 Jack for connecting a telephone TEL PORT1 6 Telephone Jack 1 LINE PORT1 7 Telephone Jack 2 LINE PORT2 8 USB Port Type A USB2 0 1 1 9 Network Connector 10Base T...

Page 52: ...d to load custom size paper or special paper 5 Paper Empty Indicator Flashes orange when a tray runs low on paper and lights up orange when the tray runs out of paper 6 Paper Tray Used to load standard size paper The number of trays varies de pending on the installed Paper Feed Cabinet 7 Front Door Open this door to replace consumables or to maintenance this ma chine 8 Data Indicator Flashes blue ...

Page 53: ... Clean Unit CU 101 and Mount Kit MK 745 FAX Kit FK 515 and Fax Mount Kit MK 742 can be used in North America dReference For details refer to the User s Guide CD DVD No Name 1 Heater Power Switch 2 Power Cord 3 Telephone Jack 4 LINE PORT4 4 Telephone Jack 3 LINE PORT3 5 Jack for connecting a telephone TEL PORT1 6 Telephone Jack 1 LINE PORT1 7 Telephone Jack 2 LINE PORT2 8 USB Port Type A USB2 0 1 1...

Page 54: ...its This section shows the names of distinctive parts for each optional unit that can be installed in this machine Finisher FS 537 Saddle Stitcher SD 512 Punch Kit PK 523 Z Folding Unit ZU 609 d COLOR MF654 MF554 MF454 No Name 1 Output Tray 2 Staple Cartridge 3 Punch Kit 4 Punch Scrap Box 5 Saddle Stitcher ...

Page 55: ...d COLOR MF654 MF554 MF454 MF364 MF304 MF254 2 21 2 3 About this machine 2 No Name 1 Z Folding Unit 2 Staple Cartridge 3 Folding Output Tray 4 Stopper ...

Page 56: ...2 22 d COLOR MF654 MF554 MF454 MF364 MF304 MF254 About this machine 2 2 3 Job Separator JS 602 d COLOR MF654 MF554 MF454 No Name 1 Output Tray ...

Page 57: ...4 2 23 2 3 About this machine 2 Post Inserter PI 507 d COLOR MF654 MF554 MF454 dReference For details on how to use the Post Inserter Control Panel refer to the User s Guide CD DVD No Name 1 Lower Tray 2 Upper Tray 3 Post Inserter Control Panel ...

Page 58: ... COLOR MF654 MF554 MF454 MF364 MF304 MF254 About this machine 2 2 3 Finisher FS 533 Punch Kit PK 519 d COLOR MF554 MF454 MF364 MF304 MF254 No Name 1 Punch Kit 2 Staple Cartridge 3 Output Tray 4 Tray Extension ...

Page 59: ...d COLOR MF654 MF554 MF454 MF364 MF304 MF254 2 25 2 3 About this machine 2 Job Separator JS 506 d COLOR MF554 MF454 MF364 MF304 MF254 No Name 1 Output Tray ...

Page 60: ...OR MF654 MF554 MF454 MF364 MF304 MF254 About this machine 2 2 3 Finisher FS 536 Finisher FS 534 Saddle Stitcher SD 511 Punch Kit PK 520 No Name 1 Output Tray 2 Staple Cartridge 3 Punch Scrap Box 4 Saddle Stitcher ...

Page 61: ...d COLOR MF654 MF554 MF454 MF364 MF304 MF254 2 27 2 3 About this machine 2 No Name 1 Punch Kit 2 Staple Cartridge 3 Folding Output Tray ...

Page 62: ...2 28 d COLOR MF654 MF554 MF454 MF364 MF304 MF254 About this machine 2 2 3 Large Capacity Unit LU 302 LU 207 d COLOR MF654 MF554 MF454 ...

Page 63: ...Control Panel Use Main Power Switch to restart this machine 2 4 1 Turning the power on and off Turn the power on and off only when necessary for example when the administrative settings are changed or a power failure occurs 1 Open the Lower Front Door or Front Door and press n on the Main Power Switch 2 Press o on the Main Power Switch NOTICE To restart this machine turn the Main Power Switch off ...

Page 64: ... normal mode press the Power key again In the low power or sleep mode you can return this machine from the power save mode to the normal mode simply by placing your hand close to the Control Panel Tips When the optional Image Controller is installed the machine cannot shift to the Sub Power OFF mode Status of this machine Description Power Save mode Low Power or Sleep mode Flashes blue This machin...

Page 65: ...tem Settings Power Supply Power Save Settings Power Key Setting For information on the default administrator password refer to User s Guide CD DVD After the setting is changed the power save mode shifts as shown below depending on how the Power key is pressed Pressing the Power key This machine shifts to the Sub Power OFF mode In the Sub Power OFF mode the machine can receive data or faxes but can...

Page 66: ...Interface Kit EK 609 is required to use the Bluetooth LE function Bringing the iOS terminal closer to this machine allows you to reg ister this machine or perform user authentication with an operation from Mobile Print for iPhone iPad For details refer to the User s Guide CD DVD 3 Access If user authentication or account track is enabled enter the user name and password for user authentication or ...

Page 67: ... a large number of copies These keys can be assigned to any function in the Administrator Settings to be easy to use 9 Power Press this key to switch to the power save mode In the normal mode the key lights up blue In the power save mode the key blinks blue or lights up orange To create a higher power saving effect you can change the setting in Power Key Setting of Administrator Settings For Power...

Page 68: ...be displayed on the panel For details on how to display Language refer to the User s Guide CD DVD Function Search Tap this button to search for copy settings or fax scan settings to go to the target function screen from the search result Job List Tap this button to display current or standby jobs If necessary you can check job logs or print a communication report This list dis plays the operation ...

Page 69: ...If necessary you can add a background pat tern by registering an image on this machine dReference For details refer to the User s Guide CD DVD 2 6 2 Slide menu Tapping a tab key on the Touch Panel slides open the menu The setting of the slide menu can be changed to suit your environment No Name Description 1 Tab key Tap this key to open and close the slide menu Slide menu key Display function keys...

Page 70: ...chine supports user friendly operations such as sliding a finger on the Touch Panel Tap Lightly touch the screen with your finger then remove your finger from the screen immediately This action can select or determine a menu Double tap Lightly touch the screen with your finger twice in succession Used to retrieve detailed information to enlarge a thumbnail or preview image and to open a User Box F...

Page 71: ...de your finger parallel in a front to back and side to side direc tion on the screen Used to move to the intended display location if data spans multiple screens Long tap Hold down the document by the finger Used to display the icon re lated to the document Drag Drop Slide your finger to the intended place and release it while a doc ument is selected Used to move the document to the intended place...

Page 72: ...ying a strong force to the Touch Panel will damage the Touch Panel and potentially cause a breakage When operating in the Touch Panel do not press on it using excessive force or with a pointed object such as a mechanical pencil The Touch Panel may not respond appropriately if operated with a wet finger The Touch Panel will not respond appropriately if operated with hands with gloves on It is recom...

Page 73: ...es the Keypad will be displayed It can also be displayed by pressing the 10 Keypad key default Register key 3 How to move the Keypad Move your finger while the upper side of Keypad is being pressed How to close the Keypad After entering tap Close to close the Keypad It can also be closed by pressing the 10 Keypad key default Reg ister key 3 Input area for entering the number of copies Input area f...

Page 74: ...e For details refer to the User s Guide CD DVD 2 6 5 Entering characters When entering characters to register an address or program use the keyboard screen displayed on the Touch Panel When typing in Group1 1 To type in uppercase letters or symbols tap the Shift key If you mistyped tap or to move the cursor to the character you want to clear then tap the Delete key Tap the Shift key again to retur...

Page 75: ...dReference For details refer to the User s Guide CD DVD 2 7 2 Multi job function While a job is active you can register another job Up to 259 jobs can be registered in total The table below shows the maximum number of jobs that can be registered for each function These values may vary depending on conditions No Description 1 Displays jobs 2 Select a job type In Comm List you can also print a sendi...

Page 76: ...per single side only paper thin paper special paper thick paper letterhead colored paper and re cycled paper How to load paper 1 Pull out the tray NOTICE Be careful not to touch the Film 2 Slide the Lateral Guide to fit the size of the paper to be load ed 3 Load paper into the tray Load paper into the tray with the print side facing up 4 When loading paper other than plain paper specify the paper ...

Page 77: ...d paper How to load paper 1 Pull out the tray NOTICE Be careful not to touch the Film 2 Load paper into the right tray Load paper into the tray with the print side facing up NOTICE Do not load the tray with paper of a size other than that previ ously specified To change the paper size contact your service representative 3 Load paper into the left tray Load paper into the tray with the print side f...

Page 78: ...al paper thick paper letterhead colored paper recy cled paper How to load paper 1 Open the Upper Door NOTICE Exercise care not to touch the surface of the Paper Feed Roll er with your hand 2 Lift the Paper Feed Roller and load paper into the unit Load paper into the tray with the print side facing down NOTICE Do not load the Large Capacity Unit with paper of a size other than that previously speci...

Page 79: ...ss Tray Doing so may cause a paper jam or damage to the machine Folded torn or creased paper or bundles of sheets of different sizes Type Size Standard size paper 12 e 18 w to 5 1 2 e 8 1 2 w v 4 e 6 w SRA3 w A3 w to A6 w B4 w to B6 w A6 card w 8 e 13 w 16K w v 8K w banner paper envelope B5 w 6 15 16 inches e 9 13 16 inches 176 mm e 250 mm C4 w 9 inches e 12 3 4 inches 229 mm e 324 mm C5 w 6 3 8 i...

Page 80: ...d paper with the print side facing down then align the Lat eral Guide to the paper Insert paper into the tray until their edges are pressed against the back NOTICE Do not load an excessive number of sheets such that the top of the stack is higher than the mark If paper is curled flatten it before loading it 3 Select the paper type and paper size When loading paper other than plain paper change the...

Page 81: ...n the Lateral Guide to the paper Insert postcards into the tray until their edges are pressed against the back The screen for selecting the paper type and paper size ap pears NOTICE When loading postcards into the Bypass Tray note the following points When loading curled postcards uncurl the postcards as shown in the figure in advance Do not put spare postcards in the Bypass Tray Doing so causes a...

Page 82: ...ransparencies in the v direction as shown in the figure with the print side facing down then align the Lateral Guide to the paper Insert transparencies into the tray until their edges are pressed against the back The screen for selecting the paper type and paper size ap pears 2 Change the paper type setting Select Transparency from Paper Type Transparencies can only be printed in black When the co...

Page 83: ...are pressed against the back The flap side of envelopes cannot be printed on The screen for selecting the paper type and paper size appears NOTICE When loading envelopes into the Bypass Tray note the following points When loading envelopes remove air from them and securely press along the flap fold line Otherwise it will result in an envelope wrinkle or paper jam Do not use envelopes that have glu...

Page 84: ...elope from Paper Type The screen for selecting the envelope size appears 3 Specify the envelope size Select Envelope 4 e 6 Envelope A6 Card and specify the size of the loaded envelopes NOTICE When loading envelopes with flaps opened also select the standard size that matches them You do not have to measure the size of the envelope with the flap opened to set the size as a custom sized enve lope ...

Page 85: ... Load label sheets in the w direction as shown in the figure with the print side facing down then align the Lateral Guide to the paper Insert label sheets into the tray until their edges are pressed against the back The screen for selecting the paper type and paper size ap pears 2 Change the paper type setting Select Thick 1 from Paper Type ...

Page 86: ...Put the tab side in the direction opposite to this machine with the print side facing down then align the Lateral Guide to the paper Insert index papers into the tray until their edges are pressed against the back The screen for selecting the paper type and paper size ap pears 2 Change the paper type setting Select Index Paper from Paper Type ...

Page 87: ...3 Basic Settings and Operations ...

Page 88: ......

Page 89: ...istrator Check that this machine is correctly connected to the network cable For details refer to page 3 4 2 Checking network settings of this machine Administrator Check the network settings of this machine For details refer to page 3 4 The network can be used with the default settings unless otherwise requested 3 Installing the printer driver Install the printer driver on the computer For detail...

Page 90: ...Tips In general the default settings are available for network connection however some network environ ments require a change on network settings If no IP address is displayed you need to configure the network Tap Utility and select Administrator Settings Network Settings TCP IP Settings Configure the required settings to suit your environ ment For details refer to the User s Guide CD DVD For info...

Page 91: ... patible with the printer driver 4 Select this machine from the list If multiple identical models are displayed check the IP address to select an appropriate one For details on how to check the IP address of this machine refer to page 3 4 5 Select the check boxes of the printer drivers to be installed 6 Click Install 7 Click Finish Printing data 1 Open the data you want to print using the applicat...

Page 92: ... Check the network settings of this machine For details refer to page 3 8 The network can be used with the default settings unless otherwise requested 3 Installing the printer driver Install the printer driver on the computer For details refer to page 3 10 4 Adding and configuring a printer driver Set up your computer so that data can be printed using the installed printer driver For details refer...

Page 93: ...tails refer to page 3 11 1 Opening original data Open the data you want to print using the application software 2 Configuring the printer driver for printing Select a printer driver and change the setting if necessary before printing Checking the cable connection Check that a LAN cable is connected to the LAN port of this ma chine and the green LED is on ...

Page 94: ...heck that the IP address is displayed 2 Specify the Bonjour name Tap Utility and select Administrator Settings Network Settings Bon jour Setting ON For information on the default administrator password refer to User s Guide CD DVD The Bonjour name is displayed on the printer driver as a connected device name For IPv4 environment For IPv6 environment 1 2 3 ...

Page 95: ...d key board Tips If no IP address is displayed in Step 1 you need to set up the network Tap Utility and select Admin istrator Settings Network Settings TCP IP Settings Configure the required settings to suit your environment For details refer to the User s Guide CD DVD For information on the default administrator password refer to User s Guide CD DVD ...

Page 96: ...according to the on screen instructions until the installation screen ap pears 5 Click Install 6 When a prompt message appears to ask you to enter the name and password type in the name and password of the user with administrator privileges 7 Click Close Adding and configuring a printer driver Set up your computer so that data can be printed using the installed printer driver 0 This operation requ...

Page 97: ...nt function 3 Printing data 1 Open the data you want to print using the application software 2 From the File menu select Print 3 Select the Bonjour name of this machine Tips If necessary you can change the settings of the printer driver to click Show Details ...

Page 98: ...to a computer on the network Once settings are configured you can send data easily For details refer to page 3 14 and page 3 22 Transmitting data as E mail attachment E mail TX Send scanned data as an E mail attachment This function is useful when you want to forward data to an outside location For details refer to page 3 31 Saving data to the USB memory device External memory Directly save scanne...

Page 99: ...e above data can be sent and saved in various methods Select the appropriate one to meet your needs Issuing a scan instruction from a computer Web service function Saving data to a User Box on the HDD Save in User Box Sending to an FTP server FTP TX Sending to a WebDAV server WebDAV Send dReference For details refer to the User s Guide CD DVD ...

Page 100: ... correctly connected to the network cable For details refer to page 3 15 2 Checking network settings of this machine Administrator Check the network settings of this machine For details refer to page 3 15 The network can be used with the default settings unless otherwise requested 3 Checking computer information Check the information required for Store Address and fill out the checklist For detail...

Page 101: ...s connected to the LAN port of this ma chine and the green LED is on Checking network settings of this machine Tap Utility and select Device Information Then check that the IP address is displayed Tips In general the default settings are available for network connection however some network environ ments require a change on network settings If no IP address is displayed you need to configure the n...

Page 102: ...elect Computer System properties 2 Check the computer name and write it down in the Host address column of the checklist 3 Open the command prompt In Windows 8 1 10 while pressing the Windows key press the X key and then select Com mand Prompt in the displayed menu In Windows Vista 7 from the Start menu select All Programs Accessories Command Prompt 4 Check the user name and write it down in the U...

Page 103: ...sharing settings then select the Turn on file and printer shar ing check box In Windows Vista open the Start menu select Control Panel Network and Sharing Center then turn on File sharing 2 Create a new folder and write down the folder name in the File path column of the checklist 3 Configure the setting to share the folder created in Step 2 Right click on the folder then click Proper ties 4 Click...

Page 104: ...pecify the name to be displayed on the assigned key For Sort Character enter the same name as Name This sets the appropriate index for the name which you entered into Name to Index To change the setting tap Index 4 While checking the checklist enter the user ID and password you wrote down 1 2 3 2 3 1 ...

Page 105: ...d COLOR MF654 MF554 MF454 MF364 MF304 MF254 3 19 3 2 Scan to Send function 3 5 While checking the checklist enter the host address and file path you wrote down 6 Tap Close 3 1 2 ...

Page 106: ...3 20 d COLOR MF654 MF554 MF454 MF364 MF304 MF254 Scan to Send function 3 3 2 Sending the original 1 Load the original 2 Tap Scan Fax 3 Select a destination 1 2 ...

Page 107: ...d key on the Touch Panel 5 Press the Start key Settings Description Simplex Duplex Select whether to scan one or both sides of the original Resolution Specify the scanning resolution Color Select whether to scan the original in color or black and white mode File Type Select the type of the file to save scanned data Scan Size Specify the size of the original to be scanned File Name Subject Name Oth...

Page 108: ...inistrator Check that this machine is correctly connected to the network cable For details refer to page 3 23 2 Checking network settings of this machine Administrator Check the network settings of this machine For details refer to page 3 23 3 Checking computer information Check the information required for Store Address and fill out the checklist For details refer to page 3 25 4 Configuring your ...

Page 109: ... scan the original Checking the cable connection Check that a LAN cable is connected to the LAN port of this ma chine and the green LED is on Checking network settings of this machine Tap Utility and select Device Information Check that the IP address is displayed Tips If no IP address is displayed you need to configure the network Tap Utility and select Administrator Settings Network Settings TCP...

Page 110: ...assword refer to User s Guide CD DVD Configuring this machine The following settings are required Select NTLM v1 v2 in Utility Administrator Settings Network Settings SMB Settings Client Settings then tap OK Select ON in Utility Administrator Settings Network Settings SMB Settings Direct Hosting Setting then tap OK 2 1 2 1 ...

Page 111: ... computer information Check the host address and user ID 0 This operation requires administrator privileges for your computer Check the IP address and user name and write it down in the Host Address and User ID columns of the checklist 2 1 Name Entry column Detail Host Address IP address to which the scanned data is sent page 3 25 File Path Name of the dedicated folder to receive the scanned data ...

Page 112: ... Sharing 3 Select the File Sharing check box then click Options 4 Select the Share files and folders using SMB and user name check boxes then click Done 5 Under Shared Folders click 6 Select a new folder then click Add 7 Click the new folder to check the access right If the access right is changed to Read Write the setting is completed Registering destinations While checking the created checklist ...

Page 113: ...y For Sort Character enter the same name as Name This sets the appropriate index for the name which you entered into Name to Index To change the setting tap Index 4 While checking the checklist enter the user ID and password you wrote down 5 While checking the checklist enter the host address and file path you wrote down 1 2 3 1 3 2 1 2 3 ...

Page 114: ...3 28 d COLOR MF654 MF554 MF454 MF364 MF304 MF254 Scan to Send function 3 3 2 6 Tap Close ...

Page 115: ...d COLOR MF654 MF554 MF454 MF364 MF304 MF254 3 29 3 2 Scan to Send function 3 Sending the original 1 Load the original 2 Tap Scan Fax 3 Select a destination 1 2 ...

Page 116: ...d key on the Touch Panel 5 Press the Start key Settings Description Simplex Duplex Select whether to scan one or both sides of the original Resolution Specify the scanning resolution Color Select whether to scan the original in color or black and white mode File Type Select the type of the file to save scanned data Scan Size Specify the size of the original to be scanned File Name Subject Name Oth...

Page 117: ... cable For details refer to page 3 32 2 Checking network settings of this machine Administrator Check the network settings of this machine For details refer to page 3 32 3 Configuring the E mail transmission environment Administrator Configure a server for E mail TX For details refer to page 3 33 4 Configuring administrator information Administrator Register the administrator name and E mail addre...

Page 118: ...yed Tips In general the default settings are available for network connection however some network environ ments require a change on network settings If no IP address is displayed you need to configure the network Tap Utility and select Administrator Settings Network Settings TCP IP Settings Configure the required settings to suit your environ ment For details refer to the User s Guide CD DVD For ...

Page 119: ...e E mail transmission environment 1 Tap Utility and select Administrator Settings Network Settings E Mail Settings For information on the default administrator password refer to User s Guide CD DVD 2 Tap E Mail TX SMTP 3 Select ON to enable E mail TX SMTP settings and E mail TX function 3 1 2 ...

Page 120: ... to Send function 3 3 2 4 Enter the SMTP server address Configuring administrator information 1 Tap Utility and select Administrator Settings Administrator Machine Settings Administrator Reg istration 2 Enter the required information then tap OK 1 2 1 2 3 ...

Page 121: ...d COLOR MF654 MF554 MF454 MF364 MF304 MF254 3 35 3 2 Scan to Send function 3 Sending the original 1 Load the original 2 Tap Scan Fax ...

Page 122: ...3 36 d COLOR MF654 MF554 MF454 MF364 MF304 MF254 Scan to Send function 3 3 2 3 Enter a destination 1 2 3 4 ...

Page 123: ...d key on the Touch Panel 5 Press the Start key Settings Description Simplex Duplex Select whether to scan one or both sides of the original Resolution Specify the scanning resolution Color Select whether to scan the original in color or black and white mode File Type Select the type of the file to save scanned data Scan Size Specify the size of the original to be scanned File Name Subject Name Oth...

Page 124: ...ng the cable connection Administrator Check that this machine is correctly connected to the telephone line For details refer to page 3 39 2 Registering transmission information Administrator Specify the name and fax number to be displayed as a sender when sending a fax from this ma chine For details refer to page 3 40 3 Selecting the dialing method Administrator Select the dialing method to suit y...

Page 125: ...d COLOR MF654 MF554 MF454 MF364 MF304 MF254 3 39 3 3 Fax function 3 Checking the cable connection Check that a modular cable is connected to the LINE port of this ma chine ...

Page 126: ...select Administrator Settings Fax Settings Header Information For information on the default administrator password refer to User s Guide CD DVD 2 Enter the sender information then tap OK Sender settings Sender Fax No Settings Enter the name to be displayed as a sender Enter the fax number to be displayed as a sender 2 1 3 ...

Page 127: ...Setting 2 Tap Dialing Method 3 For the push button type select PB and for the dial pulse type select 10pps If you do not know the type of the dialing method If you do not know the type of the dialing method operate push buttons of your phone When you hear beep boop beep set Dialing Method to PB If you do not hear beep boop beep after operating push buttons select 10pps 1 2 ...

Page 128: ...3 42 d COLOR MF654 MF554 MF454 MF364 MF304 MF254 Fax function 3 3 3 Sending the original 1 Load the original 2 Tap Scan Fax ...

Page 129: ... Fax function 3 3 Enter a destination 4 Check the setting if necessary Tap Check Setting to check the setting You can also check the setting using the keys displayed on the Touch Panel To change the setting tap the desired key on the Touch Panel 1 2 3 4 ...

Page 130: ...on your computer Advantages to send a fax directly from a computer Realizing paper saving Completing fax operations without leaving your desk Offering clear images by sending data directly from a computer Tips To use this function the optional Fax Kit must be installed in this machine This function is not supported in the Mac operating system Settings Description Simplex Duplex Select whether to s...

Page 131: ... details refer to page 3 46 The network can be used with the default settings unless otherwise requested 3 Installing the fax driver on your computer Install the printer driver on your computer For details refer to page 3 47 Operation flow The following describes a flow to send a fax For details refer to page 3 48 1 Creating data Create data to be sent using application software 2 Configuring the ...

Page 132: ... connection however some network environ ments require a change on network settings If no IP address is displayed you need to configure the network Tap Utility and select Administrator Settings Network Settings TCP IP Settings Configure the required settings to suit your environ ment For details refer to the User s Guide CD DVD For information on the default administrator password refer to User s ...

Page 133: ... 0 This operation requires administrator privileges for your computer 1 Insert the printer driver CD DVD ROM into the CD DVD ROM drive of the computer 2 Click Printer Install 3 Proceed with the procedure according to the on screen instructions Printers and MFPs connected to the network are automatically searched for 4 Select this machine from the list 5 Select a fax driver 6 Click Install 7 Click ...

Page 134: ... and click Print Clicking Preferences can change the setting of the printer driver as required If user authentication is enabled in this machine specify the required data such as the user name and password 4 Enter the destination Name and FAX Number To send data to more than one destination repeat this step Clicking Add from Address Book can retrieve the registered destinations of this machine 5 C...

Page 135: ...describes the basic operations to make a copy 1 If user authentication is enabled the login screen appears Tap the entry area or keyboard icon to enter the required information then tap Login or press the Access key If IC card or biometric authentication is enabled refer to page 3 51 2 Load the original 3 Tap Copy 2 1 ...

Page 136: ...l 5 Tap the input area for entering the number of copies Settings Description Original Type Specify the original type of the original Color Specify the color to output an image Booklet The pages in the original data are arranged and spread in a booklet format and printed on both sides of sheets Paper Specify the output paper Zoom Specify the zoom ratio Duplex Combine Specify double sided copying o...

Page 137: ... perform authentication by user or group in this machine Installing optional units enables IC card NFC or biometric authentication If IC card or NFC authentication is enabled place the IC card or Android terminal on the card reader of the authenti cation unit If biometric authentication is enabled put your finger on the finger vein reader of the authentication unit ...

Page 138: ...tinations as address books This sec tion explains an example to register an address book to which a fax is sent Using the Control Panel to register an address book Registration from Util ity Select a destination type and register destination information 1 Tap Utility and select One Touch User Box Reg Create One Touch Destination Address Book Public 2 Select the type of the destination you want to ...

Page 139: ...e as Name This sets the appropriate index for the name which you entered into Name to Index To change the setting tap Index Entry items and the number of setting screens vary depending on the destination type Use or to switch setting screens while entering the required items For information on entry items refer to page 3 60 5 Enter the fax number Tap Display Keypad to display the Keypad and enter ...

Page 140: ...ring a destination 3 3 5 Using the Control Panel to register an address book Registration from Ad dress book Select a destination type and register destination information 1 Tap Address book 2 Tap New 3 Select the type of the destination you want to register ...

Page 141: ... the displayed keyboard For Sort Character enter the same name as Name This sets the appropriate index for the name which you entered into Name to Index To change the setting tap the Index field Entry items and the number of setting screens vary depending on the destination type For informa tion on entry items refer to page 3 60 5 Enter the fax number 6 Tap Close 1 2 1 2 ...

Page 142: ...tion 3 3 5 Using the Control Panel to register an address book Registration in scan fax mode Select a destination type and register destination information 1 Display the scan fax screen 2 Tap Address Reg 3 Tap New 4 Select the type of the destination you want to register ...

Page 143: ... the displayed keyboard For Sort Character enter the same name as Name This sets the appropriate index for the name which you entered into Name to Index To change the setting tap the Index field Entry items and the number of setting screens vary depending on the destination type For informa tion on entry items refer to page 3 60 6 Enter the fax number 7 Tap Close 1 2 1 2 ...

Page 144: ...ination tap Address Reg after entering the destination using direct input and then select the destination What is an index This is used as an index of a registered destination Tap the Index key to narrow down a target desti nation If Favorite is selected as an index the destination appears in the basic screen of the transmission screen after it has been registered in the address book enabling the ...

Page 145: ...ails refer to the User s Guide CD DVD 2 Start a Web browser enter the IP address of this machine into the URL field then press the Enter key For http 192 168 1 20 192 168 1 20 is an IP address In the IPv6 environment enclose the IPv6 address in brackets For example if the IPv6 address of this machine is fe80 220 6bff fe10 2f16 type in http fe80 220 6bff fe10 2f16 If the login screen appears enter ...

Page 146: ...n address book Fax Number Enter the fax number of the destination PC SMB Name Enter the name of the destination to be registered as an address book User ID Enter the login name of the destination computer Password Enter the password required to log in to the com puter Host Address Enter the computer name or IP address File Path Enter the folder name to be used as the destina tion FTP Name Enter th...

Page 147: ...ed members at periodic intervals Registering a new group 1 Tap Utility and select One Touch User Box Reg Create One Touch Destination Group 2 Tap New 3 Enter the destination name you want to register Tap Name and enter the destination name using the displayed keyboard For Sort Character enter the same name as Name This sets the appropriate index for the name which you entered into Name to Index To...

Page 148: ...the target address book on the destination selection screen The following two meth ods can be used to search for a destination Index Searches for the target destination name using an index Registration Number Searches for the target destination using a registration number 5 Repeat Step 4 until you select all address books to be grouped ...

Page 149: ... 3 5 4 Retrieving a registered destination Retrieve an address book or group to specify it as a destination to which data is sent Retrieving a destination 1 Tap Scan Fax The destinations which are categorized into Favorite when registering indexes are displayed on the basic screen ...

Page 150: ...3 64 d COLOR MF654 MF554 MF454 MF364 MF304 MF254 Registering a destination 3 3 5 2 Narrow down destinations using index and address type 2 1 3 4 ...

Page 151: ...D DVD Method Description Direct Input Directly enter a destination using the keyboard screen or Keypad Job History Specify a target destination in the job history latest five destinations on the scan fax screen Addr Search Retrieves destination candidates by the prefix search function using the name registered destination name or address fax number E mail ad dress or computer name This function is...

Page 152: ...1 1 interface Formatted in FAT32 Without security function added or with security function that can be turned off as required There is no upper limit for the memory size Available printing file types PDF Compact PDF JPEG TIFF XPS Compact XPS OOXML docx xlsx pptx and PPML ppml vdx zip Other file types are not supported on this machine Printing data 1 Connect a USB memory device to this machine NOTI...

Page 153: ...d COLOR MF654 MF554 MF454 MF364 MF304 MF254 3 67 3 6 Using a USB memory device 3 3 Select data to be printed and tap Print 4 Check print settings 2 1 4 3 ...

Page 154: ...n a computer that is not connected to the network Available USB memory device Compatible with USB version 2 0 1 1 interface Formatted in FAT32 Without security function added or with security function that can be turned off as required There is no upper limit for the memory size Specifying functions to be permitted for external memory Change the settings to save documents in the USB memory device ...

Page 155: ...d COLOR MF654 MF554 MF454 MF364 MF304 MF254 3 69 3 6 Using a USB memory device 3 2 Tap External Memory Functional Settings 3 Select Save Document and ON Tap OK 1 2 3 ...

Page 156: ... 3 6 Saving data in the USB memory device 1 Load the original 2 Connect a USB memory device to this machine NOTICE Use the USB connector on the side that is near the Control Panel Do not use a USB device other than a flash memory device 3 Tap Save a document to External Memory ...

Page 157: ...also check the setting using the keys displayed on the Touch Panel To change the setting tap the desired key on the Touch Panel Settings Description Simplex Duplex Select whether to scan one or both sides of the original Resolution Specify the scanning resolution Color Select whether to scan the original in color or black and white mode File Type Select the type of the file to save scanned data Sc...

Page 158: ...3 72 d COLOR MF654 MF554 MF454 MF364 MF304 MF254 Using a USB memory device 3 3 6 6 Press the Start key NOTICE Do not disconnect the USB memory device during data saving ...

Page 159: ...nce function to display the description of a function on the screen and view an operation procedure with moving images If you have any questions during operation try to use this guidance function Getting help on the currently displayed screen Select Function on the Help Menu to display the guidance screen 1 Press the Guidance key default Register key 2 2 Select a menu ...

Page 160: ...3 74 d COLOR MF654 MF554 MF454 MF364 MF304 MF254 Using the guidance function 3 3 7 3 Narrow down the information you want to know ...

Page 161: ...rocedure Open the Help Menu and select a menu depending on an objective to display the guidance screen 1 Press the Guidance key default Register key 2 2 Select a menu Name Description Exit Returns to the screen that is displayed before the guidance screen To Menu Returns to the Help Menu Close Returns to the preceding screen ...

Page 162: ...3 76 d COLOR MF654 MF554 MF454 MF364 MF304 MF254 Using the guidance function 3 3 7 3 Narrow down the information you want to know ...

Page 163: ...earch by Operation Tap this button to display operation examples and explanations of this machine sorted by function Other Functions Tap this button to display the guidance menu of the functions and set tings that make it easier to use this machine Name and Function of Parts Tap this button to check the name or function of each part of this ma chine Service Admin Information Tap this button to dis...

Page 164: ... the default administrator password refer to User s Guide CD DVD 2 Configure a setting for each option Settings Description Administrator Password Change the administrator password of this machine USB Enable Settings Specify whether to permit a function that requires the USB Port Password Rules Configure whether to enable the password rules Once you enable them the number of characters and text ty...

Page 165: ...u Key In some regions the Quick Security key is displayed on the main menu by default only in d COLOR MF654 MF554 MF454 However if Administrator Password in Quick Security Setting was changed from the default setting and Password Rules is set to Enable the Quick Security key will not be dis played on the main menu To display the key again tap Utility and select Administrator Settings System Settin...

Page 166: ...3 80 d COLOR MF654 MF554 MF454 MF364 MF304 MF254 Using the Quick Security function 3 3 8 ...

Page 167: ...4 Advanced Functions ...

Page 168: ......

Page 169: ...ile Type Extension Supports functions such as a function that converts a file into a DOCX or XLSX type a function that generates highly functional and high quality da ta and the E mail RX Print function This requires the registration of i Option LK 110 v2 ThinPrint Allows you to use this machine as ThinPrint Client print Client when Thin Print is enabled This requires the registration of i Option ...

Page 170: ...102 v3 LK 105 v4 LK 106 LK 107 LK 108 LK 110 v2 LK 114 d COLOR MF654 MF554 MF454 provides Extension Memory as standard i Option LK 110 v2 includes the function licenses for i Option LK 102 v3 and i Option LK 105 v4 If you purchase i Option LK 110 v2 you do not need to purchase i Option LK 102 v3 or i Option LK 105 v4 For details on how to purchase or install an optional unit contact your service r...

Page 171: ...y and select Administrator Settings Forward License Settings Install License To ken Code For information on the default administrator password refer to User s Guide CD DVD 3 Enter the token number shown in the token certificate 4 Select Yes then tap OK This machine is connected to the Internet to communicate with the License Management Server LMS and it restarts automatically 1 2 1 2 ...

Page 172: ... This procedure is available when this machine cannot be connected to the Internet 1 Tap Utility and select Administrator Settings Forward License Settings Get Request Code For information on the default administrator password refer to User s Guide CD DVD 2 Tap Yes and OK 3 Tapping Print prints the serial number and request code Prepare at hand the printed serial number request code and token cert...

Page 173: ...anagement Server LMS Enter the MFP Serial Number and Re quest Code then click Next The URL is https licensemanage com index aspx 5 Enter the Token Number select the option you want to register from the Product Description list then click Next 6 Confirm the registration contents then click Generate License Code 1 2 1 2 ...

Page 174: ...re required to enable i Option You should write them down on a memo pad or print them out on paper by clicking Print You could also store them in your USB memory device The license code input could be omitted by using a USB memory device to achieve a convenient operation When using a USB memory device insert the USB memory device and click Download to store the license code ...

Page 175: ...vailable when this machine cannot be connected to the Internet By inputting the codes 1 Tap Utility and select Administrator Settings Forward License Settings Install License Function Licence Code For information on the default administrator password refer to User s Guide CD DVD 2 Enter the license and function codes you wrote down 3 Select Yes then tap OK This machine restarts automatically 1 2 3...

Page 176: ...e 2 Tap Utility and select Administrator Settings Forward License Settings Install License from Ext Memory 3 Select Yes then tap OK This machine restarts automatically Configuring each function Configure the required settings for each advanced function dReference For details on the required setting items for each advanced function refer to the User s Guide CD DVD 1 2 ...

Page 177: ...server used for remote diagnosis refer to the User s Guide CD DVD To use the Web browser administrator settings are required in advance Preparation flow The following describes a preparation flow to use the Web browser function For details refer to the relevant page This preparation is not required the second time or subsequent times 1 Enabling the Web browser function Administrator Enable the Web...

Page 178: ... displayed page or the linked file For details refer to page 4 20 dReference For details refer to the User s Guide CD DVD Enabling the Web browser function 1 Tap Utility and select Administrator Settings Network Settings Forward twice Web Browser Settings Web Browser Usage Settings For information on the default administrator password refer to User s Guide CD DVD 2 Select ON then tap OK This machi...

Page 179: ...anagement Server LMS This procedure is available when this machine cannot be connected to the Internet 1 Display the serial number of this machine Tap Utility and select Device Information 2 Write down the serial number of this machine 3 Access the Web site of the License Management Server LMS Enter the MFP Serial Number then click Next The URL is https licensemanage com activate 1 2 ...

Page 180: ...equired to enable Web browser function You should write them down on a memo pad or print them out on paper by clicking Print You could also store them in your USB memory device The license code input could be omitted by using a USB memory device to achieve a convenient operation When using a USB memory device insert the USB memory device and click Download to store the license code ...

Page 181: ... available when this machine cannot be connected to the Internet By inputting the codes 1 Tap Utility and select Administrator Settings Network Settings Forward twice Web Browser Settings Web Browser Usage Settings For information on the default administrator password refer to User s Guide CD DVD 2 Select ON then tap OK 3 When the screen shown below appears tap Function License Code 1 2 ...

Page 182: ...4 16 d COLOR MF654 MF554 MF454 MF364 MF304 MF254 Using the Web browser function 4 4 2 4 Enter the license code you wrote down 5 Select Yes then tap OK This machine restarts automatically 2 1 1 2 ...

Page 183: ...Web browser function 4 By using a USB memory device 1 Tap Utility and select Administrator Settings Network Settings Forward twice Web Browser Settings Web Browser Usage Settings 2 Select ON then tap OK 3 Wait a few moments until the screen shown below appears 1 2 ...

Page 184: ...MF454 MF364 MF304 MF254 Using the Web browser function 4 4 2 4 Connect the USB memory device stored with the license code 5 Select Install License from Ext Memory 6 Select Yes then tap OK This machine restarts automatically 1 2 ...

Page 185: ...r starts Tips The pre specified home page appears Displaying Web pages 1 Tap the URL display area 2 Enter the URL of a desired page then tap OK The target page appears Tips Selecting Menu Display allows you to zoom in and out from a page or change the character code Selecting Menu Tab allows you to open a new tab and display a different page ...

Page 186: ...before printing the file 3 Specify the output paper To change the setting tap the desired key on the Touch Panel 4 Press the Start key Settings Description Color Select whether to print in color or black and white mode Simplex Duplex Select whether to print one side or both sides of sheets of paper To specify 2 sided printing select the binding position Finishing Configure the offset punch or stap...

Page 187: ...5 Troubleshooting ...

Page 188: ......

Page 189: ... while after the message is displayed it is advisable to promptly prepare replacement consumables For Toner Cartridge Toner is low Replace when indicated appears followed by Replace Toner Car tridge Replace the Toner Cartridge based on the maintenance contract For Drum Unit When the message The Drum Unit needs to be replaced soon or The Drum Unit needs to be replaced appears replace it based on th...

Page 190: ...your service representative if the paper jam indication persists even after you have checked 5 1 3 When an error message appears When an error is detected the following message appears Take the appropriate action according to the message displayed on the screen If you cannot resolve the error write down the Trouble Code and contact your service representative with the power plug disconnected from ...

Page 191: ...ge stabilization Image stabilization is performed while a large number of copies are being output or the temperature or hu midity inside the machine has changed Upon completion of image stabilization printing is automatically resumed Wait for a moment In case image stabilization does not finish after a short while contact your service representative NOTICE You cannot interrupt or prohibit image st...

Page 192: ...lass Printing quality deteriorates if the Print Head Glass is dirty If this occurs clean the Print Head Glass ac cording to the following procedure 1 Open the Lower Front Door or Front Door of the machine 2 Release the Waste Toner Box Lock Lever then remove the Waste Toner Box 3 Remove the Printhead Cleaner from the Lower Front Door or Front Door of this machine 1 2 ...

Page 193: ...ay to the back end of the Print Head Glass section and then slowly pull it out Repeat this operation approximately three times for all of the Print Head Glass sections 5 Mount the Printhead Cleaner onto the Lower Front Door or Front Door of this machine 6 Install the Waste Toner Box 7 Close the Lower Front Door or Front Door of the machine ...

Page 194: ...urces Check the Main Power Switch and the Power key for the status Check whether the power plug of this machine is firmly plugged into the power outlet Also check that the breaker has not tripped Check to see that the Main Power Switch and the Power key are turned ON In case the machine cannot be powered on even after checking contact your service representative ...

Page 195: ...Touch Panel In Power Save Low Power Sleep mode this machine returns from Power Save mode when the Touch Panel is touched or a key on the Control Panel is pressed and the Touch Panel appears normally On the Control Panel press the Power key If the Weekly Timer setting has put the machine in Erp Auto Power OFF mode press the Power key to display the Touch Panel To use it outside the preset operating...

Page 196: ...aples in the finisher have run out When staples in the Finisher have run out a message appears to prompt you to make replenish them Take action while referring to the label inside the machine When the punch scrap box is full When the punch scrap box is full a message appears to prompt you to dispose of the punch scraps at re placement by user Take action while referring to the label inside the mac...

Page 197: ...aintenance contract When it is time to replace a Toner Cartridge When it is time to replace a Toner Cartridge a replacement prompt message appears Replace it based on the maintenance contract Tap Start Guidance to display the replacement procedure on the screen and check it Tips Do not replace a Toner Cartridge of a color that is not displayed When it is time to replace a Toner Cartridge of a colo...

Page 198: ...presentative Do not replace a Drum Unit of a color that is not displayed When it is time to replace a Drum Unit of a color other than black printing can be forcibly continued using black Tap Continue and then select a desired print job When it is time to replace a Developing Unit When it is time to replace a Developing Unit a message appears to prompt you to contact your service rep resentative If...

Page 199: ...le shows how to replace a Yellow Toner Cartridge Tips Shake a new Toner Cartridge well approximately 5 to 10 times before installing it If a Toner Cartridge other than for black is empty printing can be continued forcibly using black Tap Continue and then select a desired print job Do not forcedly open or disassemble a Toner Cartridge toner container Do not forcedly remove or dispose of toner that...

Page 200: ...ttle take utmost care to avoid inhaling it or even getting skin contact If toner lands on your skin or clothing wash thoroughly with soap and water If you inhale toner move to a place with fresh air and gargle with a lot of water repeatedly Should you get symptoms such as coughing seek medical advice If you get toner into your eyes immediately rinse them with running water for over 15 minutes Seek...

Page 201: ...s e g toner cartridge and developing unit near devices susceptible to magnetism such as precision equipment and data storage devices otherwise they may malfunction They could cause these products to malfunction Do not force open the toner related parts e g toner cartridge and developing unit If toner tumbles from the toner bottle take utmost care to avoid inhaling it or even getting skin contact I...

Page 202: ...r could damage your health Do not store toner related parts e g toner cartridge and developing unit near devices susceptible to magnetism such as precision equipment and data storage devices otherwise they may malfunction They could cause these products to malfunction Do not force open the toner related parts e g toner cartridge and developing unit If toner tumbles from the toner bottle take utmos...

Page 203: ...e your health Do not store toner related parts e g toner cartridge and developing unit near devices susceptible to magnetism such as precision equipment and data storage devices otherwise they may malfunction They could cause these products to malfunction Do not force open the toner related parts e g toner cartridge and developing unit If toner tumbles from the toner bottle take utmost care to avo...

Page 204: ... box by itself A Drum Unit may be damaged due to exposure to light Do not take a Drum Unit out of a black plastic bag until just before it is to installed If a Drum Unit other than for black has reached the replacement time printing can be continued forcibly using black Tap Continue and then select a desired print job After replacing a Drum Unit be sure to clean the Print Head Glass for each color...

Page 205: ... A Drum Unit may be damaged due to exposure to light Do not take a Drum Unit out of a black plastic bag until just before it is to installed If a Drum Unit other than for black has reached the replacement time printing can be continued forcibly using black Tap Continue and then select a desired print job After replacing a Drum Unit be sure to clean the Print Head Glass for each color For details o...

Page 206: ...5 20 d COLOR MF654 MF554 MF454 MF364 MF304 MF254 When a message appears to replace consumables or carry out cleaning 5 5 5 ...

Page 207: ...6 Index ...

Page 208: ......

Page 209: ...e Management Server LMS 4 6 4 13 Loading Paper 2 42 2 43 2 44 2 45 Low Power mode 2 31 M Main Menu 2 34 MFP 2 16 2 18 Multi job 2 41 O Options 2 8 2 12 2 20 P PC Fax TX 3 44 PCL 3 6 Power Save mode 2 31 Print Function 3 3 3 6 Printing from a USB memory device 3 66 PS 3 6 Q Quick Security 3 78 R Request Code 4 6 S Safety information 1 6 Saving the scanned data 3 68 Search 3 63 Sender Fax No Setting...

Page 210: ...6 4 d COLOR MF654 MF554 MF454 MF364 MF304 MF254 6 ...

Reviews: