background image

27


Figure 37. In this example the following settings are displayed (valid only after the system has reached its 

stationary state): if Temperature Deviation from set point is 1°C or greater (i.e. if set point temperature is 37°C 
and the temperature reaches a value equal or less than 36.0°C or equal or more than 38.0°C) for a period of time 

equal or longer than 15 minutes (“Temp time“ set in this example) then the system trig

gers in alarm. 

8.2.2.6


Data Logging 

H201-T-UNIT-BL touch screen interface, OKO-TOUCH (see Figure 2), is equipped with on-board memory 

for data logging and storage. A simple routine allows downloading data to USB drive or to PC.  

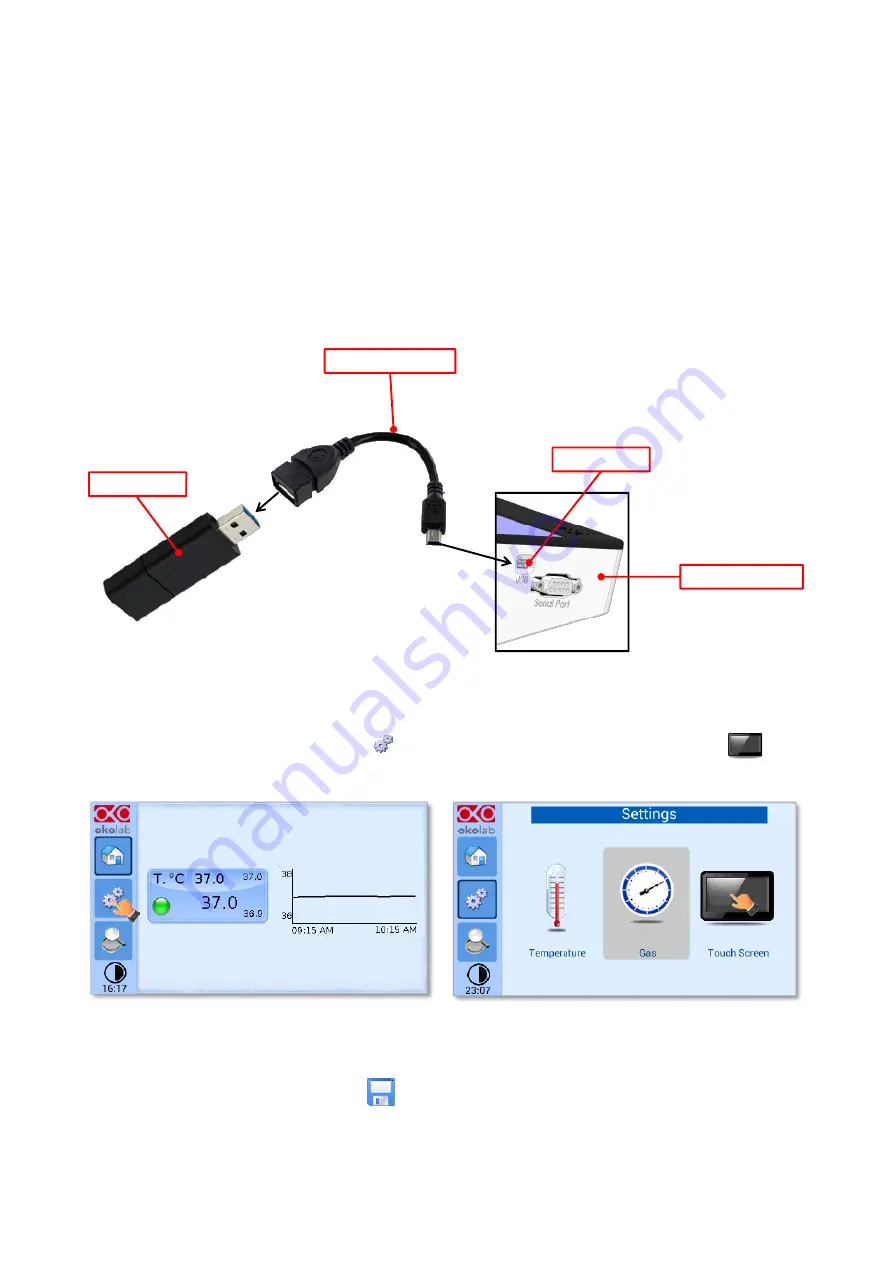
In order to log and then download the logged data, connect a USB drive (not supplied) to OKO-TOUCH, 

using MINI-USB-OTG cable (provided), as shown in Figure 38. 

USB Port

USB Drive

MINI-USB-OTG

OKO-TOUCH


Figure 38. USB drive connection 

To activate the logging, follow the steps indicated below: 

1.


Press on the 

Settings

 icon 

 (Figure 39, a) and press on the 

Touch screen

 icon 

 on the 

window that opens next (Figure 39, b). 

a

b


Figure 39 (a) How to enter the setting menu; (b) how to enter the Touch Screen menu 

2.


Press on the 

Logging

 icon 

 and flag 

Internal memory

 in the page that appears, see Figure 40 

a and b.  

Summary of Contents for H201-T-UNIT-BL

Page 1: ...1 H201 T UNIT BL Temperature Control Unit Manual IST1254_REV01 SV 3 5 4 3048 ...

Page 2: ... led and meaning 15 SETTINGS 16 8 2 1 Temperature 16 8 2 1 1 Control Mode 17 8 2 1 2 Fan Speed 19 8 2 1 3 Air filters 20 8 2 1 4 Status 22 8 2 1 5 Calibration 23 8 2 1 6 Digital Input 23 8 2 2 Touch Screen 24 8 2 2 1 Options 24 8 2 2 2 Brightness 25 8 2 2 3 Visual Effects 25 8 2 2 4 Date Time 25 8 2 2 5 Alarms 26 8 2 2 6 Data Logging 27 OVERVIEW 31 ICON AND GLANCE MODE VIEW 31 INFO PAGE 31 9 CALIB...

Page 3: ...separately OKO TOUCH features on board memory for data logging and mini USB port for data download In addition data logging is possible via SMART BOX via DATA LOG Okolab software and via following third party Imaging software LASX 2 0 NIS Elements SlideBook MetaMorph and MicroManager Macro for ZEN Black software is available upon request Okolab DATA LOG is an optional software allowing logging tem...

Page 4: ... Tip Supplies you with helpful suggestions Note Supplies you with important information to successfully setup and use the instrument Symbols on the product label CE MARKING this symbol indicates product compliance with EU legislation PRODUCT DISPOSAL this symbol indicates that this product must not be disposed as urban solid waste This symbol indicates the product production date This symbol indic...

Page 5: ...not disassemble any part of the system Do not disconnect cables while in operation Do not use a volatile solvent such as paint thinner to clean the instrument because deformation or discoloration may occur Use a soft dry cloth to remove stains from the instrument Do not exceed voltage indicated in this manual and on the product label Avoid excessive induction noise static electricity and magnetic ...

Page 6: ...formation relating to safety and EMC Not following these instructions can result in damage or breakdown of the device and its accessories We reserve the right to make technical variations IN NO EVENT SHALL OKOLAB S R L BE LIABLE FOR ANY DIRECT INCIDENTAL OR CONSEQUENTIAL DAMAGES OF ANY NATURE OR LOSSES OR EXPENSES RESULTING FROM ANY DEFECTIVE PRODUCT OR THE USE OF ANY PRODUCT ...

Page 7: ...e equipped with 1 Microscope enclosure pointer 6 in Figure 1 2 HM VF standard humidity control that includes Humidity Module pointer 7 in Figure 1 Water Trap see paragraph 10 Figure 56 TUBE G x1 Silicon tube 3 mm ID connected by a plastic connector with a silicon tube 2 mm ID The 3 mm ID silicone end must be connected to the Output Water Trap while the 2 mm ID silicone tube to the Chamber Incubato...

Page 8: ...o hoses on the BACK of the enclosure and other two tubes to attach the BLUE side of the Heating Box to hoses on the TOP of the enclosure see paragraph 10 Figure 57 and Figure 58 6 Power supply cable To connect the Heating Box 7 Okolab incubating chamber see pointer 12 in Figure 1 with lid and base chamber riser with one or more plate adapters 8 OKO TOUCH see point 13 in Figure 1 including Touch Sc...

Page 9: ...LOG software SM BL Smart Box To store data to operate the controllers via web smartphone tablet and to allow remote assistance for service 6 Equipment Description A detailed description of the H201 T UNIT BL rear is provided in the following list which refers to the pointers in Figure 5 1 OKO TOUCH RS232 serial port 2 Power Input 3 Heating Box connector 4 Air Flow Sensor connector 5 USB port 6 Gen...

Page 10: ...10 8 Gauge Thermocouple port 2 3 5 4 6 7 8 1 Figure 5 Control Unit Overview ...

Page 11: ...ors the air temperature inside the cage The NTC thermistor can be also used to monitor the room temperature when working in Sample Feedback Mode In this case you have to place it outside the cage 3 The Fine Gauge Thermocouple green plugs into the green port labeled Reference Temperature located on the rear panel of the Temperature Control Unit see Figure 6 When operating the device in Sample Feedb...

Page 12: ...O TOUCH Connection 6 Connect the 24V DC Power adapter to the Temperature Control Unit 7 To switch H201 T UNIT BL on use the power button on OKO TOUCH see Figure 11 A small green LED light will blink on the front of the Temperature Control Unit This means that the system is initializing Tip Wait until system has reached the steady state before loading your samples ...

Page 13: ...oller must stack on top of the Temperature Control Unit by lining up the bus ports located on the top and bottom surface of each When the units are properly connected the Temperature CO2 and O2 parameters will appear on the Touch Screen interface Home page If not all the parameters appear on OKO TOUCH Home Page then the Control Units are not properly connected Please check that the bus ports are p...

Page 14: ...ge see paragraph 8 2 2 1 5 Chart history length set at 1 hour 6 Display mode Touch here to switch display mode 7 Overview page 8 Settings Press here to access system options and settings 9 Home To open the homepage 10 Product info Press here to know generic info about OKO TOUCH and H201 T UNIT BL and running time Tip The Touch Screen is pre set at the following temperature 37 C Once turning the To...

Page 15: ...in transient regime The Yellow light will appear after the controller is turned on and after any set point chance The system is working properly it is not in alarm and no action is needed As soon as the H201 T UNIT BL stabilizes the temperature the Controller Status changes to NORMAL and the color turn GREEN If the H201 T UNIT BL cannot stabilize the temperature of one or both heating devices with...

Page 16: ...follow the instruction below 1 Press on the Settings icon see Figure 12 a to enter the Settings menu 2 Press on the Temperature icon to enter the temperature settings menu as shown in the Figure 12 b a b Figure 12 Temperature Settings a b The Temperature settings menu has 5 items as shown in Figure 13 Figure 13 Temperature Settings submenu ...

Page 17: ...ine gauge thermocouple into a reference well inside the Chamber Incubator so to find for instance that to keep the specimen temperature at 37 C the cage temperature has to be at 38 C see paragraphs 8 2 1 5 and chapter 9 This means that when regulating the set point given that in this mode you control the Cage s temperature this has to be set at 38 C to keep the specimen at 37 C This control mode i...

Page 18: ...n 0 1 C from the temperature set point regardless from room temperature variations Figure 16 Free Sensor attached on the internal base of the Petri Dish Tip It is recommended using an Okolab SENSOR LID available for purchase to secure the Fine Gauge Thermocouple in place in the Reference Well during calibration or operation in Sample Feedback Mode see Figure 17 Sensor lids are available for the fo...

Page 19: ...d allows a quicker start up and a more uniform thermal distribution inside the enclosure a low speed allows instead a smooth operation in applications particularly sensitive to vibrations You can set the Air Flow value by pressing on Fan Speed icon see Figure 18 a Then you can change the value in the range 35 100 m3 h see Figure 18 b Only when you use the H201 FILTER BOX the working range of the A...

Page 20: ...r High Efficiency Particulate Air Filter has been added to the Heating Box see Figure 20 In this case Okolab recommends activating the Filter Monitoring in the Air Filters subpage Press on Air Filters icon see Figure 21 a then active Filter Monitoring see Figure 21 b H201 T FILTER BOX Figure 20 Heating Box with H201 T FILTER BOX a b Figure 21 Filter Monitoring activation a b ...

Page 21: ...efilter or the HEPA icon see Figure 24 a and Figure 25 a the warning shown in Figure 24 b and Figure 25 b will appear These warning messages and icons allow you to remember that you should replace one or both the filters in order to avoid contaminations of the samples See paragraph 11 3 for the Filters Replacement A A Figure 22 Home Page and Status Page when the usage time of the HEPA filter excee...

Page 22: ...igure 26 Air Flow Warning message when using Air Filters 8 2 1 4 Status Press on the Status icon to open the Status page see Figure 27 a The Status Temperature page will open see Figure 27 b On this page you can see the status of the Temperature Control Unit with a summary of all parameters allowing you to check that all is working properly You may have to refer to this window when asking for Okol...

Page 23: ... starting the cage calibration as suggested in dialog opening when pressing Adjust see Figure 29 Figure 29 Cage calibration warning 8 2 1 6 Digital Input Digital Input feature is available only for TTL ready optional controller TTL feature allows to change setpoint between two specified values using a TTL signal see Figure 30 b The TTL is a digital input for our Units and has only two values High ...

Page 24: ... a b Figure 31 Touch screen settings a b 8 2 2 1 Options Press on the Options icon see Figure 32 a to set the scale of the X axis time duration of the graphs displayed in the main page and the buzzer sound frequency see Figure 32 b a b Figure 32 Touch Options a b Press and slide your finger along the setting bars or simply click to set desired values then press Save see Figure 32 b ...

Page 25: ... Visual Effects icon see Figure 34 a a b Figure 34 Visual effects page a b The Top LED settings allows you to when the Top LED should be illuminated see Figure 34 b if you select Never the Top LED will never illuminate if you select On Alarm the Top LED will illuminate only when the H201 T UNIT BL is in Alarm Status see paragraph 8 1 2 if you select Always the Top LED will always illuminate 8 2 2 ...

Page 26: ...er if you want the Alarm to be acoustical as well rather than just being displayed The page shown in Figure 37 will open and you can choose the Temp Deviation and Temp Time Tip Temp Deviation is the value defining the allowed tolerance from the set point Temp Time is the time for which the temperature may remain outside the allowed tolerance before the controller triggers in alarm Figure 37 How to...

Page 27: ... 2 is equipped with on board memory for data logging and storage A simple routine allows downloading data to USB drive or to PC In order to log and then download the logged data connect a USB drive not supplied to OKO TOUCH using MINI USB OTG cable provided as shown in Figure 38 USB Port USB Drive MINI USB OTG OKO TOUCH Figure 38 USB drive connection To activate the logging follow the steps indica...

Page 28: ...nsert the Time Interval i e the frequency with which you want to record a data point as shown in Figure 42 b In this example a data point is logged every 30 seconds you can change Time Interval in the range 1 60 seconds a b Figure 42 How to set the logging time a b 4 Choose how you want to organize the data when downloaded by pressing on Day Week or Month see Figure 42 a Tip If you select Day the ...

Page 29: ...wnloaded files a b Figure 44 Downloaded files on the pen drive Note If you press on the screwdriver see Figure 45 a you can view the logging starting date the available memory and the latest download see Figure 45 b Note The available memory depends on the time interval you have inserted in the Logging page The default logging Time Interval is 30 seconds a b Figure 45 Internal memory status a Logg...

Page 30: ...is case OKO TOUCH warns you that a USB drive must be connected to the USB port see Figure 47 b and will store the data on the USB drive Figure 48 Logging to USB drive Note When connecting the USB drive to OKO TOUCH a USB drive icon appears on the Homepage If you activate the logging on USB drive a red dot appears on the USB drive to remind that the USB drive should not be disconnected while data l...

Page 31: ...se data Icon and Glance Mode View The H201 T UNIT BL features two display modalities Icon mode and Glance Mode as shown in Figure 50 a and b You can swap between the two display modalities by pressing on icon as shown in Figure 50 a a b Figure 50 Display modalities Icon Mode a Glance Mode b Info page Press on the icon to access the Info Page as shown in Figure 51 This page contains the information...

Page 32: ...ing the calibration as well as reducing air drafts and forced convection If possible divert any draft coming from the air conditioning system in the room from the microscope incubation system The goal of this procedure is to adjust the temperature offset of the Cage temperature hence maintaining the sample at the desired temperature e g 37 C during imaging Before starting the Cage Calibration 1 Pl...

Page 33: ...mocouple in place in the Reference Well during calibration or operation in Sample Feedback Mode see Figure 17 and Table 1 5 Go in Control Mode page as shown in Figure 13 and enable Cage Mode 6 Wait until the system reaches the steady state temperature indicator status is green 7 When the Fine Gauge Thermocouple reads a stable temperature open the Calibration page as shown in Figure 28 and press Ad...

Page 34: ...s through this permeable membrane immersed in water before arriving to the chamber incubator The Humidity Module has to be filled with distilled water until to cover entirely the tubing into the reservoir this operation can be done before inserting it into its housing or after the insertion you have to lift the black plug only see Figure 54 Fill the Humidity Module with distilled water Permeable W...

Page 35: ... the chamber incubator The Water Trap is directly connected to the Humidity Module by the TUBE H for HM VF see Figure 66 The Water Trap should not fill because the stored water evaporates when the system restarts in the standard working condition If it fills because of anomalous operating condition you have to open it to empty it Loosen the water trap cover screws M2x8 A in Figure 56 Lift the cove...

Page 36: ... Insert the hose bayonet connector ring that is on the end part of the tubes TUBE J on the hose bayonet connector flange mounted on the back panel of the Enclosure Then rotate the bayonet connector ring until the screws do not fit into their housings Repeat the same procedure for connecting the tubes on the Enclosure top panel TUBE J TUBE J Figure 58 Connection with the Enclosure Tube Length Optim...

Page 37: ... metal wire with scotch tape a b 3 Insert the black hose back in its position see Figure 61 Figure 61 Insert the black hose Okolab suggests to cut the tubes in order to save space especially when 1 the Heating Box is put on the same desk of the enclosure very close to the enclosure see Figure 62 for Configuration A Figure 62 a shows configuration where tubes have not been cutting Figure 62 b shows...

Page 38: ...onfiguration where tubes have not been cutting Figure 63 b shows the space saving after cutting the tubes Figure 63 Before vs after cutting the tubes Configuration B a b You don t need to cut the tubes when the Heating Box is placed under the enclosure s level see Figure 64 a for Configuration C or above the enclosure but not precisely centered with it see Figure 64 b for Configuration D ...

Page 39: ...ve more information on the chamber incubator positioning on the stage Figure 65 Chamber Incubator insertion inside the enclosure E HM VF tubing connection inside the Enclosure If you have purchased also HM VF you have to connect the tubes between the Water Trap and Humidity Module Tube H between the Water Trap and the Chamber Incubator TUBE G and between the Input of the gas coming from the Gas Mi...

Page 40: ... HM ACTIVE tubing connection inside the Enclosure If you have purchased also a digital gas mixer including HM ACTIVE as humidity module you have to connect the heated tube of HM ACTIVE to the Chamber Incubator See Figure 67 Figure 67 Tubing connection inside the Enclosure with HM ACTIVE ...

Page 41: ... microscope or of the other components that you use for your experimental apparatus In Image 3 of Figure 68 there are the connector for the input of the gas coming from Gas Mixer and the opening where you can pass the temperature sensors cables the fine gauge thermocouple and the NTC thermistor The Image 1 shows the Heated Tube Input a component of the HM ACTIVE this is tapped in the configuration...

Page 42: ...nclosure is composed by several parts in total five materials are present see the list below Lexan for transparent panels Acrylic for obscuring panels Polycarbonate for black seals for light obscuring Aluminum for opening viewing window not present in all the configurations Anodized Aluminum for opening viewing window not present in all the configurations In order to keep the Cage clean they are n...

Page 43: ...days indicated with Update Time starts The maximum usage time for the Prefilter is 180 days while for the Hepa Filter is 360 days When the usage time exceeds one or both these values you should replace them in order to avoid contaminations of the sample Before opening the H201 FILTER BOX make sure that the Heating Box is unplugged from an outlet Before opening the H201 FILTER BOX to change the Pre...

Page 44: ...44 A HEPA FILTER PREFILTER 1 2 3 Figure 69 Filters Replacement After replacing one or both the filters do not dispose it them as urban solid waste The filters must be treated as special waste ...

Page 45: ...mote support session anytime also via video chat Contact our technical support sibillo oko lab com by e mail to take an appointment for the web assistance Technical Support Please do not hesitate to contact Okolab should you need any further commercial information or technical support For HARDWARE SUPPORT sibillo oko lab com Phone 39 081 806 3470 Fax 39 081 876 4410 Mobile 39 348 96807 18 For COMM...

Page 46: ...age Mode if room temperature remains within 1 C Regime temperature time about 30 min Operating Temperature 0 C 55 C Storage Temperature 5 C 60 C Operating Humidity 0 70 Power Consumption 24 V DC 75 W max Weight 1 5 Kg Heating Box Technical Specifications Operating Temperature 0 C 55 C Storage Temperature 5 C 60 C Operating Humidity 0 70 Power Consumption 230V AC 50 Hz Fuse 5AF 250V 5x20 800 W max ...

Page 47: ...ed to Heating Box or T Unit Properly connect the cable Blown Fuses Replace the fuse in the Heating Box see Technical Specifications Heating Box is cold Power supply cable is not connected to Heating Box Properly connect the cable Heating Box Blown fuses Replace the fuses in the Heating Box see Technical Specifications Heating Box fan is turned on the speed reported by OKO Touch is 0 RPM but the sy...

Page 48: ...re 34 Visual effects page a b 25 Figure 35 Touch screen settings Date and Time a b 26 Figure 36 How to enter in Alarms page a b 26 Figure 37 How to set the Deviation and Time Alarm 26 Figure 38 USB drive connection 27 Figure 39 a How to enter the setting menu b how to enter the Touch Screen menu 27 Figure 40 Logging a How to enter in the logging menu b logging in internal memory 28 Figure 41 How t...

Page 49: ...onents on the enclosure panels 41 Figure 69 Filters Replacement 44 Figure 70 QR code for commercial info contact 45 Figure 71 QR code for technical info contact 45 16 Manual Revision Table Revision Number Additions or changes Date 01 Edited May 2018 02 Replaced some images and layout July 2018 03 Equipment correction May 2019 IST 1254 REV 01 SV 3 5 4 3048 ...

Page 50: ...ponents which wear are not warranted Okolab S r l neither assumes responsibility for any omissions or errors nor assumes liability for any damages that result from the use of its products in accordance with information provided by Okolab S r l Okolab S r l warrants only the parts manufactured by it will as specified and free of defects Okolab S r l makes no other warranties or representations of a...

Reviews: