background image

EN-2                                                                                                          Defender 5000 Indicators


3.7 Weighing Unit ............................................................................................................................ 26


3.7.1 Gram (g) .............................................................................................................................. 26


3.7.2 Kilogram (kg) ....................................................................................................................... 27


3.7.3 Pound (lb) ........................................................................................................................... 27


3.7.4 Ounce (oz) .......................................................................................................................... 27


3.7.5 Pound: Ounce (lb: oz) ......................................................................................................... 27


3.7.6 Tonne (Metric Tonne) ......................................................................................................... 27


3.7.7 Ton (Short Ton)................................................................................................................... 27


3.7.8 Custom Unit (c) ................................................................................................................... 27


3.8 GLP/GMP Menu ........................................................................................................................ 28


3.8.1 Date Format ........................................................................................................................ 28


3.8.2 Date .................................................................................................................................... 28


3.8.3 Time Format ........................................................................................................................ 28


3.8.4 Time .................................................................................................................................... 28


3.8.5 Project ID ............................................................................................................................ 28


3.8.6 Scale ID .............................................................................................................................. 28


3.8.6 Reset ................................................................................................................................... 28


3.9 Communication .......................................................................................................................... 29


3.9.1 RS232/2nd RS232 Configuration ....................................................................................... 29


3.9.2 Print Setup of RS232/2nd RS232 ....................................................................................... 30


3.9.3 RS485 Configuration .......................................................................................................... 32


3.9.4 Ethernet Configuration ........................................................................................................ 32


3.9.5 Wifi Configuration................................................................................................................ 32


3.9.6 Bluetooth Configuration ...................................................................................................... 32


3.9.7 Analog Configuration .......................................................................................................... 32


4. OPERATION ................................................................................................................................... 33


4.1 Weighing .................................................................................................................................... 33


4.1.1 Application Setup ................................................................................................................ 33


4.1.2 Auto Tare ............................................................................................................................ 33


4.1.3 Accumulation ...................................................................................................................... 34


4.1.4 ID Input ............................................................................................................................... 34


4.1.5 Input/Output (I/O) Setup ..................................................................................................... 35


4.2 Counting .................................................................................................................................... 36


4.2.1 Set the Average Piece Weight (APW) ................................................................................ 36


4.2.2 Application Setup ................................................................................................................ 37


4.2.3 Accumulation ...................................................................................................................... 38


4.2.4 Input/Output (I/O) Setup ..................................................................................................... 38


4.3 Check......................................................................................................................................... 39


4.3.1 Check Weighing (default) ................................................................................................... 39


4.3.2 Check Counting .................................................................................................................. 40


4.3.3 Application Setup ................................................................................................................ 41


4.3.4 Input/Output (I/O) Setup ..................................................................................................... 42


4.4 Percent Weighing ...................................................................................................................... 42


4.4.1 Establishing a Reference Weight........................................................................................ 43


4.4.2 Application Setup ................................................................................................................ 43


4.4.3 Input/Output (I/O) Setup ..................................................................................................... 44


4.5 Dynamic Weighing ..................................................................................................................... 45


4.5.1 Application Setup ................................................................................................................ 45


4.5.2 Average Time Setup ........................................................................................................... 47


4.5.3 Input/Output (I/O) Setup ..................................................................................................... 48


5. SERIAL COMMUNICATION........................................................................................................... 49


5.1 Interface Command ................................................................................................................... 49


Summary of Contents for Defender 5000 Series

Page 1: ...Defender 5000 Indicators Instruction Manual TD52P TD52XW 99 Washington Street Melrose MA 02176 Phone 781 665 1400 Toll Free 1 800 517 8431 Visit us at www TestEquipmentDepot com...

Page 2: ......

Page 3: ...O SD Card Installation 12 2 4 TD52XW Rear Housing Orientation 13 2 5 Mounting Bracket 13 3 SETTINGS 14 3 1 Menu Structure 14 3 2 Menu Navigation 17 3 3 Calibration Menu 17 3 3 1 Zero Calibration 17 3...

Page 4: ...6 Bluetooth Configuration 32 3 9 7 Analog Configuration 32 4 OPERATION 33 4 1 Weighing 33 4 1 1 Application Setup 33 4 1 2 Auto Tare 33 4 1 3 Accumulation 34 4 1 4 ID Input 34 4 1 5 Input Output I O S...

Page 5: ...i 57 6 4 Editable 58 7 LEGAL FOR TRADE 58 7 1 Settings 58 7 2 Verification 58 7 3 Sealing 59 8 MAINTENANCE 59 8 1 Model T52P Cleaning 59 8 2 Model TD52XW Cleaning 59 8 3 Troubleshooting 60 8 4 Service...

Page 6: ...environments Do not immerse the equipment in water or other liquids Service should only be performed by authorized personnel The TD52XW is supplied with a grounded power cable Use only with a compati...

Page 7: ...ARTS Item Description 1 Data Label 2 Front Housing 3 Control Panel 4 Mounting Bracket 5 Screws 4 6 Adjusting Knobs 2 7 Security Screw 8 Accessory Cover 9 Rear Housing 10 Power Connector 11 RS232 Conne...

Page 8: ...LE 1 2 TD52XW PARTS Item Description 1 Control Panel 2 Front Housing 3 Screws 6 4 Adjusting knobs 2 5 Rear Housing 6 Mounting Bracket 7 Load Cell Connector 8 Strain Relief for Option 9 Power Cord 10 S...

Page 9: ...MAIN PC BOARD Item Description 1 IO Analog RS232 RS485 USB Device connector J11 2 Micro SD Card slot J8 3 Rechargeable Battery Pack connector J9 4 USB Host Ethernet connector J4 5 Security Switch con...

Page 10: ...e mode of numeric input To Enter A press 2 times in the mode of uppercase input To enter Z press 5 times in the mode of lowercase input To enter 0 press the button in the mode of numeric input To ente...

Page 11: ...onnector Figure 1 1 item 11 Pin Connection 1 N C 2 TXD 3 RXD 4 N C 5 GND 6 N C 7 CTS 8 RTS 9 N C 2 2 3 AC Power to TD52P Connect the AC power cord supplied to the power receptacle Figure 1 1 item 10 t...

Page 12: ...to 2 5 N m 20 25 in lb torque to ensure a watertight seal 2 3 2 Scale Base Without Connector For connecting bases which do not have the Defender base quick connector to a TD52P or TD52XW a Load cell c...

Page 13: ...D52XW enclosure is open connections can be made to the terminal blocks on the main board as shown in Figure 2 3 Figure 2 3 Jumper Connections The TD52P and TD52XW indicators are designed to support bo...

Page 14: ...gure 1 2 item 10 and attach it to terminal block J5 Figure 1 3 item 7 Tighten the strain relief to maintain a watertight seal 2 3 4 MICRO SD Card Installation The SD memory card can be used for additi...

Page 15: ...ench To reverse the rear housing remove the four Phillips head screws carefully rotate the housing 180 and reinstall the screws Figure 2 6 Wall Mount Configuration Figure 2 7 Bench Top Configuration 2...

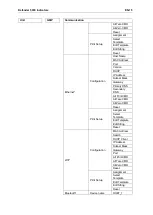
Page 16: ...Auto Off Power On Unit Base Auto Off Key Beep Adjust Contrast Transaction Counter Reset Next Transaction Password Reset Unit GMP Communication Gram g Date Format RS232 2ndRS232 USB Device Configuratio...

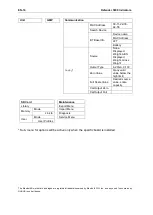
Page 17: ...n DHCP IP Address Subnet Mask Gateway Primary DNS Secondary DNS Alt Print CMD Alt Tare CMD Alt Zero CMD Reset Print Setup Assignment Select Template Edit Template Edit String Reset Wifi Configuration...

Page 18: ...ny valid value below the high limit Full Scale Value Desired source value scale capacity Cal Output Zero Cal Output Full SD Card Maintenance Library Export Menu Memory Mode Import Menu Link to Diagnos...

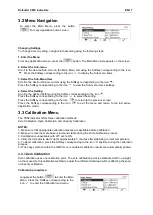
Page 19: ...ey corresponding to the icon to exit the menu and return to the last active Application mode 3 3 Calibration Menu The TD52 indicator offers three calibration methods Zero Calibration Span Calibration...

Page 20: ...point The span calibration point is established with a calibration mass placed on the scale Note Span Calibration should be performed after Zero Calibration Calibration procedures Long press the butt...

Page 21: ...ro calibration point is established with no weight on the scale The full calibration and mid calibration points can be altered by the user during the calibration procedure Calibration procedures Long...

Page 22: ...n and enter the desired value using the alphanumeric keypad After editing press the Softkey corresponding to the icon to exit the menu Note See table 9 4 for GEO values Put the calibration mass on the...

Page 23: ...ff On Next Transaction 1 9999999 Password Off On Set Password xxxxxx Confirm Password xxxxxx Reset 3 4 1 Capacity Unit Select the unit used for calibration Kg t Metric Tonne lb ton Short Ton g 3 4 2 R...

Page 24: ...the graduation for the entire weighing range of the scale If Dual interval is enabled this will be the graduation used in the lower interval 2 Graduation Specify the graduation for interval 2 If Dual...

Page 25: ...ed only after entering a password up to 6 digits 3 4 11 Reset Reset the Setup menu to the factory defaults except Range Capacity and Graduation No not reset Yes reset NOTE If the Security Switch is se...

Page 26: ...display will maintain zero until a change of 3 divisions per second has been exceeded 3 5 5 Auto Dim Set the display backlight functionality Settings 1 min backlight turns off after 1 minute of no ac...

Page 27: ...e not reset 3 6 Discrete I O Long press the button to enter the Main Menu Select Application Mode by pressing the Softkey corresponding to the icon Press the Softkey corresponding to the icon to enter...

Page 28: ...int Unit Accumulate Discrete Input2 Off Zero Tare Clear Tare Print Unit Accumulate Discrete Output1 Off Under Over Accept Under Over Overload Underload Zero Discrete Output2 Off Under Over Accept Unde...

Page 29: ...unit is defined using a conversion factor where the conversion factor is the number of custom units per gram expressed in scientific notation Factor x 10 Exponent Factor Set the conversion factor usin...

Page 30: ...YY MM DD Year Month Day 3 8 2 Date Set the date 00 to 9999 year position 01 to 12 month position 01 to 31 day position Refer to Section 3 2 Menu Navigation to enter settings 3 8 3 Time Format Set the...

Page 31: ...ardware Alt Print CMD a z A Z P Alt Tare CMD a z A Z T Alt Zero CMD a z A Z Z Reset No Yes Print Setup Assignment Demand Stable Only Off On LFT Force On Auto On Stable Mode Load Load and Zero Auto On...

Page 32: ...ill display Set the printing criteria OFF values are printed immediately regardless of stability ON values are printed only when the stability criteria are met Note For more detailed information pleas...

Page 33: ...ustomized printout format If not customized Simple template will be used Custom 2 customized printout format If not customized Simple template will be used Custom 3 customized printout format If not c...

Page 34: ...eighing ID Not fixed up to 40 3 9 2 11 Edit String Up to 10 Strings can be edited using the alphanumerical keypad Select the string number in the first selection box then any existing data for that st...

Page 35: ...When the reading is stable the appears The resulting value is displayed in the screen in the active unit of measure 4 1 1 Application Setup The Application can be customized for various user preferen...

Page 36: ...ulated after reaching gross 0 or net 0 Note The Accumulation icon will only be shown if Accumulate is set to Manual and Automatic see section 4 1 1 Viewing the Accumulation Results To view the accumul...

Page 37: ...Option Board has been installed See the Accessory list in section 9 4 for information The option I O board provides two isolated inputs and four dry contact normally open relay outputs which can be u...

Page 38: ...will be displayed and the information line will show APW is too small If APW is less than 0 05d an error message will appear and the APW value cannot be stored There are two methods to set the APW 1 E...

Page 39: ...corresponding to the icon to edit the PCS value using the alphanumerical keypad After editing press the Softkey corresponding to the icon for confirmation and then press the Softkey corresponding to...

Page 40: ...ptimized the beeper will beep once APW Auto Save Off On Off APW Auto Save is off On If the APW is derived from sampling and a counting library is selected the new APW will be saved to library after op...

Page 41: ...of a sample against target limits Press the button until the icon corresponding to Check is displayed in the screen Two different modes can be selected in the Check Mode Weighing Counting Setup check...

Page 42: ...n When LFT is OFF a gross weight and net weight can be accumulated b a new sample can be accumulated after reaching gross 0 or net 0 Audible Signal Off Under and Over Accept Under Over Off No beep Und...

Page 43: ...stable weight Automatic The Softkey displays The weight will be accumulated automatically Note The load to be accumulated has to be 5d and the next accumulation can only start once the pan has been cl...

Page 44: ...ocess weighing 4 4 Percent Weighing Use Percent Weighing to measure the weight of a sample displayed as a percentage of a pre established Reference Weight Press the button until the icon corresponding...

Page 45: ...the icon to enter the sub menu for setting the reference weight Enter the desired value using the alphanumerical keypad Press the Softkey corresponding to the icon to save the value and press the Sof...

Page 46: ...hen LFT is ON no such limit when LFT is OFF or the approved model is OIML a gross weight and net weight cannot be accumulated b gross 0 has to be reached before a new sample accumulation When LFT is O...

Page 47: ...manual reset and Automatic start and stop automatically Press the button until the corresponding to Dynamic is displayed in the upper left portion of the home screen Press the Softkey corresponding to...

Page 48: ...and countdown start automatically When the countdown is over the average weight is displayed After the load has been removed the average weight still displays until the duration time is over If the S...

Page 49: ...le can be accumulated after reaching gross weight 0 or net weight 0 Duration Time 1 10 s It is the time for the display to remain the dynamic weighing result after the load is removed 4 5 2 Average Ti...

Page 50: ...3 Off Underload Overload Discrete Output 4 Off Underload Overload Note The I O s setup will only work when the I O Option board has been installed See the Accessory list in section 9 4 for informatio...

Page 51: ...able Only menu item and allow unstable print 1S Turn on Stable Only menu item and only print stable print xP Interval Print x Print Interval 1 50000 sec 0P turns auto print OFF Z Same as pressing Zero...

Page 52: ...d characters Wrap lines Verify communication by pressing the Print button If HyperTerminal is set up properly the value on the display will be displayed in the window 5 4 Connecting to a Serial Printe...

Page 53: ...e printout string has a fixed length of 28 characters Each Space field is a delimiting space used to separate the other fields The Weight1 field is 4 right justified characters If the value is negativ...

Page 54: ...to a new card 2 Use ScaleMate software version 2 1 0 or higher to read all files in the Library File Name and Directory File Name Directory Library Weighing WeightLib txt D5000 Library Counting CountL...

Page 55: ...Press Softkey corresponding to the icon The length of PN and Name is up to 32 digits of alphanumeric characters Search Library Press the Softkey corresponding to the icon Enter PN code by alphanumeric...

Page 56: ...The supervisor just can new edit delete operator The operator has no right to new edit delete any user it just can recall library User Login If there is a user in the user profile it will show a logi...

Page 57: ...e first user must be admin user The user name is unique Search a User Press the Softkey corresponding to the icon to search the user Input the User Name using the numeric key Press soft key to confirm...

Page 58: ...ser can t be delete Supervisor Authority The admin user can set the authority of the supervisor as following Password Rule The password has a period of validity A password change notification will sho...

Page 59: ...fields include ID number a stable reading tare weight date and time will be stored in Alibi memory User can browse or search the Alibi record and the Alibi record contains the following information I...

Page 60: ...is the responsibility of the purchaser to ensure that all pertinent legal requirements are met 7 1 Settings Before verification and sealing perform the following steps 1 Verify that the menu settings...

Page 61: ...TD52XW Paper Seal 8 MAINTENANCE CAUTION DISCONNECT THE UNIT FROM THE POWER SUPPLY BEFORE CLEANING 8 1 Model T52P Cleaning The housing may be cleaned with a cloth dampened with a mild detergent if nece...

Page 62: ...need to be set to the Off position Error 8 1 Weight reading exceeds Power On Zero limit Remove load from scale Recalibrate scale Error 8 2 Weight reading below Power On Zero limit Add load to scale R...

Page 63: ...Ounce Pound Ounce Tonne Metric Tonne Ton Short Ton Custom Weighing modes Basic weighing Percent weighing Piece Counting with Optimized APW Animal weighing Dynamic weighing Check weighing Display Dot m...

Page 64: ...ace USB Host 30424021 Light Tower Kit 3 Colors OHAUS 30424022 In use cover Kit TD52P 30424023 In use cover Kit TD52XW 30424026 Wall Mount Kit SST 30424027 Wall Mount Kit CS 30424409 Extension cable 9m...

Page 65: ...Defender 5000 Indicators EN 63 9 3 Drawings and Dimensions TD52P TD52XW...

Page 66: ...4 13 13 12 12 11 42 19 43 26 17 16 16 15 15 14 14 13 13 12 12 43 26 44 32 17 17 16 16 15 15 14 14 13 13 12 44 32 45 38 18 17 17 16 16 15 15 14 14 13 13 45 38 46 45 18 18 17 17 16 16 15 15 14 14 13 46...

Page 67: ...tion the user of the weighing instrument must strictly observe the re verification period and inform the weights and measures authorities As verification requirements vary by jurisdiction the purchase...

Page 68: ...rective this device has been designed for safe removal of the batteries at end of life by a waste treatment facility Please dispose of this product in accordance with local regulations at the collecti...

Page 69: ...ed 2 Status bytes A B and C Refer to Table 5 2 Table 5 3 and Table 5 4 for details of the structure 3 Displayed weight Either gross or net weight Six digits no decimal point or sign Insignificant lead...

Page 70: ...lb 0 kg 1 see also Status Byte C bits 0 1 2 Bit 5 Always 1 Bit 6 Zero Not Captured after power up 1 Table 5 4 Status Byte C Bit Definitions Bits 2 1 and 0 Weight Description 2 1 0 0 0 0 lb or kg sele...

Page 71: ...t stable weight value P102 Print out current weight value immediately SIRU Send weight value in the current unit immediately and repeat SIU Send weight value in the current unit immediately SNR Send s...

Page 72: ...has been damaged by accident or misuse exposed to radioactive or corrosive materials has foreign material penetrating to the inside of the product or as a result of service or modification by other th...

Page 73: ...emarks of OHAUS Corporation in the United States and or other countries 30430958 P N 30430958A 2018 OHAUS Corporation all rights reserved 99 Washington Street Melrose MA 02176 Phone 781 665 1400 Toll...

Reviews: