background image


How to Connect a C-Nav3050 to C-Setup / 
C-Monitor / C-Scape. 


Revision 3


Page 25 of 42


5/5/2017 


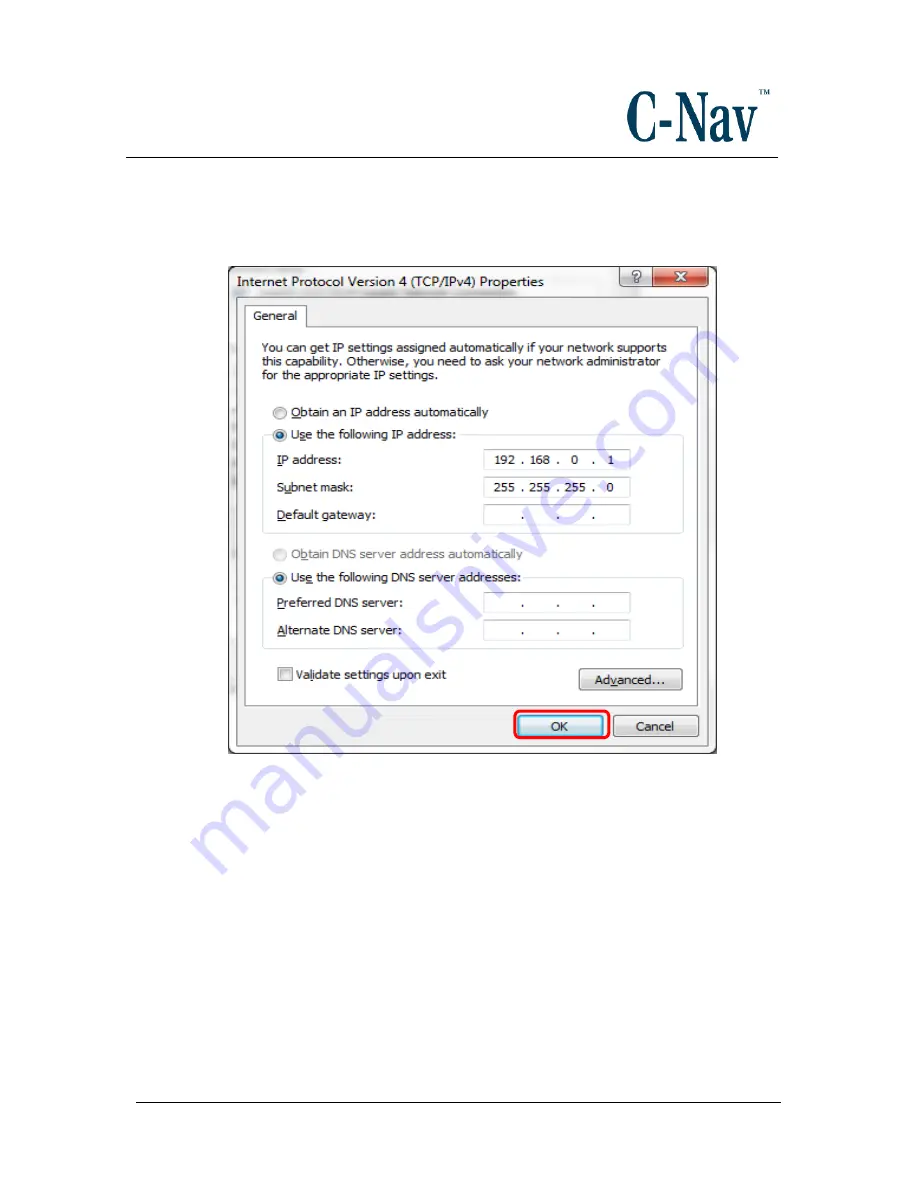
9.  Enter the IP address for the PC. In this case, enter 

192.168.0.001

. For the two 

devices to establish a connection they need to have the first three segments of 
numbers in the IP address to be the same.  


10. Press the Tab button on the keyboard. The 

Subnet mask 

is automatically 

populated.  


11. Click the 

OK


button on this dialog box and also on the 

Local Area Connection 

dialog box.  


Now connect the Positronic 9-Pin connector of the Ethernet cable (P/N 94-
310265-3006LF) to COM1 

– LAN of the C-Nav3050®. Connect the RJ45 plug 

end to an available Ethernet port on the PC. 


Summary of Contents for C-Nav3050

Page 1: ...o Connect a C Nav3050 to C Setup C Monitor and C Scape Revision 2 Revision Date April 13 2017 Oceaneering International Inc C Nav World DGNSS 730 E Kaliste Saloom Road Lafayette LA 70508 U S A www cna...

Page 2: ...s is the April 2017 release of the C Nav How to Connect a C Nav3050 to C Setup C Monitor C Scape Revision History 2 04 13 2017 Updated for C Nav OII branding changes J Hall 1 05 24 2016 Document split...

Page 3: ...NC HARDWARE SOFTWARE FIRMWARE AND DOCUMENTATION IS WITH YOU SOME STATES DO NOT ALLOW THE EXCLUSION OF IMPLIED WARRANTIES SO THE ABOVE EXCLUSION MAY NOT APPLY TO YOU Limitation of Liability IN NO EVENT...

Page 4: ...emarks 3 Disclaimer of Warranty 3 Limitation of Liability 3 Table of Contents 4 Manual Organization 5 Manual Conventions 6 Section 1 Overview 7 Introduction 7 Section 2 Serial Connection 8 Section 3 U...

Page 5: ...along with a section for installing the programs required Section 2 Serial Connection Page 8 Details how to connect the receiver to control display unit via the serial connection Section 3 USB Connect...

Page 6: ...used for captions ARIAL BLACK ALL CAPS font is used for port connection names This symbol means Reader Be Careful It indicates a caution care and or safety situation The user might do something that...

Page 7: ...upport section http www cnav com support C Setup is a free to use software package whereas C Monitor and C Scape require the purchase of a dongle This dongle must remain and be recognized by one of th...

Page 8: ...es with regards to which cable is appropriate for each COM port on the receiver Once these cables are attached to the C Nav3050 unit it is possible to choose either cable to control the unit via an av...

Page 9: ...dow which is specific to the receiver attempting to be connected to C Setup C Monitor Next select Connect Port or File Connect Port 4 Determine the COM port for the PC the C Nav3050 has been connected...

Page 10: ...f a USB to serial adapter is used in this connection the same procedures above still apply However it will be important to determine which COM port has been assigned to the device in the Device Manage...

Page 11: ...he Speed Data Bits Parity and Stop Bits Press Open The user should now witness a Device Window full of information similar to the image on the next page 8 If all settings are according to the defaults...

Page 12: ...se reset settings to defaults and email C Nav Support at the below address at your earliest convenience for troubleshooting assistance support cnav com A successful connection will look similar to the...

Page 13: ...stallation folder for C Setup C Monitor If it is the first time a connection has been attempted via USB for this receiver it may be necessary to set the USB Mode settings on the receiver prior to atte...

Page 14: ...USB DB9S 232 422 P N NAV94 310273 3006LF Windows will then proceed to search for the driver This will cause a new device to be added to the Device Manager in Control Panel Under Ports COM LPT there sh...

Page 15: ...er and select Update Driver Software 2 Next select Browse my computer for driver software 3 Specify the location of the C Nav3050 _USB inf file by clicking Browse selecting it from the appropriate dir...

Page 16: ...Page 16 of 42 5 5 2017 4 A pop up box may appear stating that Windows can t verify the publisher of this driver software Click the Install this driver software anyway option The driver should now be...

Page 17: ...al serial port assigned to it COM8 in this example Now connect to the device following the same instructions as for the Section 2 Serial Connection Page 8 section making sure to select the virtual ser...

Page 18: ...rucial to successful connection but provide a means of identification when multiple devices are added Press Add when finished 3 On the Device Window select Connect Port or File Connect Port to bring u...

Page 19: ...How to Connect a C Nav3050 to C Setup C Monitor C Scape Revision 3 Page 19 of 42 5 5 2017...

Page 20: ...now be in effect This can be confirmed by the display of Quality Panel and Position Information Please note Each new receiver connected to the PC will require the USB driver process to be completed fo...

Page 21: ...ce on the end of the Y cable shown below Y Cable Positronic 9 Pin Male to RJ45 DB9S 1PPS P N 94 310272 3006LFB Two types of Ethernet connections exist between the C Nav3050 and C Setup C Monitor contr...

Page 22: ...h as USB or a serial COM port For more information on this please refer to the Section 2 Serial Connection section Page 8 or Section 3 USB Connection Page 13 2 Once connected navigate to the following...

Page 23: ...the Virtual Ports will need to be configured to allow a connection The Configure Port button is used to configure any of the 4 virtual Ethernet ports 3 Copy the settings in the below screenshot then...

Page 24: ...he C Nav3050 In Windows 7 locate the Network and Sharing center menu under View the active networks the Local Area Connection Equivalent can be found click it and proceed to step 1 5 Click Properties...

Page 25: ...he first three segments of numbers in the IP address to be the same 10 Press the Tab button on the keyboard The Subnet mask is automatically populated 11 Click the OK button on this dialog box and als...

Page 26: ...ure the receiver for a Non Direct Over a network Ethernet connection 1 Connect the Positronic 9 Pin connector of the Ethernet cable P N 94 310265 3006LF to COM1 LAN of the C Nav3050 Connect the RJ45 p...

Page 27: ...it can talk to any device in the IP range 10 6 1 XXX 5 Once an automatic IP address for the C Nav3050 has been established use this IP information to set it back to a static type IP address by selecti...

Page 28: ...o Connect a C Nav3050 to C Setup C Monitor C Scape Revision 3 Page 28 of 42 5 5 2017 6 To confirm the receiver is set in manual mode confirm the bold text field next to the drop down shows Manual not...

Page 29: ...nd using Command Prompt CMD 7 Open a command prompt window and type ipconfig all adapter settings are displayed You can find your IP from the active adapter as shown below Please note It is recommende...

Page 30: ...ould be viable This will need to be entered into the Virtua Ethernet Ports menu to facilitate a two way connection 1 Select ETH1 and click Configure Port Please note If the port is already enabled i e...

Page 31: ...42 5 5 2017 2 Using the example IP found earlier the TCP connection would be configured as below 3 Confirm the settings by pressing OK Then return to the ETH1 configuration to enable the port press O...

Page 32: ...a new device of type C Nav 3050 2 Connect to the device using the settings assigned to the 3050 under Ethernet configuration s configuration section See below example Press OK In this example the C N...

Page 33: ...the least reliable means of communication is generally not recommended for permanent control of the unit it is instead better for output to non crucial systems Please not that depending on device hard...

Page 34: ...ing to the desired pin and the pin will display above the entry box 4 The receiver is now ready to Pair with the connecting device e g a computer The device is now ready to pair with the secondary dev...

Page 35: ...Setup C Monitor C Scape Revision 3 Page 35 of 42 5 5 2017 The following example of pairing a device will show how to pair the C Nav3050 with a personal computer 1 Turn on Discovery mode by allowing ot...

Page 36: ...onnect a C Nav3050 to C Setup C Monitor C Scape Revision 3 Page 36 of 42 5 5 2017 2 Now it is possible to Pair the personal computer to the C Nav3050 device This can be done in the Control panel Add a...

Page 37: ...C Scape Revision 3 Page 37 of 42 5 5 2017 3 The Add a device feature will search for any devices it can find with correct conditions it should find the C Nav3050 device Select it the press Next 4 Sele...

Page 38: ...How to Connect a C Nav3050 to C Setup C Monitor C Scape Revision 3 Page 38 of 42 5 5 2017 5 Enter the pairing code then press Next...

Page 39: ...How to Connect a C Nav3050 to C Setup C Monitor C Scape Revision 3 Page 39 of 42 5 5 2017 The device should then successfully pair with the computer...

Page 40: ...How to Connect a C Nav3050 to C Setup C Monitor C Scape Revision 3 Page 40 of 42 5 5 2017...

Page 41: ...C Scape Revision 3 Page 41 of 42 5 5 2017 The device will now appear in devices and printer or in the device manager To find out the serial port it has been assigned right mouse click the icon and se...

Page 42: ...ontrolled via Bluetooth using either C Setup C Monitor 1 Create a new device using File New Select a device type of 3050 then name the Device something suitable 2 Next make a connection using the COM...

Reviews: