background image

1-4

L

ayout

 & I

nstaLLatIon

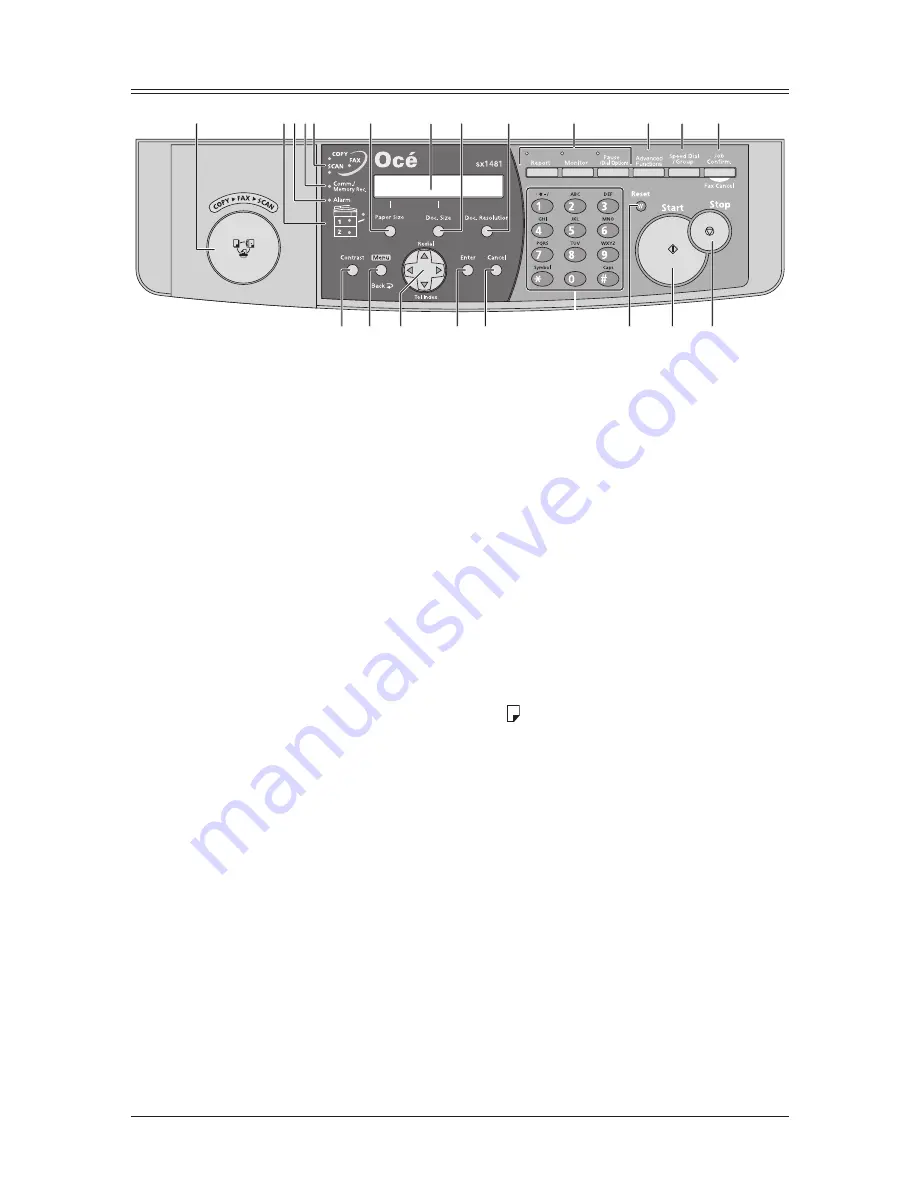
Control panel overview

1

2 3 4 5

6

7 8

9

10 11 12

13 14

15

16 17 18

19

20

21

22

  1 

Mode switch button 

Press this button to switch the machine’s mode.

  2 

Paper source light 

Indicates the selected paper source.

  3 

Alarm light 

Glows when a errors occurs.

  4 

Comm. /Memory Rec. light 

Blinks when the machine is communicating with another machine. 

Glows when the machine has received documents into memory.

  5 

Machine mode light 

Indicates what mode the machine is in.

  6 

Paper Size  

Selects the paper you want to use for copying.

  7 

LCD (Liquid crystal display) 

Shows messages and selections prompted during operation.

  8 

Doc. Size

Instructs the machine to scan Auto*, Letter, Half-letter   or Legal size documents.
* When you select “Auto”, custom size documents (up to 35.43 in. (900 mm) in length) can be auto-

matically scanned.

  9 

Doc. Resolution 

Selects the fax and copy resolution.

 10 

Contrast 

Adjusts the scanning contrast level.

 11 

Menu /Back 

Accesses machine settings.  Also, it allows you to go back to the previous menu level.

 12 

Cursor keys 

<

p

>(Redial):  Scrolls through recently dialed numbers (see page 4-6).

    <

q

>(Tel Index):  Displays one-touch and speed-dial entries which are sorted alphanumerically, 

similar to a phone directory (see page 3-11).

    In copy and scan mode —
    <

p

> <

q

>:  Adjusts the zoom ratio.

 13 

Enter 

Selects or confirms settings.

 14 

Cancel 

Deletes characters on the LCD and cancel commands you have entered into the machine.

Summary of Contents for sx1481

Page 1: ......

Page 2: ...ers This PDF manual is included on the GDI Printer Scanner Driver CD supplied with your machine To order supplies Call the Oc Copier Printer Supply Line at 1 800 462 6797 To speak to a technical suppo...

Page 3: ...ayout Installation Getting started Auto dialer Sending faxes Receiving faxes Using the F code box feature Copying Special features Restricting Machine Access User settings Report Lists Maintenance Tro...

Page 4: ...d adjusting the paper size setting 1 10 Adjusting the speaker volume 1 11 Initial setup 1 12 Clearing stored settings 1 12 Getting started 1 12 Specifying initial settings 1 13 Using the Energy Save m...

Page 5: ...ng or canceling commands 4 7 To review or cancel command 4 7 Reviewing or canceling parts of a broadcast 4 8 Printing a delayed command list 4 8 Printing a stored document 4 8 View or print the result...

Page 6: ...ent and paper handling 7 2 Changing your machine to the copy mode 7 2 Display in the copy standby mode 7 2 Memory overflow message 7 2 Making copies 7 3 Making copies 7 3 Basic copy settings 7 4 Selec...

Page 7: ...ings 10 8 Accessing the scanner setting 10 8 Chapter 11 Report Lists 11 1 Table of the lists and journal 11 2 Activity journal 11 4 Setting the activity journal 11 4 Printing an activity journal manua...

Page 8: ...ors CD 12 20 Print quality problems 12 21 If you cannot solve the problem 12 23 Appendix Index AI 1 Specifications AI 2 General AI 2 Fax AI 3 Copy AI 3 Printer AI 3 Scanner AI 4 Consumable items AI 4...

Page 9: ...njury or dam age to properties if you handle the machine incorrectly For safe operation please follow instructions carefully IMPORTANT Describes important conditions or restrictions you should careful...

Page 10: ...ils If the product causes harm to the telephone network the telephone company will notify you in advance that temporary discontinuance of service may be required If advance notice isn t practical the...

Page 11: ...to Part 15 of the FCC Rules These limits are designed to provide reasonable protection against harmful interference when the equipment is operated in a commercial environment The product equipment ge...

Page 12: ...normal dual access allows you to do two things at once QuadAccess allows you to do four operations at once For example even if the machine is 1 printing a copy 2 transmitting from memory and 3 scannin...

Page 13: ...eration secure an adequate installation space around the machine 28 1 inches 713 mm 32 inches 813 mm 33 6 inches 853 mm 29 6 inches 753 mm 2 inches 50 mm 2 inches 50 mm 30 4 inches 772 mm 34 3 inches...

Page 14: ...r unit and the area around it inside the machine are extremely hot To avoid getting burned DO NOT TOUCH Do not burn toner cartridges Exposure to an open flame can cause the toner cartridge to burn or...

Page 15: ...ausing serious injury Please dispose of used toner and drum cartridges in accordance with local regulations Keep toner and other consumables out of the reach of small children If a child should ingest...

Page 16: ...in your eyes or mouth immediately flush with cold water an d consult a physician Be careful not to stain your hands or clothes with the toner If your hands or clothes get stained wash them immediately...

Page 17: ...fornia USA only This Perchlorate warning applies only to primary CR Manganese Dioxide Lithium coin cells Perchlorate Material special handling may apply See www dtsc ca gov hazard ouswaste perchlorate...

Page 18: ...This page intentionally left blank...

Page 19: ...Installing the drum and toner cartridges 1 8 Plug in and power up 1 10 Loading paper and adjusting the paper size setting 1 10 Adjusting the speaker volume 1 11 Initial setup 1 12 Clearing stored sett...

Page 20: ...this book 2 Safety Information 3 Paper size label 4 One touch key label 5 Soft key label 6 Service Supplies call label 3 4 1 5 2 6 NOTE The appearance of the AC power cord and telephone line cable var...

Page 21: ...pass tray Automatic document feeder ADF Control panel Paper cassette 2nd paper cassette Option 1st side cover 2nd side cover Front cover Paper level Indicator Document guides Document tray Document ex...

Page 22: ...during operation 8 Doc Size Instructs the machine to scan Auto Letter Half letter or Legal size documents When you select Auto custom size documents up to 35 43 in 900 mm in length can be auto matica...

Page 23: ...a pre registered fax or phone number Also press this key twice and enter a group number to perform group dialing 18 Job Confirm Fax Cancel Cancel or review fax jobs or review the results of a fax tra...

Page 24: ...line connection Attach the supplied ferrite core to the telephone line cable as illustrated below Plug the telephone line cable into the LINE jack and the other end to the wall jack LINE PHONE 1 PHON...

Page 25: ...he screws supplied with the cradle Then plug the handset cord into the PHONE 1 jack of your machine LINE PHONE1 PHONE2 LINE PHONE1 PHONE2 2 10 2 10 0 spacer handset cradle Connecting an external phone...

Page 26: ...elease lever to open the side cover 2 Open the front cover 3 Turn the toner cartridge locking lever to the left unlock position 4 Unpack the drum cartridge from its carton and slide it into the machin...

Page 27: ...ds gently shake it to distribute the toner evenly inside the cartridge NOTE Do not touch the roller of the toner cartridge 6 Slide the toner cartridge into the machine firmly until it locks into place...

Page 28: ...he power switch The markings are international standards I means on O means off It will take a few seconds for the machine to warm up The machine will show Warming up NOTE While the power is on the sc...

Page 29: ...14 A L ayout I nstallation Adjusting the speaker volume 1 Press copy4fax4scan to switch the machine to the fax mode Fax Ready Dec 15 2007 1 30pm 2 Press Monitor Tel Mode 3 Press t or u to adjust the v...

Page 30: ...by law to indicate your name and fax number on every fax you send You must therefore store your name or company name and fax number in your machine before using it Every fax page you send arrives at...

Page 31: ...04 15 08 13 30 Day 5 Use the numeric keys to enter the correct date in the MMDDYY format and time in the 24 hour format For instance to set 1 30 PM on April 15 2008 press 0415081330 To change a digit...

Page 32: ...se the numeric keys to enter your fax number This number can contain up to 20 digits including and To enter a symbol before your country code Press Pause Dial Options To enter the hyphen to make long...

Page 33: ...you to set the default TTI to be shown at the top of faxes you send Usual TTI TTI 1 Enter 27 Press q or p to select TTI 1 TTI 2 or TTI 3 28 Press Enter to save the setting and continue Idle time sett...

Page 34: ...cover from Energy Save mode press any key on the control panel When your machine receives a fax message during energy save mode the machine will wake up To change the Energy Save mode setting 1 Press...

Page 35: ...13 14 A L ayout I nstallation Installing drivers CD To use your machine as a printer or a scanner install the drivers on the supplied CD to your computer For further information of installing printer...

Page 36: ...1 18 Layout Installation This page intentionally left blank...

Page 37: ...2 Switching the machine mode 2 2 Entering characters 2 2 Backup memory 2 3 Selecting a function 2 4 Function table 2 5 Document and paper handling 2 10 Document handling 2 10 Paper handling 2 12 Chapt...

Page 38: ...smission When programming any function settings Entering characters Certain settings allow you to enter characters for your TTI your name remote fax s name or others To enter letters or other characte...

Page 39: ...ou want to enter using the t u p or q keys 3 To enter a character press Enter 4 If you want to enter another character repeat steps 1 to 3 Otherwise go to next step 5 Press Enter to save it Editing ch...

Page 40: ...1 then 0 the numeric key zero then 1 then Enter Searching for a function using the cursor key Even if you don t remember the exact commands needed for an operation you can search for and enter the fun...

Page 41: ...Settings 01 Cassette Size Sets paper size for the paper cassette Ltr Legl HLtr 2 16 02 Protect Passcode Sets the passcode for using the security features 9 2 03 Soft Key Assigns a function to a soft k...

Page 42: ...ntrast Super fine resolution Normal Fine S Fine Gray Lightest Light Normal Dark Darkest 400dpi 600dpi 10 5 02 Print Parameters You can set the following settings for fax reception Reduction rate Reduc...

Page 43: ...13 5 Sort Copy Turns copy sorting on off Off On 10 7 6 Combine Turns combine copy on off Off On 7 8 10 7 7 Resolution Sets the copy resolution 600 dpi 300 dpi 7 9 10 8 8 Copy Charge Sets the copy cha...

Page 44: ...be retrieved by other F code compatible fax machine 6 8 2 Erase Document 1 Polling Document Erases a document stored for polling transmission 4 17 2 F Code Document Erases a document stored in the F c...

Page 45: ...e boxes 11 3 14 F Code Doc List Prints the list of documents stored in the F code boxes 11 3 15 Batch Box List Prints the list of batch boxes 11 3 16 Batch Doc List Prints the list of documents stored...

Page 46: ...t 35 0 to 128 0 g m2 52 0 to 105 0 g m2 Thickness 0 05 to 0 15 mm 0 07 to 0 12 mm Document type Plain paper Plain paper In the real time transmission with super fine resolution 8 5 14 in 216 356 mm Th...

Page 47: ...The scanned area is shown below Letter Legal Fax 8 2 in 208 mm Copy 8 5 in 216 mm Fax 0 08 in 2 0 mm Copy 0 in 0 mm Fax 0 1 in 2 5 mm Copy 0 in 0 mm Scanned area Loading documents in the ADF 1 Insert...

Page 48: ...nting only A5 sized paper cannot use for PC printing but A5 is available Do not use envelopes with double flaps or pressure seals since these do not feed prop erly If using a transparency OHP film be...

Page 49: ...in 3 mm Printable area Loading paper into the paper cassettes NOTE After you load paper into the paper cassettes you need to set the paper size you loaded See Setting of the paper size on page 2 16 1...

Page 50: ...jams do not refill this paper cassette without first removing any remaining paper In other words do not just add sheets to an already loaded stack 5 Pinch the side paper guide and adjust to the width...

Page 51: ...ncy film or custom sized paper use the bypass tray NOTE Only use print media specified under Acceptable paper size on page 2 12 to avoid paper jams and print quality problems 1 Open the bypass tray on...

Page 52: ...the correct paper size by using the following procedure 1 Press Menu 2 1 0 1 Enter 1st Cassette Ltr Enter 2 Press q or p to select the paper size you will use in the first cassette 3 Press Enter If yo...

Page 53: ...a one touch number 3 5 How to dial using a one touch key 3 6 Speed dial numbers 3 7 Adding or editing a speed dial number 3 7 Erasing a speed dial number 3 7 How to dial using a speed dial number 3 8...

Page 54: ...1 and 160 160 Call groups Call groups are sets of fax numbers that make it easy to send the same fax message to several locations Your machine can store up to 200 numbers in each group with up to 32 g...

Page 55: ...wait for another dial tone or signal at any point in the dialing sequence enter a pause You can change the pause length see page 10 6 Press Pause Dial Optitons soft key once Makes long numbers easier...

Page 56: ...the cursor and press Cancel to erase the number Then enter the correct digit 5 Press Enter 01 Name Upper _ 6 Use the numeric keys to name the one touch key The name can hold up to 24 characters Regar...

Page 57: ...5 Press Enter 01 Name Upper _ 6 Use the numeric keys to name the one touch key The name can hold up to 24 characters Regarding how to enter the character see Entering characters on page 2 2 To change...

Page 58: ...y4fax4scan 2 Place the document on the ADF 3 Adjust the document resolution and contrast 4 Open the one touch key panel and press the desired one touch key One touch phone dialing NOTE To connect an e...

Page 59: ...ber 5 Press Enter 001 Name Upper _ 6 Use the numeric keys to enter the speed dial name The name can hold up to 24 characters Regarding how to enter characters see Entering characters on page 2 2 To ch...

Page 60: ...al No S_ 5 Use the numeric keys to enter the three digit identifier for the speed dial number The machine will show the name or fax number you have stored Sales division S001_ 6 Press Start Phoning vi...

Page 61: ...t to store into the call group by pressing the one touch key or Speed Dial Group followed by three digit code A comma will automatically be inserted between each number 01 Sales division 01 03 S001_ I...

Page 62: ...erase another call group repeat the procedure from step 2 Otherwise press Reset to exit and return to the standby mode How to dial using a call group Press this key twice Enter group number Press Star...

Page 63: ...age 1 7 2 Press q Tel Index The machine shows the first listing in your phone directory Telephone Index A Asian partner 01 The phone directory sorts entries in the following order 1 alphabetically 2 n...

Page 64: ...ne of the following occurs It successfully reaches the other number It has attempted the maximum number of redials and has still not connected If it was a regular phone call You will have to redial ma...

Page 65: ...mands 4 7 To review or cancel command 4 7 Reviewing or canceling parts of a broadcast 4 8 Printing a delayed command list 4 8 Printing a stored document 4 8 View or print the results of fax transactio...

Page 66: ...esolution repeatedly to select the resolution Scanning contrast Setting the scanning contrast allows you to compensate for any excessive lightness or dark ness as the case may be of the document pages...

Page 67: ...the soft key assigned to Monitor 1 or using an external telephone handset When the machine s memory is full In real time transmission the next page will not scan until the current page has been transm...

Page 68: ...art you have given your machine a command This command number appears on the first line of the LCD for a few seconds You will need to know this command number if you want to cancel the transmission or...

Page 69: ...er Then select Off and press Enter to turn off the memory transmis sion or If you assigned Memory Tx to a soft key see page 8 2 turn off the memory transmission by simply pressing that key NOTE Monito...

Page 70: ...t line of the LCD Auto Redial Apr 15 2008 1 30pm You can change the redial time and interval settings see Fax settings on page 10 5 If you want to end the redial procedure delete the redial command of...

Page 71: ...number and the phone number it will dial Here you see Command No 01 and the number it s set to dial If the command is to send a broadcast see page 4 11 Broadcast appears instead of the phone number I...

Page 72: ...cel twice If you want to cancel a different number go back to step 5 If you want to go back to reviewing or canceling another command press t To stop reviewing or canceling commands press Reset Printi...

Page 73: ...04 15 13 30 Starting date and time MM DD HH MM format Result of fax transaction OK Transaction was successful Error code Transaction failed see pages 12 17 to 12 18 NOTE You can print the result of a...

Page 74: ...Dial Opt Used to enter a dialing character 3 3 Delayed Used to make a delayed transmission 4 12 Batch Tx Stores a document for batch transmission 4 13 Select TTI Used to select the TTI or to disable...

Page 75: ...d Broadcast to a soft key page 8 2 simply press that key 4 Enter the first fax number as usual Use either a one touch key a speed dial number a call group or a regular number dialed from the numeric k...

Page 76: ...ne shows the current day of the month followed by the current time in 24 hour format Delayed Enter Time 27 14 15 5 Use the numeric keys to enter the day of the month and the time when in which you wan...

Page 77: ...were performing a transmis sion The number can be up to 40 characters in length To change a number press t or u to move the cursor press Cancel to erase the number Then enter the correct number 5 Pres...

Page 78: ...nter Batch Tx Enter or If you assigned Batch Tx to a soft key page 8 2 simply press that key 3 The machine shows the following display Select Batch Box 1 111 1111 4 Use the q or p to select the batch...

Page 79: ...e before proceeding see Erasing a document stored in a batch box above To erase an empty batch box 1 Press Menu 3 5 2 then Enter Select Batch Box 1 9 5551023 2 Use the numeric key to enter the batch b...

Page 80: ...transmission Also you can tell the machine whether or not to send the TTI information IMPORTANT In some countries you are required by law to indicate your name and fax number on every fax you send 1 P...

Page 81: ...eception mode on page 5 2 3 Place the document on the ADF and adjust the fax resolution and contrast 4 Press Menu 4 1 1 then Enter Your machine will scan the document into memory and return to the sta...

Page 82: ...nceled This feature does not work for polling page 4 17 or F code bulletin box polling page 6 8 NOTE If you assign Fax Copy to a soft key page 8 2 you can turn the Fax Copy on or off by simply pressin...

Page 83: ...fax number you have entered in the Initial settings page 1 13 to 1 15 will be pre populated in the cover page automatically NOTE If you assigned Cover Page to a soft key page 8 2 you can turn the cov...

Page 84: ...key as default Sending faxes with the Dial prefix feature To dial using the numeric keys 1 Place the document on the ADF 2 Press Advanced Functions repeatedly until Dial Prefix N appears then press E...

Page 85: ...e line module is attached Polling Real time transmission Setting the e mail gateway feature 1 Press Menu 2 2 1 9 Enter E mail Gateway Off Enter 2 Use the cursor key to select On then press Enter E mai...

Page 86: ...n also set it On by pressing Advance Functions repeatedly 4 Specify the destination 5 Press Start NOTE To cancel the transmission press Stop while the machine is scanning a docu ment Once the machine...

Page 87: ...lly 5 4 Switch between the automatic or manual reception mode 5 4 If the paper runs out during fax reception 5 5 Settings for fax reception 5 6 Setting the number of rings 5 6 Print settings 5 6 Advan...

Page 88: ...f you assigned Auto Rx to a soft key page 8 2 you can toggle between Manual reception Tel Ready and Automatic reception you have set by pressing that key Manual reception mode Tel Ready mode Use it if...

Page 89: ...the default setting is twice If you don t answer the call while ringing your machine answers the call automati cally If a caller sends a fax your machine begins receiving it If a voice call comes in y...

Page 90: ...s will wait several seconds to hear reception tones from your machine you have about 30 seconds to walk to your machine and press Start Switch between the automatic or manual reception mode 1 Make sur...

Page 91: ...t of paper reception If your machine runs out of paper it stores up to 250 fax receptions in its memory This is called out of paper reception Once you refill the paper supply the machine prints the st...

Page 92: ...to Automatically reduces printouts at variable rates down to a mini mum of 50 Tries to reduce printout to fit on one sheet of your selected paper size If it cannot print the image at 100 size on two o...

Page 93: ...just the print settings Default setting Rx reduction rate Auto Reduction margin 40 mm Half page reception Off Paper save Off 1 Press Menu 2 2 0 2 then Enter The machine shows the current reduction rat...

Page 94: ...ok dialing Pause Dial Opt Enters the special dialing character 3 3 Delayed Used to make a delayed transmission 4 12 Batch Tx Stores a document for batch transmission 4 13 Select TTI Used to select the...

Page 95: ...machine With Block Junk Fax activated your machine would reject faxes from these machines Access codes can cause confusion If an autodialer entry ends with extra codes such as long distance codes Blo...

Page 96: ...a number from the list 1 Press Menu 2 2 1 0 then Enter Block Junk Fax Mode2 Enter 2 Press Enter Select BlockJunk No 01 5553038_ 3 Press q or p until you see the number you want to clear 4 Press Cance...

Page 97: ...ular polling 1 Make sure the document is inserted in the remote fax machine 2 Press Advanced Functions until Polling appears on the LCD then press Enter Use q or p to select On Polling On Enter or If...

Page 98: ...fer rule You can make up to 10 transfer rules 1 Press Menu 3 6 2 then Enter Select Fax Forward 01 No Number Stored 2 If you set up a transfer rule at your first time skip to step 4 If you have already...

Page 99: ...t Off Enter Automatic printing determines whether the machine will print a document automati cally upon receiving it On A copy of every document received and transferred is printed at your machine Off...

Page 100: ...elect the paper source for the separator page using the cursor key 5 Press Enter Print on S Page Off Enter Determine if the separator page will be printed blank or not If you wish that the separator p...

Page 101: ...n empty F code box 6 7 Storing a document in a bulletin box for polling 6 8 Printing a document stored in a bulletin box 6 9 Erasing a document stored in a bulletin box 6 9 Printing a document receive...

Page 102: ...d Box Name You can assign an identifier name for the F code box a name can be up to 16 characters in length Sub address This is the ITU T sub address need to perform the F code fax transac tion a sub...

Page 103: ...numeric keys An F code box s name can be stored up to 16 characters Regarding how to enter characters see Entering characters on page 2 2 To change a name press t or u to move the cursor press Cancel...

Page 104: ...dditional settings Auto print and Over write Doc below Press q or p to select On or Off then press Enter Go on to the next one Auto Print Determines whether to print a received document This setting a...

Page 105: ...the received documents Enter Relay Number _ 14 Press the one touch key or press the Speed Dial Group followed by the three digit identifier to enter the fax number You cannot use the numeric keys to...

Page 106: ...0 If you choose this you will have to delete documents manually 21 Press Enter 22 The machine asks for your F code box s four digit security I D code 01 Set F Code Box Enter I D Code 0000 This code pr...

Page 107: ...this happens print all documents in that box before erasing it To erase an empty F code box 1 Press Menu 3 4 2 then Enter Select F Code Box 01 Bulletin box 1 2 Press q or p to select the F code box yo...

Page 108: ...ox you can skip to step 6 5 Use the numeric keys to enter the four digit I D code 6 Press Enter Overwrite Doc Off Enter On The document currently stored in the box will be replaced with a new scanned...

Page 109: ...the chosen document then returns to the standby mode Erasing a document stored in a bulletin box 1 Switch to the fax mode by pressing copy4fax4scan 2 Press Menu 4 2 2 then Enter Select F Code Box 01 B...

Page 110: ...ur machine automatically erases it To print a received documents 1 Switch to the Fax mode by pressing copy4fax4scan 2 Press Menu 4 3 2 then Enter Select F Code Box 01 Security box 3 Press q or p to se...

Page 111: ...x 5 Use the numeric keys to enter the ITU T password Then press Enter If you do not need to enter ITU T password press Enter without entering any num ber Enter Fax Number _ 6 Enter the fax number You...

Page 112: ...password on their F code box 4 Use the numeric keys to enter the ITU T password Then press Enter If you do not need to enter the ITU T password press Enter without entering any number Enter Fax Number...

Page 113: ...tandby mode 7 2 Memory overflow message 7 2 Making copies 7 3 Making copies 7 3 Basic copy settings 7 4 Selecting the document type 7 4 Scanning the contrast 7 4 Zoom ratio 7 4 Number of copies 7 5 So...

Page 114: ...hange the settings refer to Basic copy settings on page 7 4 Memory overflow message If you have stored too much information in your machine s memory a Memory Over flow message will appear on the LCD M...

Page 115: ...o Ltr 100 2 Place your document face up on the ADF and adjust the document guides to the docu ment size 3 As needed set the copy settings including the document type and scanning contrast number of co...

Page 116: ...ontrast Setting the scanning contrast allows you to adjust the excessive light or darkness of the document pages you are copying To change the contrast setting 1 Press Contrast Set Contrast Light Dark...

Page 117: ...order To make sorting copy available Press Advanced Functions once and press Enter And turn on Sort Copy using the cursor key and press Enter To turn off the sorting copy Press Advanced Functions agai...

Page 118: ...er Size Next Doc The LCD toggles the paper size in the 1st cassette in the 2nd cassette if installed and on the bypass tray 01 Legl Legl 100 01 Ltr Auto 100 Copy Ready 01 Auto Auto 100 If the bypass t...

Page 119: ...ions 3 Press q p or Advanced Functions repeatedly to select the function Then press Enter The table below lists the advanced functions that can be used in copy mode and their order of display Refer to...

Page 120: ...sure the machine is in the copy mode 2 Place your document on the ADF face up 3 Press Advanced Functions repeatedly until Combine appears then press Enter And turn on Combine using the cursor key and...

Page 121: ...low may occur 1 Make sure the machine is in the copy mode 2 Place your document in ADF face up 3 Press Doc Resolution Resolution 300dpi Photo Text u 4 Press q p or Doc Resolution to select 600dpi Reso...

Page 122: ...7 10 Copying This page intentionally left blank...

Page 123: ...s you can program into a macro key 8 4 Creating or modifying a macro 8 5 Erasing a macro key 8 6 Macro key speed 8 6 Fax dialing using a macro key 8 7 Copying using macro key 8 7 Printing lists using...

Page 124: ...the transmit confir mation report on 11 5 Monitor Used to obtain a dial tone for on hook dialing on Pause Dial Opt Used to enter a dialing character 3 3 Delayed Used to make a delayed transmission 4 1...

Page 125: ...NOTE When Report Fax Copy Memory Tx Cover Page or Select TTI are selected the function is only valid for the following transmission Once that trans mission is complete the setting returns to its defau...

Page 126: ...procedures Printouts List printing Menu 5 1 01 to 19 Document stored for polling Menu 4 3 1 F code document stored in bulletin box Menu 4 3 2 Document stored in a batch box Menu 4 3 3 Security receive...

Page 127: ...tly as you would if performing a normal operation The machine beeps during programming to confirm macro programming mode You can program up to 60 steps When you exceed 60 steps the machine asks if you...

Page 128: ...to erase 4 Press Enter The following two displays will appear M1 Erase Macro Yes Enter M1 Erase Macro No Cancel 5 Press Enter to erase the macro If you want to quit without erasing press Cancel 6 To e...

Page 129: ...ately after you press it the LCD shows the number 9 1 972 55 4335 Ltr Mem 99 Copying using macro key To copy using a macro key 1 Set the document 2 Press the macro key in which you have stored the cop...

Page 130: ...rint 100000000 Enter Press Enter and then q or p to show the counter for Copy Fax List or PC Print Copy 030000000 Fax List 040000000 PC Print 030000000 NOTE Each count shows the total number of pages...

Page 131: ...ring a department code 9 8 Erasing a department code 9 9 Turning the department code setting on and off 9 9 Fax charge setting 9 10 Copy charge setting 9 10 Sending a fax using a department code 9 11...

Page 132: ...order to use the security features listed below Security reception PIN mask Department code protection To set the passcode 1 Press Menu 2 1 0 2 then Enter Protect Passcode Old Passcode 2 When first c...

Page 133: ...y Rx Enter Time 15 42 6 Use the numeric keys to enter the time use a 24 hour format for the machine enter the security reception mode in every day To change a digit press t to move to the left or u to...

Page 134: ...ption until the security reception beginning time 1 Press Menu 4 3 4 then Enter If you assigned Security to a soft key page 8 2 simply press that key The machine shows Security Rx Doc Enter Passcode 2...

Page 135: ...t s PIN access code within that number see Autodial ing while using the PIN mask below for further details If you select either Mode 1 or Mode 2 and will be using batch transmission you must store the...

Page 136: ...ally would using the autodialer The machine now asks for the PIN Enter PIN Number _ 2 Use the numeric keys to enter the PIN and press Start Your machine will dial the number Dialing from the numeric k...

Page 137: ...tion in an autodialer number review the Mode 1 instructions under Autodialing while using the PIN mask page 9 5 Before sending a batch transmission for the first time you must store the PIN within its...

Page 138: ...partment code settings NOTE This feature will work only if you have activated the passcode protection see page 9 2 1 Press Menu 3 3 1 then Enter Set Dept Protect Enter Passcode 2 Use the numeric keys...

Page 139: ...ed the machine beeps briefly and then returns to the standby mode You will have to turn off the protection first 2 Press q or p to select the code you want to erase 3 Press Enter The following two dis...

Page 140: ...You can manage the print charge for each fax reception To enter the charge per page 1 Press Menu 2 2 1 5 then Enter Fax Charge 00 00 99 99 00 00 2 Use the numeric keys to enter the charge per page 3...

Page 141: ...h key entering a speed dial num ber or manually dialing it 4 Press Start if you pressed a one touch key no need to press Start Enter Dept Code 000000000 5 Use the numeric keys to enter the appropriate...

Page 142: ...y charge Counts the copy charge up to 9999999 99 If the copy exceeds the maximum charge it will not count further Total charge for copy and fax receptions The sum of the copy charge and print charge f...

Page 143: ...in other words to activate copy protection 1 Press Menu 2 3 4 then Enter Copy Protect Enter Passcode 2 Press q or p to select On or Off Copy Protect Off Enter 3 Press Enter to save the setting If the...

Page 144: ...9 14 Security features This page intentionally left blank...

Page 145: ...10 2 Accessing the machine setting 10 2 Fax settings 10 5 Accessing the fax settings 10 5 Copy settings 10 7 Accessing the copy setting 10 7 Scanner settings 10 8 Accessing the scanner setting 10 8 Ch...

Page 146: ...you instant function access from the control panel see page 8 2 04 Silent Mode Mutes or selects the volume of the ringer the alarm and the key tones On After you turn the silent mode on you can set th...

Page 147: ...0 Paper Source Sets the usage rules for the paper cassettes and bypass tray Cassette1 You can choose one of the following for cassette 1 Fax Copy Used for fax printing list printing and copying Not Us...

Page 148: ...mode on you can set the scanner lamp sleep start time and sleep reset time Start time Enter the sleep start time using 24 hour format E g 10 00 p m as 22 00 The machine automatically turns off the sca...

Page 149: ...m Contrast You can choose one of the following Normal Dark Darkest Light or Lightest S Fine Resol You can choose one of the following 400dpi 600dpi 02 Print Parameters Rx Reduc Rate Refer to page 5 7...

Page 150: ...rity Rx Keeps all received fax messages in memory and print them later Default setting is Off see page 9 3 12 Separator Page Sets a partition each received document by inserting a separator page Defau...

Page 151: ...condition automatically in a certain period of time You can change this time from 1 to 10 minutes 03 min 3 Copy Auto The machine automatically selects the recording paper size according to the docume...

Page 152: ...ter 4 Change settings and press Enter For details of each setting refer to the following table 5 When you have finished press Reset to return to the standby mode The underlined settings are factory de...

Page 153: ...journal 11 4 Printing an activity journal manually 11 4 Setting the printing order of the activity journal 11 5 Transmission Confirmation Report 11 5 Setting the transmission confirmation report 11 5...

Page 154: ...umber or name of the destination The start time dd hh mm format A note telling if the command is a polling or F Code operation To print this list press Menu 5 1 0 6 Enter 2 9 4 9 One Touch List Lists...

Page 155: ...the each transfer rule s identifier number remote fax s number where you want documents to be transferred on off setting time period and auto print setting To print a program list press Menu 5 1 1 7 E...

Page 156: ...via the highspeed V 34 modem Any special operations For example a fax call made using an external tele phone will appear as Manual Setting the activity journal Your fax machine will print the activit...

Page 157: ...t a transmit confirmation report TCR after sending a fax to any Group 3 fax machine The TCR lists the following information for each communication Date and time of the TCR s printout Remote location c...

Page 158: ...ts and F Code box document erased may be printed May 1 No The number of the communication 2 From Sender information be indicated in the following order 1 Sender name or 2 Sender number if 1 has not be...

Page 159: ...2 4 Replacing the drum cartridge 12 6 Troubleshooting 12 8 Document jams 12 8 Paper jams 12 10 LCD error messages 12 13 Check Message printouts 12 16 Error code 12 17 Machine errors 12 19 Faxing error...

Page 160: ...components inside Never try to clean sealed areas inside your machine They are sealed for both your safety and the safety of your machine For cleaning the machine s exterior use a mild cleaning solut...

Page 161: ...llowing message appears on the LCD or if there are any poor print quality on your print the charge wire of the drum cartridge requires cleaning Open Front Cover Follow Instruction A NOTE Your machine...

Page 162: ...your machine shows Toner Empty on the LCD and it cannot print any page until the toner cartridge is replaced to the new one To replace the toner cartridge 1 Open the front cover 2 Turn the toner cart...

Page 163: ...the toner cartridge with both hands gently shake it to distribute the toner evenly inside the cartridge NOTE Do not touch the roller of the toner cartridge 5 Slide the toner cartridge into the machin...

Page 164: ...not print until the drum cartridge is replaced To replace the drum cartridge 1 Open the side cover and front cover 2 Turn the toner cartridge locking lever to the left unlock position then pull the to...

Page 165: ...solving 1 2 3 4 5 6 7 8 9 10 11 12 13 14 A M aintenance P roblem solving 5 Reinstall the toner cartridge and turn the cartridge locking lever to the right until it locks into place completely 6 Close...

Page 166: ...w Document Jam ContStor Enter Cancl 1 If you want to continue the operation press Enter and proceed to step 2 To abort the operation press Cancel NOTE If the machine is left idle for 3 minutes the mac...

Page 167: ...A M aintenance P roblem solving Jammed in the input area 1 Open the ADF cover 2 Gently remove the document from the ADF If you cannot remove it turn the release knob to remove the jammed document 3 Cl...

Page 168: ...the paper jam CAUTION When you open the side cover to remove the paper DO NOT touch the fuser roller The fuser unit is very hot IMPORTANT Do not touch the drum cartridge surface Scratches or smudges w...

Page 169: ...d in the fuser area Jammed in the paper exit area If the jammed paper was partially fed and you cannot seize it easily 3 Open the paper cassette After you pull it out completely lift the front part of...

Page 170: ...12 12 Maintenance Problem solving 5 Close the side cover and insert the paper cassette Lower the rear part of the cassette to align the rear edge to the slot of the machine then insert it completely...

Page 171: ...properly Communication Error A communication error disrupted the reception or transmission If you were transmit ting press Stop to clear the error message and then re try the transmission If you were...

Page 172: ...command No Department Code You tried to turn on the department code setting but there are no department codes stored in your machine Store at least one department code or You entered an incorrect depa...

Page 173: ...for the machine to finish printing Protect Doc Stored A received document was in your machine s memory when you tried to turn off the security reception passcode Print the received document from your...

Page 174: ...ty of things Here is a brief summary Error message Possible meanings Check condition of remote fax Remote machine malfunctioned No Handshake signals from remote fax Wrong phone number reached Repeat t...

Page 175: ...had a document feeder problem during transmission R 3 4 Poor phone line conditions may have prevented your fax machine from prop erly printing some or all of the pages it received R 4 1 The machine re...

Page 176: ...n poor line conditions developed Try the call again T 4 4 Poor line conditions prevented transmission Try the call again T 5 1 ECM transmission failed perhaps due to line noise Conditions can change T...

Page 177: ...ode to the fax mode by pressing copy4fax4scan Cannot stop transmission Your machine cannot cancel a transmission by pressing Stop To cancel a transmission press Job Confirm Fax Cancel and select a job...

Page 178: ...Please wait until the machine finishes the job Print quality is poor See Print quality problems on pages 12 21 to 12 22 The printing option does not effect for the printouts Some software applications...

Page 179: ...w Replace the toner cartridge The paper is damp Replace the paper Printouts are too dark ABCDE ABCDE ABCDE ABCDE ABCDE Contrast selected was too dark Select a lighter contrast setting Printouts have a...

Page 180: ...its original position see page 12 3 The toner cartridge or drum cartridge may be defective Remove the cartridges and check them for damage If the problem persists replace either or both of the cartrid...

Page 181: ...unplug it imme diately contact Oc National Diagnostics Center Do not attempt to disassemble or repair the machine yourself IMPORTANT Attempting to repair the machine yourself may void the limited war...

Page 182: ...12 24 Maintenance Problem solving This page intentionally left blank...

Page 183: ...AI Specifications AI 2 General AI 2 Fax AI 3 Copy AI 3 Printer AI 3 Scanner AI 4 Consumable items AI 4 Index AI 5 Chapter Appendix Index...

Page 184: ...2 lines Image memory capacity 8 MB 650 pages approx plus optional 32MB additional 2 720 pages approx Using the ITU T test document 1 with normal resolution Image memory backup time 8 MB 72 hours 40 MB...

Page 185: ...phone line conditions Scanning width 8 2 in 208 mm Grayscale 256 levels Scanning resolution Normal 8 dots mm 3 85 lines mm Fine 8 dots mm 7 7 lines mm Super fine 16 dots mm 15 4 lines mm In the case t...

Page 186: ...256 level Scan boxes 20 boxes Operating system Windows 2000 XP Server 2003 Vista English version Consumable items Drum cartridge life Approx 20 000 pages Toner cartridge life Approx 16 000 pages Star...

Page 187: ...handling 2 10 acceptable document 2 10 Document type 7 4 Drum cartridge replace 12 6 E ECM Mode 10 6 e mail gateway 4 21 Energy save mode 1 16 10 3 Error code 12 17 Error messages 12 13 external phon...

Page 188: ...ary Mode 10 3 Printer driver 1 17 Print parameters 10 5 Product Recycling and Disposal ix Protection passcode 10 2 Q Quick memory transmission 4 3 10 6 R Real time transmission 4 3 Receive time stamp...

Page 189: ...MEMO...

Page 190: ...MEMO...

Page 191: ......

Page 192: ...DA7 92370 60...

Reviews: