When discriminating metals as ferrous / non-ferrous, the
Target ID sometimes is not sufficient. FerroCheck™ shows
the ferrous/non-ferrous ratio of targets graphically on the
screen.
FerroCheck™ is a unique feature of The LEGEND that you will not
find on other detectors and it provides the user the
ferrous/non-ferrous ratio of the target signal to be able to identify
targets more easily.
Targets such as large iron, rusted nails, bottle caps contain both
ferrous and non-ferrous signals and these types of targets
cannot be discriminated by Target ID and audio response only.
These types of targets may generate a non-ferrous audio
response as well as a Target ID.
IMPORTANT!
Until you get experienced with this feature, it is
recommended to dig out all targets. By comparing the targets
with the FerroCheck™ graphs, users can use this feature
more productively to identify targets.
Ferrous Target
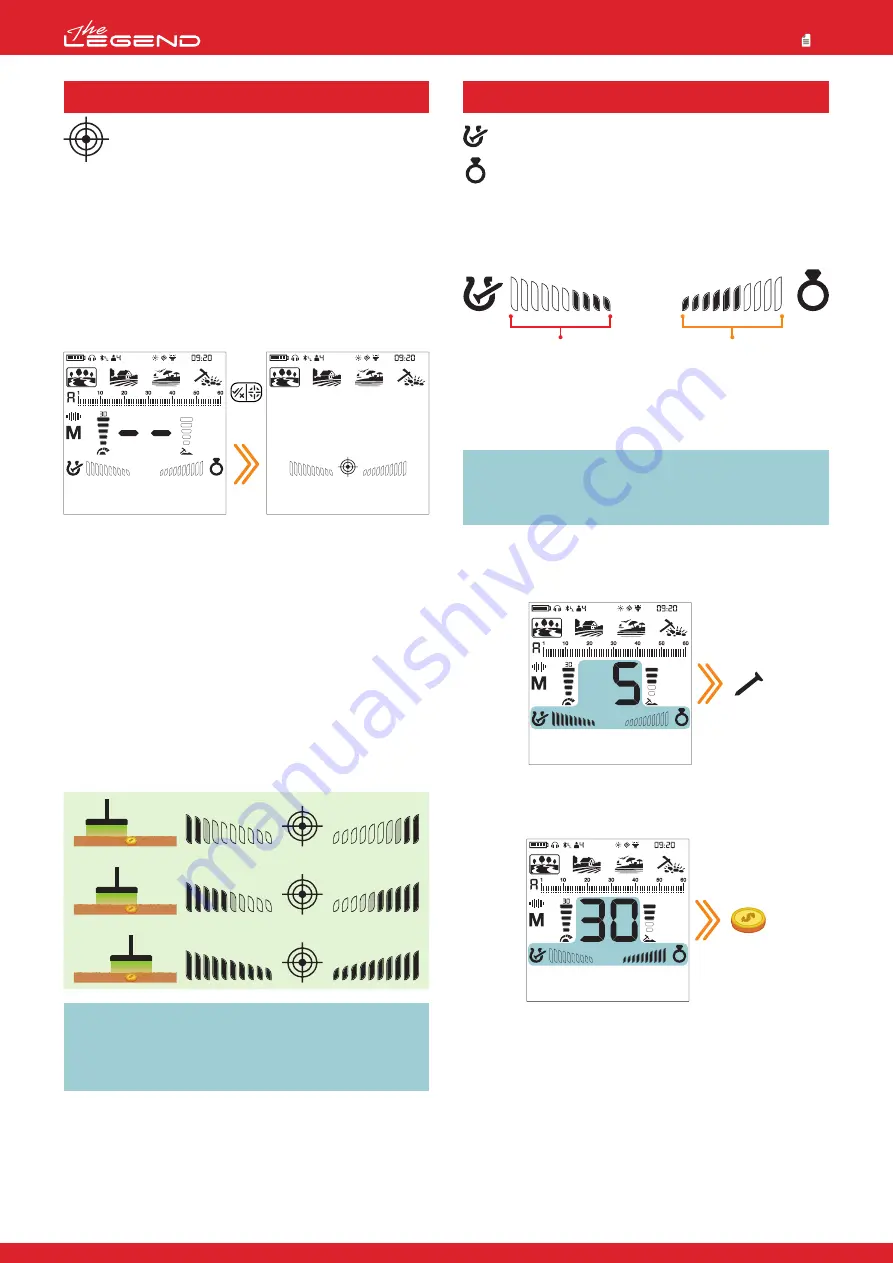
Targets with ferrous signal only will be identified as 100% ferrous
both in Target ID and FerroCheck™ as shown below:
True Non-Ferrous Target
Targets with non-ferrous signal only will be identified as 100%
non-ferrous both in Target ID and FerroCheck™ as shown below:
PINPOINT
Pinpoint is to find the center or the exact location of a
detected target.
The LEGEND is a motion detector. In other words, you are
required to move the search coil over the target or the target over
the search coil in order for the device to detect the target. The
pinpoint mode is a non-motion mode. The device continues to give
a signal when the search coil is kept stationary over the target.
When the Pinpoint & Accept/Reject Button is pressed, unused
icons are cleared from the screen. The pinpoint icon and the
FerroCheck™ bars are displayed empty.
In the pinpoint mode, the device does not discriminate metals or
provide Target IDs.
To perform pinpoint:
1. After a target is detected, move the search coil aside where
there is no target response and push the pinpoint button.
2. Keep the button pressed down and bring the search coil closer
to the target slowly and parallel to the ground.
3. Signal sound becomes stronger and changes in pitch while
getting closer to the target center and the bars in the FerroCheck™
start filling up from.
4. Mark the position which provides the loudest sound using a tool
or your foot.
5. Repeat the above procedure by changing your direction 90°.
Actions to be performed from a couple of different directions will
narrow the target area and provide you with the most exact
details of the target location.
IMPORTANT!
When a signal is received, inexperienced users,
until they get the experience to perform the procedure
mentioned above, can pinpoint by putting the search coil
down on the ground and scan over the target while pressing
the Pinpoint & Accept/Reject Button.
Long
press
FERROCHECK™
Ferrous ratio
Non-ferrous ratio
False Non-Ferrous Target
When targets such as bottle caps -although they generate a
non-ferrous Target ID- are checked by the FerroCheck™ feature,
they are identified as alloy which has ferrous (iron) content as
shown below:
The target generates a non-ferrous ID. However, it has both
ferrous and non-ferrous signal.
IMPORTANT!
For the FerroCheck™ feature to work, the
detector must receive a strong signal. Therefore, FerroCheck™
is designed to work with shallower targets.
Correct Usage of the FerroCheck™
The accuracy of the FerroCheck™ feature is directly related to
correct usage. Therefore, once you detect a target, if you want to
check whether the target is ferrous or non-ferrous with the
FerroCheck™, please pay close attention to the instructions below:
1. You MUST sweep the coil with a large angle over the target and
make wide scans. Make sure that the search coil leaves the signal
completely during the sweeps.
2. You must go around the target and swing the coil over it from
different angles, with long sweeps again.
3. The ferrous side does not need to fill up completely. More than
2 bars is enough to identify a target as an alloy containing iron
(not a true non-ferrous target).
13


