background image

The LEGEND is designed to work without ground balancing 

on most terrains. However, for experienced users and on 

highly mineralized grounds, ground balancing will bring 

extra depth and stability to the device.

Ground balance can be performed in three ways with The 

LEGEND: Automatic, Manual and Tracking.

Ground balance only affects the mode currently 

selected; changes made in one mode do not affect 

the others.

The device can perform ground balance within the range of 00-99 

in all modes and 00-20 in the Beach mode MW Multi frequency. 

The ground balance must be performed separately for the Beach 

MD Multi frequency and for Beach MW Multi frequency options. The 

ground balance done in MD will not work for MW and vice versa.

Automatic Ground Balance

Automatic ground balance is performed as follows in all search 

modes:
1. Find a spot where there is no metal.
2. Push and hold the Ground Balance Button down. The ground 

balance icon will start blinking in the info section at the top and 

the ground balance value will be displayed in the middle of the 

screen. If no ground balancing has been performed before, this 

value will always be zero (0).

3. Start pumping the search coil up and down from 

about 15-20 cm (~6''- 8'') above the ground down to 3 

cm (~1'') off the ground with smooth movements and 

keeping it parallel to the ground.

4. Continue until the audio reduces in response to the ground. 

Based on ground conditions, it usually takes about 2-4 pumps for 

the ground balance to be completed.
5. Upon completion of the ground balance, ground balance value 

is shown in the Target ID section on the display.  In order to 

ensure that the ground balance is proper, ground balance at least 

2-3 times and check the ground balance values on the display. 

In general, the difference between the values shall not be higher 

than 1-2 numbers.
6. If you cannot ground balance, it means that either the ground is 

too conductive or not mineralized or there is a target right below 

the search coil. In such a case, retry ground balancing at a different 

spot.

Manual Ground Balance

Allows you to manually modify the ground balance value. It is not 

preferred mostly because it takes time. However, it is the preferred 

option in cases where a successful ground balance cannot be 

performed using other methods or minor corrections are required 

to the automatic balance.
1. Find a clear spot without metals.
2. Push the Ground Balance Button once and release it. The ground 

balance icon will appear in the info section at the top and the 

device will switch to ground balancing screen. The ground balance 

GROUND BALANCE

value will be displayed in the middle of the screen. 

3. You need to listen to the sounds coming from the ground in 

order to perform manual ground balance. Pump the search coil up 

and down from about 15-20 cm (~6''- 8'') above the ground down 

to 3 cm (~1'') off the ground with smooth movements and keeping 

it parallel to the ground.
4. If you are getting a low tone while pumping the coil, it means 

that that you should increase the ground balance value  using the 

plus (+) button. On the other hand, if you are getting a high tone, 

you should decrease the ground balance value  using the minus 

(-) button. 
5. Continue the above process until the ground response is 

eliminated.
6. Press the Ground Balance Button once to exit.

The ground balance value may vary in single frequencies and 

Multi frequency in certain soil types.

The sound may not be eliminated completely on certain 

terrains.  In this case, if the ground noise is minimized, it 

means that the ground balance has been done.

Ground Tracking

The device tracks the changes in the ground during detection and 

updates the ground balance automatically. Ground changes that 

are not visible to the eye will affect the depth and discrimination 

performance of the detector. 
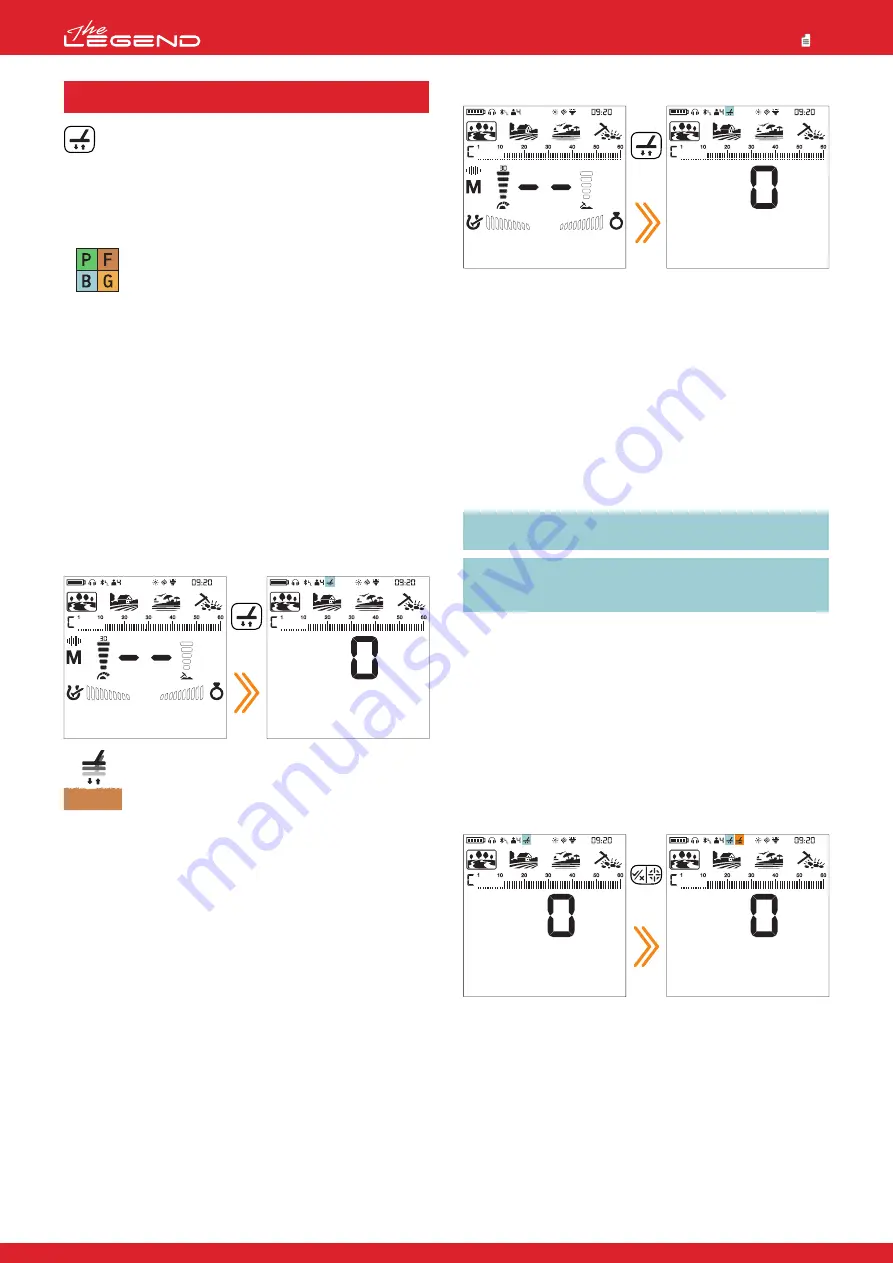
1. To activate ground tracking, press the Ground Balance Button 

once. The device will go into the ground balance screen and the 

ground balance icon will appear in the info section at the top of 

the display.
2. Press the Pinpoint & Accept/Reject Button once. In the info 

section, next to the ground balance icon, ground tracking icon will 

appear.

Ground tracking is now active. Press the Ground Balance Button 

once to go back to the main screen.
The device updates the ground balance automatically as long as 

the search coil is swung over the ground. It does not provide any 

feedback to the user.
Tracking is suitable for use in areas where different soil structures 

are present within the same land or in fields where mineralized 

rocks are scattered widely apart. If you use ground tracking in 

areas where hot rocks are intensely present, the device may not 

be able to eliminate these highly mineralized rocks or you may 

miss the smaller or deeper metals.

Press

once

Press

once

Long

press

12

Park

Goldfield

Beach

Field

Summary of Contents for The LEGEND

Page 1: ......

Page 2: ...nly be disassembled and repaired by Nokta Makro Authorized Service Centers Unauthorized disassembly intrusion into the metal detector control housing for any reason voids the warranty IMPORTANT Do not...

Page 3: ...le on the shaft without stretching too much Then plug the connector to the search coil input socket on the system box and secure by tightening the nut While tightening you may hear clicks indicating t...

Page 4: ...ou navigate between the discrimination patterns offered by The LEGEND 6 Right and Left Buttons On the main screen they are used to navigate between the modes and in the settings menu they are used to...

Page 5: ...r 2 Clock and Time Tracking 3 Search Modes 4 Target ID Scale and Notched Out IDs 5 Operating Frequency 6 Sensitivity Indicator 7 Target ID 8 Depth Indicator 9 User Profile Save Delete 10 FerroCheck Ba...

Page 6: ...unk or glove compartment Do not charge the battery in temperatures over 35 C 95 F or below 0 C 32 F The LEGEND battery can only be replaced by Nokta Makro Detectors or its authorized service centers T...

Page 7: ...in an upright position your arm is relaxed and the search coil is approximately 5cm 2 above the ground Wrong search coil angle Wrong search coil angle Correct search coil angle It is important to keep...

Page 8: ...lower the sensitivity setting 5 You can start detecting Certain settings are common to all modes changes in these settings will take effect in all modes Most of the settings are mode based and they on...

Page 9: ...equency and single frequencies cannot be selected In this mode only the Multi frequency has 2 options Wet sand underwater MW or dry sand with very low salinity WD Each time you press the Frequency But...

Page 10: ...umerically over the indicator The indicator consists of 5 levels Each level represents 6 units of sensitivity The sensitivity values corresponding to each level on the Depth Indicator are shown below...

Page 11: ...r the advantage of covering a broader range of targets on all types of terrains Multi frequency compared to single frequencies typically provides more accurate IDs at depth In addition it offers maxim...

Page 12: ...n the display and ranges between 01 60 The LEGEND s Target ID scale consists of 60 lines each of which represents 1 Target ID In addition to showing the Target ID in the middle of the screen the ID is...

Page 13: ...t buttons Each time you press the button the Target ID will change on screen Select the ID you want to turn off reject or on accept 2 Press the Pinpoint Accept Reject Button If the ID you selected was...

Page 14: ...are required to the automatic balance 1 Find a clear spot without metals 2 Push the Ground Balance Button once and release it The ground balance icon will appear in the info section at the top and the...

Page 15: ...ove the search coil over the target or the target over the search coil in order for the device to detect the target The pinpoint mode is a non motion mode The device continues to give a signal when th...

Page 16: ...a non ferrous ID However it has both ferrous and non ferrous signal IMPORTANT For the FerroCheck feature to work the detector must receive a strong signal Therefore FerroCheck is designed to work with...

Page 17: ...equency is 7 for all frequencies Frequency Shift only affects the mode currently selected changes made in one mode do not affect the others If too much noise is received when the search coil is lifted...

Page 18: ...o section at the top of the screen 4 Tone Settings These advanced tone settings offer various options to modify the sounds The LEGEND generates for targets The tone setting offers 6 sub settings as fo...

Page 19: ...tone volume and tone frequency for all targets 2 Tone The Target ID scale is divided into 2 zones as ferrous and non ferrous The default point that separates these 2 zones vary based on the selected...

Page 20: ...shown framed PARK FIELD BEACH GOLDFIELD Search Mode 1 Tone Z 1 10 10 10 10 Z 2 10 10 10 Z 2 10 10 10 Z 3 10 10 10 Z 4 10 10 10 Z 1 2 1 1 Z 1 2 1 1 Z 2 10 10 10 Z 3 10 10 10 Z 4 10 10 10 Z 5 10 10 10 Z...

Page 21: ...the left of the ID scale the selected zone will be displayed numerically 4 3 Tone Frequency Target IDs for the selected zone Selected target zone Tone Frequency Level for the selected zone 1 30 Low T...

Page 22: ...ft Press the plus button once 3 Using the left and right buttons select the Tone Break setting The selected setting will be shown framed 4 Press the plus button to go into the setting 5 The Tone Break...

Page 23: ...ss the Pinpoint Accept Reject Button once To go back to the main screen press the Power Settings Button once Threshold Tone for Rejected Targets In Park Field and Beach modes The Threshold tone will b...

Page 24: ...the Power Settings Button once Default Threshold Frequencies 4 6 Threshold Frequency PARK FIELD BEACH GOLDFIELD 5 5 5 13 Threshold Frequency Search Mode 1 30 Low Threshold Frequency High Threshold Fr...

Page 25: ...gs IMPORTANT Once you save a user profile if you use that profile as the active user profile all changes you make will be saved automatically To keep your saved settings you must choose another user p...

Page 26: ...ibration icon will be displayed in the info section at the top of the screen 6 Backlight 7 Vibration Park Goldfield Beach Field Park Goldfield Beach Field It enables you to adjust the display backligh...

Page 27: ...d minus buttons 3 When the wireless connection is turned on the Bluetooth Head phones icon will start blinking in the info section at the top of the screen Once it pairs with any Bluetooth headphones...

Page 28: ...on screen when this setting is selected When Time Tracking is selected in the settings the user can see how much time he she has spent with The LEGEND in year month day hour format Displaying the Usa...

Page 29: ...djustable Threshold Yes Notch Filter Yes Ground Balance Automatic Manual Tracking Pinpoint Yes Frequency Shift Yes Noise Cancellation Yes Vibration Yes Sensitivity Setting 30 levels Target ID 01 60 Se...

Page 30: ......

Reviews: