The LEGEND offers advanced discrimination setting to users for
an easier operation. By using the Discrimination Button, you can
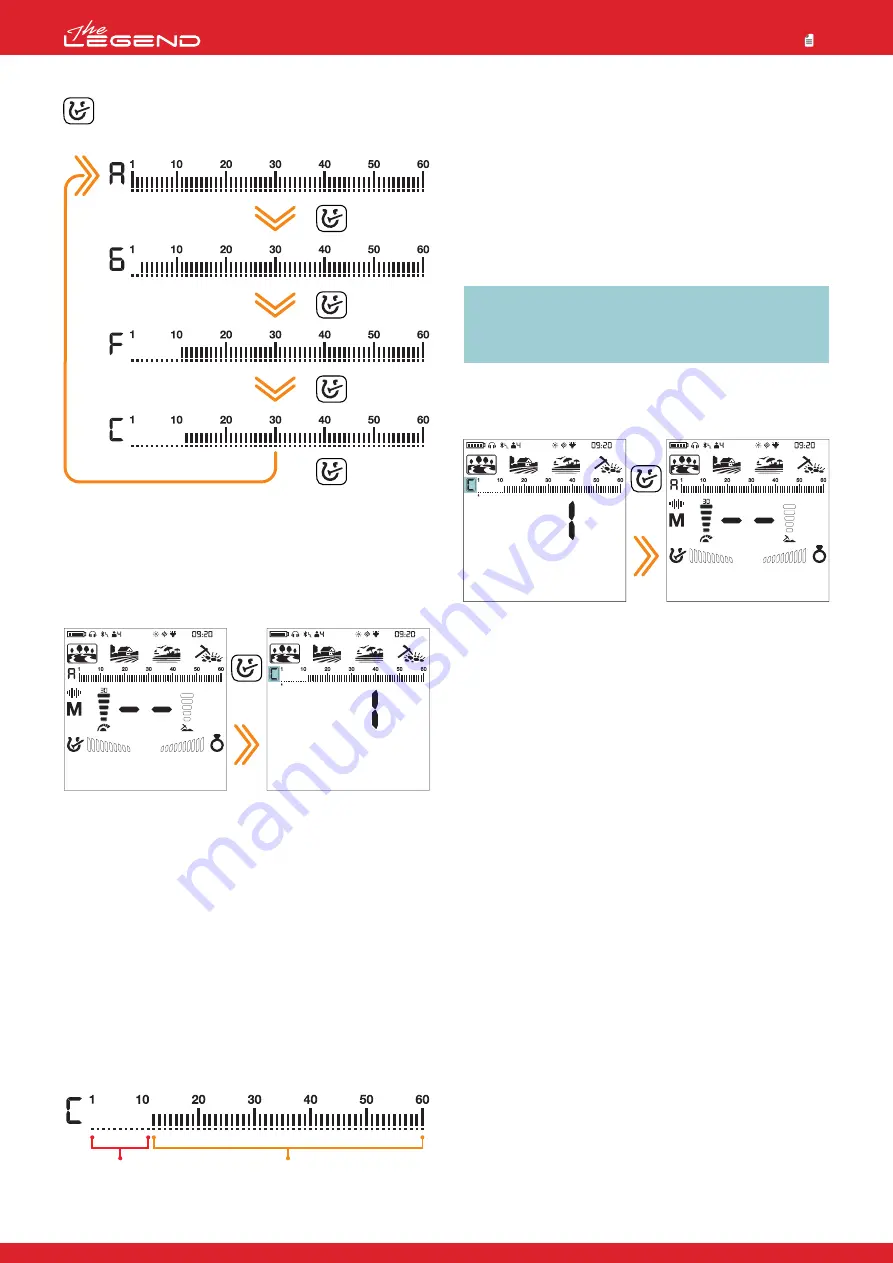
select one of the 4 different discrimination patterns, of which 3
are pre-set and 1 that is totally customizable by the user.
The default discrimination pattern for all modes is the ''C''
discrimination pattern which stands for custom. Each time the
device is turned on, it will start with the C pattern.
In this pattern, each ID can be rejected or accepted by the user.
The discrimination setting only affects the mode
currently selected; changes made in one mode do
not affect the others.
All Metal Discrimination Pattern
In this pattern all ID's are accepted on the ID scale (1-60).
In other words, all the lines on the scale are visible and
no ID is rejected. The device will emit an audio response
for all metals as well as the ground and their IDs will be
displayed on the screen.
Ground Off Discrimination Pattern
In this pattern, the device will not receive ground noise
and will not provide any audio or Target ID for it. Target
IDs 1 and 2 are turned off (rejected) and the rest are open
(accepted).
Ferrous Off Discrimination Pattern
In this pattern, the device will not provide any audio or
Target ID for ferrous targets. Rejected IDs will vary based
on the search mode.
Custom Discrimination Pattern
This pattern allows users to create their own
discrimination pattern according to the type of targets
they would like to accept and reject. The default setting
for this pattern is the same as the Ferrous Off pattern.
Accepting and rejecting IDs are also referred to as ''notch''.
The default, accepted and rejected IDs in the Ferrous Off and
Custom Discrimination Patterns for each mode are shown in
the table below:
Selecting a Discrimination Pattern
On the main screen, each time you press the Discrimination
Button, the pattern changes and is indicated with a letter in
the small box to the left of the Target ID scale.
With the notch feature, you can accept (turn on) and reject (turn
off) multiple IDs. The lines for the rejected IDs will be erased and
these IDs will be blanked out on the ID scale. The device will not
provide an audio response or Target IDs for these targets.
Forming a Customized Discrimination Pattern (Notch)
In the main screen, press and hold the Discrimination Button to
open the discrimination menu.
Regardless of which discrimination pattern is selected, the device
displays the Custom Discrimination Pattern on screen.
Unused icons will disappear from the screen and the letter ''C'' will
be shown framed.
There are 2 different ways of forming a Custom Discrimination
Pattern: Manual and Automatic.
Manual Notch:
Hold the coil stationary. The last Target ID will be displayed on
screen and an arrow cursor will appear under the Target ID scale.
1. Move the cursor with the right and left buttons. Each time you
press the button, the Target ID will change on screen. Select the
ID you want to turn off (reject) or on (accept).
2. Press the Pinpoint & Accept/Reject Button. If the ID you selected
was turned off (rejected) , it will now be turned on (accepted) and
vice versa. You can follow the changes on the ID scale.
Long
press
Rejected
IDs 1-11
Accepted
IDs 12-60
Automatic Notching:
In the discrimination menu, swing the coil over the target you want
to reject or accept. The cursor underneath the ID scale as well as
the Target ID in the middle will show the ID of the target.
2. To turn off or to turn on the ID press the Pinpoint &
Accept/Reject Button.
The LEGEND will not generate an audio response for rejected
targets. However, their IDs will be shown in the discrimination
menu.
The cursor will appear where you last left it the next time you use
the notch discrimination setting.
IMPORTANT!
In areas where there is EMI, the IDs may be jumpy
at high sensitivity settings and you may have a hard time
selecting the IDs. In such a case, please lower the sensitivity
first before you select the IDs you want to reject or accept.
Exiting the Notch Discrimination:
Press the Discrimination Button once to go back to the main
screen.
Press
once
Press
once
Press
once
Press
once
Press
once
11


