background image

InSight Radar (IR2) (IR2-HD2 and Higher Models) 

20 

Hardware Installation  

Installer’s Guide

5.  Remove the holder plate for fixing the cable and the rubber ring. 


Thread the cable through the leading opening. 


Insert the rubber ring from both sides of the scanner unit, thread it through the holder 

plate and fix it to the aerial with the screws.

6.  Connect the 7-pin connector of the cable to X11 of the printed circuit board and the 9-pin 

connector to X11 respectively.

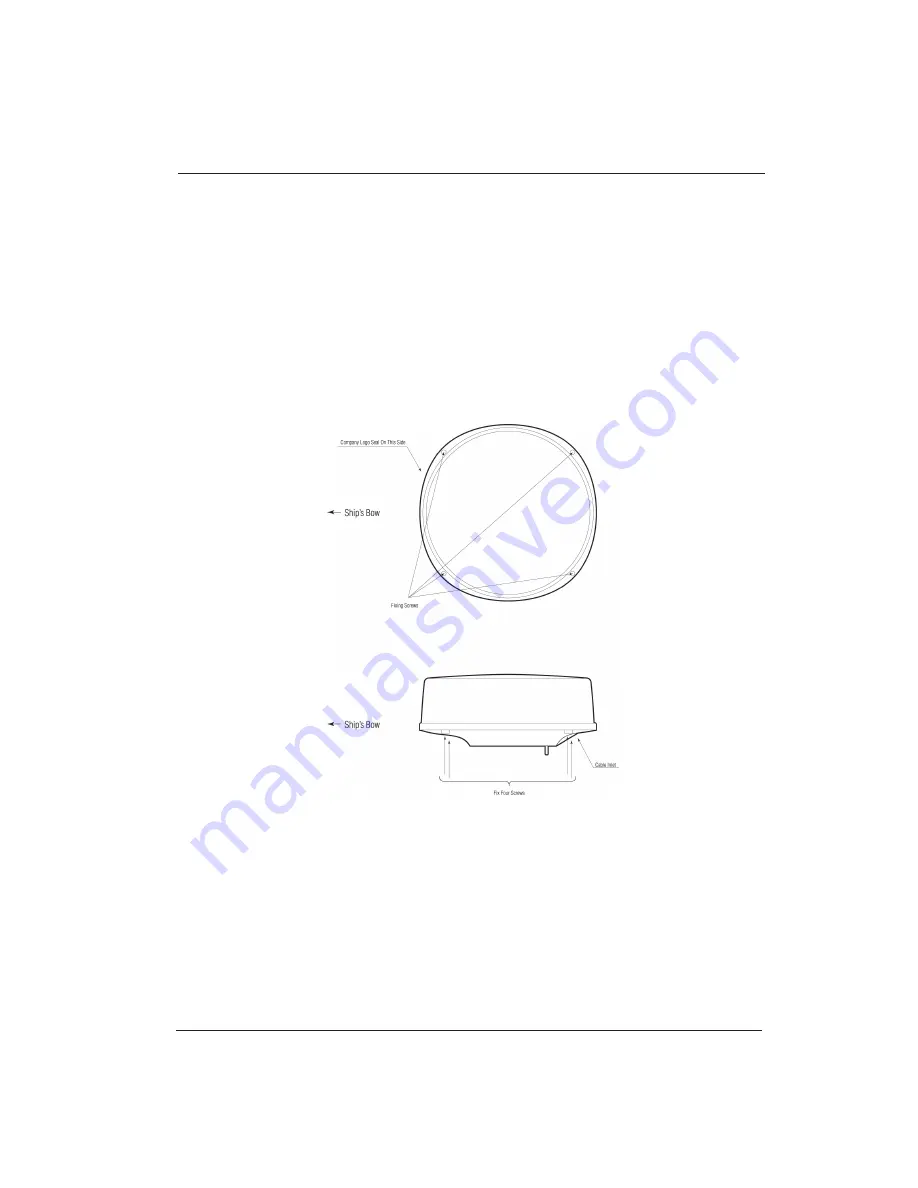
7.  Install the shield cover. At this moment, install the shield of the cable in the groove, using 

the shield cover. But, be careful for the cable not to be caught by the unit and the cover.

Figure 3.11—Fitting the cover (Radome antenna)

Summary of Contents for IR2-HD2

Page 1: ...InSight Radar 2 IR2 IR2 HD2 and Higher Models www nobeltec com Discover the Nobeltec Line of Radar Products Radar Installer s Guide 1 2011...

Page 2: ......

Page 3: ...apter 2 Getting Ready 7 Inspections of the delivered goods 7 Part Numbers List 7 Standard Equipment List 8 Optional Cable List 9 Checking the Power Supply 9 Chapter 3 Hardware Installation 11 Installi...

Page 4: ...ger Delay 43 The Transmit Trigger Delay 43 Aligning the Radar Image 44 Setting the Radar Presets 48 Chapter 5 Product Specifications 53 Radar Specifications 53 Interface Specification Control Box to P...

Page 5: ...he antenna from a close distance while the radar is in operation Never expose yourself to the transmitting antenna at a close distance Safety Warnings All personnel involved in the installation operat...

Page 6: ...omputer chassis High Voltage Do not assume that safety devices will always work Use grounding sticks and cables with high voltage circuits Use rubber gloves that have been tested within the last six m...

Page 7: ...eltec Inc 2011 Portions 2004 2010 Koden Electronics Co Ltd All rights reserved No part of this publication may be reproduced transmitted translated in any form by any means without the written permiss...

Page 8: ...Page intentionally left blank...

Page 9: ...s of installing sensitive electronic devices What is InSight Radar 2 IR2 IR2 is Nobeltec s radar solution It includes a special radar that transmits digital data through a converter box into a PC read...

Page 10: ...ading Sensor Use GPS Gyro Heading Sensor for best radar overlay on electronic charts Recommended System Requirements In order to get the best results using InSight Radar software we recommend you use...

Page 11: ...es System must have either a combo GPS heading sensor or a separate digital compass Requires the PC to have a static IP address of 192 168 0 100 or any other compatible IP address for InSight Radar co...

Page 12: ...te Nobeltec Navigation Software does not support wireless radar connec tion System notes System must have either a combo GPS heading sensor or a separate digital compass Requires approved Ethernet rou...

Page 13: ...c s Network broadcasts NMEA data to all copies of Admiral on the network GPS Gyro Heading sensor provides best results for Radar Chart overlay Dual IR2 s to a Nobeltec GlassBridge Network Figure 1 4 I...

Page 14: ...ess Step 1 Verify that you have everything Installers Guide Chapter 2 Step 2 Install the radar and Control Box Installers Guide Chapter 3 Step 3 Install Nobeltec software and configure IP address Inst...

Page 15: ...Dome 17 242J160680A 10 meter MDS 5R IR2 4D IR2 4D RB715A N A 4 kW Dome 25 2 1 242J158055A 10 meter MDS 5R IR2 4x IR2 4 3 RB716A RW701A 03 4 kW Open Array 41 3 5 242J159098A 10 meter IR2 4 4 RW701A 04...

Page 16: ...NA NA NA NA Antenna unit RB716A NA NA 1 NA NA NA Antenna unit RB717A NA NA NA 1 NA NA Antenna unit RB718A NA NA NA NA 1 NA Antenna unit RB719A NA NA NA NA NA 1 Interconnecting cable 1 10m 1 10m 1 10m...

Page 17: ...Power Supply To allow proper operation of the IR2 radars the ship s power supply capacity must satisfy the requirements detailed in the following table Keep the battery properly charged anytime to pr...

Page 18: ...5A 250V or 125V 5 x 20mm 24VDC 10A 250V or 125V 6 3 x 32mm T3 15A 250V or 125V 5 x 20mm Note Fuses marked are included with the IR2 Supply Voltage to Fuse Table for IR2 4x IR2 6x and IR2 12x Supply vo...

Page 19: ...choes C Install scanner as far forward as possible To avoid creating shadow zones or generating false echoes install the scanner at a position nearer to the ship s bow and away from obstacles When ins...

Page 20: ...4R D 2 m when R 15m Ls 0 025R D 2 m when R 15m Where Ls Length of shift or distance to be shifted from keel line D diameter of obstacle on keel line R distance from scanner to obstacle Figure 3 1 Shi...

Page 21: ...ure a stable mounting platform Figure 3 3 Recommended mounting base or platform Using the included drill hole template or you can refer to the drawings in Figure 2 4 drill holes for the five locations...

Page 22: ...tails Tip Use sealing of silicon to prevent the bolts from becoming loose Radome may be broken if you use locking putty Table 3 1 Bolts for Mounting Scanner Unit Radome antenna Thickness of mount base...

Page 23: ...tch Stainless Included 14 19mm 0 55 0 75 in M10 30 1 5mm pitch Stainless Table 3 2 Bolts for Mounting Scanner Unit Open antenna Thickness of mount base Bolts necessary to fix radome scanner Material R...

Page 24: ...four M8 bolts Figure 3 7 Fitting the Aerial Unit Installing the Control Box Find a dry weather and waterproof place within reach of the antenna cable Choose a proper bolt length according to the thic...

Page 25: ...InSight Radar IR2 IR2 HD2 and Higher Models Nobeltec 17 Installer s Guide Hardware Installation Figure 3 8 Dimensions of the fixing hole positions...

Page 26: ...factory Should the need arise for you to replace the cable use this section to understand how this occurs If the desired cable is attached to the antenna you can skip this entire section 1 The cable...

Page 27: ...over at the stern side 3 pieces of fixing screws 5 Remove the holder plate for fixing the cable and the rubber ring Thread the cable through the leading opening Insert the rubber ring from both sides...

Page 28: ...he scanner unit thread it through the holder plate and fix it to the aerial with the screws 6 Connect the 7 pin connector of the cable to X11 of the printed circuit board and the 9 pin connector to X1...

Page 29: ...l the upper radome with caution not to touch the aerial Orient the cover as shown in the illustration below 4 markings indicating the screw positions are marked on the upper and lower radomes respecti...

Page 30: ...eading it through cable leading hole 6 Install the cable holder plate washer waterproof rubber packing which are removed in step 4 to the connection cable as shown in the illustration below Remove the...

Page 31: ...ng wire from one of the bolts on the scanner base as shown in Figure 3 14 The crimping terminal and grounding wire are user supplied items Figure 3 14 Grounding the Antenna Unit Cable 1 Radar Cable to...

Page 32: ...n Ship s 7 34 Blue Ship s IR2 4D SCAN RMD PCB X12 IR2 4x 6x 12x 25x SCAN OPN PCB X12 No Color Function 1 17 Blue 24V 2 N A 3 34 Orange 12V 4 Braid of Red DAT R 5 Red DAT 6 Braid of Brown BP SHF R 7 Br...

Page 33: ...nd protective fuses or circuit breakers as shown below Figure 3 16 Typical power supply switch wiring Warning Do not apply over 41 6V to the Control Box or it may be damaged beyond repair See the powe...

Page 34: ...A IR2 HD2 2 5A IR2 4D 3A IR2 4x 3 5A IR2 6x 4A IR 12x 5 4A IR2 25x 18 6 to 41 6V Caution AC power supply cannot be used Plug the included power supply cable into the connector on the Control Box label...

Page 35: ...the On Off switch follow these steps 1 Once you have identified an optimal location for the On Off switch that is readily accessible route the blue and green wires to this location 2 Refer to the dia...

Page 36: ...The Ethernet connector cable is discussed in greater length in the next chapter Changing the Dip Switch Settings The dip switch settings are set at the factory and should not need adjustment However c...

Page 37: ...in the column labeled NewValue below Warning Electronic circuits and memories are sensitive to static shock Make sure that you are grounded to a static pad before opening the box and making any chang...

Page 38: ...coded IP address S1 2 to S1 6 These switches changes the IP address of the box from the default value Make sure S1 8 is On Value S1 2 S1 3 S1 4 S1 5 S1 6 Offset 0 Default Off Off Off Off Off 00000 1 O...

Page 39: ...ication of computers that use TCP IP Any network running with IR2 must have a DHCP server typically served by the router hub Router Hub A device which forwards data packets between networks or devices...

Page 40: ...r it can also upgrade existing Nobeltec Navigation Software to recognize and operate the InSight Radar 2 To install Nobeltec Navigation Software Insert the program CD into your CD ROM drive The progra...

Page 41: ...each type choose the system setup that best fits your needs and go to the section that describes its setup Option 1 Connecting IR2 directly to a PC This option is for systems that do not have a netwo...

Page 42: ...unt of non radar network traffic can dramatically reduce the quality of the radar presentation This is particularly true if using a wireless network or when using the network for high bandwidth uses s...

Page 43: ...ct cable However sinceWindows is not set up from the manu facturer to operate a network without a hub there are a few steps to follow Step 1 Connecting the devices Using the included Crossover cable c...

Page 44: ...twork and Dialup connections Figure 4 4 Network Connections window Because PCs can connect to more than one network you may see more than one Local Area Connection icon 3 Open the Internet Protocol TC...

Page 45: ...the address field type the following information IP Address 192 168 0 100 Subnet mask 255 255 255 0 Tip In the event that your computer already has a local connection with the IP address listed above...

Page 46: ...to verify that the network is properly setup and running and that a qualified network administrator is on board Other than limited phone support Nobeltec is not able to provide support on Network ins...

Page 47: ...n 3 Open the Internet Protocol TCP IP Properties window by double clicking the Network icon that is going to be used to connect to the IR2 because PCs can connect to more than one network You may see...

Page 48: ...oftware on a new computer on which you want to see the InSight Radar TheWizard also sets up the communication ports for other NMEA devices such as a GPS heading sensor and more Important note for netw...

Page 49: ...Radar Wizard from the Start menu Remember If the Radar SetupWizard is not in the Nobeltec program group you have not installed the Nobeltec Navigation Software with the Insight Radar module Check to...

Page 50: ...he Radar Setup Wizard making sure to closely follow the instructions Figure 4 10 Search for Radar window Tip When you run the Radar SetupWizard make sure that your GPS head ing sensor and the radar ar...

Page 51: ...t you enter here will be saved in the Nobeltec program Initial Radar Setup Setting the Trigger Delay After successfully installing the radar the transmit trigger delay should be reviewed and adjusted...

Page 52: ...line This software setting allows an offset to be entered into the program to compensate for this occurrence Radar Heading Line For similar reasons to the compass it is not always possible to install...

Page 53: ...rocess allows you to align the digital compass with the vessel center line This is normally a one time process that corrects the entire 360 equally To align the compass 1 Start the Nobeltec Navigation...

Page 54: ...adar return for the same land mass use the rotate scroll bar to adjust the rotation angle until the overlaid image aligns correctly Remember Make sure you have a heading sensor connected to the PC Wit...

Page 55: ...s you to enter correction values at each 5 increment Tip Using a Combination GPS Heading sensor that determines heading based on dual GPS antennas instead of magnetic significantly improves the accura...

Page 56: ...e the vessel heading to another heading and repeat the process until you feel confident that the radar image lines up with the chart at each heading Setting the Radar Presets The auto gain and auto se...

Page 57: ...ar to make sure you have the best image Follow these steps 1 Select Adjust Radar Presets by right clicking on the radar image window or from the Radar menu 2 Adjust the auto tune control down until yo...

Page 58: ...s not attempt to dynami cally adjust the sea clutter application but rather applies a static sea clutter control value based on the harbor sea clutter preset As with the Auto Gain setting the Auto Sea...

Page 59: ...The STC Curve function allows you to control the Sea Clutter profile of the radar By default the STC Curve profile is set to a value of 4 For most applications there should be no need to change this...

Page 60: ...IR2 IR2 HD2 and Higher Models 52 The PC Connection Installer s Guide profile is too low On the other hand if you notice that echoes disappear too quickly when applying sea clutter the STC profile may...

Page 61: ...W 25 kW Transmit frequency 9445 30 MHz 9410 30 MHz Beam Width Horizontal 6 0 3 9 2 5 1 8 1 8 1 2 1 8 1 2 0 8 Vertical 25 22 22 22 25 Rotation 24 RPM 24 48 RPM Pulse Length PRF Short 08 mSec 2000Hz Med...

Page 62: ...48 64 72 96 Minimum range Better than 25m 82 feet at 1 8 nm range Range discrimination Better than 25m 82 feet Range accuracy Better than 8m 26 feet or 0 9 of max range of scale in use Bearing accurac...

Page 63: ...less 70 watts or less 80 watts or less 90 watts or less 130 watts or less Preheat time 120 seconds 180 seconds Compass Safe Distance Component Type Name Standard Steering Antenna Unit IR2 HD2 2 0 m 1...

Page 64: ...Edition The major environmental specifica tions are as follows Temperature and humidity Operating Temperature Storage Temperature Humidity Antenna Unit 25 to 55 C 77 C 93 3 at 40 C Radar Base 15 to 55...

Page 65: ...Less than 1 Mbps Direct Play Port Assigned Dynamically by Microsoft Direct Play Bandwidth Consump tion Standard operation less than 1 Mbps Peaks during initial chart sharing at full consumption Serial...

Page 66: ...InSight Radar IR2 IR2 HD2 and Higher Models 58 Product Specifications Installer s Guide Dimensions and Weight IR2 4D Figure 5 1 IR2 4D...

Page 67: ...InSight Radar IR2 IR2 HD2 and Higher Models Nobeltec 59 Installer s Guide Product Specifications IR2 4 2 and IR2 4 4 Figure 5 2 IR2 4 3 and IR2 4 4...

Page 68: ...InSight Radar IR2 IR2 HD2 and Higher Models 60 Product Specifications Installer s Guide IR2 6 4 IR2 6 6 IR2 12 4 and IR2 12 6 Figure 5 3 IR2 6x and 12x...

Page 69: ...InSight Radar IR2 IR2 HD2 and Higher Models Nobeltec 61 Installer s Guide Product Specifications IR2 25 4 IR2 25 6 and IR2 25 9 Figure 5 4 IR2 25x...

Page 70: ...InSight Radar IR2 IR2 HD2 and Higher Models 62 Product Specifications Installer s Guide Radar Control Box MD5 5R and MDS 6R Figure 5 5 Radar Control Box...

Page 71: ...nd the radar with a ping 1 Turn on the radar and wait for one to two full minutes while the radar decides to use its default IP address 2 Reboot your computer 3 Once everything is up and running selec...

Page 72: ...ed correctly 3 The power is turned on to the radar and has been for at least one full minute 4 The LEDs on the RJ 45 connector on both the PC and the MDS box are illuminated and or blinking The left m...

Page 73: ...bleshooting 2 The Router hubs that Nobeltec recommends you use allow you to view the DHCP table to obtain all the devices on the network Using this tool for your Router hub locate the IP address of th...

Page 74: ...tton shows the entire list of devices on the network as shown below 4 The RadarSensor is clearly identified with its accompanying IP address 5 Select Start Run from the Taskbar 6 In the Open field typ...

Page 75: ...inated and or blinking The left most LED should remain solid while the other LED may blink 6 Verify the IP address and Subnet mask are obtained automatically 7 If you are uncertain about the PC s netw...

Page 76: ...en these two causes the smearing to occur Q My vessel already has an existing network and I am trying to connect my InSight Radar 2 into it but am having problems What should I do A There are a number...

Page 77: ...beltec InSight Radar IR2 is intended for use only by persons trained in navigation and only as a navigational aid not as the sole method of navigation Note The information in this manual and the speci...

Page 78: ...Nobeltec see the GETTING SERVICE section of this warranty Perfor mance of unauthorized warranty work elsewhere is not sanctioned nor will No beltec pay for such repairs Nobeltec will not be responsibl...

Page 79: ...box if possible Include on the package label The Return Mailing Address where the repaired unit can be sent The RMA number Nobeltec s address unless instructed to send elsewhere by a Nobeltec Custome...

Page 80: ...ental or conse quential damages resulting from furnishing this material or the performance or use of this product Nobeltec reserves the right to change product specification without notice Infor matio...

Page 81: ...Page intentionally left blank...

Page 82: ...www nobeltec com Printed in USA Press Date January 2011 2011 Nobeltec Inc All rights reserved 1 2011...

Reviews: