C
o
nf
ig
ur
in
g t
he
Ne
tw
o
rk
/ M
a
ci
nto
sh / Co
nne
ct
in
g to
an
In
frast
ruc
ture
Introduction
45
6
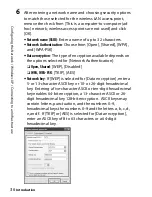
Enter the network name and other settings for the wireless
access point and click [OK].
•
Network Name
: Enter a name of up to 32 characters.
•
Wireless Security
: Choose from [None], [WEP Password], [WEP
40/128-bit hex], [WEP 40/128-bit ASCII], [WPA Personal], and
[WPA2 Personal]. [LEAP], [WPA Enterprise], [WPA2
Enterprise], and [802.1X WEP] can not be used with the
WT-4.
•
Password
: If WEP or WPA encryption is enabled, enter a
security key. The length of the key depends on the option
selected for [Wireless Security]:
❏
[WEP Password]
: Enter a five- or thirteen-character key.
❏
[WEP 40/128 bit (hex)]
: Enter a 10- or 26-digit hexadecimal
key. Hexadecimal keys may contain only the numbers 0–9
and the letters a, b, c, d, e, and f.
❏
[WEP 40/128 bit (ASCII)]
: Enter a five- or thirteen-character key.
❏
[WPA-Personal], [WPA2-Personal]
: Enter a key of 8 to 63
characters.
Summary of Contents for WT-4
Page 1: ...Wireless Transmitter En User s Manual ...
Page 41: ...Configuring the Network Windows XP Creating an Ad Hoc Network Introduction 29 5 Click Add ...
Page 67: ...55 Copying Network Profiles to the Camera Ad Hoc Networks Using the WT 4 with a Computer ...
Page 136: ...124 Copying Network Profiles to the Camera Ad Hoc Networks Uploading Images to an ftp Server ...
Page 156: ...Connecting to the ftp Server Uploading Images to an ftp Server 144 4 Click Close ...
Page 162: ...Uploading Images Uploading Images to an ftp Server 150 ...
Page 186: ...174 Device Settings Format Transmitter s Memory Menu Guide ...


