117
C
rea
tin
g
f
tp
P
rof
iles Usin
g C
a
mer
a
M
e
n
u
s
Appendices
3
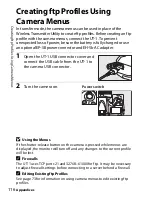
Press the power switch for about a
second to turn the UT-1 on.
4
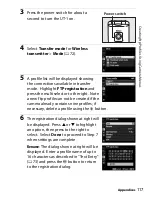
Select
Transfer mode
for
Wireless
transmitter
>
Mode
(
0
72).
5
A profile list will be displayed showing
the connections available in transfer
mode. Highlight
FTP registration
and
press the multi selector to the right. Note
a new ftp profile can not be created if the
camera already contains nine profiles; if
necessary, delete a profile using the
O
button.
6
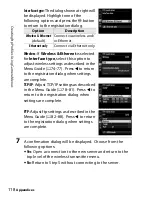
The registration dialog shown at right will
be displayed. Press
1
or
3
to highlight
an option, then press to the right to
select. Select
Done
to proceed to Step 7
when settings are complete.
Rename
: The dialog shown at right will be
displayed. Enter a profile name of up to
16 characters as described in “Text Entry”
(
0
73) and press the
J
button to return
to the registration dialog.
Power switch
Summary of Contents for UT-1
Page 1: ...Communication Unit User s Manual En ...
Page 30: ...18 Installing the Wireless Transmitter Utility Introduction ...
Page 41: ...Copying Network Profiles to the Camera Using the UT 1 with a Computer 29 ...
Page 60: ...PC Mode Using the UT 1 with a Computer 48 ...
Page 69: ...57 Copying Network Profiles to the Camera Uploading Pictures to an ftp Server ...
Page 82: ...70 Uploading Images Uploading Pictures to an ftp Server ...
Page 103: ...Print Menu Guide 91 Print PrintModeOnly The UT 1 does not support this option ...
Page 106: ...Device Settings Menu Guide 94 ...
Page 138: ...126 ...
Page 139: ......


