background image


23 

Setting the delivery table paper guides 


The patented “floating” or tilting delivery table on the HD-CXENVL-FDR is designed to advance the envelopes that 

the feed belts deliver, one at a time, into the printer’s manual feed tray feed roller.  


The delivery table is equipped with self-centering paper guides, an envelope drive belt, and a stop photo sensor at 

the end, which is used to stop each envelope in position underneath the printer’s feed roller, for take-away by the 

printer.   An additional envelope sensor is positioned a few inches back from the stop sensor.  This is the start 

sensor.  When the first envelope is pulled away by the printer, the trail edge of that envelope uncovers the start 

sensor, which starts the feeder motor.  Using the dual sensors allows the HD-CXENVL-FDR to run larger envelopes 

and keep pace with the printer. 
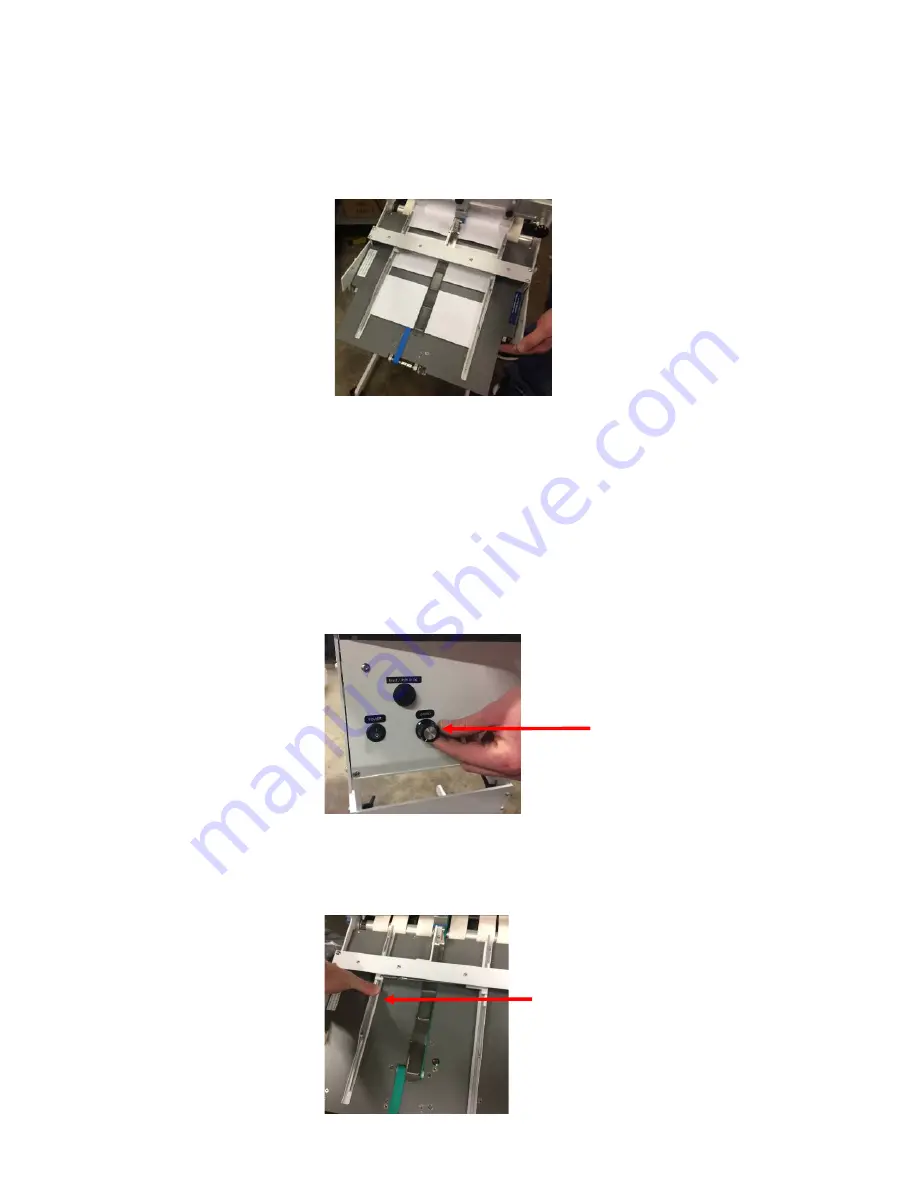
 

Step 1.   

After the feeder portion has been setup properly and a small stack of envelopes is loaded into the hopper, turn 

the speed control knob completely counter-clockwise to set the feeder speed on zero. 


Step 2. 

Grasp the delivery table paper guides near the bridge and move them outward toward the sides of the machine.  

CAUTION:  Do not push paper guides at the ends as it may bend the guides.   


Speed control knob


Move guides outward.  As you move 

one guide, the other will also move.


Summary of Contents for HD-CXENVL-FDR V2

Page 1: ...8 NOTE If you feeder looks different than shown above please refer to the guide for the original feeder version HD CXENVL FDR V1 Neopost Digital Print Group 3100 Horizon Drive Suite 100 King of Prussi...

Page 2: ...ge 19 Setting the Envelope Support Wedge for Other Envelope Types 22 Setting the delivery table paper guides 23 Testing the feeder 25 Setting the speed of the feeder 27 RUNNING A JOB WITH THE FEEDER A...

Page 3: ...ou must first remove the door from the manual feed tray First open the manual feed tray door on the right side of the printer 2 Press inward on the right side hinge of the door to release it from the...

Page 4: ...ssible for the sensor to detect the white plastic housing just to the left of the feed roller which can cause erratic feeding It is very important to place a piece of black tape or Velcro included wit...

Page 5: ...assembled and the feeder can be attached to the stand Feeder Stand Assembly When assembled the stand should look like this Step 1 Carefully remove the feeder and the stand components from the box and...

Page 6: ...op bolt is at the highest point in the slot Place a washer on the exposed bolt ends and then thread the locking levers onto the bolts Tighten the locking levers to hold leg in this position Step 5 Rep...

Page 7: ...a preliminary adjustment to the stand height easily before the feeder is bolted to the stand Final height adjustment may be necessary after the feeder is installed Place one side of the stand alongsid...

Page 8: ...lpful to have an assistant hold the stand steady while attaching the feeder Carefully lift the feeder up by grasping the bridge as shown below and place the feeder over the top of the stand with the s...

Page 9: ...rews on one side of the feeder first and then tighten the opposite side Aligning the feeder with the printer and final stand height adjustment Step 1 After the feeder has been attached to the stand ca...

Page 10: ...o into the manual feed tray just above the tray bottom and below the overhanging tabs on the manual feed tray side guides When the end of the delivery table is near the overhanging tabs on the manual...

Page 11: ...e way into position Step 7 Set the stand height on each side of the feeder so the top of the feeder side plate enters just underneath the gray metal plate on the printer as shown here THE STAND HEIGHT...

Page 12: ...oth legs of the stand securely You may now detach the feeder from the printer to set up your envelopes THE FEEDER IS EQUIPPED WITH A RELEASE LEVER ON THE NON OPERATOR SIDE THAT ALLOWS IT TO BE EASILY...

Page 13: ...usage are explained in detail within this manual Envelope support wedge Paper guide Bridge Feed belt 6 Paper guide adjustment knob Separator Delivery table paper guide Delivery table Start sensor Stop...

Page 14: ...ng presenting the envelope under the printer s feed roller for media take away As the printer removes the presented envelope from the delivery table the feeder will resume feeding when either sensor b...

Page 15: ...e following basic steps 1 Setting up the hopper paper guides 2 Setting up the sheet separator s 3 Setting the envelope support wedge back wedge 4 Setting the delivery table paper guides 5 Testing the...

Page 16: ...is turned both paper guides will move Step 4 Position one of your envelopes between the paper guides above the feed belts Step 5 While holding the envelope in position rotate the paper guide adjustin...

Page 17: ...dvanced by the feed belts from the bottom of the stack This forms a downward buckle in the envelope for easy separation from the stack This method is simple effective and easy to set up and does not r...

Page 18: ...counter clockwise to lower the separator tip onto the envelope Step 4 Continue to slowly lower the separator tip until the envelope is buckled downward between the belts slightly approximately 1 16 t...

Page 19: ...lts The envelope support wedge is attached to the top plate of the feeder When the feed motor is running the top plate and envelope support wedge move up and down to jostle the envelope stack This uni...

Page 20: ...lopes so that the bottom one will be the foremost envelope in the stack as shown here Step 3 Place the stack in the hopper on top of the envelope left on the belts from the separator setup Try to nudg...

Page 21: ...in the pictures above and below the support wedge should be in just far enough to hold the back edge of the envelope stack up off the belts Step 5 When the wedge is in position tighten the locking kn...

Page 22: ...lopes i e 9 x 12 or 10 x 13 tend to sag downward in the middle when supported in the front by the feed belts and the back by the wedge This sagging can result in miss feeds and inconsistent production...

Page 23: ...sensor This is the start sensor When the first envelope is pulled away by the printer the trail edge of that envelope uncovers the start sensor which starts the feeder motor Using the dual sensors all...

Page 24: ...ightly against the envelope as this will keep the envelopes from advancing down the delivery table Set the guides close to the envelope but do not pinch it Step 4 With the speed control all the way do...

Page 25: ...nce down the delivery table unrestricted you can release the RESET JOG button to stop the motor Note The motor will continue to run until the 4 second timer elapses OR the envelope reaches the stop se...

Page 26: ...table the two envelope sensors will become blocked When both sensors are blocked by one or more envelopes the motor will stop It is strongly recommended at this point to test the feeding and consiste...

Page 27: ...you have consistent feeding with consistent gaps between envelopes you are now ready to move the feeder into position with the printer Turn power to the feeder OFF and remove the envelope from the end...

Page 28: ...ing fast enough to stay ahead of the printer it will result in the printer s manual feed tray pickup roller trying to pull an envelope in before the feeder has advanced it into position This will resu...

Page 29: ...ry table approaches the overhanging tabs on the manual feed tray paper guides allow the table to drop down onto the manual tray 6 Slowly push the feeder in towards the printer If the side plates of th...

Page 30: ...n and the latches have secured the feeder in place set the speed control of the feeder on at least 70 of maximum speed 9 Turn the power switch ON to start the feeder The first envelope in the delivery...

Page 31: ...gin printing If you want to pause printing simply move the Feeder Ready Lever back right and the printer will consider this an envelope out condition The printer display will indicate that you need to...

Page 32: ...or not ready position Load more envelopes into the feeder and press the RESET button to start the motor and advance the first envelope down the delivery table to the stop sensor Then move the feeder r...

Page 33: ...printer A convenient release lever is positioned on the non operator side close to the printer for this purpose To detach the feeder pull the release lever back towards the feeder and move the feeder...

Page 34: ...wide range of speeds As a general rule the feeder will work best with the speed control set at approximately 50 to 70 of maximum As a general rule larger envelopes will require a higher speed setting...

Page 35: ...pes jams or is delayed in getting envelopes to the printer in time the printer will recognize this as a PAPER JAM and will indicate this on the display Since this circumstance may not actually be a pa...

Page 36: ...ng the HD CX1600 1700 1750 C9xx Printer 2 Cause Feeder not setup adjusted properly Solution Move feed away from printer and readjust separator s back wedge and paper guides so paper feeds consistently...

Page 37: ...sure consistent feeding Loosen envelope separator turn knob clockwise to allow envelopes to feed closer together 3 Cause Feeder ran out of media out of paper or hesitation in paper feed Solution Move...

Page 38: ...p Fuse 5 Amp located in the fuse holder on the back plate OPERATOR MAINTENANCE CAUTION Unplug power cord before cleaning Clean dust from the feeder and delivery table using a soft dry cloth soft brush...

Page 39: ...e height adjustment range of both the HD CXENVL FDR feeder and HD CXENVL CNV conveyor HD CXENVL CNV conveyor with HD CX1700 printer on HD CX 3IN1 3 paper trays with casters HD CXENVL FDR feeder NOTE T...

Reviews: