SL2100 GETTING STARTED GUIDE
25
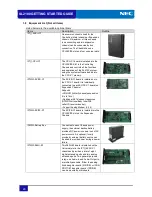
Items
List of Contents
Quantity
Note
IP7[ ]-CPU-C1
CPU-C1 Board
1
Lithium Battery (CR2032)
1
EULA sheet
1
IP7WW-082U-B1
082U-B1 Board
1
IP7WW-008U-C1
008U-C1 Board
1
IP7WW-000U-C1
000U-C1 Board
1
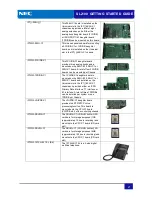
IP7WW-3COIDB-C1
3COIDB-C1 Board
1
3 x 8 Screw with Washer and Spring Washer
1
IP7WW-1PRIDB-C1
1PRIDB-C1 Board
1
3 x 8 Screw with Washer and Spring Washer
1
IP7WW-VOIPDB-C1
VoIP Daughter Board
1
3 x 8 Screw with Washer and Spring Washer
4
Unpack other parts as necessary.
Section 2
Installation
2.1 General Precautions
Ensure you take the following precautions when installing the SL2100 system.
•
To avoid shock or equipment damage, do not plug in or turn the system power on before
completing the installation process.
•
Avoid working with the equipment during electrical storms.
•
Use only commercial AC power to prevent shock or fire.
•
Use the power cord supplied with the chassis.
•
Install batteries with the correct polarity to prevent damaging equipment.
•
Never install telephone wiring during a lightning storm.
•
Never install telephone jacks in wet locations unless the jack is specifically designed for wet
locations.
•
Never touch uninsulated telephone wires or terminals unless the telephone line is
disconnected at the network interface.
•
To avoid damage, the chassis should not be placed on unstable surfaces.
•
To avoid damage the plastic parts, never use an electric screw driver to tighten the screws.
•
To prevent overheating, do not bundle AC power cords together.
•
Make sure the chassis has proper earth ground.
•
If Expansion Chassis are installed, turn the power on/off in the following order:
Expansion 2 Chassis, Expansion 1 Chassis and then Main Chassis
!! Not all boards are hot swappable. Do not remove or install from the chassis when powering
up.
2.2 Preparations
•
Make sure the necessary tools (screw driver set, pliers set, etc) are available.
•
Make sure you have a building plan showing common equipment, extensions, the telecom
demarcation, and earth ground location. The installation site must meet the following site /
environmental requirements.
2.3 Site Requirem
ents
・
The system should be wall-mounted only. Ensure enough space exists to allow the installation
of additional Chassis and/or a battery box.
・
A dedicated 100V-120V/220V/230V/240VAC circuit located within two meters of the Chassis is
required. A separate dedicated AC outlet is necessary for each Chassis.

