background image

Main Menu

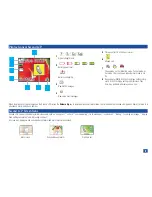
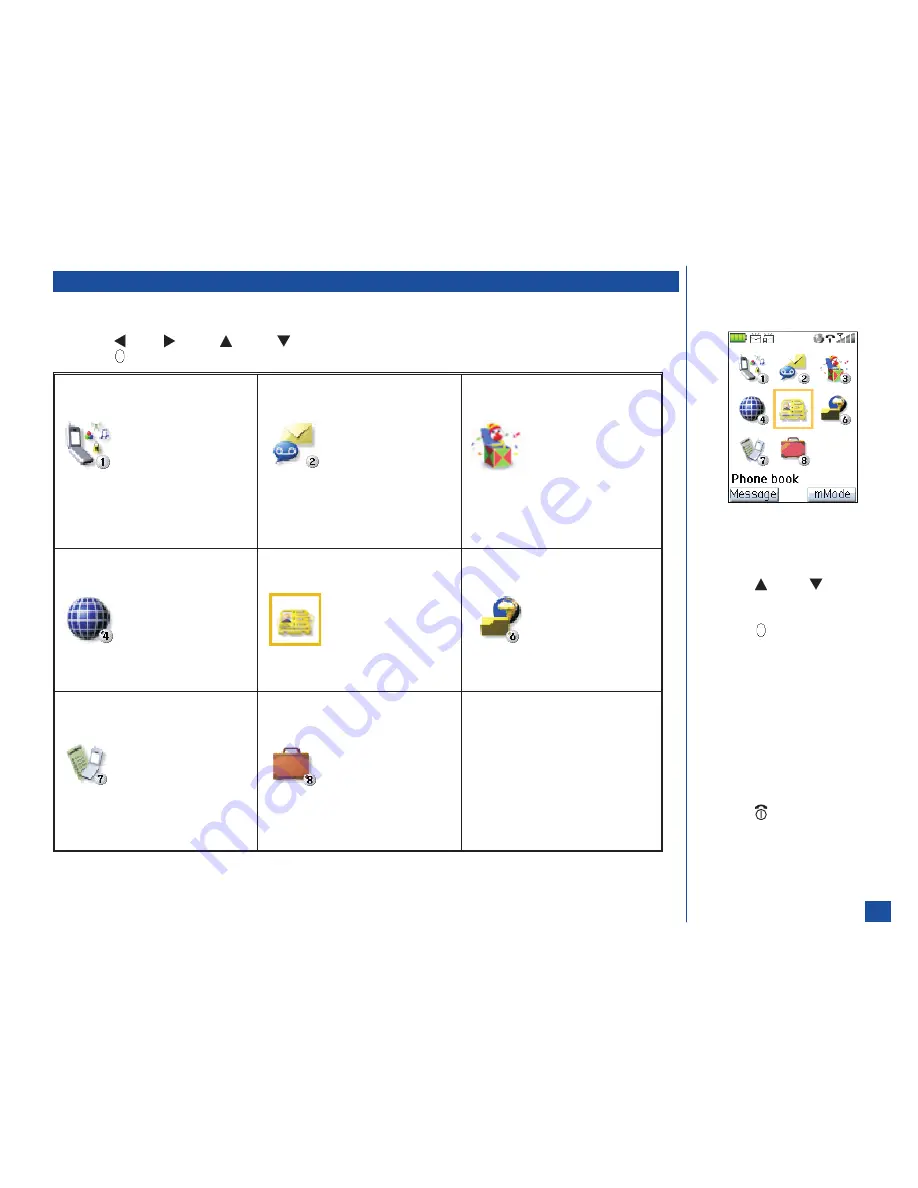
The menu structure begins with the Main Menu icons for top level options. To access a menu option:

*

Press

MENU

to access the Main Menu. Press the option number

1

through

8

or

press

(Left),

(Right),

(Up), or

(Down) navigation key to highlight the desired menu option with a box frame and

press

(Select) to confirm your choice. (See Flags for more information.)

1.

Settings

(Sub-menus)
1. Phone
2. Screen
3. Calls
4. Security
5. Network
6. Clock
7. Other
8. Reset

2.

Message center

(Sub-menus)
1. Inbox
2. Drafts
3. Outbox
4. Sent
5. Recycled
6. User 1
7. User 2
8. Voice

3.

Games and Apps

(Sub-menus)
1. Software list
2. mMode downloads
3. Settings

4. mMode

(Sub-menus)
1. mMode Home
2. Bookmarks
3. Go to webpage
4. Saved pages
5. Last address
6. Settings

5.

Phone book

(See Flag.)

(Sub-menus)
1. Lists
2. Information #s

6.

Audio and Visual

(Sub-menus)
1. Pictures
2. Music
3. Voice memo
4. Camera

7.

Call records

(Sub-menus)
1. Last call
2. Missed calls
3. Received calls
4. Dialed calls
5. Total calls

8. Tools

(Sub-menus)
1. Calculator
2. Scheduler
3. ToDo list
4. Notepad
5. Currency converter
6. Synchronization
7. IR Receive

O

A Main Menu Icon becomes animated
when it is highlighted.

O

The default highlighted selection for
the Main Menu is Phone book.

O

When an option list is displayed,
press

(Up) or

(Down)

navigation key to move the highlight
box over the desired option, and
press

(Select) to select the

option.

O

The currently selected option setting
on a sub-menu is marked by a
checkmark if the options are not
numbered. The selected option
setting number is green if the
options are numbered.

O

Press

CLR

(Clear/Back) to return to

the previous screen.

O

Press

(End/On-Off) to return to

the Idle screen.

4

Summary of Contents for 525

Page 1: ...RE PROVIDED ON AN AS IS BASIS EXCEPT AS REQUIRED BY APPLICABLE LAW NO WARRANTIES OF ANY KIND EITHER EXPRESSED OR IMPLIED INCLUDING BUT NOT LIMITED TO THE IMPLIED WARRANTY OF MERCHANTABILITY OR FITNESS FOR A PARTICULAR PURPOSE ARE MADE REGARDING THE ACCURACY COMPLETENESS OR CONTENTS OF THIS GUIDE NEC RESERVES THE RIGHT TO REVISE OR RESCIND THIS GUIDE AT ANY TIME WITHOUT PRIOR NOTICE NEC IS NOT RESP...

Page 2: ... CALLS AND PHONE USE 22 PERSONALIZING SETTINGS 30 TEXT ENTRY 57 MESSAGING AND VOICE MAIL 63 GAMES AND APPS 83 WEB BROWSER 87 PHONEBOOK 99 AUDIO AND VISUAL 121 CAMERA FUNCTIONS 131 CALL RECORDS 137 TOOLS 141 ACCESSORIES 165 FDA INFORMATION 168 WARRANTY 173 ii ...

Page 3: ...Equipped with an Air Bag 14 Battery Care and Disposal 14 Performance 15 Third Party Equipment 15 Service 15 Efficient Use 15 Battery 15 Idle and Talk Times 15 Antenna 15 Licenses 16 Getting Started 17 Service Activation 17 Voice Mail and Text Messaging 17 PIN and Security Codes 17 SIM Card 18 Inserting a SIM Card 18 Removing a SIM Card 18 Preparing the Battery 19 Charging the Battery the First Tim...

Page 4: ...te Any Key Answer Option 35 Ring Silencer 35 Activate Ring Silencer Option 35 Deactivate Ring Silencer Option 35 Volume Key 35 ALS 36 Own Number 36 Language 36 Screen Settings 37 Main LCD 37 Wallpaper 37 Color Theme 37 Contrast 37 Display Call Timer 38 Auto hyphenation 38 Second LCD 38 Display 38 Clock Screen 38 Clock Type 39 Picture Screen 39 Display Direction 40 Contrast 40 Power Saving 40 Event...

Page 5: ... 56 Erase Data 56 Text Entry 57 Normal Text ABC 57 Numbers 57 T9TM Text Entry 58 Symbol Mode 58 Text Entry Options Menu 59 Text Color 59 Text Format 59 Text Alignment 59 Text Paste 60 Text Highlight 60 Insert Object 61 T9 Text Language 62 Text Edit Settings 62 Messaging and Voice Mail 63 Accessing Messages 63 Message Center Overview 63 Message Center Folders 64 Message Center Icons 64 Message Cent...

Page 6: ...ding Pictures 91 NEC Site 92 Bookmarks 92 Adding a Bookmark 92 Go to Bookmark 92 Bookmark Folder Options Menu 93 Bookmark List Options Menu 93 93 Deleting Bookmarks 94 Saved Pages 95 Saving a Page 95 Viewing a Saved Page 95 Save Pages Options Menu 95 Protecting a Saved Page 96 Deleting Saved Pages 96 Settings 97 Setting Scroll 97 Setting Load Files 97 Setting Tables and Wrap Text 97 Setting Cookie...

Page 7: ...Shortcut to Voice Tag 120 Sending IR from Phonebook 120 Audio and Visual 121 Pictures 122 Selecting and Displaying an Image 122 Using Pictures Options Menu 122 View Detail 122 Edit File Name 122 Delete Current 123 Delete All 123 Send as Email 123 Send MMS Message 123 Edit 123 Set as Wallpaper 125 Slide Show 125 Picture mMode Downloads 125 Music 126 Display the Music List Screen 126 Selecting and P...

Page 8: ...155 IR Sending 155 Changing Task Detail Status 155 Notepad 156 Viewing Notes 156 Adding and Editing Notes 156 Deleting Notes 157 Sending as Email 158 Sending as SMS 158 Currency Converter 159 Setting the Currency Converter Fields 159 Resetting Currency Converter Fields 159 Synchronization 160 Setup for Synchronization 160 Synchronizing 160 Synchronization Process 161 Full Synchronization 161 Confl...

Page 9: ...cially important when you are roaming among networks User Guide Conventions The user guide legends direct your attention to specific information and are identified in the right column The instructions for all tasks and phone functions start at the Idle screen see page 3 unless instructed otherwise When one or more of the Left Right Up and Down symbols are shown in the user guide press the correspo...

Page 10: ...vigation key symbols are Left Right Up and Down The navigation keys are located on the outer edge of the oval shape Press the corresponding part of the 4 way navigation key to move the cursor scroll cycle or highlight Navigation keys are also used as keypad shortcuts to access a specific menu or list Refer to page 5 for more keypad shortcuts information The Send key is used to dial and send calls ...

Page 11: ...Displays the finder screen l Event indications Indicates events occurrence such as during call on hold communicating for IR exchange received call dialing receiving a message display fixed setting completed and adjusting contrast l Battery information Displays the low battery alarm and charger connected indication l Alarms Displays the schedule event alarm and alarm clock when they are activated S...

Page 12: ... Phone book See Flag Sub menus 1 Lists 2 Information s 6 Audio and Visual Sub menus 1 Pictures 2 Music 3 Voice memo 4 Camera 7 Call records Sub menus 1 Last call 2 Missed calls 3 Received calls 4 Dialed calls 5 Total calls 8 Tools Sub menus 1 Calculator 2 Scheduler 3 ToDo list 4 Notepad 5 Currency converter 6 Synchronization 7 IR Receive O A Main Menu Icon becomes animated when it is highlighted O...

Page 13: ...ection method to set Any Answer Key feature On or Off as follows Press MENU Main 1 1 3 and 1 The option is set to any key answer and returns to the previous menu Use the shortcut selection method to access the calculator function as follows Press MENU Main 8 and 1 to display the Calculator screen Keypad Shortcuts The following single button shortcuts are available from the Idle screen the screen t...

Page 14: ...ce SMS l Multi party call capability conference calling l One button Internet access mMode l Organize your life with SyncML functionality synchronizes Phone book ToDo s and Scheduler Calendar l Contacts l Scheduler Calendar events l ToDo tasks l Personalize your phone with down loadable content l 40 layer polyphonic ring tunes l Wallpapers l Picture caller id 10 l Phone mode operation Normal Meeti...

Page 15: ...ine status encrypted black unencrypted red 9 Signal strength level No network connected out of the service area 10 Alarm set On 11 Camera Options Menu 12 TTY set On 13 Java auto run failure 14 Phone mode set On Meeting mode Pocket mode or Car mode No icon shows when Normal mode is set On 15 Vibrate mode set On Vibrate mode and silent set On Silent set On 16 Remote time as set for 12 or 24 hour for...

Page 16: ...aling Dialed Call Connected Received call Sending Message Checking Server Pop up Screen Icons Busy Please Wait Decision symbol Activity successful Activity failed Alert Pop up Icons Reminder of scheduled event Low battery alert Something needs attention 8 ...

Page 17: ...ay and date all display on one line When the missed call icon displays on the Second LCD press the Volume Up key to view the missed call information the time and date of missed call person s name if stored in a phonebook entry and phone number Second LCD Screen Icons Second LCD screen icons display to indicate events such as during call on hold communicating for IR exchange received call dialing r...

Page 18: ...before attempting an emergency call If your battery is empty see page 19 you can not make or receive any calls including emergency calls To make an emergency call in the United States Input the emergency number for your present location i e 911 or other designated emergency number Press Send Ask the operator for the service you require Police Ambulance Fire Coastguard or Mountain Rescue Services G...

Page 19: ...atically charged cloth Do not use chemical or abrasive cleaners as these may damage the case See Flag for recycling information General Safety l The earpiece and phone may become warm during normal use The unit itself may become warm during charging and use l Observe Turn off 2 way radio signs such as those near gas stations chemicals or explosives See Flag l A small rubber plug for hands free soc...

Page 20: ...and FCC requirements While there may be differences between the SAR levels of various phones and at various positions they all meet the government requirement Body worn Operation The FCC has granted an Equipment Authorization for this model phone with all reported SAR levels evaluated as in compliance with the FCC RF exposure guidelines SAR information on this model phone is on file with the FCC a...

Page 21: ...of such interference you may want to consult your wireless service provider Other Medical Devices and Medical Facilities Operation of wireless phones could interfere with medical devices or implanted equipment which are inadequately shielded from external RF energy Consult a physician or the manufacturer of the medical device to determine if such devices are adequately shielded Turn Off your phone...

Page 22: ...es where the temperature could exceed 140 F i e on a car dashboard on a window sill in direct sunlight etc Do not put your phone s battery in your mouth as battery electrolytes may be toxic if swallowed Keep the battery away from children It is not a toy and it could be a choking hazard Your phone battery is a sealed unit with no serviceable parts inside do not attempt to open the battery covering...

Page 23: ...n as you would any other phone and speak directly into the mouthpiece Battery The 525 phone contains an 800 mAh standard Lithium ion battery Battery performance depends upon signal strength network configuration phone features selected battery age and condition battery charging habits temperatures to which battery is exposed and many like factors Idle and Talk Times Your wireless phone works close...

Page 24: ...ber 2238414B l Hong Kong Standard Pat Number HK0940329 l Republic of Singapore Pat No 51383 l Euro Pat Number 0 842 463 96927260 8 DE DK FI FR IT NL PT ES SE GB l Republic of Korea Pat Nos KR201211B1 and KR226206B1 l Additional patents are pending worldwide Copyright 2002 Music Airport Inc http www music airport com Copyright Yamaha Corporation http www yamaha com Pumatech the Pumatech logo Intell...

Page 25: ...ervice provider for information on availability and setup of these services PIN and Security Codes When your service is activated a PIN and PIN2 Personal Identification Number are provided by the wireless phone retailer and programmed into the SIM card Check with your wireless service provider for additional information regarding your security codes and passwords Use the PIN to lock and unlock SIM...

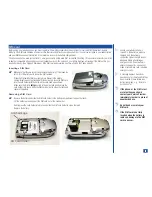
Page 26: ...he notch on the card lined up as shown Make sure the SIM is fully inserted in the holder and gently press the card holder into place Slide the SIM card holder to close the latch and replace the battery Removing a SIM Card Remove the battery and slide the SIM card holder in the battery compartment to open the latch Lift the holder up to easily pull the SIM card out of the card holder Gently press t...

Page 27: ...r battery pack The empty battery icon displays when the battery is nearly empty with approximately one minute of talk time remaining Full battery power Low battery power Battery empty red Check the icon at the top left corner of the screen the status bar see page 7 Low Battery Indication If battery is completely discharged or brand new there could be a few minutes delay before the charging indicat...

Page 28: ...f your phone as shown on page 165 Changing the Battery Make sure the phone is turned Off Some settings stored numbers and messages may be lost if the battery is removed while the power is On Slide the battery catch towards the base of the phone see in picture below Carefully lift the battery away from the phone see in picture below Put the new battery pack in place with the battery terminal end to...

Page 29: ... Menu Press 1 1 and 8 to display the Language screen See Flag Press the appropriate key to select the required language Press End to return to the Idle screen Frequency Bands The type of frequency band that you use depends upon your location See Flag Press MENU Main 1 5 and 4 to display Band Priority screen Press 1 to select the 850 1900 frequency band if you are located in the United States or pr...

Page 30: ...ft of the cursor or hold the CLR Clear Back key at least 2 seconds to delete the entire phone number Press a number key and it is inserted at the cursor position Ending Calls There are 3 ways to end a call 1 Press End On Off 2 Press MENU Options Menu and 9 to disconnect a call or 3 Close your phone See Flag The phone returns to Idle screen Receiving Calls When someone calls your number phone is po...

Page 31: ...d end the call the web browser screen returns You are still connected to the last website accessed Using Features Application During a Call There are a number of features and tools that you may use during a call The ones that you cannot use during a call are listed in the following table Phone Settings Screen Settings Calls Settings Security Settings Network Settings Clock Settings Other Settings ...

Page 32: ...e The last number you called displays Press Send again The last number you dialed is automatically called See Flag Plus Dialing Before you can enter a symbol in a number the cursor must be at the beginning of a number See Flag To make international calls Press and HOLD until the 0 character displayed changes to a character on the display The replaces the international access code used as the prefi...

Page 33: ...ced between the phone number and the extension number Do not enter a pause in an international number Make sure the condition in Plus Dialing does not apply Input the phone number Press and HOLD at least two seconds the Number Symbol key to insert a pause The letter P displays for the inserted pause Input the numbers to be dialed after the pause Speed Dialing There are two speed dial methods See F...

Page 34: ...nd the other button to decrease volume The volume buttons may be used to increase or decrease ringer volume when the hands free accessory is connected During an incoming message the volume buttons on the back of the flip cover adjust the ringer volume During the clock s daily alarm or a Scheduler alarm press a volume button on the back of the flip cover to silence the alarm if the Ring silencer op...

Page 35: ...iting from the Call in progress screen when you hear the beep tone Press Send to answer the new call and automatically place the current call on hold Finish the conversation and press End to terminate the new call Press Softkey 2 to take the first call off of hold You may switch between the calls Press Send to answer the new call and automatically place the current call on hold Press Softkey 2 Hol...

Page 36: ...e instructions in the previous topic to turn Off the DTMF tones When the call is being dialed the associated parties of the multi party call are placed on mute and cannot hear the conversation until the new caller is added to the conference call You can leave the conference call while the remaining participants carry on with the call See Flag A multi party call is considered as one call in progres...

Page 37: ...from the Call in progress screen Press MENU Options Menu 8 and Softkey 1 record to record Press Softkey 2 Stop to end recording before the 20 second time lapse At the end of 20 seconds recording automatically stops and the Call in progress screen displays IR Send Receive IR is short for infrared The Infrared Data Association a group of device manufacturers developed a standard for transmitting dat...

Page 38: ...creen and return to the Idle screen Phone Settings The Phone settings menu contains the settings for voice volume phone modes any key answer ring silencer volume key own number and language Voice Volume To change the volume during a call proceed as follows Press the buttons on the back of the flip Press the button nearest to the Second LCD screen to increase volume and the other button to decrease...

Page 39: ... selected mode and continues so until another mode is selected When Car mode is selected a message briefly displays Backlight is always on An icon displays on the Idle screen for the selected mode except for Normal mode an icon does not display See Flag The icons that display on the Idle screen for the phone modes are Meeting Mode Pocket Mode Car Mode Whichever mode the wireless phone is operating...

Page 40: ... Auto answer Off Always Off Off Off Changing Mode Settings The mode settings are how you want the wireless phone to operate when that mode is selected To change the settings of a particular mode proceed as follows At the Idle screen press Up a keypad shortcut navigation key or press MENU Main 1 1 and 2 to display the Phone modes menu Use the navigation keys to highlight the preferred mode Press So...

Page 41: ...e current ring volume setting and return to the previous menu Press Softkey 2 Cancel to reject any ring volume changes and return to the previous menu press CLR Clear Back to return to the previous screen with no changes or press End to exit and return to the Idle screen Message Tune To change the new message tune See Flag that will sound when the phone receives a message or Email Press 3 for New ...

Page 42: ...aveling into and out of the area where the network provides service To turn the service tone on or off Press 6 to display the Service tone screen Press 1 On for the tones to sound or press 2 Off for no tones to sound and return to the previous menu Vibrate The phone vibrates when a call is received To turn vibrate on or off Press 7 to display the Vibrate screen Press 1 On for the phone to vibrate ...

Page 43: ...ng a volume button for a received call when the flip is closed To silence the ring sound when the flip is open press any key except Send End On Off Softkey 1 or Softkey 2 If you wish to answer the call press Send to accept the call and begin your conversation Activate Ring Silencer Option Press MENU Main 1 1 4 and 1 to activate the ring silencer feature and return to the Phone menu Deactivate Ring...

Page 44: ...the options My Mobile Line 2 and Data display If the number has not been entered for the highlighted option no number displays on lower bottom of the screen Highlight the desired line number and Select to display the Edit screen Highlight the Name field and begin text entry to display the text editor screen Input the name and press Select to return to the Edit screen Highlight the Number field Inp...

Page 45: ...aving any changes and return to the Main LCD menu Color Theme To choose a color theme for the phone s Main LCD display proceed as follows Press MENU Main 1 2 1 and 2 to display the Color theme screen Press Up or Down navigation key to highlight a color theme The screen colors change to match the highlighted color theme Press Select Save when the desired color theme is highlighted or press the corr...

Page 46: ...d on the back of the phone s flip cover Display Press MENU Main 1 2 2 and 1 to display the Display screen Input 1 to set the Second LCD display On or 2 to set the Second LCD display Off The setting is saved and the display returns to the 2nd LCD menu Clock Screen A picture may be selected as the wallpaper to display on the Second LCD with display icons date and time Press MENU Main 1 2 2 and 2 to ...

Page 47: ...to return to the Pictures screen list with the picture name added to the list or press CLR Clear Back to cancel the picture and return to the Pictures list Repeat this step until all desired pictures are added to the list To remove a picture from the Picture screen list Press MENU Main 1 2 2 and 4 to display the Picture screen list Use the navigation keys to highlight the picture to be removed and...

Page 48: ...to the 2nd LCD menu Press CLR Clear Back or Softkey 2 Cancel to reject any contrast changes and return to the 2nd LCD menu Power Saving To set power saving on or off Press MENU Main 1 2 2 7 and 1 to display the Setting screen Input 1 to set power saving On or 2 to set power saving Off The setting is saved and the display returns to the Power saving screen To set the waiting time before power savin...

Page 49: ...d easy way to end call forwarding is to create and use a profile called OFF before establishing other profiles Select the Off profile to automatically end call forwarding To end call forwarding without the OFF profile you must change the settings for each call type to Never or No forward The default settings for all call types is Never or No forward Creating OFF Profile Creating the OFF profile el...

Page 50: ...or Down navigation key to highlight Unchanged Never Always or Conditional and press Select See Flag Always Press Down navigation key to highlight the number field under Always Input or change the call forwarding number without hyphens This is the phone number to which received calls will always be forwarded Conditional Press Down navigation key to highlight the Answer Time field See Flag Press Lef...

Page 51: ...g Off Press MENU Main 1 3 1 and 1 to display the Set forwarding profile list screen Highlight the Set forwarding OFF profile and press Select The OFF profile details screen displays Press Softkey 1 Set to set OFF profile and the Setting Status Progress screen displays A confirmation screen displays briefly with the dialogue Setting successful or Setting unsuccessful and returns to the Set Forwardi...

Page 52: ...ess is finished the Current Status screen displays Press Softkey 1 to exit the status screen and return to Call Forwarding menu Call Waiting Call waiting allows you to answer a received call during another call The phone provides a tone during a call to announce that another call is received To set the call waiting option On or Off and view the call waiting status proceed as follows Setting Call W...

Page 53: ...umbers While the handset is locked you cannot access any tools or information stored in the phone until a 4 8 digit security code is correctly entered Changing PINS PIN and PIN 2 codes are provided by your network service provider The security code is user defined and may be changed at any time The default security code is 0000 until you change it Once the security code is changed the default code...

Page 54: ...he function lock 1 Auto power up lock Phone is locked when powered On Enter your security code to unlock the phone for use 2 SIM PIN lock SIM card is locked Enter the PIN to unlock the SIM card and use the phone 3 Phone lock Locks the phone after powered On and displays locked screen Enter your security code to unlock 4 PIM lock Locks the PIM Personal Information Manager tools Phone book Scheduler...

Page 55: ... level is adequate or the security code entered To make an emergency call while the phone is locked Press Softkey 1 SOS or enter the emergency 911 number and press Send Fixed Dialing This feature allows you to restrict the use of dialed numbers to FDN Fixed Dialing Numbers only To change the settings for fixed dialing Press MENU Main 1 4 and 4 to display the Fixed dialing screen Input 1 to turn FD...

Page 56: ... they allow this feature s use Adding Network to Empty SIM List To add the first network to the SIM List screen Press MENU Main 1 5 and 3 to display the SIM list screen with statement SIM list empty Press Softkey 1 Add New or press MENU Options Menu and 2 to display the Add new screen Input the country location code and the network code Press Softkey 1 OK to return to the SIM list screen with the ...

Page 57: ...work code Press Softkey 1 OK to return to the SIM list with the new name displayed at the top of the list With the new network added to the SIM list press Softkey 1 Save to save the changes and return to the Network menu See Flag Removing a Network With the desired network highlighted and the SIM List Options menu displayed remove the network from the SIM List as follows Press 3 and a confirmation...

Page 58: ...he network time for the time setting A checkmark is placed in the box See Flag Press Down navigation key to move to the Offset field and input the hours and minutes for the preferred time difference Press Right navigation key to move to and radio buttons Press Up or Down navigation key to select the radio button for an advanced time difference or a behind time difference Press Softkey 1 OK to stor...

Page 59: ...enu Setting the Alarm Press MENU Main 1 6 and 4 to display the Set alarm screen With the alarm set to Off press Left navigation key to highlight On and press Select Press Down navigation key to move Set time field Input the required alarm time Press Right navigation key move to the am field and press Down or Up navigation key to highlight am or pm and press Select Press Down navigation key to move...

Page 60: ...selected radio buttons and return to the Clock menu Setting Time Zone To set up the time zone Press MENU Main 1 6 and 6 to display the Set time zone screen Press Up or Down navigation key to highlight the preferred time zone As each time zone is highlighted the Greenwich Mean Time GMT offet for the highlighted time zone displays in the colored bar near the bottom of the screen If the highlighted t...

Page 61: ...ss Enter the IP address of the server in numeric values only e g 000 00 000 00 Proxy address Enter the IP address of the Proxy server in numeric values only e g 000 00 000 00 Proxy Login Enter the user name and password provided for the proxy server address Phonebook Path Enter the relative path of the phonebook in the server Begin with e g contact personal ToDo list Path Enter the relative path o...

Page 62: ...t and press Select to display the entry screen or input the corresponding number of the desired list item to display the entry screen 1 APN Enter the Access Point Name that defines the network by name stored on GGSN 2 Proxy server Enter the proxy server that is between the client application such as a web browser and the real server 3 Portal URL Enter the web site service address that offers an ar...

Page 63: ...edge the certificate list information and return to the Certificate screen To set the certification validity Press MENU Main 1 7 3 and 3 to display the Certificate List screen Press Up or Down navigation key to highlight a certificate Press MENU Options Menu to display the Certificate Options menu Press 2 to display the Set validity screen Input the corresponding validity option number or highligh...

Page 64: ... to cancel with no application data erased and return to the Settings menu If erasing data the next 5 application reset erase data screens display Erase Data Five screens display to allow you to erase data for the following tools l Schedule Events ToDo Items and Notepad l SMS MMS and Email Messages l Downloaded pictures and music l Voice Memos l Downloaded Games and Applications pre loaded games t...

Page 65: ...ingle character or space to the left of the cursor with the Clear Mode set as Backspace in Edit settings Remove a single character or space to the right of the cursor with the Clear Mode set as Delete in Edit settings The maximum number of characters is defined as the number of single byte characters alphanumeric characters etc allowed in a field description If a double or triple byte character su...

Page 66: ...ut the characters for the new word Press Softkey 1 T9 to return to T9 text entry Symbol Mode In the symbol mode the screen displays the available symbols see the symbol screens below Make sure that the cursor is positioned where you want to input the symbol If a word is highlighted in T9 text entry move the cursor to the end of the word The symbol mode cannot be used if a word is highlighted Press...

Page 67: ...editor screen Press MENU Options Menu and 1 to display the Text Color screen Press Left Right Down or Up navigation key to highlight the desired text color or background color and press Select Press Softkey 1 OK to save the changes or press Softkey 2 Cancel to cancel the changes and return to the text editor screen Text Format At the text editor screen Press MENU Options Menu and 2 to display the ...

Page 68: ...hlight mode Options menu and input the corresponding number 1 To change the text color of the selected text on the text editor screen 2 To change the text format of the selected text on the text editor screen 3 To copy the selected text 4 To cut remove the selected text where it is located on the text editor screen 5 To delete the selected text from the text editor screen With the cursor positione...

Page 69: ... to return to the text editor screen and the emoticon is inserted Canned text provides a list of items to be added to the Add Quick Text list The Quick Text menu provides options to add new canned text items edit and delete existing canned text items and restore the list to the original default canned text list To add edit delete or restore canned text begin at the text editor screen and Press MEN...

Page 70: ...guage and press Select to return to the text editor screen Text Edit Settings Press MENU Options Menu and 8 to display the Edit Settings screen Use the navigation keys to highlight the type of write mode and clear mode of text entry and press Select to select the radio button Press Softkey 1 OK to save the settings and return to the text editor screen 62 ...

Page 71: ...lows you to send text messages with attached graphics audio and slide presentations The total data size cannot exceed 100 KB including the message text When you receive an MMS message you are notified by a message from the MMS center You can either automatically or manually receive the contents of an MMS message When sending MMS messages with slides each slide may contain an image sound and text Y...

Page 72: ...ame Press MENU Options Menu and 1 to display the Rename screen Press CLR Clear to remove the existing folder name before adding text for the new name Input the new name for the user folder and press Select to save the change and return to the Message center Options menu Message Center Icons The following icons represent the number of read and unread messages in the Message center folders Displays ...

Page 73: ...s all the messages in all folders on the same list 3 View msging status Displays the current number of messages stored in your phone and their total data size 4 Email settings Changes the settings for Email Messaging function 5 SMS settings Changes the settings for the SMS Messaging function 6 MMS settings Changes the settings for the MMS Messaging function 7 Voice mail number Displays and edits t...

Page 74: ...lag Press Softkey 1 Next to display the first SMTP screen Input the SMTP server and port override information Press Down navigation key to highlight Authentication and press Select to check or uncheck the box See Flag Press Softkey 1 Next to display the second SMTP screen If the SMTP user id and password are different from the POP3 user id and password input the SMTP user id and password If the SM...

Page 75: ...rvice provider To establish or edit the SMS settings Press Softkey 1 Message or MENU Main and 2 to display the Message center folder screen Press MENU Options Menu and 5 to display the first SMS settings screen Input the SMS center the short message service center number responsible for the relaying storing and forwarding short messages Email MDN and user Name Highlight Auto display and press Sele...

Page 76: ...See Flag Press Softkey 1 Next to display the third MMS settings screen See Flag Highlight a message size and press Select to select the radio button for the maximum message size Press Softkey 1 Next to display the fourth MMS settings screen See Flag Highlight a time period and press Select to select the radio button for the validity period Press Softkey 1 OK to save the MMS settings or changes and...

Page 77: ...atically and press Select to select the radio button Press Softkey 1 OK to save the broadcast setting or changes and return to the Broadcast menu To establish the filters for broadcast settings from the Message center folder screen Press Softkey 1 Message or MENU Main and 2 to display the Message center folder screen Press MENU Options Menu 8 and 3 to display the Filter screen Highlight the type o...

Page 78: ...en you receive an MMS message the MMS center sends you a notification message When the notification message is received a pop up message appears When Set auto receive setting is set as Auto the default the contents of the MMS message are downloaded automatically from the MMS center When Set auto receive setting is set as Manual only the notification message is saved in the Inbox To manually receiv...

Page 79: ...highlight the Email address if there is more than one press Right or Left navigation key to highlight the desired Email address See Flags Press MENU Options Menu and 2 to add the Email address to the blacklist Creating SMS or Email Message To create a new message from a phone number or Email address in the message text Highlight an item in a message center folder list and press Select to display t...

Page 80: ...ot included in this procedure or use the navigation keys to highlight a folder name and press Select to display the message center folder list screen Press MENU Options Menu and the option number to complete the desired function The following describes each function of the menu options that display for the message list Options menu 1 Move Message Moves the highlighted message to another folder or ...

Page 81: ...ge view screen Press MENU Options Menu and the option number to complete the desired function The following describes each function of the menu options that display for the message view Options menu 1 Move Message Moves the highlighted message to another message folder Inbox User 1 or User 2 or copy to the SIM card 2 Reply Displays Reply with the sender of the highlighted message in the To field 3...

Page 82: ...ot designed for only text messages because of the maximum 5 lines per composed screen Press Softkey 1 Message Softkey 2 New and 2 to display the New MMS screen Use the navigation keys to highlight the To field and press Select to display the text entry screen Input the recipient s number or press Phonebook to access the last viewed phone book list Highlight the desired phonebook entry and press Se...

Page 83: ...umber 01 to 60 in the highlighted number field and press Softkey 1 OK to return to the Composer screen To compose additional slides Press MENU Options Menu to display the first page of the Edit menu Highlight the Add slide option to add a slide after the current composed slide or highlight Insert slide option to add a slide before the current composed slide and press Select Or press the appropriat...

Page 84: ...t send setting as Account 1 or Account 2 the New Email screen displays with the To field blank The To field allows only one Email address To input the recipient s Email address that is not in the phonebook press Select to display the text entry screen Input the Email address and press Select to return to the New Email SMS or New Email screen For the New Email screen highlight the Cc field Follow t...

Page 85: ... Highlight the Attachment field and press Select to display the Attachments screen Highlight the attachment item to be deleted and press MENU Options Menu and 5 A confirmation screen displays Attachment deleted and returns you to the Attachments screen with the attachment item name removed from the list See Flag Saving Attachments An attachment received in an Email may be saved The slide show cont...

Page 86: ...ion is not available for a message type the option is disabled grayed out or does not appear in the menu 1 Change msg type For Emails and SMS Only Changes the message type of the message being created or edited 2 Send option For Emails Only Sets sending the Email now or at a specified date and time 3 Send using For Emails Only Sets the Email account 4 Priority For MMS Only Sets the priority from H...

Page 87: ...ress Select to display the message view screen Press MENU Options Menu and 1 to display the Move message screen Press the number corresponding to the folder 1 for Inbox 2 for User 1 or 3 for User 2 A confirmation screen displays Moved 1 message Moving Messages to SIM To move a message to the SIM memory from the message center folder list Press Softkey 1 Message or MENU Main and 2 to display the Me...

Page 88: ...ntly Press Softkey 1 Yes to delete the message stored in SIM or Softkey 2 No cancel the deletion When deleting SMS messages stored in the SIM memory these messages are not moved to the Recycle message center folder They are deleted permanently To delete a message from the message center folder list Options menu Press Softkey 1 Message or MENU Main and 2 to display the Message center folder screen ...

Page 89: ... messages that have been sent to the Recycle folder Press Softkey 1 Message to display the Message enter folder screen Press 5 to display the Recycled message center folder list screen Highlight a message item and press Softkey 1 Restore to restore the message to its previous message center folder Adding Email to Blacklist The Blacklist blocks specific Email addresses and those Emails are not down...

Page 90: ...e any letters and input the correct information Press Select to save the changes or press Softkey 2 Cancel to cancel any changes and return to the first Email blacklist screen Deleting a Blacklist Email An Email address may be removed from the Blacklist Press Softkey 1 Message or MENU Main and 2 to display the Message center folder screen Press MENU Options Menu 4 and 3 to display the Blacklist sc...

Page 91: ...re List To display and run an application or game from the software list Press MENU Main 3 and 1 to display the Software list of applications and games Press Up or Down navigation key to highlight the desired application game and press Select or input the corresponding number of the desired application game The selected application game begins If an application game is network server interactive a...

Page 92: ...software setting for auto start Press MENU Main 3 and 1 to display the Software list screen Use the navigation keys to highlight the desired application game and press MENU Options Menu to display the S W list menu Input 2 or use the navigation keys to highlight S W auto start and Select to display the S W auto start screen Use the navigation keys to highlight ON and press Select Use the navigatio...

Page 93: ...Displays the software description and information about the highlighted application game software which includes the name version memory size last modified etc 6 Upgrade The wireless phone automatically connects to the Internet and downloads the latest software version for an application or game 7 Delete this Allows the highlighted software application game to be deleted from the wireless phone 8 ...

Page 94: ...tem for all applications games or by the active software application game See Flag 4 S W desc Setting Allows a software description to display before the application game is selected to run or allows application game to run without displaying the software description 5 Check settings Displays the summary information of the first four application settings download auto start backlight and software ...

Page 95: ...g the Internet Accessing the Internet may be done by two methods l Press MENU Main and 4 to display the mMode menu Press 1 or Softkey 2 mMode or highlight the mMode Home option and press Select l Press Softkey 2 mMode It may take a few seconds for the mMode page to download and display The ways to access the Internet through Internet connections stored in the wireless phone are l Connect to URL in...

Page 96: ...y list When a new website is accessed the website URL is added to the top of the list and the oldest URL is removed Connect to URL in Saved Page From the Idle screen press MENU Main 4 and 4 to display the Saved pages screen Press Up or Down navigation key to highlight the saved page title and press Select or input the corresponding saved page number to view the saved page Highlight the URL if the ...

Page 97: ... To display the second mMode Options menu Press Right navigation key to go to the second mMode Options menu or highlight option 8 on the first page and press Down navigation key to go to the second menu Press Left navigation key to return to the first menu or highlight option 1 on the second page and press Up to return to the first menu The following describes each function of the menu options tha...

Page 98: ...ely using the application game Highlight No and press Select to return to the Application menu When downloading an application or game with Java programming the Games and Apps icon displays briefly on the screen Highlight Cancel and press Select to cancel the downloading process Downloading Sounds Sounds are saved to Music in Audio and Visual and listed in the Ring Tune list The selected sound mel...

Page 99: ...a text message Pictures may be attached to MMS messages and Emails The graphic files that have the following file extensions are supported by and may be saved to the 525 wireless phone gif jpeg jpg wbmp and png To download an image for viewing When you observe an image file link on the website use the navigation keys to highlight the image link Press Select to show the image file as a picture on t...

Page 100: ...be deleted or the folder name changed A total of 9 Bookmark folders are allowed The Add folder option becomes disabled grayed out with 9 Bookmark folders A total of 100 Bookmarks are allowed in all Bookmark folders To access the Bookmark folders Press MENU Main 4 and 2 to display the Bookmark folder screen Use the navigation keys to highlight the desired bookmark folder and press Select to display...

Page 101: ...lay the Bookmark folder list Options menu from the Bookmark folder screen Press MENU Main 4 and 2 to display the Bookmark folder screen Use the navigation keys to highlight the desired bookmark folder and press Select to display the Bookmark folder list screen Use the navigation keys to highlight the desired bookmark press MENU Options Menu and input the option number to complete the desired funct...

Page 102: ...kmark folder screen Use the navigation keys to highlight the desired bookmark folder and press Select to display the Bookmark folder list screen Press MENU Options Menu and 7 The Security code screen displays Enter the correct security code and press Select to display the decision screen Delete all bookmarks in this folder Use the navigation keys to highlight Yes or No and press Select If Yes was ...

Page 103: ...Press MENU Main 4 and 4 to display the Saved page screen Use the navigation keys to highlight a saved page and press Select to display the page Save Pages Options Menu Specific tasks may be completed through the Saved pages Options menu To display the Saved pages Options menu from the Save pages screen Press MENU Options Menu and the option number to complete the desired function The following des...

Page 104: ...ed page screen Press MENU Options Menu and 5 to display the list of saved pages A box displays beside each saved page name If the saved page is protected a lock icon is shown between the saved page name and the box Use the navigation keys to highlight a saved page and press Select to check or uncheck the box When all saved pages to be deleted have a checkmark beside them press Softkey 1 Done Prote...

Page 105: ... the Common settings menu Setting Load Files To set up the type of files to load to the wireless phone when accessing the Internet Press MENU Main 4 6 and 1 to display the Common settings screen Input 2 to load image files or 3 to load animation files The corresponding load screen displays Input 1 Yes to load the files or 2 No for no files to load when accessing the Internet and return to the Comm...

Page 106: ...the Browser settings Press MENU Main 4 6 2 and 4 to display Check settings screen for the browser settings Press CLR Clear Back to return to the Browser settings menu Setting Reset Setting reset clears or removes the bookmarks history addresses and saved pages Press MENU Main 4 6 and 3 to display Setting reset security code screen Input your security code and press Select to display Setting reset ...

Page 107: ... inquiries billing information sports lines weather lines etc If SDN is not supported by the network service provider SDN does not show as a phonebook When the phone is powered On the sorting process of the phonebook is run in the background If you immediately access the phonebook after powering On you can only use Softkey 1 Call to call a number in the Phone phonebook during the sorting process I...

Page 108: ...calls log or 4 for the Dialed calls log The respective call type log screen displays Press Up or Down navigation key to highlight an item in the list Press MENU Options Menu and 2 to copy the selected number to the Phone phonebook The Add new screen displays with the phone number in the number field Continue with the instructions provided in Storing Numbers and Names in Phonebook Adding a New Name...

Page 109: ...pe displays The phonebook name appears at lower left above the Softkey 1 indicator Press Softkey 1 OK to save the name number entry in the suggested location of the selected phonebook To store the number entry in a specific location press CLR Clear Back to remove the suggested location number and input the preferred location number in the Enter location field Press Softkey 1 OK to save the name nu...

Page 110: ...type screen offers alternative number types to identify the new number See Flag Press Up or Down navigation key to highlight the number type and press Select or input the appropriate option number see number type in right column to identify the new entry s number type The name number entry is assigned the selected number type the entry is saved and a confirmation screen briefly states Entry saved ...

Page 111: ...mber of entry characters for the edit fields are l Name Field 30 characters l Phone Number Fields 40 characters for international call access and P for pause are considered a character space See Flag l Email Fields 64 characters l Information Fields 64 characters When adding a new entry upon pressing Softkey 1 Yes at the Input more fields screen the Edit screen displays to add more information Ski...

Page 112: ...e to assign the entry to the Group and return to the screen where you started the add edit process To remove a phone entry from all Groups Press Up or Down navigation key to highlight the Group field and press Select to display the Group list screen Press Up or Down navigation key to highlight No Group and press Select Save to assign the entry to No Group and return to the Edit screen Continue wit...

Page 113: ...ory and none in the SIM memory Refer to page 117 for instructions using a voice tag Allocate LED Color A color may be selected to flash on the LED when the person of the phone entry calls your wireless phone The LED color may be allocated by cycling through the LED field or at the LED screen To allocate a color in the LED field Press Up or Down navigation key to highlight the LED field Press Left ...

Page 114: ...on of the phone entry calls your phone Press Up or Down navigation key to highlight the Default melody field and press Select to display the Melody list screen Press Up or Down navigation key to highlight the preferred melody name Press Softkey 1 Play to play the highlighted melody name Press Softkey 2 Stop to stop the ring tune sound and return to the Melody list screen With the preferred melody ...

Page 115: ...k location and a number type press Softkey 1 Yes at the Input more fields decision screen The Edit screen displays to add more information or edit existing fields for the new contact entry From Phonebook Options Menu Press Phonebook until preferred phonebook displays Press Up or Down navigation key to highlight the phonebook entry Press MENU Options Menu and 2 to display the Edit screen from the p...

Page 116: ...ls Options menu from the entry details screen Press Phonebook until preferred phonebook displays Press Up or Down navigation key to highlight the phonebook entry and press Select to display the entry detail screen Press MENU Options Menu and the option number to complete the desired function The following describes each function of the menu options that display 1 Call Dial and connect to a highlig...

Page 117: ...se the location number and input the location numbers to include in the copy process For example instead of copying all of the location numbers provided 1 to 125 you may choose to copy only 30 to 95 Press Softkey 1 OK to identify the total numbers to be copied or press Softkey 2 Cancel to cancel the copy process and return to the Phone phonebook Press Softkey 1 Yes to begin checking memory availab...

Page 118: ...mplete If you press Softkey 2 Cancel during the copying process the copy process stops and a screen displays the number of entries that were copied Copying Moving a Phonebook Entry From the entry details Option menu you are allowed to copy or move an entry record to another location within the same phonebook or to a location in another phonebook Press Phonebook until the preferred phonebook displa...

Page 119: ...ype is copied or moved to the one number field in SIM as a new SIM entry or FDN as a new FDN entry The screen returns to where the copy or move process was started Overwrite Location If a preferred location number is already in use a message displays Overwrite the entry Press Softkey 1 Yes to confirm the replacement or press Softkey 2 No to cancel If a preferred phonebook is full input the locatio...

Page 120: ...ntry name displays at the top of the screen in the title bar with the location number to the right of the entry name Press MENU Options Menu and 6 to display the entry name with Delete this entry Press Softkey 1 Yes to delete the entry and a confirmation screen displays Entry deleted or press Softkey 2 No to cancel the deletion From Group Entries List At the list of entries assigned to a displayed...

Page 121: ... a group Displaying All Groups and Group Entries Press Phonebook to display the phonebook in phone memory Press MENU Options Menu 5 and 3 to display the Group list screen a list of all the group names Unassigned contains the phonebook entries that have not been assigned to a group Press Up or Down navigation key to highlight the group name and press Select to display the group entries list screen ...

Page 122: ... Options Menu While viewing the list of phonebook entries assigned to a displayed Group you may go back to the Phone phonebook to select a phonebook entry assigned to another group or not assigned to a group and add the selected phonebook entry to the current displayed Group Press Phonebook to display the Phone entries in SIM phonebook cannot be allocated to a group Press MENU Options Menu 5 and 3...

Page 123: ... display the Phone entries in SIM phonebook cannot be allocated to a group Press MENU Options Menu 5 and 3 to display the Group list screen Press Up or Down navigation key to highlight a Group name and press Select The Group name with a list of assigned phonebook entries displays Press Up or Down navigation key to highlight the entry to remove from a group Press MENU Options Menu and 4 to remove t...

Page 124: ...g with J or twice for names beginning with K With the desired entry highlighted press Left or Right navigation key to view the next or previous number and number type icon home mobile work etc or Email address at the bottom of the screen Location Press Phonebook to display the preferred phonebook Press MENU Options Menu and 6 to display the Sort screen Pres Up or Down navigation key to highlight L...

Page 125: ...Edit screen and press Send key To create send an Email to the Email address at the bottom of the screen press Softkey 1 Mail and the New E mail screen displays Refer to page 76 for Email instructions See page 104 to add a voice tag to a phonebook entry Calling Stored Numbers To automatically dial a highlighted entry in a phonebook list or a group list with a number type displayed at the bottom of ...

Page 126: ... press MENU Options Menu and 2 The New Email screen displays if the default send setting is Account 1 or Account 2 The New Email SMS screen displays if the default send setting is SMS Refer to page 76 for Email Message instructions Sending Message from Entry Details To send a SMS message from the entry details screen Press Up or Down navigation key to highlight the Mobile phone number for the entr...

Page 127: ...n key to highlight the voice field and press Select or press Softkey 2 Edit to display the Edit screen with the Voice tag field highlighted Press Select to display the Voice tag menu Input 2 to play the voice tag and place the wireless phone to your ear to hear the voice tag play After playing the screen returns to the Voice tag menu Press CLR Clear Back to return to a previous screen or press End...

Page 128: ...ice tags were deleted an attention screen displays Voice tag list empty Press Softkey 1 OK to return to the phonebook list screen Keypad Shortcut to Voice Tag The keypad shortcut to Voice tag is to press and HOLD Down navigation key Refer to page 117 for further instructions using the keypad shortcut to access a voice tag Sending IR from Phonebook The entry information in the Phone phonebook may b...

Page 129: ...ht Up or Down navigation key to highlight Audio and Visual option 6 with a box frame Audio and Visual menu icon becomes animated Press Select to confirm your choice See Flag To select an Audio and Visual option Press the Audio and Visual option number 1 through 4 or press Up or Down navigation key to move the highlight over the desired Audio and Visual option and press Select Remember to press CLR...

Page 130: ...creen use the navigation keys to scroll the image in the respective direction Using Pictures Options Menu In the Options Menu you can select operations functions for the selected image file To display the Pictures Options Menu Press Up or Down navigation key to highlight an image file and press MENU Options Menu to display the Pictures Options Menu Press Up or Down navigation key to highlight a me...

Page 131: ...Send MMS Message This option allows you to send the selected image file in an MMS message Press 6 or highlight the Send as MMS option and press Select to display New MMS screen Follow the instructions on page 74 to complete the MMS message Edit This option allows you to cut the image file reduce the image size and rotate the image file Press 7 or highlight the Edit option and press Select to displ...

Page 132: ...it to return to the Edit menu or press Softkey 1 Save to display the Save quality screen Continue with the instructions At the Save quality screen below To rotate the display of the image file Press 3 to display the image file Press Softkey 1 Left to rotate the image to the left or press Softkey 2 Right to rotate the image to the right Press Select The options to save and edit display Press Softke...

Page 133: ...t screen Press Softkey 1 View to begin the slide show To end the Slide Show Press CLR Clear Back and return to the Pictures screen To turn the Slide Show option Off Press MENU Options Menu and 9 to display the Slide Show screen Highlight the Off radio button and press Select which disables the Slide Duration field Press Softkey 1 OK to save the slide show setting as Off Picture mMode Downloads Thi...

Page 134: ...1 Play or press Select to play the highlighted music item Stop While the music item is playing press Softkey 2 Stop to stop the playback Pause While the music item is playing press Softkey 1 Pause to pause the current playback Press Softkey 1 Play to continue the replay of highlighted music Adjust Playback Volume While the music item is playing press Volume Up and Volume Down buttons on the flip t...

Page 135: ...sion screen Delete file name Press Softkey 1 Yes to execute the deletion or Softkey 2 No to cancel the deletion and return to the Music list screen Delete All To delete all the music items in the Music List screen Press 4 or highlight the Delete all option and press Select to display the decision screen Delete All Files Press Softkey 1 Yes to execute the deletion or Softkey 2 No to cancel the dele...

Page 136: ...et as Msg tune option and press Select The highlighted music file is set as the message tune Play Mode In Play mode screen you can select play modes Current only Continuous Repeat current and Repeat all Press 9 or highlight the Play mode option and press Select to display the Play mode menu Press Up or Down navigation key to highlight the desired play mode and press Select or press the correspondi...

Page 137: ...lect to display the memo Summary screen Press Softkey 1 OK to exit the memo Summary screen and return to the Voice memo screen Adding a Memo To record and add a memo from the Voice memo screen Press Softkey 1 Add New or press MENU Options Menu and 3 to display the Add new screen Press Softkey 1 Record to display the Record screen and begin the recording process Speak clearly holding the phone as y...

Page 138: ... memos one after another Press MENU Options Menu 1 and 2 to display the Play All screen and play the most recent memo See Flags Press Left navigation key to play the previous memo in the list and Right navigation key to play the next memo in the list With the Play All screen displayed press Softkey 1 Pause to pause playing memos and display the Play All Pause screen With the Play All Pause screen ...

Page 139: ...ery power level and battery charging 5 Signal strength level 6 Brightness control Press Up navigation key to increase brightness Press Down navigation key to decrease brightness The brightness level icon displays in the status bar 7 Softkey 1 Shutter Camera shutter to take picture Softkey 1 Start Start camera timer Displays only when self timer is set 8 Camera Options Menu The M icon represents th...

Page 140: ...Taking a Picture To take a picture using the Main LCD See Flag Activate the camera function Look into the camera view finder screen and adjust the camera position to place the target on the screen Hold the camera still and press Softkey 1 Shutter or press Select View the picture taken on the Main LCD To take a picture using the Second LCD Activate the camera function and press Asterisk Symbol or c...

Page 141: ...en but not saved from the Save Send screen Press MENU Options Menu and 1 to return to the camera view finder screen Continue taking a another picture Zoom Switch to Zoom or Normal focus by pressing Softkey 2 Zoom Normal on the camera view finder screen Controlling Brightness Press Up or Down navigation key to control the brightness level of the picture on the Camera viw finder screen The current b...

Page 142: ... be taken with the selected frame surrounding the picture Filtering To place a filter on the picture taken proceed as follows Press MENU Options Menu and 3 to display the Filtering screen Select the suitable filter None Monochrome or Sepia and press Select The camera view finder screen displays the image with the selected filter condition Take a picture as you normally would The saved picture will...

Page 143: ...keys to highlight a picture See Flag Press MENU Options Menu and 1 to display the View details screen of picture s file name file size file format and if allowed to be forwarded After viewing the picture details press Select or CLR Clear Back to return to the Pictures list screen Delete Current Picture To delete the current picture Press MENU Options Menu and 5 to display the Pictures list screen ...

Page 144: ...th the pictures you have taken added to the list Use the navigation keys to highlight a picture and press Softkey 1 View to view a picture A Pictures Options Menu is available to view picture details delete a selected picture or delete all pictures taken Follow the instructions on the previous page After a picture is taken and you are not satisfied with the picture use the Save Send Options Menu t...

Page 145: ... view the duration of the last call in hours and minutes Press Softkey 1 OK to exit and return to the Call records menu Call Logs Each call type log lists the last 20 phone numbers with caller s number information if available See Flag If the caller s number information is not provided the log displays Unknown The list displays with the last call type received at the top and the oldest call at the...

Page 146: ...ow details screen of a call record Press MENU Main and 7 to display the Call records menu Input the appropriate number 2 for the Missed calls log 3 for Received calls log or 4 for the Dialed calls log to display the respective call type log screen Press Up or Down navigation key to highlight an item in the call log Press MENU Options Menu and 4 to display the Show details screen Press Softkey 1 Ca...

Page 147: ...on screen asking Delete all entries Press Softkey 1 Yes to delete all items from the call log and a confirmation screen briefly displays All entries deleted or press Softkey 2 No to cancel the deletion The screen returns to the call log screen Viewing Call Record Details To view the details of a highlighted item in the call type log list Missed calls Received calls or Dialed calls Press MENU Main ...

Page 148: ...e total time duration for all calls Press MENU Main 7 and 5 to display the Total calls screen Press Softkey 1 OK to continue incrementing the current duration time exit the Total calls screen and return to the Call records menu Press Softkey 2 Reset to reset the current duration time to zero and return to the Call records menu 140 ...

Page 149: ...ugh 7 or press Up or Down navigation key to highlight the desired Tools option and press Select Remember to press CLR Clear Back key to return to the previous screen or press End to exit the screen and return to the Idle screen If the PIM lock is set On refer to Security settings and Locks on page 46 the security code entry screen displays each time Scheduler or ToDo are accessed The security code...

Page 150: ...ber 12 in Memory An M displays to the left of the calculation field Press CLR Clear Back for each digit till 0 displays Press 3 Up navigation key 5 and Select to display the interim result of 15 Press Right navigation key Softkey 2 and Select to display the final result of 27 See Flag Press Phonebook to clear all user input including the memory and display 0 in the calculation field With 0 in the ...

Page 151: ...the view last used when exiting out of the Scheduler with the current date highlighted See Flag At the Monthly Calendar screen Press Up navigation key to move and highlight a date in the previous week Press Down navigation key to move and highlight a date in the following week Press Left navigation key to move and highlight a previous date Press Right navigation key to move and highlight the next ...

Page 152: ...een Press MENU Main 8 and 2 to display the calendar screen press Softkey 1 to switch between weekly and monthly calendar Use the navigation keys to highlight the desired date and press Select to display the daily event list screen Press Softkey 2 Edit to display the Edit event screen To edit an event from the daily event list screen or the Details event screen using the Options Menu Press MENU Mai...

Page 153: ...ct the radio button for am or pm Press Softkey 1 OK to save store the entered date and time and return to the previous Add new or Edit screen Description Highlight the Description field and begin text entity to display the text editor screen Use the normal text entry procedures see page 57 to enter a description for the scheduled event up to 256 characters Press Select Save to store the event desc...

Page 154: ...s Softkey 2 No to cancel saving the changes and returns to the screen where you started the event edit daily event list or event details screen Copying an Event With an event displayed in the Daily Events or Details screen Press MENU Main 8 and 2 to display the Calendar screen press Softkey 1 to switch between weekly and monthly calendar Use the navigation keys to highlight the desired date and pr...

Page 155: ... Softkey 1 OK or press Softkey 2 Cancel If you have entered your PIM security code during current use of Scheduler the Scheduler security code screen does not display See Flag A decision screen displays with Delete all events Press Softkey 1 OK or press Softkey 2 No A confirmation screen displays with Event s deleted and returns to the Scheduler screen where you started Weekly Calendar Monthly Cal...

Page 156: ... screen Use the navigation keys to highlight the desired event with an URL and press Select to display the Daily Event list screen Press Left or Right navigation key to highlight the URL Press Softkey 2 Go to or press MENU Options Menu and 6 to access the Internet and go to the URL web site Viewing Events To list Public Events Private Events or all events for a specific date from the Weekly calend...

Page 157: ...ether the wireless phone is powered On or Off The Scheduler alert notification provides the event date time and description When the phone is powered On an alert notification displays on the current screen and the reminder tune sounds one time to remind you of a scheduled event If vibrate mode is set On the reminder tune does not sound The phone displays the alert notification and vibrates one tim...

Page 158: ...ed before a new task is added Viewing ToDo Tasks and Task Details To access and view the ToDo tasks Press MENU Main 8 and 3 to display the ToDo list menu The number of tasks in each list displays to the right of the list name Press Up or Down navigation key to highlight the list type Highlight Public and press Select to display the Public tasks If Private or All were selected the ToDo list securit...

Page 159: ...ay the selected task list Input your security code if the ToDo Security code entry screen displays and press Softkey 1 OK Press Up or Down navigation key to highlight the a task in the list and press Select to display the ToDo Details screen Press MENU Options Menu and 4 to display the ToDo Add new screen To edit a task from the Public Private or All list screen Press MENU Main 8 and 3 to display ...

Page 160: ...he task on a specified date input 4 Choose date and the Due date screen displays Input the 2 digits for day of the month the 2 digits for month and the 4 digits for year See Flag Press Softkey 1 OK to exit the Due date screen and return to the previous ToDo screen Add new or Edit Description Begin text entry to display the text editor screen Use the normal text entry procedures see page 57 to ente...

Page 161: ...displays the task due date task description and Delete this entry Press Softkey 1 Yes to delete the task and a confirmation screen displays Entry deleted or press Softkey 2 No to cancel the task deletion Display returns to the previous list screen To delete a single task from the ToDo Details screen Press Left or Right navigation key to cycle to and display the desired task Press MENU Options Menu...

Page 162: ...omplete tasks To filter the task list screens Press MENU Main 8 and 3 to display the ToDo List menu Press Up or Down navigation key to highlight the list type and press Select to display the selected task list Input your security code if the ToDo Security code entry screen displays and press Softkey 1 OK Press MENU Options Menu and 4 to display the Filter List menu Input 1for None list all tasks 2...

Page 163: ...in a direct line within a few feet from each other Press MENU Options Menu and 7 to send the highlighted ToDo task information A busy screen displays Sending Please wait If the send attempt fails a decision screen displays Cannot send Press Softkey 1 OK and return to the previous ToDo List screen To send your task to another 525 wireless phone from the ToDo Details screen Display the desired task ...

Page 164: ...note and Right navigation key to go to the next note Adding and Editing Notes The text editor screen is used to add or edit a note in Notepad To add a note from the Notepad list screen Press MENU Main 8 and 4 to display the Notepad list screen Press Softkey 1 Add New or press MENU Options Menu and 1 to display a blank text editor screen Use the normal text entry procedures see page 57 to input a n...

Page 165: ...ghlight a note and press Select to display the View note screen Press Softkey 2 Delete or press MENU Options Menu 3 and 1 to display the decision screen with Delete this entry Press Softkey 1 Yes to delete the note and a confirmation screen displays Entry deleted or press Softkey 2 No to cancel the deletion and return to the View note screen To delete a single note from the Notepad List Press MENU...

Page 166: ...ions Sending as SMS To send the note in a short text message from the Notepad list or View note screens Press MENU Options Menu and 5 to access Messaging and display a message screen The information from notepad is placed in the SMS Message field Continue the SMS message see page 74 for SMS message instructions O The New Email screen displays if the Email default send account setting is Account 1 ...

Page 167: ...e exchange rate and return to the Currency converter screen or press Softkey 2 Cancel to exit the Exchange rate screen without saving the rate and return to the Currency converter screen Highlight the Amount field and press Select to display the Amount screen Input the amount Press Softkey 1 to input a decimal in the appropriate place See Flag Press Select Save to save the amount and return to the...

Page 168: ...ld be done Specifying more than one for example phonebook contacts and ToDo tasks may cause an error message to appear To access Synchronization Press MENU Main 8 and 6 to display the security code entry screen or the Synchronization screen If the security code has not been entered during current use of the phone since last powering On input your security code and press Softkey 1 OK The Synchroniz...

Page 169: ...onization will occur Continue message displays Use the appropriate Softkey to continue or cancel the sync process Conflicts from Last Synchronization To view the number of application conflicts that occurred during the last synchronization from the Synchronization screen Press MENU Options Menu and 2 to display the Conflicts screen with the number of conflicts that occurred in each application Pre...

Page 170: ... Internet service provider The user id and passwords are case sensitive Synchronization cancelled There is an error during Sync l Retry Sync a couple of times l Reset SyncML logs and retry Sync l Power the phone Off back On and try Sync again l Check that the total phone entries have not reached full limits If full then start deleting some entries l Retry Sync a couple of times l If you are gettin...

Page 171: ...thin the name the word before the comma is treated as the last name and the word after the comma is treated as the first name During synchronization an entry of Doe John treats Doe as the last name and John as the first name An entry of John Doe without a comma treats John as the last name and Doe as the first name l Contacts with only a first name display on the 525 wireless phone with a space ma...

Page 172: ...tion the phone status field can change the original server status field l The 525 wireless phone only supports Business Personal and Other categories Any other category except for Business or Personal is mapped to Other During synchronization the phone category field can change the original server category field l The 525 wireless phone priority field may not match the server priority field l The ...

Page 173: ...d included in the wireless phone package O To purchase NEC Authentic AccessoriesTM please contact the NEC customer Care Center at 1 800 637 5917 in the United States O Look for the NEC Authentic AccessoriesTM logo to know if the item has been approved by NEC for use with the 525 I Not using NEC Authentic AccessoriesTM or not using NEC approved accessories may void your phone s warranty I WARNING T...

Page 174: ...oving it from the electrical outlet Use the correct voltage range The AC adapter is 100V 240V Do not leave the AC adapter plugged in when not in use Hands free Headset The foam covered ear piece is placed within your ear Do not put any other part of the headset in your ear Attach the clip near the neckline of your clothing so that the microphone is near your mouth Do not attach the clip to any par...

Page 175: ...e 525 plug end has release clips see picture below Squeeze the release clips and insert into the 525 adapter port When inserting the 525 plug be sure that the rectangular opening on the connector is lined up with the rectangular opening in the phone The plug will slide easily into the phone DO NOT FORCE THE PLUG When removing the plug from the phone squeeze both release clips and gently pull strai...

Page 176: ...e manufacturers of wireless phones to notify users of the health hazard and to repair replace or recall the phones so that the hazard no longer exists Although the existing scientific data does not justify FDA regulatory actions at this time FDA has urged the mobile phone industry to take a number of steps including the following l Support needed research into possible biological effects of RF of ...

Page 177: ...y The research done thus far has produced conflicting results and many studies have suffered from flaw in their research methods Animal experiments investigating the effects of radio frequency energy RF exposures characteristic of wireless phones have yielded conflicting results that often cannot be repeated in other laboratories A few animal studies however have suggested that low levels of RF co...

Page 178: ...f new research programs around the world The Project has also helped develop a series of public information documents on EMF issues FDA and the Cellular Telecommunications and Internet Association CTIA have a formal Cooperative Research and Development Agreement CRADA to do research on wireless phone safety FDA provides the scientific oversight obtaining input from experts in government industry a...

Page 179: ...y factor in how much exposure a person receives reducing the amount of time spent using a wireless phone will reduce RF exposure l If you must conduct extended conversations by wireless phone every day you could place more distance between your body and the source of the RF since the exposure level drops off dramatically with distance For example you could use a headset and carry the wireless phon...

Page 180: ...Institute of Electrical and Electronic Engineers IEEE This standard specifies test methods and performance requirements for hearing aids and wireless phones so that no interference occurs when a person uses a compatible phone and a compatible hearing aid at the same time This standard was approved by the IEEE in 2000 The FDA continues to monitor the use of wireless phones for possible interactions...

Page 181: ...iginal warranty period or ninety 90 days from the date of service return shipping whichever is longer 5 What will the manufacturer do if the product becomes defective in materials or workmanship during the warranty period If any product covered under this warranty becomes defective in materials or workmanship resulting in product failure during the applicable warranty period NECAM will at its opti...

Page 182: ... ALLOW THE EXCLUSION OR LIMITATION OF INCIDENTAL OR CONSEQUENTIAL DAMAGES SO THE ABOVE LIMITATION OR EXCLUSION MAY NOT APPLY TO YOU e THE REMEDIES CONTAINED HEREIN ARE YOUR SOLE AND EXCLUSIVE REMEDIES FOR BREACH OF WARRANTY 7 How do you get warranty service If your product requires warranty service it must be returned to a NECAM Distribution Center with shipping paid by You along with a descriptio...

Page 183: ...he warranty period If any Product covered under this warranty becomes defective in materials or workmanship during the applicable warranty period NECAM will at its option either repair the defective Product without charge for parts and labor or provide a replacement in exchange for the defective Product 6 What is not covered by this warranty a THIS WARRANTY DOES NOT EXTEND TO i Products which have...

Page 184: ...s warranty you will be notified and Your authorization will be requested for any further repair activity Products repaired under warranty will returned to you transportation prepaid You must pay return shipping costs for the Products repaired which are not covered by warranty 8 How does State law apply to this warranty This warranty gives you specific rights and you may also have other rights whic...

Page 185: ...ss in message text 71 Email Attachments 77 Email blacklist 81 Email message 76 Email settings 66 Emergency calls 10 25 Emoticons 61 Ending calls 22 F FDN setting 47 Format date 52 Format time 52 free size an image 123 Frequency bands 21 G Games and Apps 83 Games settings 86 General Care 11 Go to address 88 Graphic Display Area 3 Groups 113 H Holding a call 27 I Idle screen 3 Inserting SIM Card 18 ...

Page 186: ...re 132 Text edit setting 62 Text entry 57 Text entry options 59 Text highlight 60 Text Paste 60 Time setting 50 Time zone setting 52 To Do list 150 Total calls 140 TTY settings 54 U URL in message text 72 88 User Guide Conventions 1 User Guide Legends 1 V View finder 131 Voice mail 26 Voice mail setting 69 Voice memo 129 Voice tag 117 119 Volume 30 Volume controls 26 W Wallpaper setting 37 Web bro...

Page 187: ...sibility driving safely 6 Dial sensibly and assess the traffic if possible place calls when you are not moving or before pulling into traffic Try to plan calls when your car will be stationary If you need to make a call while moving dial only a few numbers check the road and your mirrors and then continue 7 Do not engage in stressful or emotional conversations that may be distracting Make people y...

Reviews: