7193 Service Guide
Chapter 5: Disassembling and Reassembling the Printer
August 1998
47
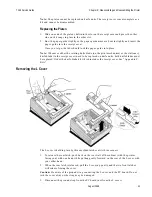
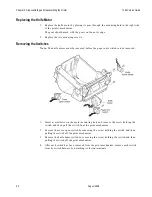
Replacing the Knife Assembly
1.
Place the left knife support over the left side of the knife blade.
2.
Slide the rotating blade into the right-hand knife support.
3.
Replace the two screws in the left-hand knife support, securing it to the frame.
4.
Place the slotted drive arm on the right end of the rotating blade.
5.
Replace the set screw in the top of the slotted drive arm by using a 1½ mm hex driver.
6.
Reattach the ground strap from the printhead to the right side of the rotating blade.
Summary of Contents for 7193
Page 1: ...BD20 1440 A Issue B August 1998 NCR 7193 Thermal Receipt Printer Service Guide ...
Page 6: ...Contents 7193 Service Guide August 1998 x ...
Page 10: ...Chapter 1 About the 7193 Printer 7193 Service Guide August 1998 4 ...
Page 19: ...7193 Service Guide Chapter 2 Installing the Printer August 1998 13 Parallel Models ...
Page 22: ...Chapter 2 Installing the Printer 7193 Service Guide August 1998 16 ...
Page 24: ...Chapter 2 Installing the Printer 7193 Service Guide August 1998 18 ...
Page 26: ...Chapter 2 Installing the Printer 7193 Service Guide August 1998 20 ...
Page 38: ...Chapter 3 Diagnostics 7193 Service Guide August 1998 32 ...
Page 66: ...Appendix B Ordering Paper and Supplies 7193 Service Guide August 1998 60 ...
Page 78: ...Appendix E Commands 7193 Service Guide August 1998 72 ...
Page 83: ......

