7193 Service Guide
Chapter 5: Disassembling and Reassembling the Printer
August 1998
45
Disconnecting Cables
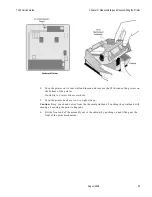
See the illustration on the facing page for the locations of the connectors on the PC board.
1.
Remove the following cables by gently tugging on the connector.
•
J1, sensor connector
•
J2, motor connector for knife motor (on knife unit)
•
J3, paper feed motor connector
•
J4, cash drawer connector
•
J7, 4-pin connector for printhead ground
2.
Remove the 30-pin ZIF connector (J8) for the printhead.
a.
Carefully pry up the outer shell of the ZIF connector with a screwdriver.
b.
Remove the flat flex cable from the connector, leaving the inner white connector
attached to the PC board.
Summary of Contents for 7193
Page 1: ...BD20 1440 A Issue B August 1998 NCR 7193 Thermal Receipt Printer Service Guide ...
Page 6: ...Contents 7193 Service Guide August 1998 x ...
Page 10: ...Chapter 1 About the 7193 Printer 7193 Service Guide August 1998 4 ...
Page 19: ...7193 Service Guide Chapter 2 Installing the Printer August 1998 13 Parallel Models ...
Page 22: ...Chapter 2 Installing the Printer 7193 Service Guide August 1998 16 ...
Page 24: ...Chapter 2 Installing the Printer 7193 Service Guide August 1998 18 ...
Page 26: ...Chapter 2 Installing the Printer 7193 Service Guide August 1998 20 ...
Page 38: ...Chapter 3 Diagnostics 7193 Service Guide August 1998 32 ...
Page 66: ...Appendix B Ordering Paper and Supplies 7193 Service Guide August 1998 60 ...
Page 78: ...Appendix E Commands 7193 Service Guide August 1998 72 ...
Page 83: ......

