7193 Service Guide
Chapter 2: Installing the Printer
August 1998
15
Testing the Printer
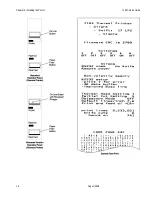
Run this test to check the printer. The test prints the settings for several functions, prints all
variations of the character sets, and partially cuts the paper between each variation. See the
“Diagnostics” chapter for a description of the functions.
A sample printout (RS-232C) is shown later in this section. The printouts for other models
are similar. The test ends with a partial cut, then begins again. Several feet of paper can be
used to print one pass of the test.
Running the test is slightly different for printers receiving power from the host computer
and printers receiving power from a power supply.
Additional diagnostic tests may be performed. For more information, see “Diagnostics”
later in this book.
Models Receiving Power from the Power Supply (Remote)
1.
Press the On Line button on the operator panel to take the printer off-line.
The On Line light turns off indicating the printer is off-line.
2.
Press and hold the Paper Feed button while pressing the On Line button.
3.
Let go of the Paper Feed button once the printing begins.
The printer begins printing the data and character sets. This can be given to a service
representative if it appears there is a problem.
4.
To stop the test, press the On Line button.
The On Line light turns off indicating the printer is off-line.
5.
To return to the on-line mode, press the On Line button again.
The printer is ready to receive and print data from the host computer.
Models Receiving Power from the Host (Integrated)
1.
Open the receipt cover by pulling up on the front left corner.
The Paper Out light (red) comes on indicating that the receipt cover is open and that
the printer cannot receive or print data (not that the paper is out).
2.
Press and hold down the Paper Feed button while closing the receipt cover.
3.
Let go of the Paper Feed button once the printing begins.
The printer begins printing the data and character sets. This can be given to a service
representative if it appears there is a problem.
4.
To stop the test, press the Paper Feed button.
The printer returns to the on-line mode and is ready to receive and print data from the
host computer.
Summary of Contents for 7193
Page 1: ...BD20 1440 A Issue B August 1998 NCR 7193 Thermal Receipt Printer Service Guide ...
Page 6: ...Contents 7193 Service Guide August 1998 x ...
Page 10: ...Chapter 1 About the 7193 Printer 7193 Service Guide August 1998 4 ...
Page 19: ...7193 Service Guide Chapter 2 Installing the Printer August 1998 13 Parallel Models ...
Page 22: ...Chapter 2 Installing the Printer 7193 Service Guide August 1998 16 ...
Page 24: ...Chapter 2 Installing the Printer 7193 Service Guide August 1998 18 ...
Page 26: ...Chapter 2 Installing the Printer 7193 Service Guide August 1998 20 ...
Page 38: ...Chapter 3 Diagnostics 7193 Service Guide August 1998 32 ...
Page 66: ...Appendix B Ordering Paper and Supplies 7193 Service Guide August 1998 60 ...
Page 78: ...Appendix E Commands 7193 Service Guide August 1998 72 ...
Page 83: ......

