1.13
Getting started
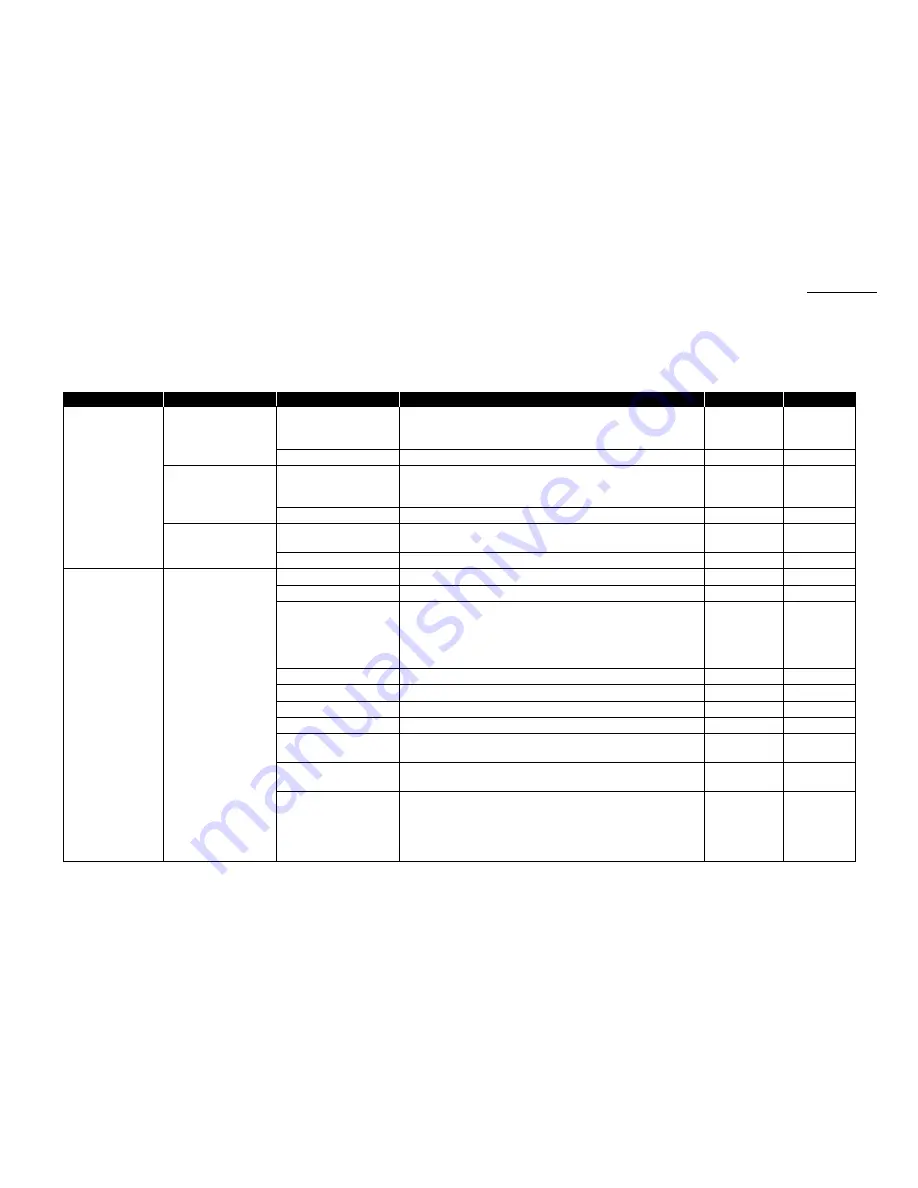
Function table
Note: Your machine can print a function list. It lists the functions available on your fax machine and the keystrokes needed to complete them.
To print a function list, press
MENU
, 5, 1, 0, 1.
Level one function
Level two function
Level three function
Summary of setting
Default setting
Page
1. Autodial Entries
1.One-Touch Dial
1.Enter One-Touch
Select one-touch key and register the fax dial numbers and names
(Max. 56 locations.)
on one-touch dial keys.
—
3.2
If you register the name, you can use the telephone index feature.
2.Erase One-Touch
Erase the registration in a one-touch key.
—
3.2
2.Speed Dial
1.Enter Speed Dial
Select speed-dial number and register the fax dial numbers and
(Max. 144 locations.)
names as Speed-Dial numbers.
—
3.4
If you register the name, you can use the telephone index feature.
2.Erase Speed Dial
Erase the registration in a speed-dial number.
—
3.4
3.Group Dial
1.Enter Group Dial
Select group number and register the one-touch dial or speed-dial
—
3.6
(Max. 32 group.)
numbers you want to group.
2.Erase Group Dial
Erase the registration in a group number.
—
3.6
2. User Settings
1.Machine Settings
01.Cassette Size
Set the size of paper in the paper cassette.
Letter
1.9
02.Protect Passcode
Enter the protection passcode for using the security features.
—
3.42
03.Soft Key
Program to turn on or off the function by pressing this key.
Soft key 1:
COMM
.
CANCEL
/
CONFIRM
. Soft key 5:
SPEED DIAL
/
GROUP
Soft key 2:
BROADCAST
Soft key 6:
MONITOR
/
CALL
See left.
3.15
Soft key 3:
COMM
.
OPTIONS
Soft key 7:
REPORT
Soft key 4:
PAUSE
/
DIAL OPT
.
Soft key 8:
MEMORY TRANSMIT
04.Silent Mode
Mute your machine.
Off
4.8
05.Sleep Mode
Conserve power.
On
4.9
06.Fax & Copy
Make a copy of your document each time it transmit.
Off
3.19
07.Date & Time
Enter the current date and time.
—
4.9
08.Paper Source
Select paper source (paper cassette and bypass tray) for
For Fax / Copy
4.9
fax reception or copying.
09.Service Mode
For technical support. Do not turn this setting to on unless an
Off
—
authorized technician asks you to do so.
10.2-Bin Tray*
1
Select the paper tray for delivery.
• Copy exit
Lower tray
• Received fax document exit
Upper tray
4.9
• List exit
Upper tray
• PC-Fax print exit*
2
Upper tray
*1: This option appears only if the optional 2-Bin tray has been installed.
*2: This option appears only if the optional RS-232C interface has been installed.
Summary of Contents for F-320
Page 1: ...F 320 Operating Instructions Plain paper Digital Fax ...
Page 7: ...This page intentionally blank ...
Page 32: ...1 21 Getting started This page intentionally blank ...
Page 48: ...2 15 Basic operation This page intentionally blank ...
Page 98: ...Advanced features This page intentionally blank 3 49 ...
Page 110: ...Changing the default settings This page intentionally blank 4 11 ...
Page 132: ...Just in case This page intentionally blank 5 21 ...
Page 133: ...Appendix and index ...
Page 141: ...This page intentionally blank Appendix and index AI 8 ...


