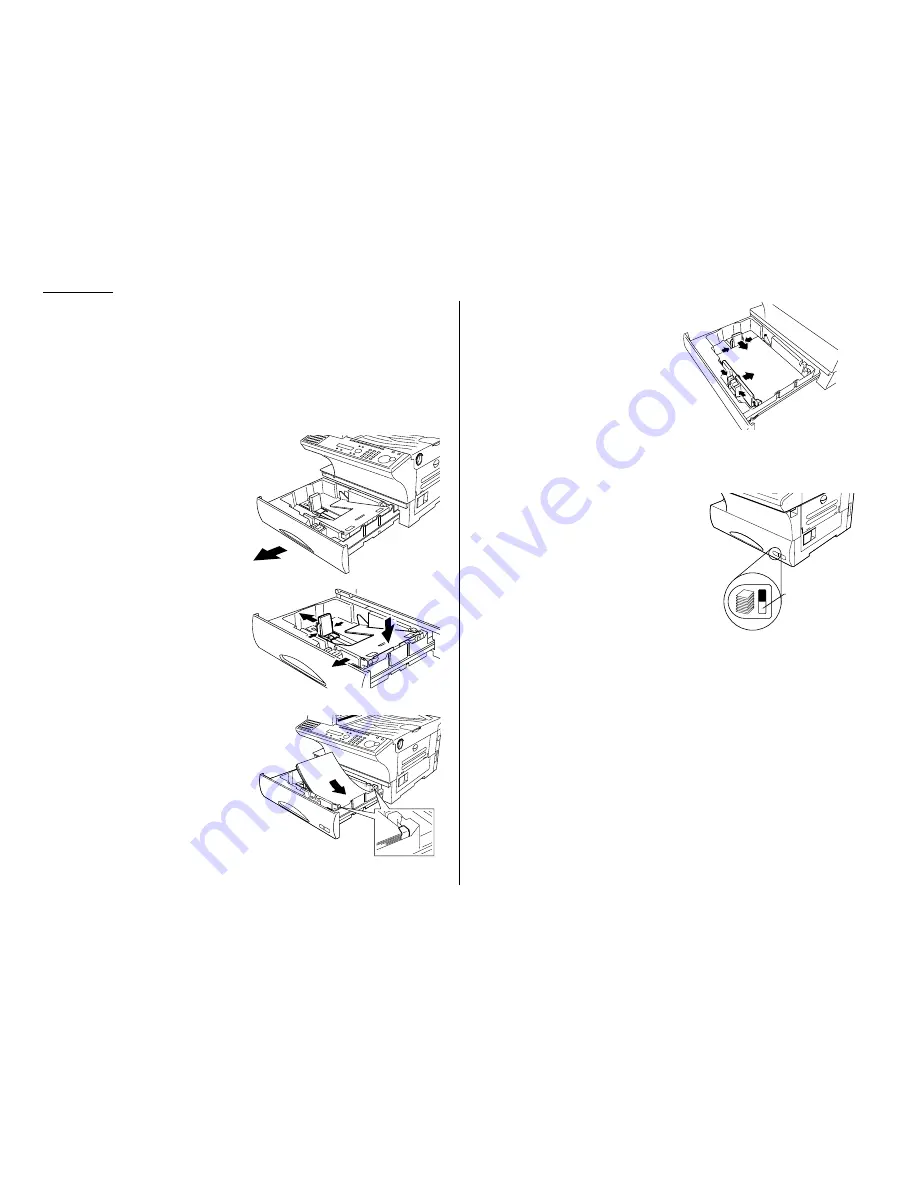
Loading paper in paper cassette
Before you load paper, note the following:
• After you load paper in fax’s cassette, you must “tell” your machine what size
paper you loaded: letter-, legal- or half letter-sized.
You can do this by the “Setting of the paper size” operation. (See page 1.9.)
Note: If you will be using letter-sized paper, there’s no need to adjust the cas-
sette; your machine is initially set for Letter-sized paper. Simply attach
the LTR sticker to the outside of the paper cassette.
1
Open the paper cassette from the
front of your machine by gently
pulling it toward you.
2
While pressing the release lever,
slide the paper length guide to
select the paper size you want to
use.
3
Press down the paper lifting plate.
4
Insert the paper into the cassette.
• Before you insert paper in the
cassette, stack it so the leading
edge and sides of the paper are
even.
• Do not stack the paper over
the limit mark inside of the
cassette.
• Place the edges of the top sheet
under the metal tabs on the
cassette’s left and right side.
5
Adjust the paper guides to fit the
size of paper.
6
Gently push the paper cassette back into its original (closed) position. You’ll
feel a click when it’s properly in place.
7
Attach the paper size sticker on the cassette’s front.
Helpful Tip: The paper level indicator on the
front paper cassette lets you see
how much paper is in the cassette
without your having to open the cas-
sette. When you see the paper level
indicator drop (i. e., show more blue
area), make sure you have a supply
of paper nearby. Then, when you see
the “Please Supply Paper” message
on the display, you’ll be ready to
refill the cassette.
Important: To avoid paper jams, do not refill this paper cassette without first
removing all of any paper which may remain in it. In other words, do
not just add sheets to an already-loaded stack.
Paper level
indicator
1.8
Getting started
Summary of Contents for F-320
Page 1: ...F 320 Operating Instructions Plain paper Digital Fax ...
Page 7: ...This page intentionally blank ...
Page 32: ...1 21 Getting started This page intentionally blank ...
Page 48: ...2 15 Basic operation This page intentionally blank ...
Page 98: ...Advanced features This page intentionally blank 3 49 ...
Page 110: ...Changing the default settings This page intentionally blank 4 11 ...
Page 132: ...Just in case This page intentionally blank 5 21 ...
Page 133: ...Appendix and index ...
Page 141: ...This page intentionally blank Appendix and index AI 8 ...


