

The lamp is designed to project the image on the LCD
panels. When the lamp no longer functions, replace it with a
new one.
Caution:
• Do not remove the lamp immediately after using the
projector, you may get burned because of the high
temperature of the lamp.
• When you replace the lamp, press the power button to
power off, then wait for 120 seconds in stand-by mode
to allow the lamp and LCD panels to cool. Turn off the
main switch, unplug the power cord from the outlet, and
wait one hour so that the lamp is cooled to the touch.
• Do not remove the lamp except for replacement.
Careless treatment can cause injury or fire.
• Do not touch the lamp element directly. It may break and
cause you to injure or burn yourself.
• Be sure not to drop the lamp lid screw into the projector.
Also be sure not to insert metal or any flammable
objects, it may cause fire or electric shock. If any objects
are inserted, please unplug and contact your dealer.
• Install the lamp securely, failure may cause a fire.
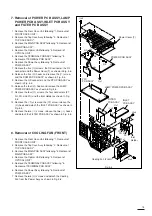
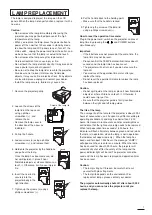
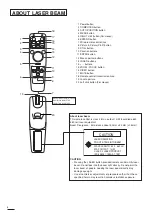
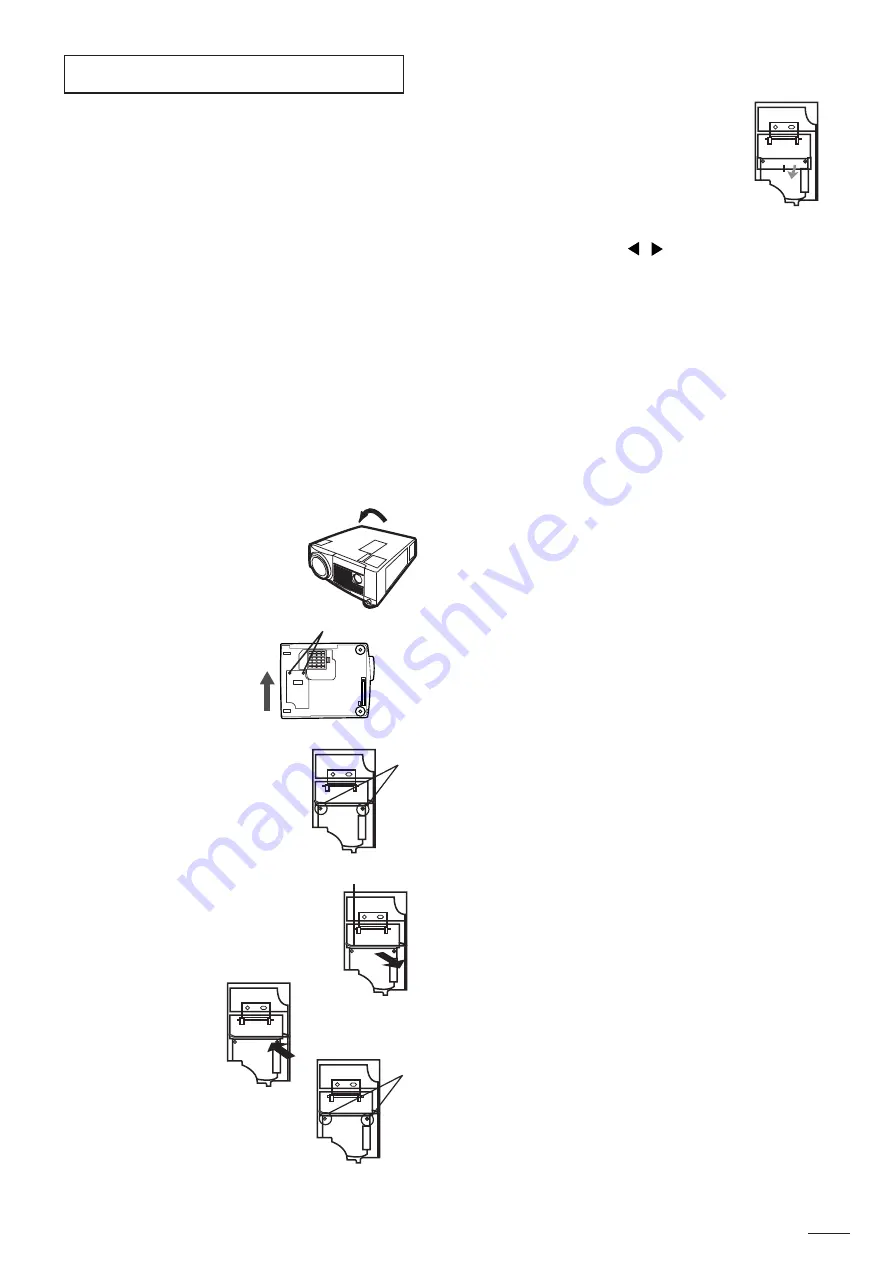
1. Reverse the projector gently.
2. Loosen the screws of the
lamp lid on the top cover
using a phillips
screwdriver (+) , and
remove the lid.
• Remove the lamp cover in
the direction of the arrow as
indicated.
3. Pull up the handle.
4. Loosen screws (a) using a phillips
screwdriver (+), and remove them.
5. Hold onto the projector by the handle as
you pull out the lamp.
Once the lamp has been removed, do
not spill liquid on it, place it near
flammable objects or where children can
touch it. Otherwise, it will cause injury or
fire.
6. Insert the new lamp
securely into the
projector body in the
right direction.
7. Tighten up the screws (a) using a
phillips screwdriver (+).
8. Put the handle back to the holding point.
• Make sure that the handle is locked.
9. Tighten up the screws of the lamp lid
using a phillips screwdriver (+).
How to reset the operation time meter
Plug in the power cord, switch on the projector, and reset
lamp time by pressing the
,
and POWER buttons
simultaneously.
Important:
• If the 3 buttons was not pressed at the same time, the
lamp time may not be reset.
• Please confirm the TEMP indicator illuminates about 2
seconds and the lamp time has been reset.
• The projector will not turn on if you do not secure the
lamp lid.
• You must reset the operation time meter after you
replace the lamp.
• Do not reset the operation time meter unless the lamp
has been replaced.
Caution:
• Do not spill liquid on the lamp or place it near flammable
objects or where children can touch it. Otherwise, it
could cause injury or fire.
• Be sure that the projector guide is firmly inserted
between the right and left lamp guides.
The life of the lamp
The average life of the lamp for the projector is about 2,000
hours of consecutive use. Life span may differ according to
operating environment, and may be shorter than 2,000
hours. Decreases in luminescence and/or color brightness
will indicate that the light source lamp needs to be replaced.
When lamp operation time exceeds 1,500 hours, the
indicator will flash alternately between green and red (while
the lamp is in operation; when the lamp is not in operation,
the indicator will appear red only). When the lamp has
been used for about 1,900 hours, the message “LAMP!!.”
will appear on the screen for one minute. When the lamp
has been used for about 2,000 hours, the projector will
automatically shut off for the safety of the lamp and the
power indicator light will be red. The projector cannot be
used until the lamp has been replaced and operation timer
has been reset.
Caution:
• The lamp is fragile. If broken, be careful not to cut
yourself with glass fragments.
• The lamp life depends on the environment. For
replacement lamps, please contact your dealer.
The projector automatically shuts off after about 2,000
hours, and you cannot use the projector until you
replace the lamp.
LAMP REPLACEMENT
Screw of the lamp lid
Handle
1
(a)
(a)
Summary of Contents for S290U
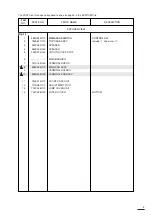
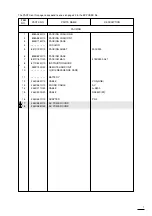
Page 83: ...16 ...
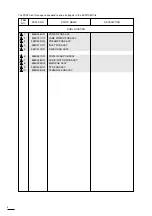
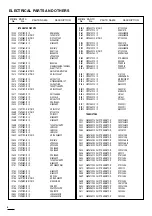
Page 180: ...113 SYMBOL NO ADDRESS X7A1 A 3 PCB MAIN COMPONENT SIDE ...
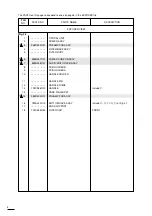
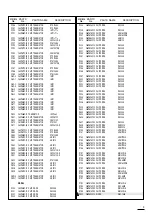
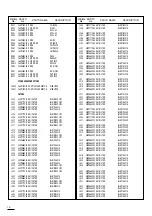
Page 188: ...121 ...


