45
CONNECTIONS
PRINTING
ADJUSTMENTS
PRECAUTIONS
FEA
TURES
PREP
ARA
TION
OTHERS
TROUBLE-
SHOOTING
BEFORE CALLING FOR SERVICE
2
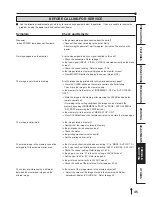
Use the following troubleshooting chart to try to resolve any apparent defect in operation. If you are unable to resolve the
problem, unplug the power cord and contact your dealer.
Symptom
Check and Remedy
No power
Is the power cord plug disconnected from the outlet?
(when POWER lamp does not illuminate)
→
Connect the power cord plug to the outlet firmly.
After turning the power off, wait for approx. 2 minutes. Then turn on the
power.
No image appears on the monitor.
Are the video signal and sync. signal inputted to this unit?
→
Check the connection. Refer to page 11.
Is the input signal (INPUT : VIDEO, S-VIDEO) selected correctly on the menu
screen?
→
Check the current setting. Refer to pages 17-18.
Is the image stored in memory displayed on the monitor screen?
→
Press MONITOR button to display the source image (LIVE).
The image is not stored in memory.
Are the images being printed with full memorized memory page?
→
Press the CLEAR button on the remote control unit after printing.
Then, store the image in the memory again.
Is the memory full in the status of “INCREMENT : OFF” or “AUTO CLEAR :
OFF”?
→
Store the image in the memory after pressing the CLEAR button on the
remote control unit.
(According to the setting conditions, the image can be stored in the
memory by setting INCREMENT to “PART” or “PAGE”, AUTO CLEAR to
“AFT. PRN” or pressing the PRINT button.)
Is the memory full in the status of “MEM & STOP : ON”?
→
Press CLEAR button on the remote control unit, and store the image again.
The image is not printed.
Is the image stored in memory?
→
Confirm that the image is stored in memory.
Is the print paper or ink sheet used up?
→
Check the status.
Is the printing mechanism set correctly?
→
Set the printing unit correctly.
The stored image in the memory cannot be
Is the S size ink sheet installed when selecting “S” in “MODE : AUTO/S”? Or
enlarged to fill the maximum print area.
is the L size ink sheet installed when selecting “AUTO” in “MODE : AUTO/S”?
→
Check the current setting. Refer to pages 18-19.
Is the paper size set to “N” in the size setting in LAYOUT menu?
→
Set the size to “M” or “W”. Refer to page 33.
Is the print area set correctly in LAYOUT menu?
→
Check the setting of the print area. Refer to pages 32-33.
The colour or picture quality is different
Is the colour of the image stored in the memory adjusted?
between the memorized image and the
→
Adjust the colour of the image stored in the memory with Colour
printed image.
adjustment display (COLOR ADJ). Refer to page 32.

