j
Safety Summary
1.
Read these instructions before using or working on this computer.
2.
Follow all warnings and instructions in this manual or marks on the computer
and its components.
3.
Avoid submerging the system unit in liquids.
4.
avoid stacking papers or other flammable objects on top of, underneath, or
next to the system unit.
5.
Use only batteries supplied with the system.
6.
Make sure any external power source connected to the adapter or system
conforms with adaptor or system ratings.
7.
The external power adapter has a two-pronged grounding plug. If an adapter
is needed to plug the system into a power source, make sure the system is
properly grounded.
8.
Arrange all cables so that they are out of traffic and unobstructed by
personnel or equipment.
9.
Avoid using extension cords with this product. If an extension cord is needed,
make sure it is rated for at least 10 amperes.
10. Make sure amperage drawn by all items plugged into an outlet with this
system does not exceed 15 amperes.
11. Do not put any objects except those designed for use with this system inside
the computer.
12. Observe proper electrical safety precautions when performing system
maintenance.
13. Replace any cables with identically rated cables as those included with the
original equipment.
14. Improper handling of the battery can cause personal injury or fires. Do not
attempt to disassemble or replace individual cells in the battery pack. Do not
expose the battery to open flames. Do not short the positive and negative
ends together even if the battery is fully discharged. Keep the battery away
from children.
Summary of Contents for A770
Page 2: ......
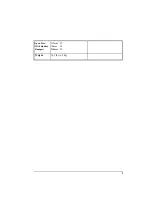
Page 11: ...i Open Size With Rubber Bumper 315mm W 70mm H 260mm D Weight 14 3 lbs 6 5 kg ...
Page 15: ...iii 2 4 5 Wireless LAN Utility Installation PROSET 2 18 ...
Page 17: ...v 4 4 Cleaning 4 2 ...
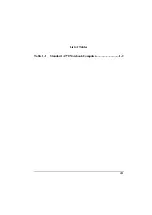
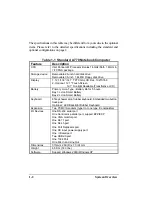
Page 19: ...vii List of Tables Table 1 1 Standard A770 Notebook Computer 1 2 ...
Page 20: ...viii ...
Page 35: ...System Overview 1 15 Figure 1 6 Cursor Control Keys ...
Page 54: ...Operation 2 7 Figure 2 5 Removing a FDD CD ROM DVD COMBO DVD RW Module ...
Page 66: ...Operation 2 19 2 When the TSRC XP htm file appear then select START Control Panel button ...
Page 73: ...Operation 2 26 10 When the Hardware Update Wizard screen appears click on Finish button ...
Page 101: ...SetupConfiguration Utility 3 20 4 Use IRQ5 as below ...


