background image

NV9607 Control Panel  •  User’s Guide

69

8. Misc. Topics

Chapter 8 provides the following:

Glossary


Power Cord Retention


Glossary 

AES/EBU 

(Audio Engineering Society/European Broadcasting Union). AES and EBU are standards organiza-
tions.

Breakaway

A condition where a destination has multiple sources on different levels.

Category

A category represents a set of devices. (The concept of categories exists to make it easier to select 
devices at a control panel.) A category can contain sources, destinations, or devices that are both 
sources and destinations. Each device in the category has a unique selection index within that cate-
gory. Each category has a mnemonic ID associated with it.

The NV9607 does not support categories or category selection.

Data Routing

Data routing (a.ka., machine control routing) is a bidirectional form of routing. Routes are charac-
terized by a controlling device and controlled device(s). The NV9607 provides certain data routing 
options including a ‘Broadcast’ button.

Device

A “device” is a grouping of input and output ports that define a logical entity. (The logical entity 
often represents a real device, but it does not have to be a real entity.) For example, a system might 
have 3 levels: video, AES, and time code. A hypothetical device in this system is Camera 1, which 
consists of video on input port 1 of the video router, AES on input port 5 of the AES router, and 
time code on input port 8 of the time code router. 

GPIO

General Purpose Input and Output. A generic term for the NV9607’s tally interface. The tally inter-
face is called the “GPI Interface” at the rear of the NV9607.

Level set

A level set is a group of virtual levels that are commonly used together when switching devices. A 
level set also defines the mapping of each virtual level within the level set to a single physical level. 
All levels in a level set have a unique display index within that level set.

Multi-Destina-
tion (Mode)

A mode on an NV9000 control panel that presents many destinations at once, in contrast to X-Y 
mode. An operator may route sources to multiple destinations in a single take. Multi-destination 
mode does not permit the selection of breakaway levels. 

Operator

The term operator (a.k.a. user) usually refers to users other than the system administrator or config-
urer. An operator is responsible for making the routes. 

Physical Level

Multiple routers provide different “physical levels” on which to switch the signals of devices. Any 
particular device might send or receive HD, SD, AES, time-code, or machine-code signals.

PIN

The system administrator may create a single “super user” personal identification number (PIN) 
that functions as a passcode. A PIN is 4–6 digits in length. The PIN allows certain operators to per-

Summary of Contents for NV9606

Page 1: ...NV9607 Control Panel User s Guide Miranda Technologies Inc 3499 Douglas B Floreani Montreal Quebec Canada H4S 2C6 ...

Page 2: ...w Reverse engineering of the software is prohibited Due to continued product development the accuracy of the information in this document may change without notice The information and intellectual property contained herein is confidential between Miranda and the client and remains the exclusive property of Miranda If you find any problems in the documentation please report them to us in writing Mi...

Page 3: ...ts your needs In the event that problems arise that you cannot resolve or if there are any questions regarding this equipment or information about other products manufac tured by Miranda please contact your local representative or contact Miranda directly through one of the appropriate means listed here Main telephone 530 265 1000 9 am to 9 pm PST Fax 530 265 1021 In the Americas call toll free 1 ...

Page 4: ... in place for RoHS compliance that includes significant invest ment in our manufacturing process and a migration of Miranda product electronic components and structural materials to RoHS compliance It is our objective at Miranda GVD to maintain compliance with all relevant environmental and product regulatory requirements Detailed information on specific products or on the RoHS pro gram at Miranda...

Page 5: ...ons The Ground symbol represents a protective grounding terminal Such a terminal must be connected to earth ground prior to making any other connections to the equipment The fuse symbol indicates that the fuse referenced in the text must be replaced with one having the ratings indicated The presence of this symbol in or on Miranda equipment means that it has been designed tested and certified as c...

Page 6: ...fer fuse replacements to qualified service personnel To avoid explosion do not operate this equipment in an explosive atmosphere Have qualified service personnel perform safety checks after any service General Cautions A caution indicates a possible hazard to equipment that could result in equipment damage Observe the following cautions when operating or working on this equipment When installing t...

Page 7: ...ion Mode 8 Single Destination Mode with Breakaway 8 Multi Destination Mode 9 Secondary Modes 9 Other NV9607 Functions 9 Chapter 3 Installation 11 Package Contents 11 Installation 12 Installing Software and Documentation 12 Initialization 13 Testing 14 Chapter 4 Configuration 15 Summary 15 Adding a Panel to an NV9000 Configuration 15 NV9607 Panel Configuration Page 18 Regions of the Configuration P...

Page 8: ... 36 Default State 37 Destination 37 Destination Lock 37 Destination Protect 37 Destination Shift 38 Free Source 38 Hold 38 Information 38 Level 38 Menu 38 Name Set Toggle 39 None All 39 Page Down 39 Page Up 39 Panel Lock 39 Previous Source 39 Salvo 39 Source 40 Source is Master 40 Source Preview 40 Source Destination 41 Source Shift 41 Take 41 Undefined 41 Lock Protect and Release 41 Locks and Pro...

Page 9: ... 48 Menu Mode 49 Main Menu 49 Software Submenu 50 User Submenu 50 Panel Submenu 51 Panel ID Submenu 51 Illumination Submenu 52 Setup Mode 53 Chapter 6 GPIO 57 The Interface 57 Input 57 Output 58 GPIO Configuration Concepts 58 The GPIO Section of the NV9607 Page 58 Configuring Outputs 59 Configuring Inputs 61 Chapter 7 Technical Details 63 Power Specifications 63 NV9607 Specifications 64 Environmen...

Page 10: ...x Rev 1 0 21 May 10 Table of Contents ...

Page 11: ...s chapter is for operators primarily Chapter 6 GPIO provides information about the tally interface general purpose I O This chapter is for configurers primarily Chapter 7 Technical Details provides electrical mechanical and environmental specifications product drawings and default settings Chapter 8 Misc Topics provides a glossary An index is also provided for your reference The PDF Document This ...

Page 12: ...sed throughout this guide The term control panel refers to the NV9607 control panel and to NV96xx control panels in general High tally means that a button is brightly illuminated High tally usually means that the but ton function is selected or active Low tally means that a button is illuminated at low intensity Most buttons assume a low tally state until selected SE is an abbreviation used in thi...

Page 13: ... for details The NV9607 can operate in one of 4 modes Limited X Y mode Single destination SD mode Single destination mode with breakaway Multi destination MD mode See Modes of Operation following The panel is organized as shown in figures 2 1 and 2 2 Figure 2 1 NV9607 Front The function buttons are configurable They select sources or destinations or they execute func tions Physical source selectio...

Page 14: ...s The panel can be configured with a Source Shift button that toggles between the two source pages and a Destination Shift button that toggles between the two destination pages Each button has three operational levels high and low tally green amber and sometimes red and off Operators can adjust the low tally levels in increments of 10 using the panel s menu Buttons that are turned off are said to ...

Page 15: ...VTR 6 CAM 1 VTR 6 CAM 1 VTR 7 CAM 1 VTR 7 Page 1 CAM 1 VTR 8 Page 1 CAM 1 VTR 8 Limited X Y mode Multi destination mode Single destination mode with breakaway Single destination mode 1Dst wBrk HD 1Dst wBrk HD Dest CAM 1 SD Dest CAM 1 SD VTR 1 CAM 1 AUDIO 1 VTR 1 CAM 1 AUDIO 1 CAM 1 AUDIO 2 CAM 1 AUDIO 2 CAM 1 AUDIO 3 CAM 1 AUDIO 3 CAM 1 AUDIO 4 CAM 1 AUDIO 4 TIMECODE TIMECODE Page 1 Page 1 Single ...

Page 16: ...eflecting that the preset sources have now become current sources In the other modes the preview column represents the levels of a source or the levels of multi ple sources under breakaway Here too these are called the preset source s After the take they disappear from the preview column and re appear in the status column reflecting that the preset sources have now become current sources Status Th...

Page 17: ...rectly after a source indicates a breakaway on that destination An L indicates that a device has been locked A P indicates that a device has been protected NV9607 operators may lock protect or release destinations It is important for operators to know that other operators may lock protect or release sources and destinations Tally Interface At the rear of the panel is a DB25 connector that provides...

Page 18: ...evels are selected Operators can use a Source Shift button to toggle between two sets of sources Similarly opera tors can use a Destination Shift button to toggle between two sets of destinations Single Destination Mode In single destination mode the panel s destination is configured as the default destination and there are no destination buttons Pressing a source button completes a take unless a ...

Page 19: ...ere the NV9607 is powered up but disconnected from the network In this mode you can preset the NV9607 s panel ID and perform a few diagnostic tasks Menu mode pressing a menu button places the NV9607 in menu mode In menu mode the buttons lose their normal functions and become part of a menu that changes as needed during menu operation Source preview mode in any of the operating modes allows source ...

Page 20: ...10 Rev 1 0 21 May 10 2 Introduction Other NV9607 Functions ...

Page 21: ...ge unrelated to shipping please contact technical support Refer to Technical Support Con tact Information on page iii Depending on your order the NV9607 items that can ship include One or more NV9607 control panels One or more power supplies PS0001 with power cord retention straps The package does not contain network cables serial cables or mounting screws You do not need to take any special preca...

Page 22: ...ons 3 Connect one or both power supplies First connect the 4 pin connector to PS1 or PS2 on the rear of the router The connectors are keyed and snap into place There is only one way they fit Do not force them Then connect the power supply to AC power A second power connection is for redundancy only protection against failure and is not a requirement for operation Refer to Power Specifications on p...

Page 23: ...ng the keypad The panel requires a non zero ID The display tells you to press button 23 to cancel press button 24 to save the panel ID or press button 116 to exit and move to the next part of the setup sequence These buttons are the ones that are illuminated They are identified in the illustration Button 116 is the setup button When you finish press the setup button 3 Continue to press the setup b...

Page 24: ...hould load whatever configura tion exists for that panel and the buttons appropriate for its configuration should light If you continue to see No Server ACQUIRE IP ADDRESS or Locating Network you have a problem Reboot everything and try again S The NV9607 by default acquires its IP address through DHCP on the NV9000 s panel router network You can use the Panel IP Configuration Utility to force the...

Page 25: ...relatively few button functions there are 4 operating modes Limited X Y Mode Single Destination Mode Single Destination Mode with Breakaway Multi Destination Mode The set of button functions varies from mode to mode NV9000 SE Utilities is the software with which to configure the NV9607 Figure 4 1 following shows the default NV9607 panel configuration page from NV9000 SE Utilities Adding a Panel to...

Page 26: ...the Type field In the ID field enter the panel ID you assigned to the panel while it was in setup mode You can change the panel ID in NV9000 SE Utilities Give a name to the panel in the name field and select a user When you are creating a panel configuration you have 3 options These options are presented in the Configuration Options area 1 Make a copy of an existing configuration file giving it a ...

Page 27: ...d Click Previous to go back the previous page Click Cancel to terminate the entry operation S There are 2 other buttons Suffix and Navigate both dim disabled These do not apply to the NV9607 Return to the Control Panels page to view your new entry To edit an NV9607 configuration dou ble click its list entry You will then see the panel configuration page for the selected NV9607 Following is a discu...

Page 28: ...gions of the Configuration Page Above the Revert to Saved and Save buttons always present there are 4 main regions A graphic representation of the NV9607 panel Configurers must click a button proxy to select the button for configuration Button definitions In this section configurers make button assignments using its pull down menus and text fields See Button Definitions following GPIO definitions ...

Page 29: ... in their default order according to their display index as defined in NV9000 SE Utilities If you leave some fields blank those display lines will appear blank while the lines for which you specified a level will show that level S Filling any field of the display options with an actual level means that the entire first page of levels contains either blank lines or the level s you specify Configura...

Page 30: ...selected Multi destination In multi destination mode source buttons are configured with destinations as well as sources Thus each source button completes a route to an individual destination Takes are all level Release Mode Normal Release This panel can release locks and protects set by the designated user at this panel or any other panel Force Release This panel can release locks and protects set...

Page 31: ...t When this checkbox is checked the panel powers up in hold mode Otherwise it powers up with hold mode off Hold mode under single destination mode with breakaway causes the selected levels to be retained after a take If hold mode is off all levels become selected after a take Data Routing Mode Automatic If a control data level is involved in the route make the route on the control level even if th...

Page 32: ...checkbox Button Definitions There are three classes of button functions Dedicated functions such as Default State or Chop Variable functions such as Source or Destination Special functions such as Menu and Salvo Button Specification The button definition section configures the button you have selected in the image of the NV9607 When you choose a button type additional drop down menus can appear de...

Page 33: ...op function is used to test system timing The button definition has no fields to configure Default state S B X The button returns the panel to its most recent power up state That is called the default state The button definition has no fields to configure Destination X The button selects a destination The destination name appears in the Destination display The destination is the target of an upcom...

Page 34: ...ed phantom device that can be used to release or free devices on the data machine control level A free source is also used with tielines to free the tieline for others to use The free source is defined in the Level Set Details page of NV9000 SE Utili ties The button definition has no fields to configure Hold B X In single destination mode with breakaway this button retains break away levels after ...

Page 35: ...htness values When the panel is in menu mode the menu button cycles through the functions of the menu See Menu Mode on page 49 The button definition has no fields to configure Name Set Toggle All The button toggles the panel between its default name set and the sys tem name set One or the other becomes the active name set The button definition has no fields to configure If the default name set is ...

Page 36: ...e S B X The button presets the previously routed source to the currently selected destination The operator must next press Take to restore the previous route This function is useful when an operator makes a route in error The button definition has no fields to configure The button does not restore the previous destination If the user changed the destination and presses Previous Source the take wil...

Page 37: ...sing the button selects device 1 When the second page is selected pressing the button selects device 2 The Destination Device field allows you to configure a destination for every source button Typically you will assign one destination device to one set of sources another destination to another set of sources and so on At the limit you could configure up to 116 desti nations When the NV9607 has an...

Page 38: ...except source buttons source related buttons the Source Preview button and the Take button are disabled Source Shift All The button toggles between the first and second source sets The button definition has no fields to configure The button affects the operation of any source button in any mode Source buttons represent two sources One belongs to one source set and the other belongs to the other so...

Page 39: ... typical multi destination configuration will present fewer destinations organized in button clusters on the panel The following organization for example provides 12 destinations with up to 16 sources available for each one with 20 buttons assigned to other functions As another example this organization provides 6 destinations with up to 32 sources available for each one again with 20 buttons assi...

Page 40: ...30 Rev 1 0 21 May 10 4 Configuration Multi Destination Configuration ...

Page 41: ... menu items in other cases Physically you will find Function buttons e g select previous source or lock a destination Source destination and salvo buttons Names of destination s source s and level s At any particular time some of the buttons are high tally some are low tally and some might be undefined Active buttons are usually of two colors green and amber but are sometimes red Red means locked ...

Page 42: ... levels are selected or when all levels are selected You can use a Source Shift button to toggle between two sets of sources Takes occur as soon as a source button is pressed unless source preview mode is active In that case pressing a Take button is required for the completion of the take Limited X Y Mode In limited X Y mode takes occur from a single source to a single destination Destinations ar...

Page 43: ...htness An operator may use the menu to set button brightness Administrators and configurers may use the menu to view or change the panel ID or to determine the software and firmware revisions See Menu Mode on page 49 When the panel is not in setup mode or menu mode we say it is in normal mode Normal means the panel is functioning in one of the 4 operating modes Button Legends There are about 25 di...

Page 44: ...ion It is high tally when it has enabled the second destination A destination shift button toggles all destination buttons However destination shift does not apply to Source Destination buttons Levels In NV9000 SE Utilities and in the NV9000 router control system routes occur on levels A level is typically SD HD analog video AES analog audio or machine control Various devices are defined as sendin...

Page 45: ... button If the panel is in hold mode the hold button will be high tally Press the hold button again if it is not 3 Select the additional destinations you require As you select each destination its name appears in the destination display You can toggle these additional destinations on or off 4 Select a source Use a Source Shift button if necessary to access the source The take to the multiple desti...

Page 46: ...ode with breakaway X limited X Y mode M multi destination mode All all modes X Broadcast A broadcast button applies to a data or machine control level only The button assigns one con trolling device the master to multiple controlled devices the slaves The function is useful in dubbing applications See Broadcast Routes on page 45 for more information S Pressing the Broadcast button turns off the So...

Page 47: ...locked the Destination Lock button returns to low tally amber S If you attempt to take a source to a destination that is locked or protected by another user the message Some levels did not switch appears in the display S Locks apply to selected levels in single destination mode with breakaway S The NV9607 provides no explicit indication during operation whether a destination is locked or unlocked ...

Page 48: ...s you to perform a gang or dub switch In hold mode destination selections are cumulative and not mutually exclusive See Hold on page 35 The Destination field of the display shows the most recently selected destination under hold mode The button definition has no fields to configure All Information The Information button presents auxiliary information on the alphanumeric display The informa tion bu...

Page 49: ...Page Down button becomes enabled when it is possible to scroll down and is disabled when it is not possible All Page Up This button scrolls the alphanumeric display up Scrolling is necessary when the number of lines to display is greater than the number of lines available either 3 or 7 depending on the configuration of the display The Page Up button becomes enabled when it is possible to scroll up...

Page 50: ...ontrol routes The button is a toggle Press it once to make the source the master it goes high tally press it again to make the destination the master the button is low tally The Source is Master button is also used to initiate broadcast machine control routes See Broadcast Routes on page 45 During data level i e machine control takes this button makes the source device the master Oth erwise the de...

Page 51: ... a source Then the take button turns low tally red and the source name appears in the Preview column of the dis play After you press the take button the button goes dark again To cancel a pending take press the Source Preview button again The panel will exit source pre view mode In MD mode a take button switches the preset source device s to the selected destination device s on all levels In the o...

Page 52: ... levels you want to lock or unlock Selected levels are high tally If your panel has a None All button you can use it to select either no levels or all levels 5 Press a Destination Lock button Use this same method to protect or unprotect selected levels using a Destination Protect button instead Note that lock buttons are toggles Therefore if you select some levels that are already locked and some ...

Page 53: ...s the source you chose and the take button turns red If that is the correct source press a Take button If it is not the correct source you can press another source and then press a Take button S A take is all level when all the level buttons are selected high tally or when none of the level buttons are selected S If your panel has a Hold button you can use it to preserve the chosen breakaway level...

Page 54: ...ganized is important to knowing which destination is assigned to any particular source button See Multi Destination Operations next Multi Destination Operations A panel that is configured in multi destination mode has source buttons that represent 2 sources and a destination Pressing a source button selects the source and the destination and performs an imme diate take to the destination assigned ...

Page 55: ... always a system name set That name set includes the device names defined within the NV9000 configuration Any other name sets are optional Note that when the panel is displaying alternate names and a device does not have an alternate name the panel displays the system name Name sets are defined in NV9000 SE Utilities under the System Management page See the appropriate section in the NV9000 SE Uti...

Page 56: ...e broadcast route is cleared and data connections are removed from all slaves Important Points After you perform the complete take you must start the playback of the source device manu ally The panel provides no way to determine which devices belong to the broadcast group You must keep track of this yourself If another operator takes either your master device or the first slave device the entire b...

Page 57: ...t Breakaway 1 Select a source 2 Examine the display 3 If the destination display shows Retry press the source button again to complete the take The take will time out if you do not press the source button Case 2 Limited X Y Mode 1 Select a destination 2 Select a source 3 Examine the display 4 If the destination display shows Retry press the source button again to complete the take The take will ti...

Page 58: ...utton 4 Select another source This is the second source The chop is immediately activated on the rout ers of the default destination that support chop To terminate the chop 1 press the chop button again to turn it off 2 select the destination you had chosen for the chop then 3 select any source Case 3 Multi Destination Mode Follow these steps 1 Select a source This is the first source 2 Press the ...

Page 59: ...on level Configurers should ensure that the menu button is not part of the numeric keypad that becomes available in the panel ID submenu See Panel ID Submenu following Main Menu The main menu appears first when you press the menu button The menu identifies 3 submenus that you can select by pressing buttons 1 2 or 3 If you press but ton 24 the panel will leave the menu and return to normal mode The...

Page 60: ...o return to the main menu or button 24 to exit menu mode User Submenu The user submenu appears when you press button 2 under the main menu The user menu is also for viewing only Press button 23 to return to the main menu or button 24 to exit menu mode BOOT SV0639 060000 Server SV0921 66 Main Menu 23 Exit 24 24 23 Main Menu Software 1 User 2 Panel 3 Exit 24 USER ID 01 Main Menu 23 Exit 24 ...

Page 61: ... panel menu The panel ID menu shows the current panel ID and allows you to change the panel ID using a numeric keypad comprising the top left 10 buttons In addition buttons 20 and 21 act as Cancel and Save buttons Note that the numeric keys range from 0 at the left to 9 Press button 20 to cancel the new panel ID press button 21 to save it Press button 23 to return to the panel menu or button 24 to...

Page 62: ...nate to show you the illumination level currently selected The right most two buttons increase and decrease the selected illumination level by 10 The default low level is 40 and the default high level is 100 These buttons remain disabled until you select either low illumination or high illumination When you are satisfied with the illumination level you have chosen press button 23 to return to the ...

Page 63: ...and a dis play of the current panel ID The panel ID is usually set to 0 at the factory Press the setup button to proceed to the first part of setup which is to set the panel ID These are the buttons that apply The panel now allows you to enter the panel ID using buttons at the top left that function as a numeric keypad The buttons range from 0 at the left to 9 Press button 23 to cancel your entry ...

Page 64: ...er test In this test all the characters should display as pound signs Press the setup button to proceed to the color test This test has 6 parts All buttons turn high tally amber All buttons turn low tally amber All buttons turn high tally red All buttons turn low tally red All buttons turn high tally green All buttons turn low tally green To proceed through this test press the setup button still i...

Page 65: ... appears in the display Continue to test any other buttons you want to test Pressing the setup button i e button 25 will terminate the button test and return you to the initial display of setup mode At this point if you have a assigned your NV9607 a suitable panel ID you may connect your NV9607 to the panel network of your NV9000 system NV9607 BUTTON TEST Press Menu Button to Exit BUTTON 5 ...

Page 66: ...56 Rev 1 0 25 May 10 5 Operation Setup Mode ...

Page 67: ...in the NV9607 switch your tally devices The DB25 connector labeled GPI Interface at the rear of the NV9607 presents the tally signals There are 8 input signals and 4 pairs of output signals Figure 6 1 GPI Interface Input The tally inputs expect contact closure to ground through the ground pins on the connector to trig ger a GPI input event Figure 6 2 GPI Input When the input transitions off or tra...

Page 68: ...epts These are the I O characteristics of the NV9607 s tally interface Eight optically isolated inputs sometimes called GPIs that can be configured to trigger an event when the input transitions from off to on and to trigger another event on a transition from on to off Events include Execute a salvo Route the previous source switched by any panel to a destination Route the previous source switched...

Page 69: ...oses When the conditions are not met the relay opens Figure 6 4 shows one such Bool ean expression Boolean expressions comprise terms and operators The operators include those indicated on the left AND OR and NOT Expressions can be parenthesized to control the order of evaluation Operator precedence is normally NOT AND OR All parenthesized expressions are evaluated first expressions in nested pare...

Page 70: ... the state of the NV9607 inputs and other system wide events The router control system sends signals to the NV9607 instructing it to open or close its relays Four arrow buttons at the lower left corner of the relay dialog allow you to traverse the expression you are building The left double arrows highlights the first term or operator in the expression The right double arrow positions you at the v...

Page 71: ...ious source that was switched by any control panel to a destination even if it is the same as the current source If you choose this behavior select a destination in the destination drop down list 3 Route the previous source switched by this panel to a destination even if it is the same as the current source If you choose this behavior select a destination in the destination drop down list 4 Route ...

Page 72: ...62 Rev 1 1 21 May 10 6 GPIO Configuring Inputs ...

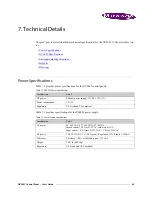
Page 73: ...ons for the PS0001 power supply Table 7 1 NV9607 Power Specifications Specification Detail DC power External power supply 12VDC 10 5A Power consumption 21W Regulatory UL listed and CE compliant Table 7 2 Power Supply Specifications Specification Detail AC power 90 264 VAC 127 300 VDC 47 447 Hz Inrush current 50 A at 230 VAC cold start at 25 C Input current 2 0 A rms at 115 VAC 1 0 A at 230 VAC DC ...

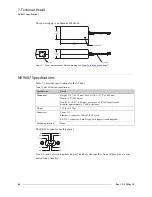
Page 74: ...her None of those pins are con nected to any circuitry Indicator LED 5 24 133 0 2 39 60 7 AC Input 1 62 41 0 DC Output Table 7 3 NV9607 Physical Specifications Specification Detail Dimensions Height 1 72 43 7 9mm fits EIA 1 RU 1 75 or 44 5mm Width 19 0 482 6mm Depth 1 52 0 01 38 6mm enclosure 1 90 48 3mm overall Requires approximately 3 cable clearance Weight 2 53lb 1 147kg Connectors Power AC Eth...

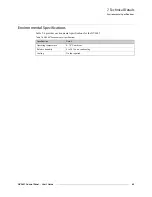
Page 75: ...pecifications Environmental Specifications Table 7 4 provides environmental specifications for the NV9607 Table 7 4 NV9607 Environmental Specifications Specification Detail Operating temperature 0 30 C ambient Relative humidity 0 to 90 non condensing Cooling No fan required ...

Page 76: ...d The default panel options are Behavioral model Single destination Release mode Normal Default destination None Status monitor None Data routing Automatic Default name set System names All other options Disabled check boxes clear DHCP The panel is set up to respond to DHCP from the factory It is possible to assign the panel a fixed IP address using the Panel IP Configuration Utility Drawings The ...

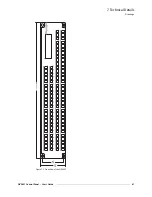
Page 77: ...NV9607 Control Panel User s Guide 67 7 Technical Details Drawings Figure 7 2 Front View of the NV9607 3 00 76 2 3 47 88 1 19 0 482 6 ...

Page 78: ...Technical Details Drawings Figure 7 3 Top and Rear Views of the NV9607 GPI INTERFACE ATTACH PS TRAY HERE MAX SCREW LENGTH 6MM CTRL 10 100 BT PS1 PS2 DC IN 1 37 34 8 1 90 48 3 0 15 3 8 3 00 76 2 3 47 88 1 19 0 482 6 17 6 447 0 ...

Page 79: ...is system is Camera 1 which consists of video on input port 1 of the video router AES on input port 5 of the AES router and time code on input port 8 of the time code router GPIO General Purpose Input and Output A generic term for the NV9607 s tally interface The tally inter face is called the GPI Interface at the rear of the NV9607 Level set A level set is a group of virtual levels that are commo...

Page 80: ...h a device would be a monitor A device can be both a source and destination An example of such a device is a VTR System admin istrator The system administrator is the person responsible for installing configuring and maintaining a router control system Tally 1 High or low button illumination 2 Tally interface to be defined Virtual level Virtual levels allow the system administrator to define a sin...

Page 81: ...the remaining strap around the cord end and down 3 Holding the buckle in place lift the strap up and around the cord end so the strap overlaps itself 4 Holding the buckle loop in place route the strap around the back of the supply diagonally across so that it sticks out on the left below the output cord 5 Continue the strap around toward the buckle loop and through the loop Cinch the strap tightly...

Page 82: ...72 Rev 1 0 21 May 10 8 Misc Topics Power Cord Retention ...

Page 83: ...efault state 23 37 destination 23 36 38 destination lock 23 37 42 destination mode 38 destination protect 24 37 42 destination shift 8 24 32 35 finish 17 free source 9 24 38 hold 24 35 38 information 24 level 25 38 menu 9 25 33 36 38 49 name set toggle 7 25 39 45 next 17 none all 25 39 page down 19 25 39 page up 19 25 39 panel lock 26 39 previous source 9 26 39 revert to saved 18 19 salvo 26 36 39...

Page 84: ...ce 36 Controlling device 36 Copyright notice ii D Data routing 9 Data routing defined 69 Data routing options 46 47 Data routing mode 21 66 DB25 connector 7 57 Declaration of conformance CE ii Default destination 20 66 NV9607 configuration page 18 66 source is master 21 Default name set 39 45 Default name set option 21 66 Default state button 23 37 Defaults 66 Destination buttons 31 default 20 66 ...

Page 85: ...o to last page Acrobat 2 Go to next page Acrobat 2 Go to next view Acrobat 1 Go to previous page Acrobat 2 Go to previous view Acrobat 1 GPI interface 7 57 GPIO 57 connector 7 57 inputs 7 57 61 interface 7 options 58 outputs 7 57 58 GPIO definitions 18 GPIO section 18 H Hide sources not configured on this panel option 22 High tally 2 33 Hold button 24 35 38 Hold mode 35 38 Hold preset default opti...

Page 86: ...d 47 Miranda email tech support iii mailing address iii main number iii sales number iii shipping address iii technical support iii website address iii Misc Topics 69 Mode data routing 21 66 destination 33 hold 35 38 limited X Y 5 8 15 19 20 23 27 31 32 35 38 43 47 menu 9 25 33 38 49 multidest 6 multi destination 5 9 15 20 23 27 29 31 32 36 37 41 44 47 48 69 70 normal 9 33 release 20 66 setup 9 14...

Page 87: ...on 19 25 39 Page up button 19 25 39 Pane configuration 16 Panel initial state 66 organization 4 Panel submenu 51 Panel configuration 15 Panel configuration page 18 Panel ID 13 14 21 25 33 39 49 53 55 Panel ID submenu 51 Panel image 18 Panel IP configuration utility 11 12 66 Panel lock button 26 39 Panel options 18 20 Panel router network 14 Panels control 2 11 12 70 NV96xx 11 70 Part number docume...

Page 88: ...tware 12 Software version ii 49 Software configuration 2 Source buttons 31 devices 22 locks 41 protects 41 shift 34 Source button 27 36 40 Source defined 70 Source is master as default 21 Source is master button 21 27 36 40 Source preview 35 Source preview button 40 Source preview mode 9 Source shift button 8 9 28 32 34 35 41 Source destination button 28 41 Special messages symbol for 2 Specificat...

Page 89: ... 65 Terms Boolean 59 Terms conventions and abbreviations 2 Testing your installation 14 Tielines 38 Trademarks iii U Undefined button 28 41 UniConfig 11 Use eight line display mode option 22 User ID 49 User s guide chapter structure 1 User programmable panel ID 21 V Velcro strap 11 71 Version software ii Versions software 49 Virtual levels 69 70 W X WC0053 7 Website Miranda iii Weight 64 X Y mode ...

Page 90: ...80 Rev 1 0 18 Aug 10 Index ...

Reviews: