background image

 About the Control Panel

20

English

Administration/Communications/Optional NIC/
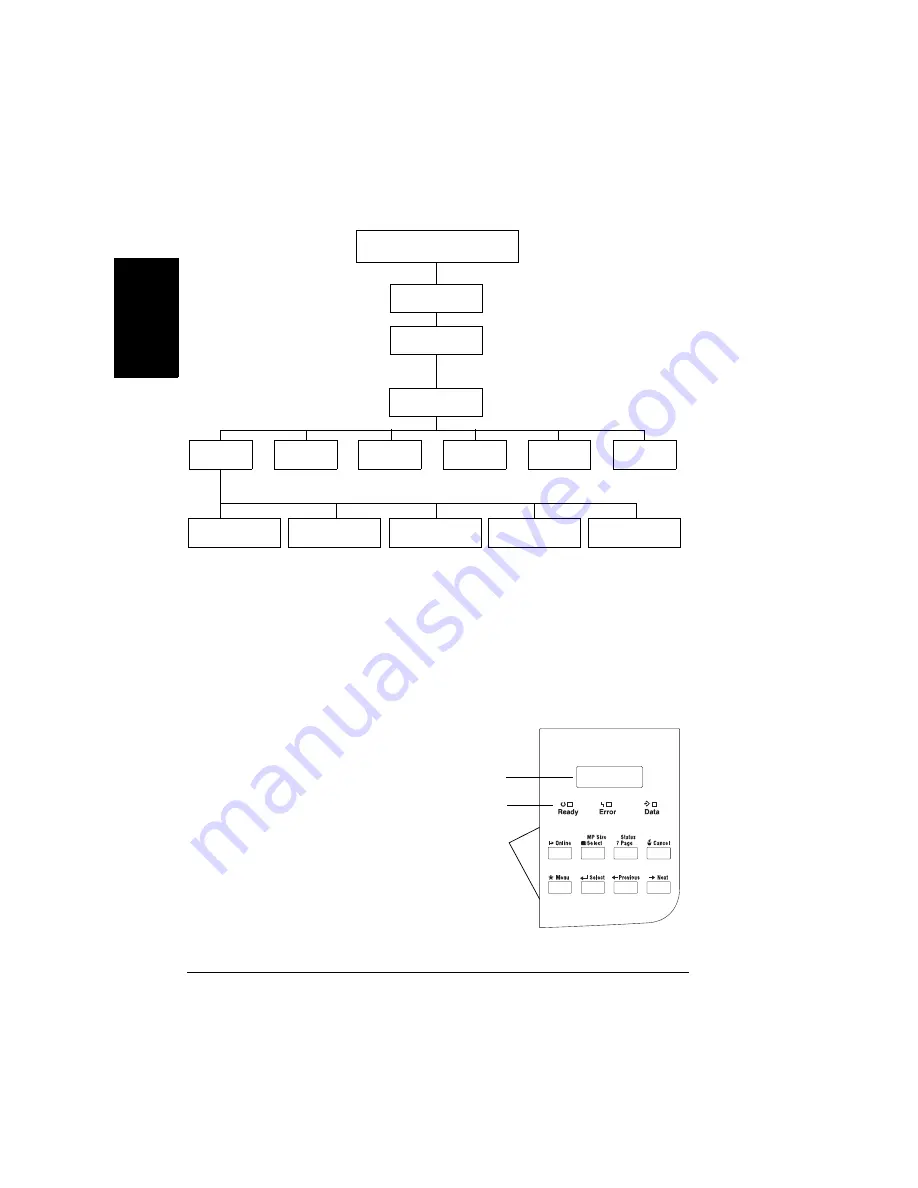
CrownNet Submenu for Networking 

About the Control Panel

A dm inistration


Configuration

C om m unications

O ptional N IC

P S  P rotocol

D ef Job P rio

M in  K   S po ol

E m ulation

M ode

C row nN et

C om m on

E therT alk

LA N  M ana ger

N etW are

T C P /IP

Note: For more menu details 
and printer configuration
information, refer to the 
CrownBooks in PDF on the 
Documentation CD-ROM.

The control panel, located on the right of the 
printer, allows you to direct the printer’s operation. 
In addition, it displays the current status of the 
printer, including any condition that needs your 
attention.

c

c

c

c

 A 2-line, 16-characters-per-line message 

window displays status messages and 
configuration information.

d

d

d

d

 3 indicators provide printer status 

information.

Status messages are listed in the Maintenance 
Guide and the User’s Guide. 

e

e

e

e

 8 buttons are used in printer configuration.

c

c

c

c

d

d

d

d

e

e

e

e


Summary of Contents for PagePro 9100

Page 1: ...English PagePro 9100 Installation Guide 1800659 001B ...

Page 2: ... or part nor transferred to any other media or language without written permission of MINOLTA QMS Inc Manual Notice MINOLTA QMS Inc reserves the right to make changes to this manual and to the equipment described herein without notice Considerable effort has been made to ensure that this manual is free of inaccuracies and omissions However MINOLTA QMS Inc makes no warranty of any kind including bu...

Page 3: ...ate your Printer 2 Printer Parts 3 Documentation Set 4 Setting up Your Printer 5 Shipment Contents 5 Unpacking the Printer 5 Installing the Toner Cartridge 6 Installing the Exhaust Filter 9 Loading the Upper Media Tray 10 Loading the Multipurpose Tray 14 Installing Accessories 15 Plugging in Turning on the Printer 16 What s Next 17 ...

Page 4: ...es and Consumables 26 Accessories 26 Consumables 27 Regulatory Compliance 29 CE Marking Declaration of Conformity 30 For European Users 30 FCC Compliance Statement 30 For American Users 30 Interference causing Equipment Standard ICES 003 ISSUE 3 31 For Canada Users 31 Electro Magnetic Interference 31 For All Users Except for American and Canadian Users 31 Safety Information 31 Toner 31 Laser Safet...

Page 5: ...allation 52 Manually Assigning a Crown Port 53 Select Driver Options Defaults 54 Windows USB 54 Select Driver Options Defaults 55 Windows Parallel Connection 56 Plug and Play Installation 56 Manual Installation of the Printer Driver 62 Select Driver Options Defaults 63 Installing Printer Drivers and Utilities Macintosh Environments 64 Some Notes to Consider 64 Macintosh EtherTalk Interface Configu...

Page 6: ......

Page 7: ...English Hardware Installation Guide ...

Page 8: ......

Page 9: ...lopes 14 5 N A Postcards 26 6 N A SDRAM 64 MB 500 sheet Upper Media Tray Standard 200 sheet Multipurpose Media Tray Standard 4 bin Mailbox Optional Optional Media Trays up to 3 Optional IEEE 1284 parallel Standard Ethernet Standard USB Standard Internal IDE Hard Disk Optional Time of Day Clock Optional Manual Duplexing Standard Autoduplex Printing Optional Only plain paper 16 24 lb 60 90 g m2 can ...

Page 10: ...n Close to an easily accessible grounded power supply on an exclusively dedicated power outlet that meets printer specifications Near your computer At the length 6 5 2 m or less for an IEEE 1284 bidirectional parallel connection A connection to the same electrical circuit as high current machines Noise generating equipment such as a copier or air conditioner and strong magnetic or electromagnetic ...

Page 11: ...Power switch 5 Ventilation grilles 6 Media guide 7 Multipurpose tray open 8 Upper media tray 9 Carrying grips both sides Front View k 1 Top cover 2 Optional mount cover 3 Interface panel 4 Exhaust port 5 Fuser unit cover 6 Duplexer connection 7 4 bin mailbox connection 8 AC power connection 9 Carrying grips both sides d e f g c Rear View j h i k 1 Top cover 2 Transfer roller 3 Fuser unit 4 Toner c...

Page 12: ... installation Maintenance Guide Keep this guide close to the printer for quick reference information regarding operation and care Hardcopy and Documentation CD ROM User s Guide This guides you through the day to day operation of your printer including printing files refilling print media and replacing toner It also includes information on additional accessories cleaning and maintaining your printe...

Page 13: ... the shipment If you need cables contact your local vendor or computer store Unpacking the Printer 5 We strongly suggest that you save the packaging materials in case you ever need to move or ship the printer After removing the consumables from the printer carton use the following instructions to unpack your printer 1 With another person s help lift the printer from the carton Do not tilt it more ...

Page 14: ...protective package until you re ready to install it Any exposure to light should be limited to less than two minutes or permanent damage could result 1 Slide the top cover release lever to the right c and open the top cover d The toner cartridge contains the OPC Optical Photo Conductor and toner that form the image that is developed and transferred to the media Each toner cartridge comes with a pr...

Page 15: ...r malfunction can result Be careful not to touch d d d d around the image transfer roller touching certain parts in this area may result in reduced print quality or e e e e around the fusing unit since the inside reaches temperatures of about 392 F 200 C touching any part in this area may result in burns 2 Remove the new toner cartridge from its protective box 3 Peel off the packing tape d c e 1 2...

Page 16: ... The toner is nontoxic If you get toner on your hands wash them in cool water and mild neutral detergent If you get toner on your clothes lightly dust them off as much as possible If some toner remains on your clothes use cool not hot water to rinse the toner off provided your clothing is washable WARNING If you get toner in your eyes wash it out immediately with cool water and consult a doctor Ma...

Page 17: ...oner spills within the printer decreased print quality may result or the printer may be damaged WARNING The toner cartridge should not be opened under any circumstances Installing the Exhaust Filter Insert the exhaust filter in the exhaust port on the back of the printer Attention If you will be installing an optional duplexer it is not necessary to install the exhaust filter ...

Page 18: ...g the release buttons c one on each side of the media tray remove the tray d 3 Remove the media tray cover For information about approved media refer to chapter 2 Using Media in the User s Guide Check www minolta qms com support click on Answer Base for currently approved media To order approved media go to www q shop com 1 2 ...

Page 19: ...media retainer to the right d b Lift up on the left end of the media retainer c and remove it d c Insert the right end of the media retainer into the slot c for the size of media to be loaded and press it down d d Slide the retainer to the left and then press down on the gray lever to secure the retainer Attention Pressing down on the lever before sliding the retainer to the left causes the sides ...

Page 20: ...e of the media d Do not load media above the fill limit mark ø on the inside left side of the tray or it may not feed correctly The upper media tray holds a maximum of 500 letter A4 sheets of 20 lb 75 g m2 of plain paper Attention The media should fit easily between the guides Improperly adjusted guides may cause poor print quality media jams or printer damage Long Edge Feed Short Edge Feed Do not...

Page 21: ...Insert the media tray as far as possible into the printer It should snap into place 10 Attach the appropriate media size label to the the media tray Media size labels are supplied with this printer 11 When printing on media larger than B4 open the output tray extension ...

Page 22: ...above the fill limit mark on the inside left of the tray or it may not feed correctly The multipurpose media tray holds approximately 200 sheets of 20 lb bond 75 g m paper For information about approved media and about loading different types of media refer to chapter 2 Using Media in the User s Guide The multipurpose tray is used for all media types especially envelopes labels Japanese sized post...

Page 23: ...d slot Installing Accessories Attention Installing accessories always requires that both the printer and the accessories are turned off and unplugged during installation If you purchased any additional printer accessories such as a duplexer or additional memory then install them now If installation instructions are included with the accessory follow them If not instructions are included in the Use...

Page 24: ... normal temperature and humidity your printer prints a startup page and displays IDLE on the message window If IDLE is not displayed in the message window after the printer is turned on and warmed up recheck the setup If the startup page doesn t print or the print quality is not good skip ahead to About the Interface Panel on page 24 The printer automatically switches to power saving energy saving...

Page 25: ...NOLTA QMS Software Installation Guide Configuration Menu Overview The printer s configuration menu allows you to customize the printer settings for your printing environment In normal situations you should not have to perform any configuration other than that indicated in this manual The three main configuration menus are shown below Security Menu Operator Control Configuration Administration Secu...

Page 26: ...nly with an optional media tray s installed Only with an optional hard disk installed Multipurpose Sz Accounting Mode Disk Space ResetAccounting File Segment MPT Media Plain Paper Transparency Thick Stock Bold Default Letter Govt Letter Legal A4 A3 B4 Folio Ledger Executive B5 JIS A5 Statement B5 ISO C5 DL Com10 C6 Monarch Postcard 32 Kai 16 Kai 8 Kai Custom Outputbin Upper Mailbin 1 Mailbin 2 Mai...

Page 27: ...utbin 2 Name Inputbin 5 Name Inputbin 6 Name Inputbin 7 Name Outputbin 1 Name Outputbin 2 Name Outputbin 3 Name Outputbin 4 Name Outputbin 5 Name Def Resolution Operator Control Miscellaneous Disk Operations Save Defaults Restore Defaults Reboot System New System Image Format Disk Backup Hard Disk Capture PrintJob Keypad Language Clock Operations Restore Disk Consumables Start Period Service Optio...

Page 28: ... the CrownBooks in PDF on the Documentation CD ROM The control panel located on the right of the printer allows you to direct the printer s operation In addition it displays the current status of the printer including any condition that needs your attention c c c c A 2 line 16 characters per line message window displays status messages and configuration information d d d d 3 indicators provide pri...

Page 29: ...he installed options 5 The printer must be restarted for changes to the Keypad Language menu to take effect You can either let the printer restart automatically after you save the change and exit from the Configuration menu or you can wait for the change to take effect the next time you manually turn on the printer Control Panel Indicators Press Key Until Display Reads Online IDLE and Online LED i...

Page 30: ...ter back on line You must take the printer off line before using all keys except the Cancel Status Page and MP Size keys The Cancel key allows you to cancel one or all print jobs See the CrownBooks on the Documentation CD ROM for complete information It also allows you to end a job If the printer is on line press the Cancel key to cancel the job currently printing To cancel the entire print job if...

Page 31: ...ey to cancel a change before pressing the Select key to return to a previous menu or to return to a previous character when entering character information Press Select to access a menu or to choose a displayed menu option Press the Previous key to return to the previous selection or option for the current menu When changing character information use this key to return to the previous choice for th...

Page 32: ...ting the parallel port on the printer to the parallel port on your computer e e e e USB Port Use a USB cable Type B when connecting the USB port on the printer to the USB port on your computer Troubleshooting Although your printer is designed to be highly reliable it may occasionally experience a problem The following table helps you to identify the cause of possible installation problems and sugg...

Page 33: ...play is IDLE but no startup page prints You did not wait long enough The printer takes approximately 70 seconds to warm up Be sure you wait long enough for a startup page before suspecting a problem The printer is not receiving data from the computer The Data indicator doesn t blink after a file is sent The printer is not on line Put the printer on line and verify that the message window displays ...

Page 34: ...ia jam The printer is printing codes or not printing at all when in ESP mode The printer emulation is not correct Reconfigure the port to the specific printer emulation of the file you are trying to print Your ESP timeout is too short If a PostScript file prints PostScript statements while the printer is in ESP mode increase the ESP timeout in the Administration Communications Timeouts ESP Timeout...

Page 35: ... 32 64 128 or 256 MB PC 100 Compliant SDRAM DIMMs up to a printer maximum of 512 MB Duplex Option Only plain paper 16 24 lb 60 90 g m2 can be autoduplexed ImageServer TIFF CALS emulations requires hard disk Internal IDE Hard Disk Drive Maximum 2 2 GB Kanji Font Internal IDE Hard Disk Drive Includes two fonts Media Tray 500 Sheet Extra trays may be convenient when media formats change and or media ...

Page 36: ...e information about consumables and accessories or check the Service Support Guide for the MINOLTA QMS office closest to you If you have any questions refer to www minolta qms com support then click on the Answer Base Toner cartridge TONER EMPTY The toner cartridge consists of an OPC toner and a transfer roller Transfer roller Notes Refer to the User s Guide in PDF on the Documentation CD ROM for ...

Page 37: ... USA Title 47 CFR Ch I Part 15 Industry Canada Canada ICES 003 Issue 3 International EU EN 55022 EN 61000 3 2 EN 61000 3 3 VCCI Japan VCCI V 3 01 04 Class A Digital Device Class A Digital Device Class A ITE Harmonic Current Emissions Voltage Fluctuations and Flicker Class A ITE Energy Saver ENERGY STAR USA and Japan ENERGY STAR Compliant in basic configuration Immunity Requirements EU Internationa...

Page 38: ... instruction manual may cause harmful interference to radio communications However there is no guarantee that interference will not occur in a particular installation Operation of this equipment in a residential area is likely to cause harmful interference in which case the user will be required to correct the interference at his own expense If this equipment does cause harmful interference to rad...

Page 39: ... Class A product In a domestic environment this product may cause radio interferences in which case the user may be required to take adequate measures Safety Information Toner CAUTION Keep out of reach of children Laser Safety This printer is a page printer which operated by means of a laser There is no possibility of danger from the laser provided the printer is operated according to the instruct...

Page 40: ...product employs a Class IIIb Laser Diode that has an invisible laser beam The Laser Diode and Scanning Polygon Mirror are incorporated in the toner cartridge The print head in the interior of the printer in front of the toner cartridge consists of the print head unit and the mirror unit The laser beam is emitted from the print head unit passes through the mirror unit then is radiated through the l...

Page 41: ...ical Health CDRH of the U S Food and Drug Administration FDA of the Department of Health and Human Services DHHS This means that the product does not produce hazardous laser radiation The label shown below indicated compliance with the CDRH regulations and must be attached to laser products marketed in the United States This is a semiconductor laser The maximum power of the laser diode is 15 mW an...

Page 42: ...Safety Information 34 English Laser Safety Label CDRH Requirement ...

Page 43: ...ll quantity of ozone is released This amount is not large enough to harm anyone adversely However be sure the room where the printer is being used has adequate ventilation especially if you are printing a high volume of materials or if the machine is being used continuously over a long period Used Battery Precautions Minimum 0 75 mm2 Minimum H05 VV F The male plug is certified in the country in wh...

Page 44: ...not accept receipt These Actions Will Result in Voiding Your Warranty Print Media Use of nonsupported such as coated color transparencies OHP or inkjet paper See chapter 2 Using Media in the User s Guide for approved media Contact your local vendor or www minolta qms com for purchase information Electrostatic Discharge Failure to protect the printer controller board and any associated daughterboar...

Page 45: ...English Software Installation Guide ...

Page 46: ......

Page 47: ... without operator intervention if the system software on the CD ROM is the same as or older than the one currently installed on the printer controller Regional Settings Options Windows When you insert the Software Utilities CD ROM that ships with your printer into your PC s CD ROM drive it checks your PC s Regional Settings Options and automatically starts up in the language that is set if this la...

Page 48: ...es you access to all of the printer features including finishing and advanced layout on the Windows Me 98 95 platform Parallel page 56 Ethernet page 52 USB page 54 Windows 95 does not support USB PostScript Driver for Windows XP 2000 This driver gives you access to all of the printer features including finishing and advanced layout on the Windows XP 2000 platform Parallel page 56 Ethernet page 52 ...

Page 49: ...CL6 Drivers for Windows XP 1200 dpi PCL6 allows access to most of the features on the printer Reasons to use a PCL6 driver the application requires it or you have problems printing using the PostScript driver Readme on the Software Utilities CD ROM PCL6 Drivers for Windows Me 98 and 95 Notes The PCL drivers support the same networks and connectivity that the PostScript drivers do however on the De...

Page 50: ...ption allows you to configure options such as memory installed and informs the computer what options and features are available Readme on Software Utilities CD ROM OS X Installer This installer places a PostScript Printer Description PPD file on your system and allows you to use your printer with Macintosh OS X version 10 0 3 or higher The installer places the PPD files in the correct folder autom...

Page 51: ...connected Instructions for each type of connection are included below PostScript Printer Description Files PPDs These PPD files allow you to install the printer for a variety of platforms drivers and applications Readme on Software Utilities CD ROM CrownBooks on the Documentation CD ROM UNIX Host Software UNIX Host Software compatible with a variety of UNIX platforms allows for the customization o...

Page 52: ...Follow the instructions on the screen to install printer software and documentation TCP IP If you chose TCP IP click First Time Setup The Welcome to the New Printer Setup Wizard appears First Time Setup needs to run only once after that choose In Use Click Next After reading the Program License Agreement choose Accept Click Next Select your new printer in the list and type an easy to recognize nam...

Page 53: ...the screen to install printer software and documentation This installation process is quite similar to the process shown below for Parallel connection Parallel If you choose Parallel select a language for your driver from the available list Click OK After reading the Program License Agreement choose I Accept Click Next TCP IP ...

Page 54: ...ties CD ROM Installer may appear Choose to read the entire screen for further information or choose to skip it by clicking Next Choose Next to install Printer Software and Documentation to the directory shown in the box Choose Browse to install to a different directory Choose the setup type that best suits your needs Easy or Custom Click Next ...

Page 55: ...tWare lists the Microsoft NetWare client installed Network Capable Printers lists printers attached directly to the network that use TCP IP Local printers lists the printers already installed If your printer is listed select it by highlighting its name and clicking Next If your printer is not listed select Not Found and follow the instructions on the screen Select options needed such as Sharing It...

Page 56: ...pears Click Next The Digital Signature Not Found screen may appear Follow the instructions on the screen Add a port with the Add Crown Port wizard Click Finish Select Default Printer to select the printer as the default device or print a test page to confirm that the printer is ready for use Click Next ...

Page 57: ...vers and Utilities Windows 49 Parallel Wait while the software loads to the chosen directory Select the language for your Download Manager from the available list Click OK The Download Manager setup screen appears Click Next ...

Page 58: ... install remaining components When the installation is complete click Finish If the printer already has the code version you re attempting to load or has a newer one an error page will print a message saying that the printer will not replace a current or newer version with an older version Wait for it to finish loading 5 If you are installing a new code you may have to wait up to10 minutes for the...

Page 59: ... structure we follow to install the printer s Windows software We use screen shots taken from a Windows 98 platform Although the procedure is very similar these screen shots may differ if you work on other Windows platforms We add comments for other Windows platforms whenever appropriate Begin Which Interface USB Parallel Ethernet TCP IP Set Printer IP Address Load Crown Print Monitor Install Prin...

Page 60: ...l NIC CrownNet TCPIP Default Router menu enter the Internet address The factory default router address is 000 000 000 000 This setting provides automatic sensing of gateways If you identify a subnet mask automatic sensing is disabled 3 If you want to refer to the printer by host name instead of IP address edit the system host table by adding the following line to the host file internetaddress host...

Page 61: ...t However if you installed the Crown Print Monitor and want to manually assign a new Crown port follow the instructions in this section 1 From the Start menu choose Settings 2 Choose Printers 3 In the Printers window click the right mouse button on the PagePro 9100 printer icon to display the printer s menu 4 Choose Properties 5 Choose the Details tab Windows Me 98 95 or Ports tab Windows XP 2000 ...

Page 62: ...ions list and then click Remove 4 After you have installed all options click Apply 5 Choose Device Settings 6 Select the default settings for your printer such as the default media format you use 7 Click Apply 8 Click OK and exit from the Properties dialog box Windows USB USB uses a Plug and Play installation See also Plug and Play Installation on page 56 Make sure your operating system Win98SE an...

Page 63: ...se insert disk labeled MINOLTA QMS PostScript Driver select OK 9 Select OK Select Driver Options Defaults Before you start working with your printer you are advised to verify change the default driver settings Also if you have options installed you should declare the options in the driver 1 If you installed available options proceed with the next step otherwise proceed with step 5 2 Choose Setting...

Page 64: ...rnet network connection skip to Windows Ethernet TCP IP on page 52 1 Connect your printer to your PC with a parallel cable 5 Under certain PC configurations the Software Utilities CD ROM automatically launches its own installation utility If this should occur during the Plug and Play procedure cancel the Plug and Play installation and install the driver using the CD ROM installer for easy access t...

Page 65: ...hen click Next Select Search for the best driver in these locations Uncheck all options except Include this location in the search Click Browse to open a window to locate the driver files Browse to the appropriate language directory for example PCL PPD or PS within the Drivers WINDOWS XP directory Click OK Verify your selection and click Next Windows XP ...

Page 66: ...k Finish Windows 2000 Insert the Software Utilities CD ROM and close the CD ROM auto installer window In the first window of the Found New Hardware Wizard click Next Select the option to Search for a suitable driver for my device Then select Next Windows XP ...

Page 67: ...es except Specify a location Then select Next Click Browse to open a window to locate the driver files Browse to the appropriate language directory within the Drivers Windows 2000 directory Click OK In the Driver Files Search Results window verify your selection and click Next Click Finish Windows 2000 ...

Page 68: ... click Next Select the option to Search for the best driver for your device Then select Next In the window that follows uncheck all boxes except Specify a location Then Click Browse to open a window to locate the driver files Use the Browse For Folder window to browse to the Drivers Windows Me 9x directory Select the language for your driver from the available list in the Driver directory Click OK...

Page 69: ...ter Drivers and Utilities Windows 61 Verify your selection and click Next The next window show you what driver will be installed Click Next Give the printer a name or leave the default name Click Next Windows Me 98 95 ...

Page 70: ...r screen 4 From the Windows Start menu choose Settings 5 Choose Printers 6 In the Printers window double click Add Printer The Add Printer wizard appears Click Next 7 Click Next again for Local Printer 8 Select Have Disk and Browse 9 Choose the CD ROM drive and select Drivers 10 Select the driver appropriate for your operating system and the desired language 11 Choose a file name such as mqgsps in...

Page 71: ...he PC and store it in a safe place Select Driver Options Defaults Before you start working with your printer you are advised to verify change the default driver settings Also in case you have options installed you should declare the options in the driver 1 If you installed available options proceed with the next step otherwise proceed with step 5 2 Choose Settings 3 Select an option one at a time ...

Page 72: ...OS 9 platform The procedure is similar to other Macintosh OS platforms The current version of Macintosh OS X has limited support for PPD PostScript Printer Definition files Although MINOLTA QMS printers can be used with OS X not all advanced printing features will be available Advanced printing features are still available under OS 9 1 or when printing from the Classic Environment in OS X To obtai...

Page 73: ...nd Zone Part 2 menus to enter the name of the zone to which the printer is attached if you want it to appear in a zone different than the one it shows in 5 The two Zone Part x menus allow you to identify 1 zone with a name up to 32 characters long Up to 16 characters can be entered in each of the two menus You cannot use these two menus to identify two zones Trailing spaces are not considered part...

Page 74: ...fter the PPD and utilities installation is complete choose Quit 5 Remove the CD ROM from your CD ROM drive and store it in a safe place Macintosh OS 9 x USB 1 Plug one end of the USB cable into the Macintosh and the other into the printer s USB port The operating system displays New Hardware Found and lists USB Device 2 Locate the Desktop Printer Utility If you cannot locate it on your hard disk i...

Page 75: ...ro 9100 and click OK Macintosh OS 9 x System Software 1 Insert the PagePro 9100 Software Utilities CD ROM in your Macintosh s CD ROM drive If this screen does not appear double click the MINOLTA QMS CD ROM icon on your Macintosh desktop 2 Double click the Explore this CD icon 3 Double click the 9100 System Code folder and then locate the system software file sys_x_x_x ps 4 Drag the sys_x_x_x ps ic...

Page 76: ...grade the printer s system software 5 When the system software installation is complete remove the CD ROM from your CD ROM drive and store it in a safe place Macintosh PPDs and Utilities OS X Installation 1 Insert the PagePro 9100 Software Utilities CD into your Macintosh s CD ROM drive If this screen does not appear double click the MINOLTA QMS CD ROM icon on your Macintosh desktop 2 Double click...

Page 77: ...er s PPD will be stored Hard Disk Name Library Printers PPDs Contents Resources Language Abbreviation lproj 5 For example en lproj would designate English 6 Drag the appropriate PPD from the directory in step 4 to the Language Abbreviation lproj directory PPD installation is complete Macintosh OS X USB 1 Plug one end of the USB cable into the PC and the other into the printer s USB port The operat...

Page 78: ...e printer type If your printer is connected properly you will see PagePro 9100 in the window 5 Choose the Printer Model popup menu to select the PagePro 9100 PPD and choose Add The printer should appear in the Printer List Macintosh System Software OS X 1 Insert the PagePro 9100 Software Utilities CD ROM in your Macintosh s CD ROM drive ...

Page 79: ... of the system software file sys_x_x_x ps 6 At the command prompt type ftp xxx xxx xxx xxx xxx xxx xxx xxx is the printer s IP address at the username prompt at the password prompt bin hash put sys_x_x_x ps sys_x_x_x ps is the system software filename 5 Note If your printer s system software version is later than the version on the CD ROM that you are downloading an error page will print on the pr...

Page 80: ...X NetWare and NDPS For UNIX NetWare 3 NetWare 4 NetWare 5 and NDPS installation refer to the CrownBooks on the Documentation CD ROM Linux For Linux PPD and PDQ installation refer to the readme file on the Software Utilities CD ROM ...

Reviews: