


11
English
11
SPECIFIED CONDITIONS OF USE
The Thermal Imager can be used for taking thermal images. The
recordings can be saved as images on the memory card.
Do not use this product in any other way as stated for normal use.
DESCRIPTION
Thermal Imager is an ultra-rugged, hand-held battery
powered
tool that takes thermal pictures, called “thermal images.” Thermal
images reveal different temperatures as different colors. A bright color
display shows an image of hot and cold spots and temperature
gradients in-between. The temperature of the object in the center
target is shown at the top of the thermal image. Information about
color palette settings for the image are on the bottom of the image.
You can optionally load the thermal images onto a computer to prepare
a report later. The Thermal Imager and its supplied PC software
satisfy the requirements of industrial electricians and technicians new
to thermal imaging, as well as expert professional thermographers.
The MILWAUKEE Thermal Imager Report Software is available for
download at www.milwaukeetool.com. Refer to the Thermal Imager
Report software manual PDF for training.
BUTTONS
Power Button
Arrow Buttons
Image Review Button
LED Worklight Button
OK Button
Setting Button
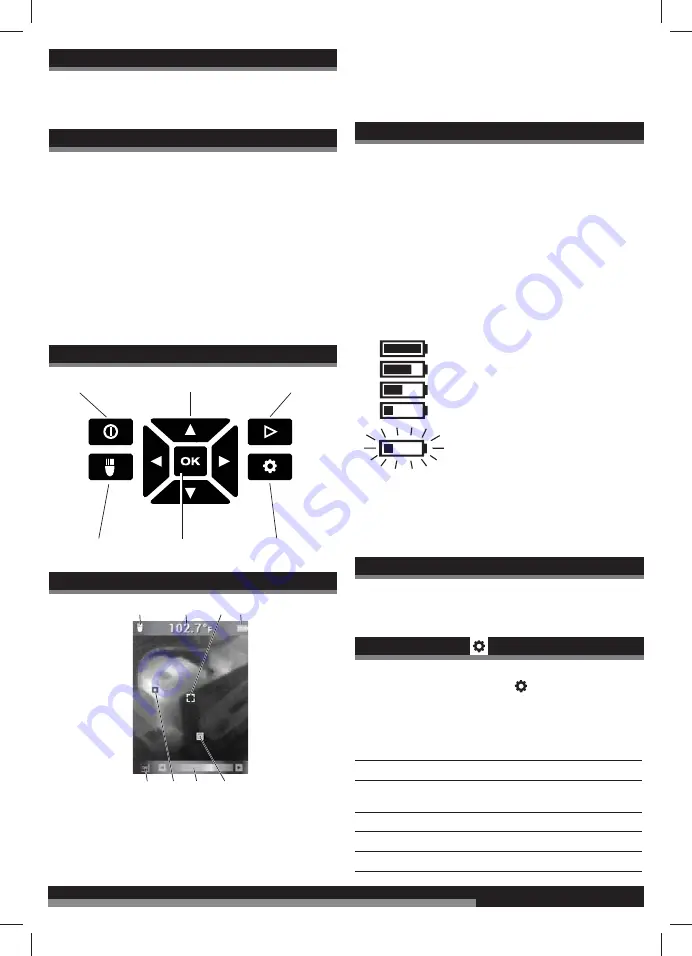
DISPLAY ELEMENTS
1
5
2
6
3
7
4
8
1. LED worklight ON
2. Target temperature
3. Temperature crosshair
4. Battery charge indicator
5. HOT/COLD indicators ON/OFF
6. HOT indicator (red)
7. Palette bar
8. COLD indicator (blue)
BATTERY LIFE AND POWER-SAVING FEATURES
To preserve battery life, the Thermal Imager goes into Sleep Mode
after 5 minutes of no activity. Sleep Mode maintains a ready-to-go,
warmed-up condition, but uses little battery power. To reactivate the
tool, pull the trigger or press any button. After another 15 minutes of
no activity, the Thermal Imager turns itself completely off. Press
the power button to turn
the tool back on.
A Fuel Gauge on the Thermal Imager display shows the capacity
remaining in the battery. When 10% of charge remains, the Fuel
Gauge blinks on and off. This is the time to replace the battery with
a charged one, or charge the battery as soon as you can. When no
charge remains, a Low-Battery Message appears on the display for 3
seconds. Then the Thermal Imager shuts itself off.
The fuel gauge is displayed in the upper right corner of the LCD while
the tool is on.
100 %
75 %
50 %
25 %
< 10 %
Battery packs which have not been used for some time should be
recharged before use.
Temperatures in excess of 50°C (122°F) reduce the performance of
the battery pack. Avoid extended exposure to heat or sunshine (risk
of overheating).
INITIAL START-UP
The first time the Thermal Imager is turned on, you are required to
select the Language, Time, and Date.
See Basic Settings for more information.
PERSONAL SETTINGS
To set up the Thermal Imager to your personal preferences, turn on
the tool and press the Settings button
.
Use the arrow
▲▼◄►
buttons and OK button to toggle and select
the desired settings.
LASER
Turn the laser guides ON/OFF
CROSSHAIR
Turn the crosshair ON/OFF
EMISSIVITY
Select the Emissivity of the target (see
“Selecting the Emissivity”)
UNITS
Select Fahrenheit (F°) or Celsius (C°)
TIME
Set the time
DATE
Set the date
Summary of Contents for M12 TD
Page 1: ...M12 TD...
Page 2: ...2...
Page 3: ...3 5 4 micro USB 6 7 8 8 LASER...
Page 5: ...5...
Page 6: ...6 1 2 3...
Page 7: ...7 1 2 micro USB 1 2 USB...
Page 8: ...8...
Page 17: ...17 17 IEC60825 1 2...
Page 21: ...21 21 IEC60825 1 2...
Page 25: ...25 25 3 4 OK 5 OK 1 2 3 OK Delete OK 4 DELETE ALL 5 Milwaukee Milwaukee Milwaukee IEC60825 1 2...
Page 34: ......
Page 35: ......
Page 36: ......


