


4
Selecting the Color Palette
Select one of three color palettes to suit your needs.
Turn the tool on, then use the arrow ◄► buttons to
step through the palettes.
RAINBOW
Shows a very wide range of
temperatures
IRON-BOW
Useful for revealing small
temperature differences
HIGH CONTRAST
Shows the most detail
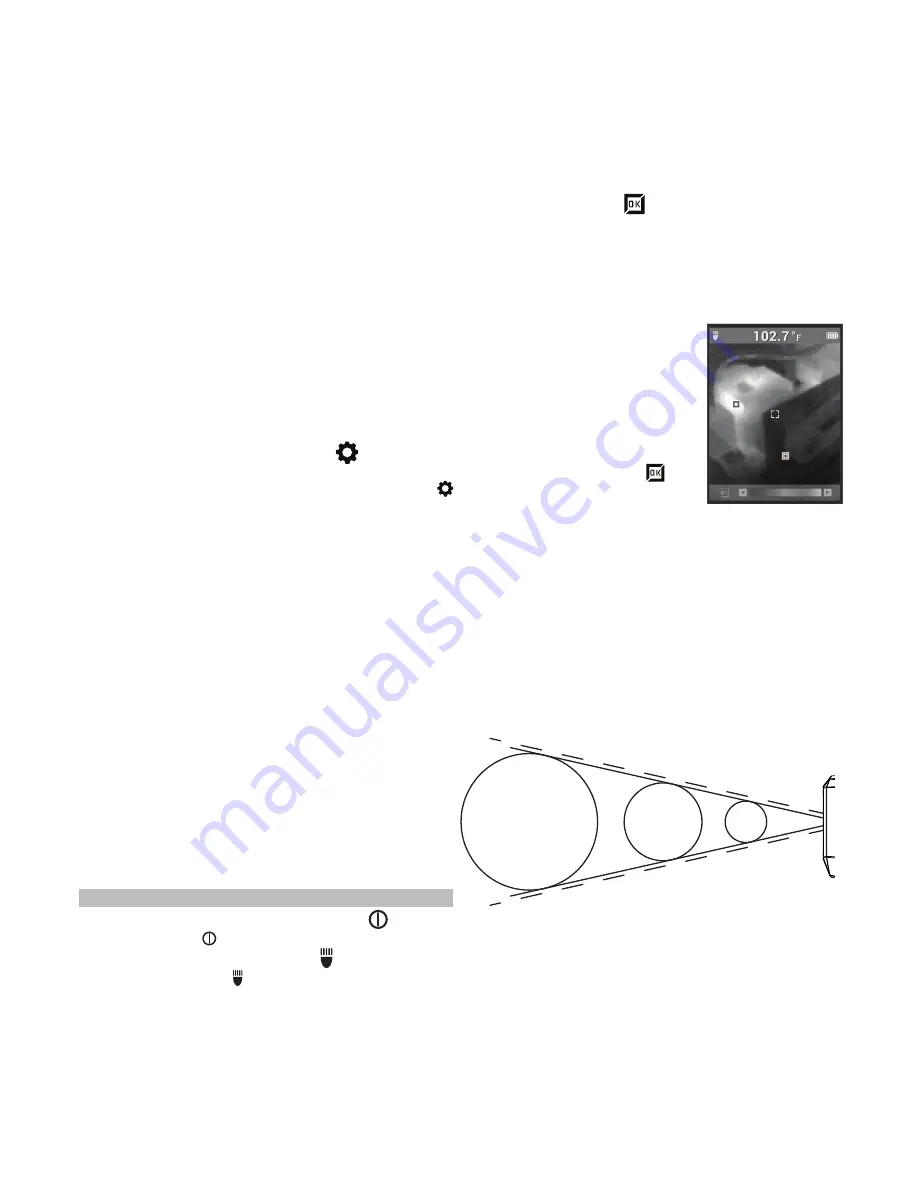
HOT/COLD Indicator marks
To turn the HOT/COLD Indicator marks on or off
while taking a temperature measurement, press
the OK button during live view. Red (hot) and blue
(cold) target marks locate the highest and lowest
temperatures in the display area.
Taking a Temperature Measurement
1.
Insert a battery pack and turn
on the tool.
2. Point the tool at the target.
The Target Temperature is dis-
played at the top of the screen.
3. To activate the laser guides,
pull the trigger softly (less than
half-way). See "83:1 Distance
to Spot Ratio".
4.
Turn the HOT/COLD
indi-
cator marks on or off, or toggle
through the different palettes
to get the desired image on the display.
5.
The center temperature is affected by the material
of the target, and can be adjusted by changing the
Emissivity. See "Selecting the Emissivity".
Using the Laser Indicators
Use the lasers to frame up the target area. The
lasers correlate to the temperature crosshair on the
display. Lasers are accurate to 3" @ 50'. The target
temperature is taken in between the laser indicators,
and sized according to the following chart.
83:1 Distance to Spot Ratio
At 83' away,
spot is ~Ø 1'
At 25' away,
spot is ~Ø 4" At 3' away,
spot is ~Ø 1/2"
NOTE:
A quick change in temperature (>10°F) can
affect the meter’s readings. Always allow the me
-
ter to reach its stable operating temperature after
startup and before use (5 to 30 minutes, depending
on environment).
Viewing Images on Another Device
Saved images can be transferred to another device in
two ways - by removing the SDHC card and inserting
it into another device, or by connecting the Infrared
Camera directly to another device. This allows the
images to be available for things like email, insert
-
ing into documents, or for use in the MILWAUKEE
Thermal Imaging Software.
To transfer the SDHC card, follow the Removing/
Installing the SDHC Memory Card instructions. To
transfer pictures directly, connect the micro USB
cord to the Infrared Camera micro USB port. Con-
nect the other end to your device. Turn the Infrared
Camera on.
Two types of files are created for each image. A
".PNG" file is created for general use. A ".DAT" file
is created for use in the MILWAUKEE Thermal Imag
-
ing Software.
MILWAUKEE Thermal Imaging Report
Software
The MILWAUKEE Thermal Imaging Report Software
is available for download from the 2258-21 product
page at www.milwaukeetool.com.
Refer to the Thermal Imaging Report software
manual PDF for training.
Personal Settings
To set up the Infrared Camera to your personal pref-
erences, turn on the tool and press the Settings
button. Use the arrow ▲▼◄► buttons and OK but
-
ton to toggle and select the desired settings.
LASER
Turn the laser guides ON/OFF
CROSSHAIR
Turn the crosshair ON/OFF
EMISSIVITY
Select the Emissivity of the
target (see "Selecting the
Emissivity")
UNITS
Select Fahrenheit (F°) or
Celsius (C°)
TIME
Set the time
DATE
Set the date
FORMAT
Select the Time and Date
formats
LANGUAGE
Select the display language
DELETE ALL
Delete all images on the
SDHC card
FACTORY RESET
Return Infrared Camera to
original factory settings
SYSTEM INFO
Display system information
OPERATION
Turning the Tool ON/OFF
Press the Power
button to turn the tool on and off.
Turning the Worklight ON/OFF
Press the Worklight button to turn the worklight
on and off.
Optimizing Thermal Images
Use the emissivity settings, palette selection, and
HOT/COLD indicators to optimize your thermal im
-
ages to your needs.