background image

English

   - 12 -

format, you can download an auxiliary application 

such as a media player from the App Store.

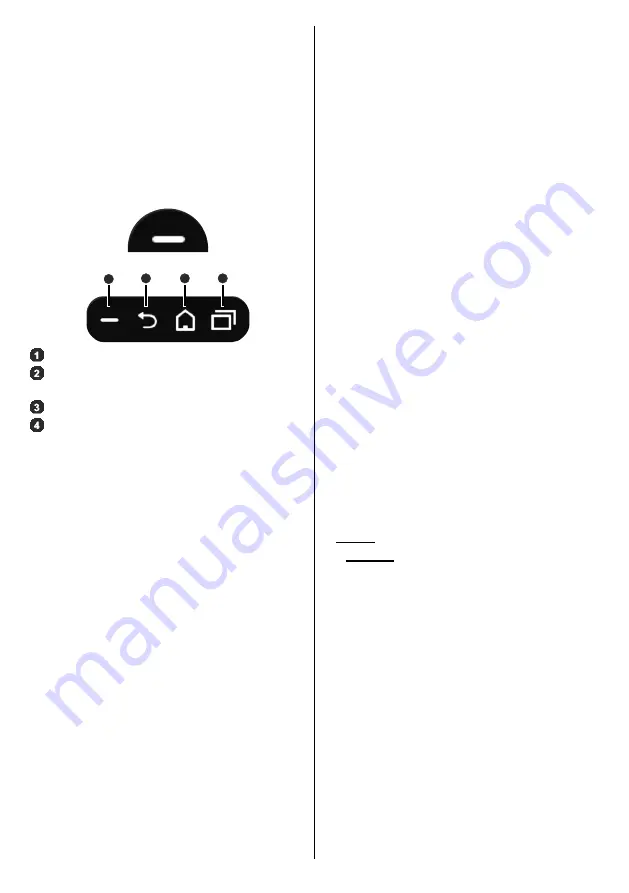
Navigation Toolbar

Over the bottom edge of the screen navigation toolbar 

will be available. Touch the 

Collapse/Expand

 button 

of the tool bar to expand it. You can touch this button 

again to hide. 

Back

Home

 and 

Recent Apps

 buttons 

will be available when you expand the bar. You can 

use these buttons to navigate through the menus 

without having to use the remote control. 
Toolbar in collapsed state

Toolbar in expanded state

1

2

3

4


Collapse / Expand


Back: 

Touch to return to the previous screen, or 

to close a dialogue box, menu, or keyboard


Home:

 Touch to return to the home screen


Recent Apps:

 Touch to display recent apps

The toolbar is pinned to the bottom edge of the screen 

However you can change the position of it. Touch and 

hold the bar and then drag your finger in left or right 

direction to move the bar over the bottom edge of the 

screen. The toolbar can not be dragged when it is in 

expanded state.

Settings (Home Screen)

To  configure  the  home  screen  you  need  to  enter 

the hidden 

Settings

 menu. In order to do that touch 

and hold the logo on the home screen for at least 

5  seconds  and  then  raise  your  finger. You  will  be 

requested to enter a password in order to access 

the settings. Enter the default password(*) using the 

virtual keyboard,  unless you have defined another 

password, and then touch 

OK

(*)

 Default password is set to 

android

.


You can configure the wallpaper, logo, home screen 

applications,  language,  enable  or  disable  the 

displaying of the time and date widget and change the 

password using the options in the 

Settings

 screen.

Wallpaper:

 The preview of the current wallpaper 

will be displayed. Touch 

BROWSE

 to select a new 

wallpaper.  The  supported  file  formats  are  BMP, 

JPEG, PNG, GIF and WebP. Touch 

RESET

 to reset 

the default wallpaper.

Logo:

 The preview of the current logo will be 

displayed. Touch 

BROWSE

 to select a new logo. 

The supported file formats are BMP, JPEG, PNG, 

GIF and WebP. Touch 

RESET

 to reset the default 

logo. The logo can be positioned in any of the 4 

corners of the screen. Touch the desired position 

option to set. 

Top left

Top right

Bottom left

 and 

Bottom right

 options will be available.

Home screen applications:

 The applications of 

the home screen will be shown. Touch 

Add

 (plus 

sign), then touch the app you want to add from the 

listed applications. You can add up to 8 apps to 

home screen. To remove an application from the 

home screen touch the application and then touch 

Remove

 on the next screen.

Time and Date Widget:

 This widget shows 

the current system time and date information in 

system language. Touch the on/off switch indicator 

located under the 

Clock

 title to enable or disable 

the displaying of the time and date widget on the 

home screen.

Language:

 Touch the current language under the 

Language

 title if you want the change it. Available 

languages will be listed. Touch the desired language 

to set as current language. You will be asked to enter 

the password. Enter the password and touch 

OK

 to 

return to 

Settings

 menu. Touch 

Cancel

 to return to 

home screen.

Password:

 Touch 

SET NEW PASSWORD

 to 

change the default password.

Android System Settings Menu

In order to access the 

Settings

 menu touch 

All apps


on the home screen and then touch the 

Settings

 app. 

The available options will be listed. Touch one to see 

the details and available options.

1. Device
1.1. Network
Wi-Fi: 

To turn on the WLAN touch 

Wi-Fi 

option. 

Please ensure you have the android wireless dongle 

plugged into the USB android port on the back of the 

display. Please note that an additional usb extender 

may be required for the wi-fi dongle if another usb is 

plugged into the display. Available wireless networks 

will be searched and listed. Touch one to connect. You 

may be asked to enter a password to connect to the 

selected network, in case the network is password 

protected. You cannot use the wireless connection if 

you are connected via Ethernet.

Other options: 

Under the 

Other options

 caption 

Scanning always available

 option will be available. 


Connect via WPS

 and 

Add new network

 options will 

also be available under this caption when the WLAN 

is turned on. You can use the 

Add new network


option in order to connect to the networks with hidden 

SSID’s (wireless network name) by entering the SSID 

manually.

Summary of Contents for MA-8610BK

Page 1: ...86 218cm INTERACTIVE FLAT PANEL DISPLAY MA 8610WH MA 8610BK ENGLISH USER MANUAL...

Page 2: ...nu Content 17 Connectivity 23 DisplayPort 24 HDMI Out 24 Real Time Clock RTC 24 Crestron Connected 24 Controlling With An External PC 25 RS232 LAN Command Tables 27 RS232 HEX Commands 50 Maximum Pixel...

Page 3: ...tructions Improper adjustment of controls not described in the instructions can cause damage which often requires extensive adjustment work by a qualified technician Important Safety Information CAUTI...

Page 4: ...stics and performance as the original parts Use of unauthorized parts can result in fire electric shock and or other danger Safety checks Upon completion of service or repair work request the service...

Page 5: ...Store unused batteries in their packaging and away from metal objects which may cause a short circuit resulting in leakage or in extreme cases fire or even an explosion monitor where it cannot be pus...

Page 6: ...lowed or placed inside any part of the body If leaked battery fluid gets on your skin or clothing rinse immediately and thoroughly If it gets into your eye bathe your eye well rather than rubbing and...

Page 7: ...ar Side 1 11 1 2 3 8 4 5 9 12 13 14 15 7 6 10 1 RS232 2 VGA 3 Ethernet 4 USB 2 0 6 HDMI2 In 7 HDMI3 In 9 IR Input 10 Headphone Line Out 11 Display Port In 12 Display Port Out 13 HDMI1 In 14 HDMI Out 1...

Page 8: ...on To turn the Display off Press the centre of the joystick in and hold it down for a few seconds the Display will turn into standby mode To change source Press the centre of the joystick in the sour...

Page 9: ...ont side of the Display Turning the Display On Off After connecting the Display to the mains set the main On Off switch to the 1 position The Display will switch into standby mode Press the Standby bu...

Page 10: ...e device In this case the required driver patch should be installed onto the external source device Otherwise the Touch Screen may not work properly Refer to the user manual of the source device for f...

Page 11: ...ed 15 Media browser Opens the media browsing screen 16 Play Starts to play selected media 17 Stop Stops the media being played 18 Rapid advance Moves frames forward in media such as movies 19 No funct...

Page 12: ...s may not be available depending on the country selection Android Launcher The Display will be opened on the Android source when it is turned on for the first time Press the Source button on the remot...

Page 13: ...oned in any of the 4 corners of the screen Touch the desired position option to set Top left Top right Bottom left and Bottom right options will be available Home screen applications The applications...

Page 14: ...able storage option to format a storage device and use it as a removable storage device again Removable storage Under this option the removable storage devices connected to the Display will be listed...

Page 15: ...own sources option is not checked highlight this option and press OK Then follow the below mentioned steps in order to install a third party application Copy the file with the extension apk onto a FAT...

Page 16: ...ection problems otherwise Use a wired connection if you experience problems with a wireless connection Note Android system allows only one network connection at a time If the Display is connected to t...

Page 17: ...vated USB Auto Play Feature USB AutoPlay feature is to start playing the media content installed on a removable device automatically It uses the Media Browser The media content types have different pr...

Page 18: ...mains plug This will also reduce energy consumption Note Available options may differ depending on the selected Mode Backlight This setting controls the backlight level The backlight function will be...

Page 19: ...eout When you connect an external amplifier to your Display using the headphone jack you can select this option as Lineout If you have connected headphones to the Display set this option as Headphone...

Page 20: ...ecutively to find signal If no signal is detected from other available sources No Signal OSD will be displayed and the signal search will continue according to the order in the Sources list until the...

Page 21: ...the Display will turn on with the HDMI1 input source when it is switched on This feature works based on HDMI 5V signal When this signal is active the Display wakes up and when the signal is inactive...

Page 22: ...signal of the OPS at bootup in order to turn it on by sending a PSON signal if it is off Some OPS s send incorrect information on their status during the bootup of the Display so they seem to be on ev...

Page 23: ...tified Premium High Speed HDMI Cable Source device connection cable quality and other HDMI equipments used may affect performance Please refer to https www hdmi org consumer finding_right_cable aspx f...

Page 24: ...ocal area network such as a smartphone Your Display is WoL compatible To enable this feature set the Wake On option in the Settings Network menu as On and set the Quick Standby option in the Options P...

Page 25: ...t port upper HDMI port HDMI Out This port will not function as an input thus no source devices should be connected to this port Only the content received from the HDMI input port located also on the r...

Page 26: ...t having admin level otherwise user must have ADMIN level privilege Currently there are 2 modes for user NORMAL and ADMIN For switching user to admin mode use the following command SETUSERSECLEVEL ADM...

Page 27: ...ple When GETSOURCE command is entered current source should be displayed on the putty window as shown in the picture below Connecting to the Display RS232 port Run the software and select Serial as Co...

Page 28: ...QUSERFREQ 100Hz 10 It s available if TV source is active integer n 0 mono 1 stereo 2 dual I 3 dual II 4 mono left 5 mono right setSoundMode set to n or Invalid sound mode entered or TV Source is inact...

Page 29: ...izer user freq value of specified band string n 120Hz 500Hz 1 5KHz 5KHz 10Khz the equalizer value for the band is n or Invalid parameter entered Note Above n is 13 n 13 GETDIGITALOUT Get digital out n...

Page 30: ...set to Headphone balance is set to Headphone bass is set to Headphone treble is set to Digital audio out is set to Audio output description path is set to Audio description is Audio description relati...

Page 31: ...CHCONTROL SETTOUCHCONTROL n where n is one of off on string parameter on or off Set Touch Control on or Set Touch Control off or Touch Control is already on or Touch Control is already off or Touch De...

Page 32: ...ring integer n ex irkey 0x38 GenericIRKeySet key n SETSOURCE Set source as enable disable string n integer b n SCART1 n SCART2 n FAV n SVHS n HDMI1 n HDMI2 n HDMI3 n HDMI4 n YPBPR n VGA n SCART1S n SC...

Page 33: ...n OFF Set Quick Standby option ON or Set Quick Standby option OFF or Quick Standby option is ON or OFF or Quick Standby Control is not enabled GETQUICKSTANDBY OPTION Returns Quick Standby option stat...

Page 34: ...time and outputs the following RTC set time to 255 RTC new time is 255 0xff SETRTCDATE Set Query RTC date str int DD MM YYYY 0 DD of days in the month 0 MM 13 Example SETRTCDATE 20 12 2016 RTC Date is...

Page 35: ...Gaelic 8 Croatian 9 Italian 10 Latvian 11 Lithuanian 12 Hungarian 13 Dutch 14 Norwegian 15 Polish 16 Portuguese 17 Russian 18 Romanian 19 Albanian 20 Slovenian 21 Slovak 22 Serbian 23 Finnish 24 Swedi...

Page 36: ...ANIA AUSTRALIA AUSTRIA BAHRAIN BELARUS BELGIUM BULGARIA CHINA COLOMBIA CROATIA CYPRUS CZECH_ REBUPLIC DENMARK ESTONIA FINLAND FRANCE GERMANY GREECE HUNGARY ICELAND INDIA IRAQ IRELAND ISLE_OF_MAN ISRAE...

Page 37: ...Set poweron delay level integer n 0 n 20 delay is calculated as 100ms n Poweron delay set to ms or NACK GETPOWERONDELAY Get poweron delay level no parameter The power on delay is ms SIGNAGERESET Set...

Page 38: ...t static IP address of eth0 network interface str int n Example set_IP_ address 192 168 0 15 IP address setting Succesfull or IP address setting NOK get_IP_address Get IP address of eth0 network inter...

Page 39: ...f note string is case insensitive Error Access Point state parameter is invalid or Access Point state is already STATE or Setting Wifi AP state STATE succeeded GETWIFIAPCHANNEL returns the stored chan...

Page 40: ...ue should be of format nnn nnn nnn nnn eg SETDEFAULTGATEWAY nnn nnn nnn nnn string nnn nnn nnn nnn set default gateway nnn nnn nnn nnn or setting default gateway is failed GETDEFAULTGATEWAY get defaul...

Page 41: ...n nnn nnnn addr nnn nnn nnn nnn port nnnn GETPROXY Gets proxy configuration no parameter Current proxy is nnn nnn nnn nnn nnnn or No proxy address CLEARPROXY Clears proxy configuration no parameter Pr...

Page 42: ...ource PHASE Set phase int n 30 n 30 set dot clock to percentange in the range or invalid value entered or PHASE is available only for VGA Source GETPHASE Get phase no parameter The phase is or GETPHAS...

Page 43: ...arameters parameters for items in following format picture_mode contrast brightness sharpness color powesave_mode backlight_mode colortemp zoom_mode hdmi_trueblack picture_hue volume headphone_volume...

Page 44: ...erbian Slovak Slovenian Spanish Swedish Thai Turkish Ukranian Welsh Subtitle is set to one of the languages written as in the parameters section GETMBSUBTLANG get subtitle language no parameter Subtit...

Page 45: ...rameter Optional parameter If the parameter is skip_restart system reset will be skipped Profile Files Updated from default path success Profile Files Updated from defined path success UWSI Update Wel...

Page 46: ...and saving system language and txt language text parameters then reboots the system string string system language look at abbreviations txt language text look at txt languages System reinitialised SD...

Page 47: ...ameter number of attached usb storages is numbers 0 1 2 GETTOTALSPACE get total usb space in MB no parameter or usb index numbers 1 2 The total space is MB or Invalid index only for parametrized versi...

Page 48: ...U Inhibit selection OR wrong string parameter for RCU Inhibit GETRCU get RCU Inhibit value no parameter RCU Inhibit is ON OFF OR NACK TSU trigger sw update no parameter Web Software Update search trig...

Page 49: ...his feature Set width or height as 0 to disable crop string X Y W H set x position to X set y position to Y set width to W set height to H GETVIDEOCROP Get crop parameters no parameter x position is X...

Page 50: ...ing FAILURE END string could not be captured correctly FAILURE no parameter after character FAILURE all parameters are not processed SUCCESS GETBOARDNAME Sends the board name to C2 side string length_...

Page 51: ...e ASCII option to HEX in UART 0 or UART 1 sub menu item Open any serial port communications program e g Realterm Configure serial communication settings as below Baud Rate 19200 for UART0 9600 for UAR...

Page 52: ...EF 03 06 00 00 00 01 00 00 20 04 00 06 FAV BE EF 03 06 00 00 00 01 00 00 20 05 00 06 S Video BE EF 03 06 00 00 00 01 00 00 20 06 00 06 Source HDMI2 BE EF 03 06 00 00 00 01 00 00 20 08 00 06 HDMI3 BE E...

Page 53: ...ontrast GET BE EF 03 06 00 FD D3 02 00 04 20 00 00 1D 00 XY SET BE EF 03 06 00 FD D3 03 00 04 20 01 XY 06 range 0x4E 0xB2 INCREMENT BE EF 03 06 00 9B D3 04 00 04 20 00 00 06 DECREMENT BE EF 03 06 00 4...

Page 54: ...ENT BE EF 03 06 00 16 F4 04 00 B2 30 00 00 06 DECREMENT BE EF 03 06 00 C7 F5 05 00 B2 30 00 00 06 GET BE EF 03 06 00 70 F4 02 00 B2 30 00 00 1D 00 XY Color Temp Gain B INCREMENT BE EF 03 06 00 EA F5 0...

Page 55: ...5 70 156 26 25 O O 640 x 480 31 469 59 95 25 175 O O 800 x 600 37 879 60 317 40 O O 1024 x 768 48 363 60 004 65 O O 1360 x 768 47 712 60 015 85 5 O O 1920 x 1080 67 5 60 148 5 O O HD 1280x720p 37 5 5...

Page 56: ...webm Picture File Formats Image Photo Resolution width x height Remark JPEG Base line 15360x8640 The limit for max resolution depends on DRAM size Progressive 1024x768 PNG non interlace 9600x6400 int...

Page 57: ...mka 3GPP 3gpp 3gp MP4 mp4 mov m4a LBR cook 8KHz 11 025KHz 22 05KHz 44 1KHz 6Kbps 128Kbps RM ra FLAC 8KHz 96KHz 1 6Mbps Matroska mkv mka Subtitle File Formats Internal Subtitles Extension Container Su...

Page 58: ...lled and used in accordance with the instructions may cause harmful interference to radio communications However there is no guarantee that interference will not occur in a particular installation If...

Page 59: ...ttery contains lead 1 2 Products Battery License Notification The terms HDMI and HDMI High Definition Multimedia Interface and the HDMI Logo are trademarks or reg istered trademarks of HDMI Licensing...

Page 60: ...ient temperature range 0 35 C When installing the product on an indented wall allow at least the space specified above between the product and wall for ventilation and ensure that the ambient temperat...

Page 61: ......

Reviews: